
If you've spent any time configuring user authentication on... Full Story
By Manny Fernandez
November 11, 2026
EJBCA Internal CA: Deploy a Private PKI for Your Local Servers with Docker
InfoSecMonkey | No fluff. Just the config that works.
Executive Summary: Why an EJBCA Internal CA
Every lab and small shop ends up with the same mess: a NAS, a hypervisor, a FortiGate, an internal wiki and a monitoring box, each throwing a self-signed certificate warning that everyone has learned to click through. This guide builds an EJBCA internal CA that fixes that for good: a two-tier private PKI running in Docker, with an offline-style Root CA, an online Issuing CA, a reusable TLS server profile, and working CRL and OCSP endpoints, so every local server gets a certificate your clients actually trust.
| Item | Detail |
|---|---|
| Objective | Install EJBCA Community in Docker with a persistent MariaDB database, build a Root CA and Issuing CA, and issue trusted TLS certificates to internal servers |
| Target audience | Network and security engineers, homelabbers, and small IT teams who want an internal CA without standing up Active Directory Certificate Services |
| Time | About 60 to 90 minutes end to end |
| Outcome | web01.lab.internal serving HTTPS with no browser warning, openssl verify returning OK, and CRL and OCSP answering for revocation checks |
Gotcha: EJBCA Community Edition is the LGPL open source subset of EJBCA Enterprise. Keyfactor positions it for learning, testing and prototyping and recommends Enterprise for production PKI. For an internal CA that only issues certificates to your own lab or local servers, Community is a solid fit, as long as you treat the database and secrets like the crown jewels they are. Source: Keyfactor EJBCA Community container on Docker Hub (keyfactor/ejbca-ce).
Prerequisites and Architecture
Assumed knowledge
- Linux shell basics and editing files with
nanoorvim - Docker and Docker Compose fundamentals (images, volumes, networks)
- PKI vocabulary: root CA, intermediate (issuing) CA, CSR, SAN, CRL, OCSP
- Creating DNS A records on your internal DNS server
Lab requirements
- One Ubuntu Server 24.04 LTS VM for the CA: 2 vCPU and 4 GB RAM (the container’s stated minimum is two cores and 1 GB, but MariaDB and the JVM appreciate headroom)
- An internal DNS zone (this guide uses
lab.internal) with an A record forca.lab.internal - An admin workstation with Firefox (it keeps its own certificate store, which makes the SuperAdmin import painless)
- At least one server to issue a certificate to; this guide uses
web01.lab.internalrunning nginx
Components
| Component | Hostname / IP | Role |
|---|---|---|
| CA host (Ubuntu 24.04) | ca.lab.internal / 10.0.10.20 | Runs Docker, EJBCA and MariaDB |
| ejbca container | keyfactor/ejbca-ce | CA, RA Web, Admin UI, CRL and OCSP responder (ports 80 and 443 on the host) |
| ejbca-db container | mariadb:11.4 | Persistent database on an internal-only Docker network |
| Admin workstation | 10.0.99.10 | Firefox with the SuperAdmin client certificate |
| Target server | web01.lab.internal / 10.0.10.31 | nginx, receives the first TLS certificate |
| Lab Root CA – G1 | Soft crypto token, manual activation | Signs only the Issuing CA; kept deactivated day to day |
| Lab Issuing CA – G1 | Soft crypto token, auto-activation | Signs server certificates, publishes CRLs, answers OCSP |
Figure 1: EJBCA internal CA architecture and two-tier hierarchy
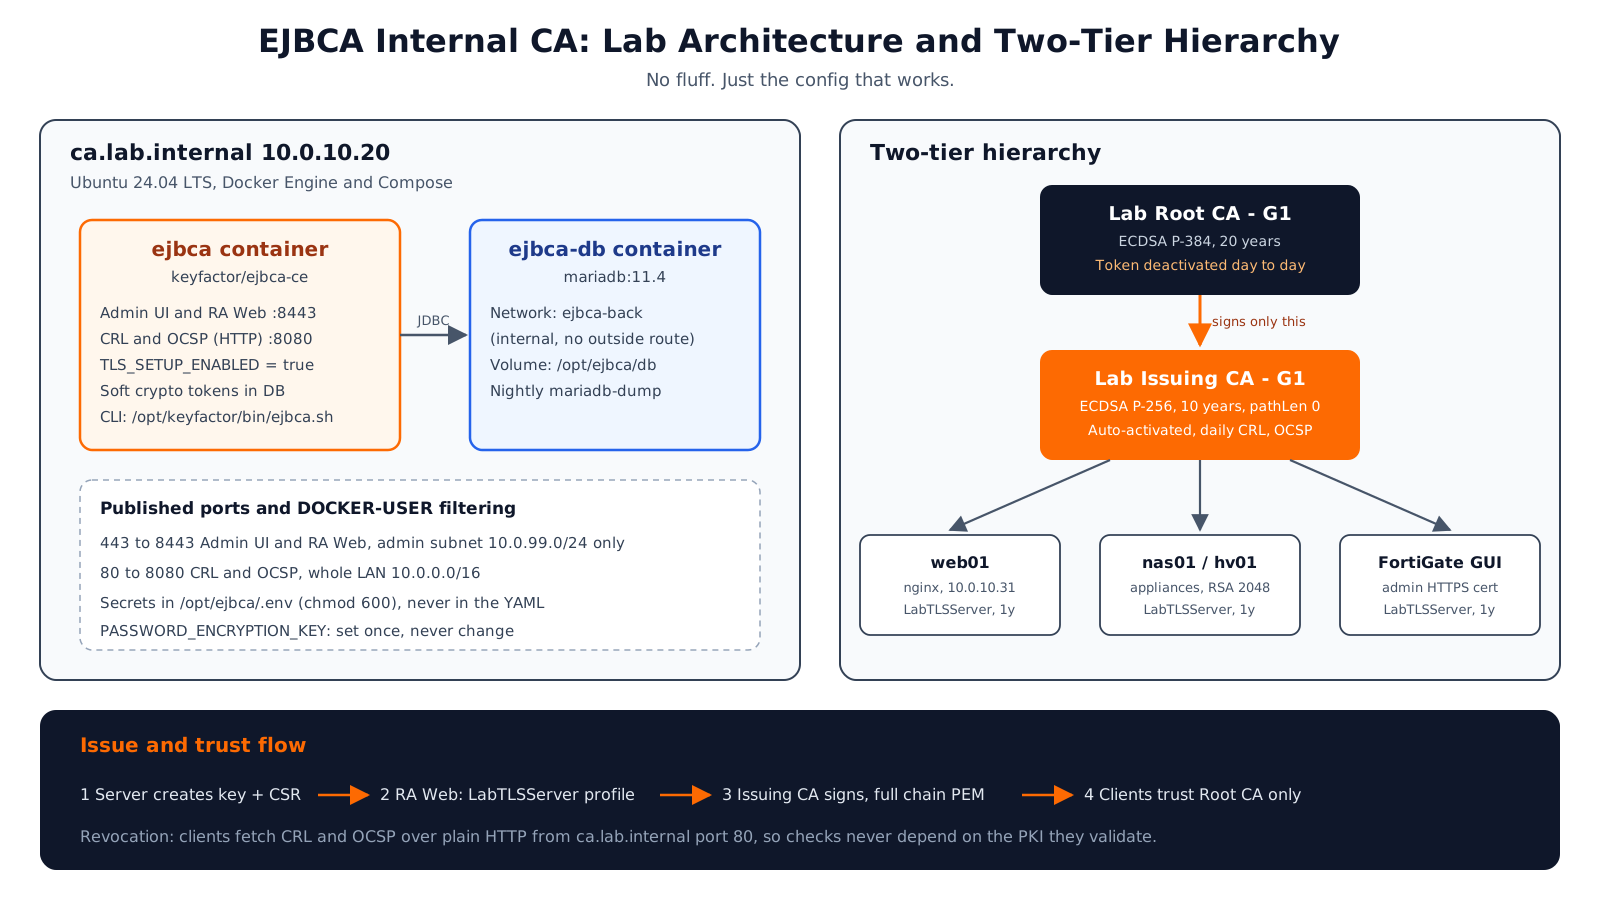
Why two tiers? The Root CA is the trust anchor you push to every client once. If it only ever signs the Issuing CA, you can keep its key deactivated, and if the Issuing CA is ever compromised you revoke and replace it without touching a single client trust store. Keyfactor’s own hierarchy guide recommends the same pattern, with the subordinate CA at roughly half the validity of the root. Source: Keyfactor how-to: Create a PKI Hierarchy in EJBCA.
Step-by-Step Implementation
Step 1: Prepare the CA host and install Docker
Goal: A patched Ubuntu host with the correct FQDN and Docker Engine plus the Compose plugin.
Action: Set the hostname to match the DNS record (EJBCA generates its own TLS server certificate for the container hostname on first start), then install Docker from Docker’s official repository.
sudo hostnamectl set-hostname ca.lab.internal
sudo apt update && sudo apt -y upgrade
sudo apt -y install ca-certificates curl
sudo install -m 0755 -d /etc/apt/keyrings
sudo curl -fsSL https://download.docker.com/linux/ubuntu/gpg \
-o /etc/apt/keyrings/docker.asc
echo "deb [arch=$(dpkg --print-architecture) signed-by=/etc/apt/keyrings/docker.asc] \
https://download.docker.com/linux/ubuntu \
$(. /etc/os-release; echo $VERSION_CODENAME) stable" \
| sudo tee /etc/apt/sources.list.d/docker.list
sudo apt update
sudo apt -y install docker-ce docker-ce-cli containerd.io docker-compose-plugin
sudo usermod -aG docker $USERVerification: Log out and back in, then confirm both tools respond.
docker version --format '{{.Server.Version}}'
docker compose version
getent hosts ca.lab.internalStep 2: Create the project folder and generate secrets
Goal: Random, persistent secrets stored outside the Compose file.
Action: EJBCA reads three security parameters at startup. PASSWORD_ENCRYPTION_KEY encrypts stored passwords such as crypto token auto-activation codes, and Keyfactor is explicit that it must be set before first start and never changed afterward. CA_KEYSTOREPASS protects soft crypto tokens that use a default password, and EJBCA_CLI_DEFAULTPASSWORD authenticates the local CLI. Source: Keyfactor EJBCA Community container on Docker Hub (keyfactor/ejbca-ce).
sudo mkdir -p /opt/ejbca/db /opt/ejbca/backup
sudo chown -R $USER:$USER /opt/ejbca
cd /opt/ejbca
{
echo "MARIADB_ROOT_PASSWORD=$(openssl rand -hex 24)"
echo "MARIADB_PASSWORD=$(openssl rand -hex 24)"
echo "PASSWORD_ENCRYPTION_KEY=$(openssl rand -hex 32)"
echo "CA_KEYSTOREPASS=$(openssl rand -hex 32)"
echo "EJBCA_CLI_DEFAULTPASSWORD=$(openssl rand -hex 24)"
} > .env
chmod 600 .envGotcha: Copy
.env to your password manager now. Lose PASSWORD_ENCRYPTION_KEY and a restored database can no longer decrypt the Issuing CA auto-activation code.Step 3: Write the Docker Compose file
Goal: EJBCA plus MariaDB, with the database reachable only from the EJBCA container.
Action: This is Keyfactor’s Compose and MariaDB pattern, hardened in three ways: the database sits on an internal network with no outside route, EJBCA waits for a healthy database, and TLS_SETUP_ENABLED is "true" instead of "simple". With "simple", anyone who can reach port 443 gets full admin rights until you lock it down; with "true", the Admin UI requires a client certificate from the first boot. Sources: Keyfactor how-to: Start out with EJBCA Docker container (Compose and MariaDB) and Keyfactor EJBCA Community container on Docker Hub (keyfactor/ejbca-ce).
networks:
ejbca-front:
ejbca-back:
internal: true
services:
ejbca-db:
image: mariadb:11.4
container_name: ejbca-db
restart: unless-stopped
networks: [ejbca-back]
environment:
MARIADB_ROOT_PASSWORD: ${MARIADB_ROOT_PASSWORD}
MARIADB_DATABASE: ejbca
MARIADB_USER: ejbca
MARIADB_PASSWORD: ${MARIADB_PASSWORD}
volumes:
- ./db:/var/lib/mysql
healthcheck:
test: ["CMD", "healthcheck.sh", "--connect", "--innodb_initialized"]
interval: 10s
timeout: 5s
retries: 10
ejbca:
image: keyfactor/ejbca-ce:latest
container_name: ejbca
hostname: ca.lab.internal
restart: unless-stopped
depends_on:
ejbca-db:
condition: service_healthy
networks: [ejbca-front, ejbca-back]
environment:
DATABASE_JDBC_URL: jdbc:mariadb://ejbca-db:3306/ejbca?characterEncoding=UTF-8
DATABASE_USER: ejbca
DATABASE_PASSWORD: ${MARIADB_PASSWORD}
TLS_SETUP_ENABLED: "true"
PASSWORD_ENCRYPTION_KEY: ${PASSWORD_ENCRYPTION_KEY}
CA_KEYSTOREPASS: ${CA_KEYSTOREPASS}
EJBCA_CLI_DEFAULTPASSWORD: ${EJBCA_CLI_DEFAULTPASSWORD}
LOG_LEVEL_APP: INFO
LOG_LEVEL_SERVER: INFO
ports:
- "80:8080"
- "443:8443"Pro tip: Once the lab works, replace
latest with a specific version tag from the Docker Hub Tags tab. A CA is not something you want upgrading itself on a random docker compose pull.Step 4: Start the stack and enroll the SuperAdmin
Goal: EJBCA running on MariaDB, and a SuperAdmin client certificate in your browser.
Action: Bring the stack up and follow the EJBCA log. On first start with an empty database, the container creates a ManagementCA, issues a TLS server certificate for ca.lab.internal, and prints a one-time enrollment URL and enrollment code for the initial SuperAdmin.
cd /opt/ejbca
docker compose up -d
docker compose ps
docker compose logs -f ejbca- Copy the enrollment URL from the log into Firefox on the admin workstation and accept the one-time warning (the ManagementCA is not trusted yet).
- Enter the enrollment code, and for the key algorithm choose RSA 2048 or EC P-256. The default can be a post-quantum algorithm that browsers cannot use for client authentication.
- Download the
.p12keystore and import it in Firefox under Settings, Privacy and Security, View Certificates, Your Certificates, Import. - Open a private window (Firefox remembers the non-certificate session) and browse to
https://ca.lab.internal/ejbca/adminweb/. Select the SuperAdmin certificate when prompted.
GUI verification: The EJBCA Administration page loads and shows your SuperAdmin identity. From the CLI, confirm the CA exists and lives in MariaDB:
docker exec ejbca /opt/keyfactor/bin/ejbca.sh ca listcas
docker exec ejbca-db sh -c \
'mariadb -uejbca -p"$MARIADB_PASSWORD" -e "SHOW TABLES" ejbca' | headPro tip: Keep the SuperAdmin
.p12 and its password somewhere safe and offline. Then create a second administrator certificate under Roles and Access Rules so a lost laptop does not lock you out of your own CA.Step 5: Create the certificate profiles
Goal: Three profiles that define what the Root CA, Issuing CA and server certificates look like.
Action: In the Admin UI go to CA Functions, Certificate Profiles. Clone each built-in template, rename it, and edit the fields below. Everything not listed stays at the template default. Profile settings follow Keyfactor’s hierarchy and TLS guides, adapted for a lab. Sources: Keyfactor how-to: Create a PKI Hierarchy in EJBCA and Keyfactor how-to: Issue TLS server certificates with EJBCA.
| Profile (clone of) | Field | Value |
|---|---|---|
| LabRootCAProfile (ROOTCA) | Available Key Algorithms / curves | ECDSA, P-384 / secp384r1 |
| Validity | 20y | |
| LabIssuingCAProfile (SUBCA) | Available Key Algorithms / curves | ECDSA, P-256 / secp256r1 |
| Validity | 10y | |
| Path Length Constraint | Enabled, 0 (can sign end entities only) | |
| CRL Distribution Points / Authority Information Access | Enabled, Use CA defined CRL Distribution Point, OCSP locator and CA issuer | |
| LabTLSServer (SERVER) | Available Key Algorithms | ECDSA P-256 plus RSA 2048 and 3072 for appliances that cannot do ECC |
| Validity | 1y (397 days is the longest most browsers accept) | |
| Key Usage / Extended Key Usage | Digital Signature, Key encipherment / Server Authentication | |
| Subject Alternative Name | Enabled; Issuer Alternative Name cleared | |
| CRL Distribution Points / Authority Information Access | Enabled, all three Use CA defined options | |
| LDAP DN order | Cleared on all three profiles (standard X.509 ordering) |
Step 6: Create the crypto tokens
Goal: Separate key stores for the Root and Issuing CAs, with different activation behavior.
Action: Go to CA Functions, Crypto Tokens, Create new. A soft crypto token stores encrypted keys in the database. Number the key labels so CA renewals later are obvious. Source: Keyfactor how-to: Create a PKI Hierarchy in EJBCA.
| Token | Activation | Keys to generate |
|---|---|---|
| LabRootCAToken | Manual (no auto-activation), strong authentication code kept offline | rootSignKey0001 (P-384), rootEncryptKey0001 (RSA 4096), testKey (P-384) |
| LabIssuingCAToken | Auto-activation enabled so the CA survives container restarts | issuingSignKey0001 (P-256), issuingEncryptKey0001 (RSA 4096), testKey (P-256) |
Gotcha: EJBCA Community 9.6 release notes state that HSM crypto tokens now require EJBCA Enterprise, so soft tokens are the Community path. Protect the database, the backups and
.env accordingly. Source: EJBCA Community releases on GitHub (Keyfactor/ejbca-ce).Step 7: Create the Root CA and Issuing CA
Goal: A two-tier hierarchy with CRL and OCSP URLs baked into every certificate.
Action: Go to CA Functions, Certification Authorities. Create the Root CA first, then the Issuing CA signed by it.
| Field | Root CA | Issuing CA |
|---|---|---|
| CA name (Add CA field) | LabRootCA-G1 | LabIssuingCA-G1 |
| Crypto Token / defaultKey | LabRootCAToken / rootEncryptKey0001 | LabIssuingCAToken / issuingEncryptKey0001 |
| Signing Algorithm | SHA384withECDSA | SHA256withECDSA |
| Subject DN | CN=Lab Root CA – G1,O=InfoSecMonkey Lab | CN=Lab Issuing CA – G1,O=InfoSecMonkey Lab |
| Signed By | Self Signed | LabRootCA-G1 |
| Certificate Profile | LabRootCAProfile | LabIssuingCAProfile |
| Validity | 20y | 10y |
| CRL Expire Period / Issue Interval | 6mo / 0 (manual, re-issue twice a year) | 3d / 1d (automatic daily CRL) |
| Default CRL Distribution Point | Click Generate, set host to ca.lab.internal | Click Generate, set host to ca.lab.internal |
| OCSP service Default URI | http://ca.lab.internal/ejbca/publicweb/status/ocsp | http://ca.lab.internal/ejbca/publicweb/status/ocsp |
Use plain HTTP for CRL and OCSP URLs. Clients fetch revocation data before they trust anything, so these endpoints must not depend on TLS issued by the same PKI. EJBCA serves them on the container’s port 8080, published as port 80 on the host.
Prefer the CLI? The Root CA can also be created with ca init (positional arguments: name, DN, token type, token password, key spec, key type, validity in days, policy, signing algorithm). Source: EJBCA 9.6 documentation: Creating a Root CA (GUI and CLI).
docker exec -it ejbca /opt/keyfactor/bin/ejbca.sh ca init LabRootCA-G1 \
"CN=Lab Root CA - G1,O=InfoSecMonkey Lab" soft '<ROOT_TOKEN_PASSWORD>' \
secp384r1 ECDSA 7300 null SHA384withECDSAGUI verification: Both CAs show as Active on the Certification Authorities page. Then go to Crypto Tokens and deactivate LabRootCAToken. The Root CA goes offline, the Issuing CA keeps working, and you only reactivate the root twice a year to publish its CRL or when you need a new Issuing CA.
Step 8: Create the end entity profile
Goal: One reusable template for every internal server certificate.
Action: Go to RA Functions, End Entity Profiles, add LabTLSServer, then edit it. Source: Keyfactor how-to: Issue TLS server certificates with EJBCA.
| Section | Setting |
|---|---|
| End Entity E-mail | Cleared |
| CN, Common Name | Required, Modifiable |
| O, Organization | Required, not Modifiable, value InfoSecMonkey Lab |
| Subject Alternative Name | DNS Name: Use entity CN field; plus three optional Modifiable DNS Name fields and one optional IP Address field |
| Default / Available Certificate Profiles | LabTLSServer |
| Default / Available CAs | LabIssuingCA-G1 |
| Default / Available Tokens | User Generated (CSR), plus PEM file if you want EJBCA to generate keys for appliances |
Pro tip: Chrome, Edge and Safari ignore the CN and validate only the SAN list. A certificate with no DNS SAN gets a name-mismatch error even when the CN is perfect, which is why the CN is copied into the first DNS Name field automatically.
Step 9: Generate a CSR on the target server
Goal: A private key that never leaves web01, and a CSR carrying its names.
Action: On web01.lab.internal, create a small OpenSSL request config and generate a P-256 key and CSR.
mkdir -p ~/pki && cd ~/pki
cat > web01.cnf <<'EOF'
[ req ]
default_md = sha256
prompt = no
distinguished_name = dn
req_extensions = v3_req
[ dn ]
CN = web01.lab.internal
O = InfoSecMonkey Lab
[ v3_req ]
subjectAltName = DNS:web01.lab.internal, DNS:web01, IP:10.0.10.31
EOF
openssl ecparam -genkey -name prime256v1 -noout -out web01.key
chmod 600 web01.key
openssl req -new -key web01.key -config web01.cnf -out web01.csr
openssl req -in web01.csr -noout -subject
cat web01.csrStep 10: Issue the certificate in RA Web
Goal: A signed server certificate plus the full chain in PEM.
- In the Admin UI click RA Web, then Enroll, Make New Request.
- Certificate Type: LabTLSServer. Key-pair generation: Provided by user.
- Paste the CSR and click Upload CSR. EJBCA reads the CN from the request.
- In Provide request info, confirm the DNS Name fields (web01.lab.internal, web01) and the IP Address (10.0.10.31). The end entity profile decides which SAN fields exist, so fill any the CSR did not populate.
- Username:
web01.lab.internal, then click Download PEM full chain.
Copy the downloaded web01.lab.internal.pem back to web01. The leaf certificate is the first block in the file; extract it for the checks later with openssl x509 -in web01.lab.internal.pem -out web01.crt. Also download the Root and Issuing CA certificates from RA Web under CA Certificates and CRLs, or pull them from the CLI on the CA host:
EJ=/opt/keyfactor/bin/ejbca.sh
docker exec ejbca $EJ ca getcacert --caname LabRootCA-G1 -f /tmp/lab-root.pem
docker exec ejbca $EJ ca getcacert --caname LabIssuingCA-G1 -f /tmp/lab-issuing.pem
docker cp ejbca:/tmp/lab-root.pem ./lab-root.pem
docker cp ejbca:/tmp/lab-issuing.pem ./lab-issuing.pem
openssl x509 -in lab-root.pem -noout -subject -fingerprint -sha256Step 11: Distribute the Root CA to clients
Goal: Every OS and browser in scope trusts Lab Root CA – G1. Only the root goes into trust stores.
Action: Verify the SHA-256 fingerprint against the CA host before importing anywhere. Then push it with the native tooling of each platform.
# Ubuntu / Debian (file must end in .crt)
sudo cp lab-root.pem /usr/local/share/ca-certificates/lab-root-ca-g1.crt
sudo update-ca-certificates
# RHEL / Rocky / Alma
sudo cp lab-root.pem /etc/pki/ca-trust/source/anchors/lab-root-ca-g1.pem
sudo update-ca-trust
# macOS (System keychain)
sudo security add-trusted-cert -d -r trustRoot \
-k /Library/Keychains/System.keychain lab-root.pem# Windows, elevated PowerShell (or GPO: Trusted Root Certification Authorities)
certutil -addstore -f Root .\lab-root.pemFirefox uses its own store; either import the root under Authorities or set security.enterprise_roots.enabled to true so it reads the OS store. On a FortiGate, import it under System, Certificates, Import, CA Certificate so the firewall trusts internal servers it inspects or authenticates against.
Step 12: Install the certificate on nginx
Goal: web01 serving HTTPS with the EJBCA-issued chain.
sudo install -m 600 -o root -g root ~/pki/web01.key /etc/ssl/private/web01.key
sudo install -m 644 ~/pki/web01.lab.internal.pem /etc/ssl/certs/web01-fullchain.pem
sudo tee /etc/nginx/sites-available/web01 > /dev/null <<'EOF'
server {
listen 443 ssl;
server_name web01.lab.internal web01;
ssl_certificate /etc/ssl/certs/web01-fullchain.pem;
ssl_certificate_key /etc/ssl/private/web01.key;
ssl_protocols TLSv1.2 TLSv1.3;
root /var/www/html;
}
EOF
sudo ln -sf /etc/nginx/sites-available/web01 /etc/nginx/sites-enabled/web01
sudo nginx -t
sudo systemctl reload nginxStep 13: Lock down network access to the CA
Goal: Admin UI reachable only from the admin subnet; CRL and OCSP reachable from the whole LAN.
Action: Docker publishes ports through its own iptables rules, which bypass UFW input rules. Filter in the DOCKER-USER chain instead, matching on the original destination port. Replace ens18 with your interface name.
sudo iptables -I DOCKER-USER -i ens18 -p tcp -m conntrack \
--ctorigdstport 443 ! -s 10.0.99.0/24 -j DROP
sudo iptables -I DOCKER-USER -i ens18 -p tcp -m conntrack \
--ctorigdstport 80 ! -s 10.0.0.0/16 -j DROP
sudo apt -y install iptables-persistent
sudo netfilter-persistent save
sudo iptables -L DOCKER-USER -n -vStep 14: Back up the CA
Goal: A nightly database dump you can actually restore.
Action: The database holds every CA key (in soft tokens), certificate, profile and audit record. Back it up with .env, and copy both off the host.
cat > /opt/ejbca/backup.sh <<'EOF'
#!/usr/bin/env bash
set -euo pipefail
cd /opt/ejbca
docker exec ejbca-db sh -c \
'mariadb-dump -uroot -p"$MARIADB_ROOT_PASSWORD" --single-transaction ejbca' \
| gzip > backup/ejbca-$(date +%F).sql.gz
find backup -name 'ejbca-*.sql.gz' -mtime +14 -delete
EOF
chmod 700 /opt/ejbca/backup.sh
(crontab -l 2>/dev/null; echo "15 2 * * * /opt/ejbca/backup.sh") | crontab -To upgrade later: take a backup, change the image tag in docker-compose.yml, then run docker compose pull and docker compose up -d, and read the EJBCA upgrade notes for the target version first. Recent Community releases moved to Java 21 and WildFly 35, so treat major jumps as planned changes, not routine pulls. Source: EJBCA Community 9.3 release notes.
Verification and Validation
Run these from any Linux client that trusts the root. Each one proves a different link in the chain.
# 1. Chain math: leaf -> issuing -> root
openssl verify -CAfile lab-root.pem -untrusted lab-issuing.pem web01.crt
# 2. Live TLS handshake with hostname check
openssl s_client -connect web01.lab.internal:443 -servername web01.lab.internal \
-verify_hostname web01.lab.internal -verify_return_error </dev/null 2>/dev/null \
| grep -E "subject=|issuer=|Verify return code"
# 3. Real-world client, no -k
curl -sI https://web01.lab.internal | head -1
# 4. SANs present
openssl x509 -in web01.crt -noout -ext subjectAltName
# 5. OCSP responder answers for the leaf
openssl ocsp -issuer lab-issuing.pem -cert web01.crt \
-url http://ca.lab.internal/ejbca/publicweb/status/ocsp -resp_text \
| grep -E "Response verify|Cert Status"Expected success output:
web01.crt: OK
subject=CN=web01.lab.internal, O=InfoSecMonkey Lab
issuer=CN=Lab Issuing CA - G1, O=InfoSecMonkey Lab
Verify return code: 0 (ok)
HTTP/1.1 200 OK
X509v3 Subject Alternative Name:
DNS:web01.lab.internal, DNS:web01, IP Address:10.0.10.31
Response verify OK
Cert Status: goodFinally, prove revocation works end to end: in RA Web, search for the end entity, revoke the certificate with reason Superseded, wait for OCSP (immediate) and run check 5 again. It should report Cert Status: revoked. Reissue afterward.
Troubleshooting and Gotchas
1. Issuing CA shows Offline after a reboot
Symptom: RA Web enrollments fail and the Certification Authorities page shows the Issuing CA as Offline. Cause: its crypto token was created without auto-activation, so it comes up deactivated whenever the container restarts.
docker compose logs ejbca | grep -iE "offline|crypto ?token|activat" | tail -20
docker exec ejbca /opt/keyfactor/bin/ejbca.sh ca listcasFix: Crypto Tokens, select LabIssuingCAToken, Activate, then edit the token and enable Auto-activation. The Root CA token being offline is expected and correct.
2. A brand new ManagementCA appears and everything else is gone
Symptom: After docker compose down and up, the log prints a fresh SuperAdmin enrollment link and your CAs are missing. Cause: EJBCA fell back to its bundled H2 database because DATABASE_JDBC_URL was missing or misspelled, or ./db was deleted. Without an external database, data lives inside the container and disappears with it. Source: Keyfactor EJBCA Community container on Docker Hub (keyfactor/ejbca-ce).
docker compose config | grep -E "DATABASE_JDBC_URL|DATABASE_USER"
docker compose logs ejbca | grep -iE "jdbc|h2|mariadb" | head
ls -la /opt/ejbca/db | headFix: Correct the variable, restore the latest dump into MariaDB, and restart. Never regenerate .env on an existing install; a new PASSWORD_ENCRYPTION_KEY breaks every stored encrypted password.
3. Browser still warns even though the root is trusted
Symptom: curl works but Chrome shows a name mismatch, or Firefox shows an unknown issuer. Causes: the certificate has no DNS SAN for the name you typed, the server sends only the leaf without the Issuing CA, or Firefox is not reading the OS store.
openssl x509 -in web01.crt -noout -ext subjectAltName
openssl s_client -connect web01.lab.internal:443 -servername web01.lab.internal \
-showcerts </dev/null 2>/dev/null | grep -c "BEGIN CERTIFICATE"Fix: Reissue with every name users type (short name, FQDN, IP if they browse by IP). Point nginx at the full chain file (the count above should be 2 or 3, never 1). For Firefox, import the root under Authorities or enable security.enterprise_roots.enabled.
Sources
- Keyfactor EJBCA Community container on Docker Hub (keyfactor/ejbca-ce)
- Keyfactor how-to: Start out with EJBCA Docker container (Compose and MariaDB)
- Keyfactor how-to: Create a PKI Hierarchy in EJBCA
- Keyfactor how-to: Issue TLS server certificates with EJBCA
- EJBCA 9.6 documentation: Creating a Root CA (GUI and CLI)
- EJBCA Community releases on GitHub (Keyfactor/ejbca-ce)
- EJBCA Community 9.3 release notes
Recent posts
-

-

DNS is one of those technologies that quietly underpins... Full Story
-

BGP issues on FortiGate firewalls usually trace back to... Full Story
-

Every time your laptop talks to your router, a... Full Story
-

If you've spent any time configuring NAT on a... Full Story
-

If you have spent any time configuring firewall policies... Full Story
-

High availability on FortiGate is one of those features... Full Story
-

If you've configured SD-WAN on a FortiGate, you've almost... Full Story
-

FortiLink is the management protocol that turns a FortiSwitch... Full Story
-

FortiSwitches are pretty rock solid from Mean Time Between... Full Story
-

This is a quicky tip. Have you ever gone... Full Story
-

DNS is one of those quiet pieces of internet... Full Story
-

This article is an updated version of the previous... Full Story
-

You will add ns2 as a secondary (slave) BIND9... Full Story
-

In the process of deploying my lab, I needed... Full Story
-

RFC 8805, used to be known as Self-Correcting IP... Full Story
-

Years back, I wrote an article about certificate pinning. ... Full Story
-

FortiGates have the ability to send alerts to Microsoft... Full Story
-

In this post, I am going to walk through... Full Story
-

Troubleshooting VoIP on a FortiGate can feel like trying... Full Story
-

Prior to FortiOS 7.0, there were three commands to... Full Story
-

In this post, I am going to go over... Full Story
-

What we are going to do: We are going... Full Story
-

Choosing between FGCP (FortiGate Clustering Protocol) and FGSP (FortiGate... Full Story
-

Creating a VLAN on macOS (The "Pro" Move) A... Full Story
-

This blog post explores the logic behind how macOS... Full Story
-

Pretty Fly for a Wi-Fi Tell My Wi-Fi Love... Full Story
-

Part of my daily gig is creating BoMs (Bill-of-Materials)... Full Story
-

ICMP introduces several security risks, but careful filtering, rate... Full Story
-

The command diag debug application dhcps -1 enables full... Full Story
-

In the world of FortiOS, execute tac report is... Full Story
-

LLDP; What is it The Link Layer Discovery Protocol... Full Story
-

What it actually does When you run diagnose fdsm... Full Story
-

Monkey Bites are bite-sized, high-impact security insights designed for... Full Story
-

I have run macOS in macOS with Parallels but... Full Story
-

Don't be confused with my other FortiNAC posts where... Full Story
-

This is the third session in a multi-part article... Full Story
-

Today I was configuring key-based authentication on a FortiGate... Full Story
-

Netcat, often called the "Swiss Army knife" of networking,... Full Story
-

At its core, IEEE 802.1X is a network layer... Full Story
-

In case you did not see the previous FortiNAC... Full Story
-

This is our 5th session where we are going... Full Story
-

Now that we have Wireshark installed and somewhat configured,... Full Story
-

The Philosophy of Packet Analysis Troubleshooting isn't about looking... Full Story
-

InfoSecMonkey Practitioner Guide Advanced Audit Policy, command line capture,... Full Story
-

No fluff. Just the config that works. Fortinet's November... Full Story
-

FortiGuard PSIRT · FG-IR-26-188 · CVE-2026-98432 No fluff. Just... Full Story