
If you've spent any time configuring user authentication on... Full Story
By Manny Fernandez
November 2, 2026

OpenLDAP Server on Ubuntu 24.04: Deploy, Configure and Use It
OpenLDAP Server on Ubuntu 24.04: Deploy, Configure and Use It
No fluff. Just the config that works.
An OpenLDAP server is still the quickest way to stand up a real directory in a lab, a small shop, or anywhere you need central users and groups without dragging in Active Directory. This guide takes a clean Ubuntu 24.04 LTS box from zero to a hardened slapd with an organized tree, users, groups, memberOf, TLS, sane ACLs, and two real consumers: Linux logins through SSSD and FortiGate authentication over LDAPS.
| Item | Details |
|---|---|
| Objective | Deploy, configure, secure and use an OpenLDAP directory on Ubuntu 24.04 LTS |
| Target audience | Network and security engineers, sysadmins, homelab builders, anyone feeding LDAP into firewalls or Linux hosts |
| End state | LDAPS on 636, StartTLS on 389, cleartext binds refused, anonymous reads blocked, read-only service account for consumers |
| Time | About 45 minutes on a fresh VM |
Prerequisites and Architecture
Assumed knowledge
- Comfortable on the Linux CLI with
sudo,aptand a text editor - Basic directory vocabulary: a DN (distinguished name) is the full path to an entry, a suffix is the root of your tree (here
dc=lab,dc=internal), and LDIF is the plain-text format you use to add and change entries - Basic TLS: a CA signs a server certificate, and clients must trust that CA
Which OpenLDAP you get
Ubuntu 24.04 ships the OpenLDAP 2.6 series, which the project publishes as its long-term support release. The project released OpenLDAP 2.7.0 as a feature release in August 2026, retiring the back-sql and back-perl backends and deprecating the GnuTLS integration, and followed with the 2.7.1 maintenance release in September. Everything below works on the distro 2.6 packages. Stay on them for production unless you have a reason to chase 2.7.
Lab requirements
| Component | Role | Address |
|---|---|---|
| ldap01.lab.internal | Ubuntu 24.04 LTS server running slapd, 2 vCPU, 2 GB RAM, 20 GB disk | 10.0.10.10 |
| client01.lab.internal | Ubuntu 24.04 LTS client using SSSD for logins | 10.0.10.20 |
| FGT-LAB | FortiGate using the directory for admin or VPN auth | 10.0.10.1 |
| Upstream | Internet for apt, transit range | 198.18.0.0/15 |
Ports and transports
| Transport | Port | Use it for |
|---|---|---|
| ldap:// plus StartTLS | 389/tcp | Clients that upgrade the session with StartTLS |
| ldaps:// | 636/tcp | FortiGate, appliances, anything that expects TLS from the first byte |
| ldapi:/// | Unix socket | Local admin as root with SASL EXTERNAL, no password needed |
Figure 1: Lab architecture and directory tree
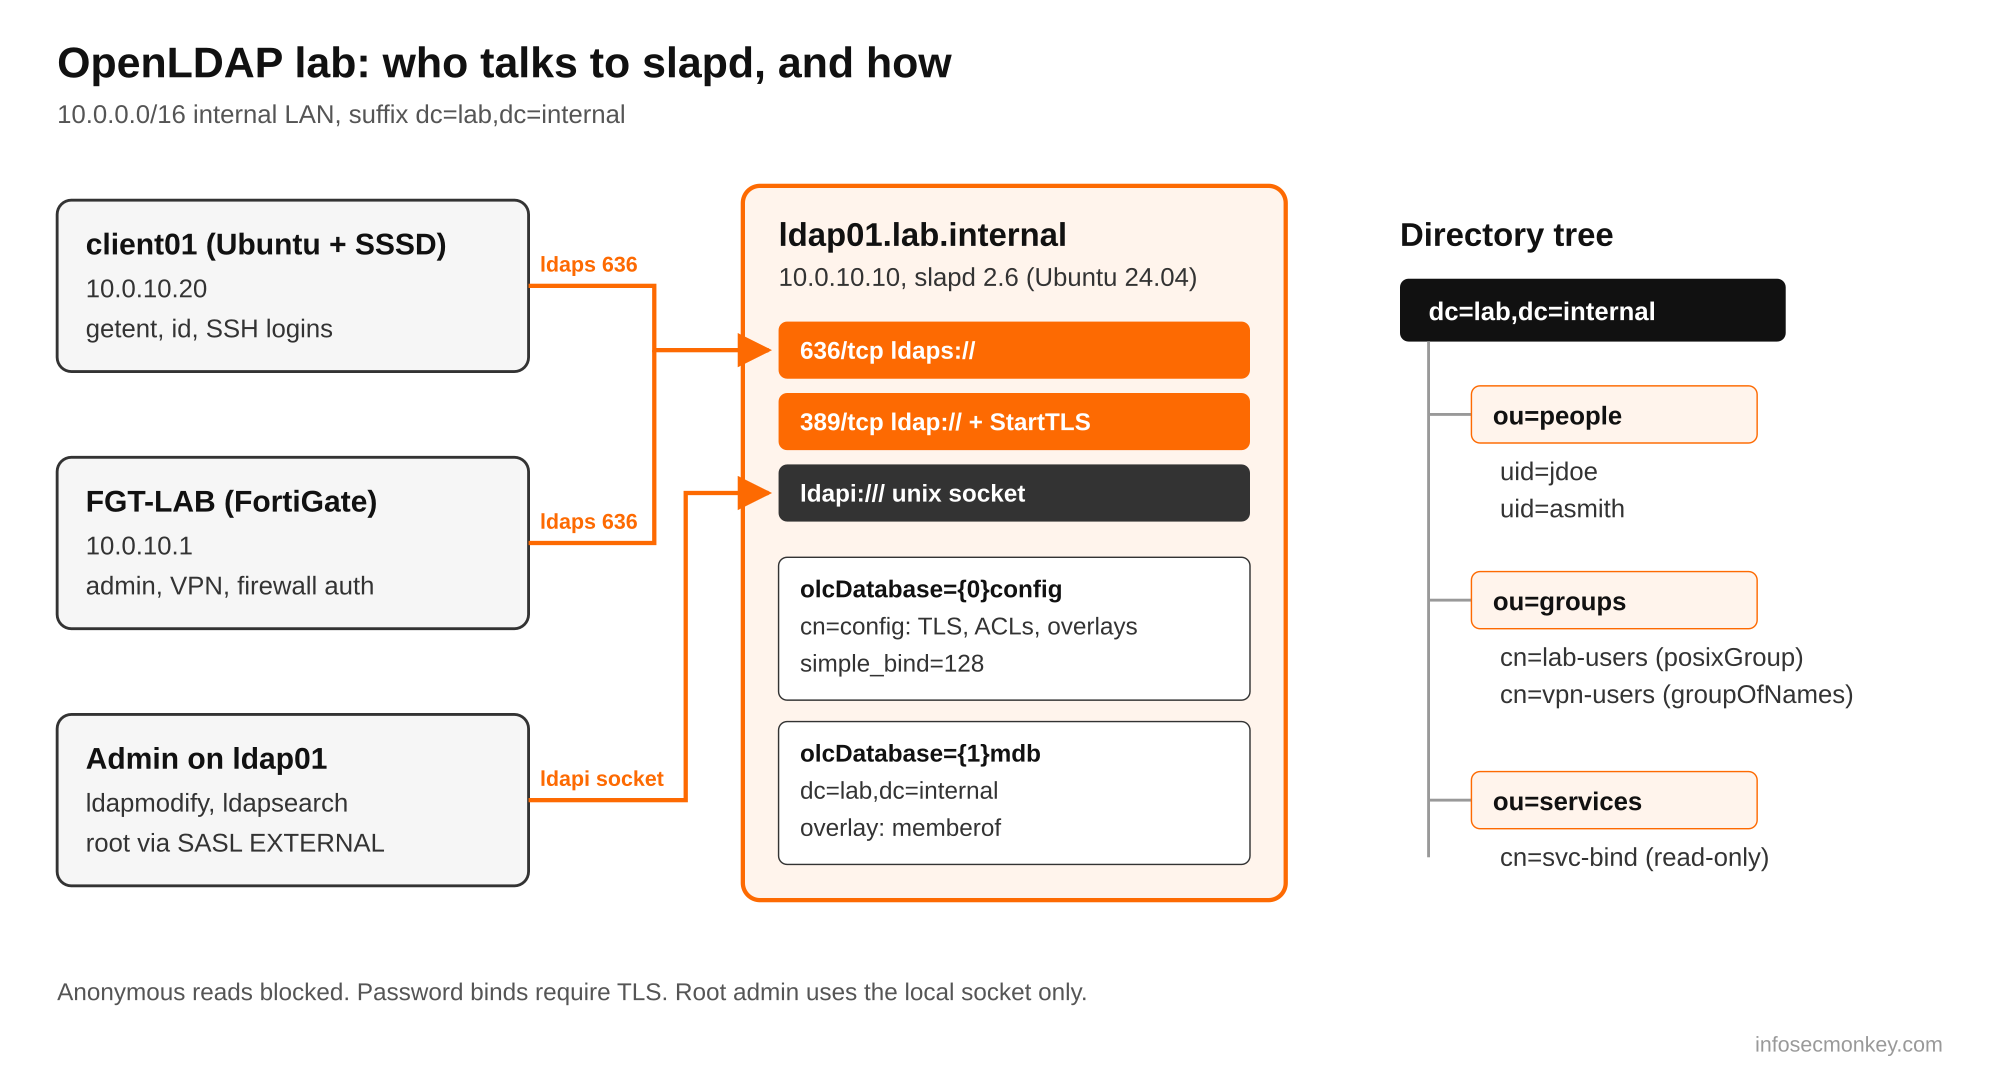
The tree we will build
dc=lab,dc=internal
  ou=people      uid=jdoe, uid=asmith
  ou=groups      cn=lab-users (posixGroup), cn=vpn-users (groupOfNames)
  ou=services    cn=svc-bind (read-only bind account)
Step-by-Step Implementation
Step 1: Prepare the host
Goal: Give the box a stable FQDN. slapd derives defaults from it, and TLS will fail later if names do not line up.
Action: Set the hostname, pin it in /etc/hosts, patch the OS and open the firewall to your LAN only.
sudo hostnamectl set-hostname ldap01.lab.internal
echo "10.0.10.10  ldap01.lab.internal ldap01" | sudo tee -a /etc/hosts
sudo apt update && sudo apt -y full-upgrade
sudo ufw allow OpenSSH
sudo ufw allow from 10.0.0.0/16 to any port 389,636 proto tcp
sudo ufw enable
GUI verification: none here. Check with hostname -f, which must return ldap01.lab.internal.
Step 2: Install the OpenLDAP server
Goal: Get slapd and the client tools installed with your real suffix, not one guessed from the hostname.
Action: Install the packages, then rerun the configuration wizard so you control the domain and organization.
sudo apt install -y slapd ldap-utils
sudo dpkg-reconfigure slapd| Prompt | Answer |
|---|---|
| Omit OpenLDAP server configuration? | No |
| DNS domain name | lab.internal (becomes dc=lab,dc=internal) |
| Organization name | InfoSecMonkey Lab |
| Administrator password | A long random value, store it in your vault |
| Remove the database when slapd is purged? | No |
| Move old database? | Yes |
The admin you just created is the rootDN cn=admin,dc=lab,dc=internal. It bypasses every ACL, so treat its password like a domain admin password. The Ubuntu install guide covers the same package flow.
slapd -VV
systemctl status slapd --no-pager
GUI verification: none. You want active (running) and a slapd 2.6.x version string.
Step 3: Set client defaults and smoke test
Goal: Stop typing the base DN and URI on every command.
Action: Edit the system LDAP client config, then run a search and a who-am-I.
sudo tee /etc/ldap/ldap.conf >/dev/null <<'EOF'
BASE    dc=lab,dc=internal
URI     ldap://ldap01.lab.internal
TLS_CACERT /etc/ssl/certs/ca-certificates.crt
EOF

ldapsearch -x -LLL -b dc=lab,dc=internal dn
ldapwhoami -x
dn: dc=lab,dc=internal
anonymousThat anonymous result is exactly what we will shut down in Step 8.
Step 4: Understand cn=config before you touch it
Goal: Know where configuration lives so you never hand-edit files under /etc/ldap/slapd.d.
Action: List the configuration tree over the local socket as root.
Modern slapd keeps its configuration inside the directory itself, in a separate tree called cn=config. You change it with LDIF over ldapi:///, and changes apply live with no restart. Root on the server already has manage rights there through SASL EXTERNAL.
sudo ldapsearch -Q -LLL -Y EXTERNAL -H ldapi:/// -b cn=config dndn: cn=config
dn: cn=module{0},cn=config
dn: cn=schema,cn=config
dn: cn={0}core,cn=schema,cn=config
dn: cn={1}cosine,cn=schema,cn=config
dn: cn={2}nis,cn=schema,cn=config
dn: cn={3}inetorgperson,cn=schema,cn=config
dn: olcDatabase={-1}frontend,cn=config
dn: olcDatabase={0}config,cn=config
dn: olcDatabase={1}mdb,cn=configolcDatabase={1}mdb is your data tree. Every overlay, ACL and limit for dc=lab,dc=internal hangs off that DN.
Gotcha: Never edit the files in /etc/ldap/slapd.d with a text editor. They carry CRC checksums, and a hand edit is how you get a slapd that will not start. Always use ldapmodify against cn=config.
Step 5: Enable the memberOf overlay
Goal: Let a user entry report its own groups, which is what FortiGate and most apps check.
Action: Load the module and attach the overlay to the data database before you create any groups.
cat > memberof.ldif <<'EOF'
dn: cn=module{0},cn=config
changetype: modify
add: olcModuleLoad
olcModuleLoad: memberof

dn: olcOverlay=memberof,olcDatabase={1}mdb,cn=config
changetype: add
objectClass: olcOverlayConfig
objectClass: olcMemberOf
olcOverlay: memberof
olcMemberOfRefInt: TRUE
olcMemberOfGroupOC: groupOfNames
olcMemberOfMemberAD: member
olcMemberOfMemberOfAD: memberOf
EOF

sudo ldapmodify -Q -Y EXTERNAL -H ldapi:/// -f memberof.ldif
Order matters: memberOf is written when a member is added. Groups created before the overlay existed will not show memberOf on their users until you remove and re-add the members. The overlay is deprecated upstream in favor of dynlist, but it still ships and works on the 2.6 packages.
Step 6: Build the tree, users and groups
Goal: Create the OU structure, two users, a POSIX group for Linux and a groupOfNames for apps.
Action: Hash passwords with slappasswd, write one LDIF, load it as the rootDN.
slappasswd -h {SSHA}Run it once per account and paste each {SSHA} hash into the LDIF below.
cat > base.ldif <<'EOF'
dn: ou=people,dc=lab,dc=internal
objectClass: organizationalUnit
ou: people

dn: ou=groups,dc=lab,dc=internal
objectClass: organizationalUnit
ou: groups

dn: ou=services,dc=lab,dc=internal
objectClass: organizationalUnit
ou: services

dn: uid=jdoe,ou=people,dc=lab,dc=internal
objectClass: inetOrgPerson
objectClass: posixAccount
objectClass: shadowAccount
uid: jdoe
cn: Jane Doe
givenName: Jane
sn: Doe
mail: jdoe@lab.internal
uidNumber: 10001
gidNumber: 10000
homeDirectory: /home/jdoe
loginShell: /bin/bash
userPassword: <JDOE_SSHA_HASH>

dn: uid=asmith,ou=people,dc=lab,dc=internal
objectClass: inetOrgPerson
objectClass: posixAccount
objectClass: shadowAccount
uid: asmith
cn: Alex Smith
givenName: Alex
sn: Smith
mail: asmith@lab.internal
uidNumber: 10002
gidNumber: 10000
homeDirectory: /home/asmith
loginShell: /bin/bash
userPassword: <ASMITH_SSHA_HASH>

dn: cn=lab-users,ou=groups,dc=lab,dc=internal
objectClass: posixGroup
cn: lab-users
gidNumber: 10000
memberUid: jdoe
memberUid: asmith

dn: cn=vpn-users,ou=groups,dc=lab,dc=internal
objectClass: groupOfNames
cn: vpn-users
member: uid=jdoe,ou=people,dc=lab,dc=internal

dn: cn=svc-bind,ou=services,dc=lab,dc=internal
objectClass: organizationalRole
objectClass: simpleSecurityObject
cn: svc-bind
description: Read-only bind account for FortiGate and SSSD
userPassword: <SVC_BIND_SSHA_HASH>
EOF

ldapadd -x -D cn=admin,dc=lab,dc=internal -W -f base.ldif
Why two group types: With the stock nis schema, posixGroup and groupOfNames are both structural, so one entry cannot be both. Linux wants posixGroup with memberUid. FortiGate and most apps want groupOfNames with member DNs, which is also what feeds memberOf. Keep both, or move to the rfc2307bis schema on day one if you want a single group type.
Step 7: Turn on TLS
Goal: Encrypt every bind. A simple bind without TLS sends the password in clear text.
Action: Create a lab CA and a server certificate with a SAN, point slapd at the files, and enable ldaps:// on 636.
sudo mkdir -p /etc/ldap/tls && cd /etc/ldap/tls

sudo openssl req -x509 -new -nodes -newkey rsa:4096 -days 3650 \
  -keyout ca.key -out ca.crt -subj "/CN=InfoSecMonkey Lab LDAP CA"

sudo openssl req -new -nodes -newkey rsa:2048 \
  -keyout ldap01.key -out ldap01.csr -subj "/CN=ldap01.lab.internal"

printf "subjectAltName=DNS:ldap01.lab.internal,IP:10.0.10.10\n\
extendedKeyUsage=serverAuth\n" | sudo tee ldap01.ext

sudo openssl x509 -req -in ldap01.csr -CA ca.crt -CAkey ca.key \
  -CAcreateserial -days 825 -sha256 -extfile ldap01.ext -out ldap01.crt

sudo chown root:openldap ldap01.key && sudo chmod 0640 ldap01.key
sudo chmod 0600 ca.key
sudo cp ca.crt /usr/local/share/ca-certificates/lab-ldap-ca.crt
sudo update-ca-certificates
In production, sign the server certificate from your real internal CA and keep the CA key off this box. The Ubuntu LDAP and TLS guide does the same job with certtool if you prefer GnuTLS tooling.
cat > tls.ldif <<'EOF'
dn: cn=config
changetype: modify
replace: olcTLSCACertificateFile
olcTLSCACertificateFile: /etc/ldap/tls/ca.crt
-
replace: olcTLSCertificateFile
olcTLSCertificateFile: /etc/ldap/tls/ldap01.crt
-
replace: olcTLSCertificateKeyFile
olcTLSCertificateKeyFile: /etc/ldap/tls/ldap01.key
EOF

sudo ldapmodify -Q -Y EXTERNAL -H ldapi:/// -f tls.ldif

sudo sed -i 's|^SLAPD_SERVICES=.*|SLAPD_SERVICES="ldap:/// ldapi:/// ldaps:///"|' \
  /etc/default/slapd
sudo systemctl restart slapd
sudo ss -ltnp | grep slapd
Now switch the local client default to LDAPS so every later command is encrypted without extra flags:
sudo sed -i 's|^URI.*|URI ldaps://ldap01.lab.internal|' /etc/ldap/ldap.confStep 8: Lock it down: ACLs and cleartext binds
Goal: Out of the box, anyone can read the whole tree anonymously and simple binds work over plain ldap://. Fix both.
Action: Replace the data ACLs and require a security strength factor of 128 for simple binds.
The stock ACLs, documented in the Ubuntu access control guide, end with a catch-all read rule for everyone, anonymous included. Replace them:
cat > acl.ldif <<'EOF'
dn: olcDatabase={1}mdb,cn=config
changetype: modify
replace: olcAccess
olcAccess: {0}to attrs=userPassword
  by self write
  by anonymous auth
  by * none
olcAccess: {1}to attrs=shadowLastChange
  by self write
  by users read
  by * none
olcAccess: {2}to *
  by dn.exact="gidNumber=0+uidNumber=0,cn=peercred,cn=external,cn=auth" manage
  by users read
  by * none
EOF

sudo ldapmodify -Q -Y EXTERNAL -H ldapi:/// -f acl.ldif

cat > security.ldif <<'EOF'
dn: cn=config
changetype: modify
replace: olcSecurity
olcSecurity: simple_bind=128
EOF

sudo ldapmodify -Q -Y EXTERNAL -H ldapi:/// -f security.ldif| Rule | Effect |
|---|---|
| {0} userPassword | Users can change their own password, anonymous can only use it to bind, nobody can read hashes |
| {1} shadowLastChange | Users update their own password age, authenticated accounts can read it for SSSD |
| {2} everything else | Root on the box via ldapi gets manage rights, any authenticated account reads, anonymous gets nothing |
| simple_bind=128 | A password bind needs TLS or LDAPS. ldapi with SASL EXTERNAL is not a simple bind, so local admin still works |
Continuation lines: In LDIF, a line that starts with a space continues the previous line, and that first space is thrown away. That is why each by clause is indented by two spaces: one marks the continuation, the second keeps a space between the words. Indent by one and you get userPasswordby, which slapd rejects.
Using the OpenLDAP Server Day to Day
Common operations
# find a user and list their groups (memberOf is operational, ask for it)
ldapsearch -x -D cn=svc-bind,ou=services,dc=lab,dc=internal -W -LLL \
  "(uid=jdoe)" cn mail memberOf

# everyone in vpn-users
ldapsearch -x -D cn=svc-bind,ou=services,dc=lab,dc=internal -W -LLL \
  "(memberOf=cn=vpn-users,ou=groups,dc=lab,dc=internal)" uid

# admin resets a password (prompts, never put it on the command line)
ldappasswd -x -D cn=admin,dc=lab,dc=internal -W -S \
  uid=asmith,ou=people,dc=lab,dc=internal

# a user changes their own password (allowed by "by self write")
ldappasswd -x -D uid=jdoe,ou=people,dc=lab,dc=internal -W -S
cat > add-member.ldif <<'EOF'
dn: cn=vpn-users,ou=groups,dc=lab,dc=internal
changetype: modify
add: member
member: uid=asmith,ou=people,dc=lab,dc=internal
EOF
ldapmodify -x -D cn=admin,dc=lab,dc=internal -W -f add-member.ldif
# remove a user entirely
ldapdelete -x -D cn=admin,dc=lab,dc=internal -W \
uid=asmith,ou=people,dc=lab,dc=internalBack it up
sudo slapcat -n 0 -l /root/ldap-config-$(date +%F).ldif
sudo slapcat -n 1 -l /root/ldap-data-$(date +%F).ldif
Database 0 is cn=config, database 1 is your data. To restore on a rebuilt box: stop slapd, empty /etc/ldap/slapd.d and /var/lib/ldap, run slapadd -n 0 -F /etc/ldap/slapd.d -l config.ldif then slapadd -n 1 -l data.ldif, fix ownership with chown -R openldap:openldap on both paths, and start slapd.
Consumer 1: Linux logins with SSSD
sudo apt install -y sssd-ldap ldap-utils
sudo cp lab-ldap-ca.crt /usr/local/share/ca-certificates/
sudo update-ca-certificates

sudo tee /etc/sssd/sssd.conf >/dev/null <<'EOF'
[sssd]
services = nss, pam
domains = lab.internal

[domain/lab.internal]
id_provider = ldap
auth_provider = ldap
ldap_uri = ldaps://ldap01.lab.internal
ldap_search_base = dc=lab,dc=internal
ldap_default_bind_dn = cn=svc-bind,ou=services,dc=lab,dc=internal
ldap_default_authtok = <SVC_BIND_PASSWORD>
ldap_tls_reqcert = demand
cache_credentials = True
EOF

sudo chmod 600 /etc/sssd/sssd.conf
sudo pam-auth-update --enable mkhomedir
sudo systemctl restart sssd
getent passwd jdoe
id jdoe
The bind DN lines are required because Step 8 removed anonymous reads. id jdoe should list lab-users as the primary group.
Consumer 2: FortiGate over LDAPS
Import ca.crt under System > Certificates > Import > CA Certificate first (it shows up as CA_Cert_1 unless you rename it), then:
config user ldap
    edit "OpenLDAP-LAB"
        set server "10.0.10.10"
        set cnid "uid"
        set dn "ou=people,dc=lab,dc=internal"
        set type regular
        set username "cn=svc-bind,ou=services,dc=lab,dc=internal"
        set password <SVC_BIND_PASSWORD>
        set secure ldaps
        set port 636
        set ca-cert "CA_Cert_1"
        set member-attr "memberOf"
    next
end
diagnose test authserver ldap OpenLDAP-LAB jdoe <JDOE_PASSWORD>
authenticate 'jdoe' against 'OpenLDAP-LAB' succeeded!
Group membership(s) - cn=vpn-users,ou=groups,dc=lab,dc=internalGUI verification: User & Authentication > LDAP Servers > OpenLDAP-LAB > Test Connectivity should report success, and Test User Credentials with jdoe should return the vpn-users group. Map that group into a FortiGate user group with a group filter on cn=vpn-users,ou=groups,dc=lab,dc=internal. We used the IP as the server and put that IP in the certificate SAN, so the FortiGate server identity check passes.
Verification and Validation
| Test | Command | Expected result |
|---|---|---|
| LDAPS certificate | openssl s_client -connect ldap01.lab.internal:636 -brief </dev/null |
Verification: OK and a TLSv1.3 or TLSv1.2 protocol line |
| StartTLS bind | ldapwhoami -x -ZZ -H ldap://ldap01.lab.internal -D uid=jdoe,ou=people,dc=lab,dc=internal -W |
dn:uid=jdoe,ou=people,dc=lab,dc=internal |
| Cleartext refused | ldapwhoami -x -H ldap://ldap01.lab.internal -D uid=jdoe,ou=people,dc=lab,dc=internal -W |
ldap_bind: Confidentiality required (13) |
| Anonymous blocked | ldapsearch -x -LLL "(uid=jdoe)" |
No entries returned |
| memberOf works | ldapsearch -x -D cn=svc-bind,ou=services,dc=lab,dc=internal -W -LLL "(uid=jdoe)" memberOf |
memberOf: cn=vpn-users,ou=groups,dc=lab,dc=internal |
| Local admin still works | sudo ldapsearch -Q -LLL -Y EXTERNAL -H ldapi:/// -b dc=lab,dc=internal dn |
Every DN in the tree |
Troubleshooting and Gotchas
1. ldapmodify fails with “Other (e.g., implementation specific) error (80)” on tls.ldif
slapd runs as the openldap user and cannot read the key. This is the number one TLS failure.
sudo -u openldap cat /etc/ldap/tls/ldap01.key >/dev/null && echo readable
ls -l /etc/ldap/tls/
sudo journalctl -u slapd --since "10 min ago" --no-pager
Fix: sudo chown root:openldap /etc/ldap/tls/ldap01.key && sudo chmod 0640 /etc/ldap/tls/ldap01.key, then reapply tls.ldif. Keep the files under /etc/ldap so the slapd AppArmor profile allows them.
2. “Can’t contact LDAP server (-1)” over ldaps:// or -ZZ
Almost always a trust or name problem: the client does not trust the CA, or the name you connect to is not in the certificate SAN.
ldapwhoami -x -H ldaps://ldap01.lab.internal -d 1 2>&1 | grep -i tls
openssl x509 -in /etc/ldap/tls/ldap01.crt -noout -ext subjectAltName
Fix: install the CA with update-ca-certificates on the client, and connect with a name or IP that appears in the SAN. On FortiGate, the same mismatch shows up as a failed connectivity test with server-identity-check enabled.
3. Binds return “Invalid credentials (49)” or memberOf is empty
Two classics. First, the admin DN is cn=admin,dc=lab,dc=internal, not uid=admin, and service accounts live under ou=services, not ou=people. Second, memberOf only appears for memberships written after the overlay loaded, and it is operational so it is only returned when you ask for it by name.
sudo ldapsearch -Q -LLL -Y EXTERNAL -H ldapi:/// -b cn=config \
  "(olcOverlay=*)" olcOverlay
sudo ldapmodify -Q -Y EXTERNAL -H ldapi:/// <<'EOF'
dn: cn=config
changetype: modify
replace: olcLogLevel
olcLogLevel: stats
EOF
sudo journalctl -u slapd -f
Fix: confirm {0}memberof is listed, then remove and re-add members of any group created before the overlay. With stats logging on, each bind shows the exact DN and result code. Set it back to none when you are done, because stats is chatty on a busy server.
Sources
- Ubuntu Server documentation: Install and configure LDAP
- Ubuntu Server documentation: Set up LDAP access control
- Ubuntu Server documentation: LDAP and Transport Layer Security (TLS)
- OpenLDAP 2.6 LTS release announcement
- OpenLDAP 2.7.0 feature release announcement
- OpenLDAP 2.7.1 release announcement (openldap-announce list)
InfoSecMonkey. No fluff. Just the config that works.
Recent posts
-

-

DNS is one of those technologies that quietly underpins... Full Story
-

BGP issues on FortiGate firewalls usually trace back to... Full Story
-

Every time your laptop talks to your router, a... Full Story
-

If you've spent any time configuring NAT on a... Full Story
-

If you have spent any time configuring firewall policies... Full Story
-

High availability on FortiGate is one of those features... Full Story
-

If you've configured SD-WAN on a FortiGate, you've almost... Full Story
-

FortiLink is the management protocol that turns a FortiSwitch... Full Story
-

FortiSwitches are pretty rock solid from Mean Time Between... Full Story
-

This is a quicky tip. Have you ever gone... Full Story
-

DNS is one of those quiet pieces of internet... Full Story
-

This article is an updated version of the previous... Full Story
-

You will add ns2 as a secondary (slave) BIND9... Full Story
-

In the process of deploying my lab, I needed... Full Story
-

RFC 8805, used to be known as Self-Correcting IP... Full Story
-

Years back, I wrote an article about certificate pinning. ... Full Story
-

FortiGates have the ability to send alerts to Microsoft... Full Story
-

In this post, I am going to walk through... Full Story
-

Troubleshooting VoIP on a FortiGate can feel like trying... Full Story
-

Prior to FortiOS 7.0, there were three commands to... Full Story
-

In this post, I am going to go over... Full Story
-

What we are going to do: We are going... Full Story
-

Choosing between FGCP (FortiGate Clustering Protocol) and FGSP (FortiGate... Full Story
-

Creating a VLAN on macOS (The "Pro" Move) A... Full Story
-

This blog post explores the logic behind how macOS... Full Story
-

Pretty Fly for a Wi-Fi Tell My Wi-Fi Love... Full Story
-

Part of my daily gig is creating BoMs (Bill-of-Materials)... Full Story
-

ICMP introduces several security risks, but careful filtering, rate... Full Story
-

The command diag debug application dhcps -1 enables full... Full Story
-

In the world of FortiOS, execute tac report is... Full Story
-

LLDP; What is it The Link Layer Discovery Protocol... Full Story
-

What it actually does When you run diagnose fdsm... Full Story
-

Monkey Bites are bite-sized, high-impact security insights designed for... Full Story
-

I have run macOS in macOS with Parallels but... Full Story
-

Don't be confused with my other FortiNAC posts where... Full Story
-

This is the third session in a multi-part article... Full Story
-

Today I was configuring key-based authentication on a FortiGate... Full Story
-

Netcat, often called the "Swiss Army knife" of networking,... Full Story
-

At its core, IEEE 802.1X is a network layer... Full Story
-

In case you did not see the previous FortiNAC... Full Story
-

This is our 5th session where we are going... Full Story
-

Now that we have Wireshark installed and somewhat configured,... Full Story
-

The Philosophy of Packet Analysis Troubleshooting isn't about looking... Full Story
-

Chrome CVE-2026-106378: Patching the macOS Sandbox Escape No fluff.... Full Story
-

OpenLDAP Server on Ubuntu 24.04: Deploy, Configure and Use... Full Story
-

PAC Files Explained: How Proxy Auto-Config Really Works No... Full Story