At its core, IEEE 802.1X is a network layer... Full Story
By Manny Fernandez
February 14, 2026

Deploying FortiWeb on ProxMox Server
I have learned from buiding my lab, that all products running on ProxMox require a little more hand holding than ESXi and public cloud. But I am extremely comfortable in the cli as I ran Linux as my desktop for years. Lets install FortiWeb in our ProxMox environment.
Download the file
Obtain your file from the support portal. You can unzip it on your computer and then only upload the one or two files.

You will not need all three of the files, in most cases, after this writing, you should really need one. But here is the explanation.
The primary difference between FortiWeb KVM images is whether the boot disk and log disk are combined (boot.qcow2) or separate (boot_2g.qcow2). For versions 5.8.5–7.2.2, boot_2g.qcow2 requires a separate log.qcow2 for logging, whereas boot.qcow2 in v7.2.3+ merges them onto one disk, simplifying deployment.
I put my file in the /mnt/pve/local2/template/iso directory.
Now you need create the VM
Create VM – In Proxmox – click Create VM.
General – Name the VM
OS – Select Do not use any media.
System – Leave defaults (Q35, BIOS).
Disks – Delete the default disk.
CPU/Memory – Allocate resources. Fortinet recommends at least 2 CPUs and 8 GB RAM for performance.
Network – Use virtio (paravirtualized) for better performance.
Finish – Click Finish, but do not start the VM yet.
Import the Disk
Now you can imort the disk and attach it to the VM. Make note of the VM ID from when you created the VM.
qm disk import 106 //mnt/pve/local2/template/iso/boot.qcow2 thin-mint
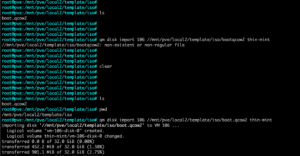
Once you start the process, you should see a message like this:
logical volume "vm-106-disk-0" created
logical volume thin-mint/vm-106-disk-0 changed
Once it gets to the end, you should see something similar to this..
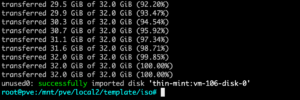
Now we need to go back to the ProxMox WebUI
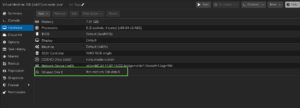
When you go into the Hardware section, you should see an unused disk 0
You will double click it and hit the add button.
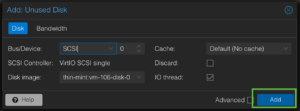
Now go to your Options section, and select Boot Order.
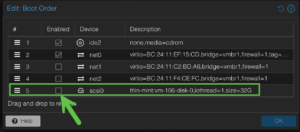
You will see the disk0 is unselected and not at the top.
Click the square and drag it to the top to boot first.
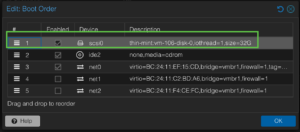
Click OK and boot up the FWB.
Console into it and configure the IP address
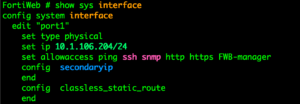
Its the standard FortiOS command structure.
Let’s add the static route.
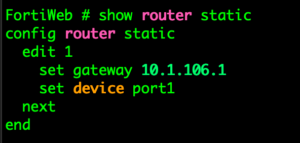
To log it, got to https://%the_ip_you_gave_it
Hope this helps.
Recent posts
-

-

In case you did not see the previous FortiNAC... Full Story
-

This is our 5th session where we are going... Full Story
-

Now that we have Wireshark installed and somewhat configured,... Full Story
-

The Philosophy of Packet Analysis Troubleshooting isn't about looking... Full Story