At its core, IEEE 802.1X is a network layer... Full Story
By Manny Fernandez
February 25, 2026
Basics of Wireshark – Session 4 – Where to Capture From
Now that we have Wireshark installed and somewhat configured, lets discuss limitations. Although this article is not so much about Wireshark, but about how you can use Wireshark and the challenges you may have around capturing or collecting, PCAPs in Ethernet networks and/or other various environemnts. This is Session 4 of a Wireshark Series. You can check out Series 1, Series 2, Series 3
How Ethernet Switches Operate
Hub vs. Switch: The Logic
At a physical level, they look similar, but their internal operations are worlds apart.
The Ethernet Hub (Layer 1)
A hub is a “dumb” device. It operates at the Physical Layer of the OSI model. When a data packet arrives at one port, the hub simply copies that signal and broadcasts it out to every other port on the device.
-
Collision Domains: All devices connected to a hub share a single collision domain. If two devices talk at once, their signals crash.
-
Efficiency: Very low. Every device receives everyone else’s data, even if it wasn’t intended for them.
The Ethernet Switch (Layer 2)
A switch is an “intelligent” device. It operates at the Data Link Layer. It maintains a MAC Address Table (or CAM table) that maps specific physical hardware addresses to specific ports.
-
Micro-segmentation: When a packet arrives, the switch looks at the destination MAC address and sends it only to the port where that device is connected.
-
Efficiency: High. Multiple “conversations” can happen simultaneously without interference.
When you are trying to capture packets while on a switched environment, you will not see the actual packets, only the broadcast traffic. To be able to capture these packets, you will need to be able to see the packets. One way is to have a device like a FortiGate handling your layer3 boundaries for that traffic, the other is using Ethernet taps, or port mirroring.
Mirroring Ports
With port mirroring, you are basically mirroring a port to another port. You can also do this with a VLAN as well.
FortiSwitch FortiLink (Managed by FortiGate)
config switch-controller switch-mirror
edit "Mirror1"
set switch-id "S124EPXXXXXXXXXX"#Your Switch Serial
set dst "port5" # Sniffer Port
set src-ingress "port1" # Source Port (In)
set src-egress "port1" # Source Port (Out)
set status active
next
end
FortiSwitch Stand Alone
config switch mirror
edit "Session1"
set dst "port10" # The port connected to your PC/Sniffer
set src-ingress "port1" # Traffic entering these ports
set src-egress "port1" # Traffic leaving this port
set status active
next
end
Cisco Systems Switches
monitor session 1 source interface GigabitEthernet 0/1 both
monitor session 1 destination interface GigabitEthernet 0/10
HP Switches
monitor session 1 destination port 1
interface 2 monitor session 1 both
Juniper Switches
set forwarding-options analyzer MY-MIRROR input ingress interface ge-0/0/1.0
set forwarding-options analyzer MY-MIRROR input egress interface ge-0/0/1.0
set forwarding-options analyzer MY-MIRROR output interface ge-0/0/10.0
Arista Switches
set forwarding-options analyzer MY-MIRROR input ingress interface ge-0/0/1.0
set forwarding-options analyzer MY-MIRROR input egress interface ge-0/0/1.0
set forwarding-options analyzer MY-MIRROR output interface ge-0/0/10.0
Dell
monitor session 1
destination interface ethernet 1/1/2
source interface ethernet 1/1/1 both
Note: Take note of the interface capability and ensure that you are not trying to mirror a 10Gbps port to a 1Gbps port which will drop an enormous amount of the data.
Capturing a PCAP on FortiGate Firewalls
To capture a PCAP on the on the FortiGate, you can go to Network (A), then Diagnostic (B) the New Packet Capture (C).
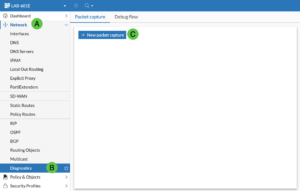
You can choose Basic filters and put in hosts, ports or protocols.

Or you can use the BPF filtering we discussed above.
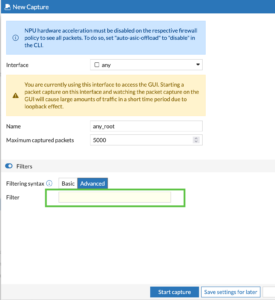
Once you start the capture, you can either view the data in the GUI, or save as PCAP. This will allow you to open the .pcap file in Wireshark.
Capturing a PCAP on Cisco FirePower
In the new Cisco FirePower, you can use Cisco Security Cloud Control (SCC)
Log into you SCC. Navigate to Devices, Choose the firewall, at the end, there click on the three dots (hamburger).
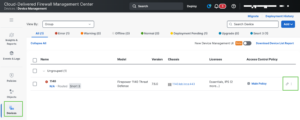
Once you do that, choose Packet Capture

Now you can define the name of the capture, the interface and any filtering
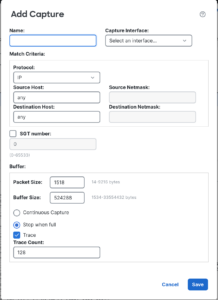
Note: Cisco does not use Berkeley Packet Filter (BPF) through any of their GUIs. However you CAN go into expert mode and run tcpdump which WILL let you use BPF syntax.
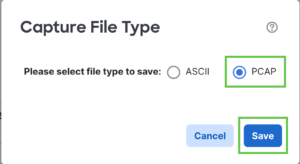
You can choose to save it in .pcap format or ASCII.
Once the packet capture is complete, you can choose the Floppy Disk to save the .pcap

Capturing a PCAP on a Juniper Device
set security datapath-debug capture-filter [FILTER_NAME] source-address [IP] destination-address [IP] protocol [PROTO]
set security datapath-debug action-profile [PROFILE_NAME] event-flag all
set security datapath-debug action-profile [PROFILE_NAME] ipv4-packet-dump
set security datapath-debug maximum-capture-size 5
set security datapath-debug packet-capture filter [FILTER_NAME] action-profile [PROFILE_NAME]
commit
file copy /var/log/pcap-debug.pcap scp://user@your-ip:/path/to/destination
Capturing a PCAP on a Palo Alto Networks Device
I am working on getting an updated PAN OS VM or device so I can document the process with screenshots.
Network Taps
An Ethernet Tap (Test Access Point) is a hardware device used to monitor a local area network (LAN). Unlike software-based monitoring, a tap provides a dedicated physical connection to “see” every bit of data passing through a network link without interfering with the traffic.
Think of it like a “Y-splitter” like we talked about in Session 1, but for a garden hose; the water continues to its destination, but you’ve added a side valve to watch the flow. Not exactly because in the hose analogy, its not a duplicate of the water going out the one side, but you get the picture.
Some of the best known manufactures of Ethernet TAPS
Gigamon
Keysight Technologies (formerly Ixia)
Garland Technology
Network Critical
Niagara Networks
Cubro Network Visibility
PROFITAP
Dualcomm
Datacom Systems
NetScout Systems
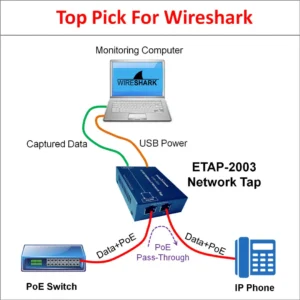
How it works
Similar to how we did with the mirroring ports, you will have one port the goes to the capturing PC and the passthrough. Now all the traffic seen by the Pass-Through will be copied to the Ethernet port of the capturing device.
Recent posts
-

-

In case you did not see the previous FortiNAC... Full Story
-

This is our 5th session where we are going... Full Story
-

Now that we have Wireshark installed and somewhat configured,... Full Story
-

The Philosophy of Packet Analysis Troubleshooting isn't about looking... Full Story