If you've spent any time configuring user authentication on... Full Story
By Manny Fernandez
February 2, 2020

Bridged FortiAPs and Managing Remote Switches Across the Bridge
I cannot tell you how many times we run into this. Sometimes its a stopgap for a customer that is waiting for fiber to be run across a parking lot, sometimes it is more of a permanent scenario. I once had a customer that wanted to bridge two building on either side of Miami International Airport. On that one, I told him I wanted nothing to do with it. Not only would you have giant metal mirrors cruising in front of the signal, but who knows what I would have been blamed for. Anyways, here is my scenario.
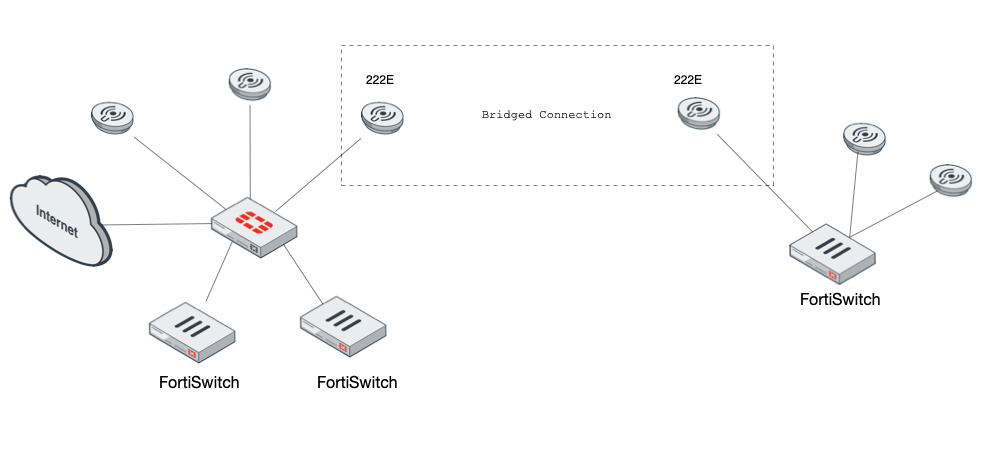
As you can see on the left side of the diagram I have my Fortigate with some FortiSwitches and some FortiAPs. On the right-side I have a FortiSwitch and some FortiAPs.
Requirements:
- Create a wireless bridge between the two locations.
- Be able to extend VLAN 10, 100, and 110 to the
right-side - Be able to manage the
right-sideswitch via the Fortigate using Fortilink. - Be able to have the SSIDs from the
left-sideon theright-side
Last year, a good friend and colleague wrote a great article and I shared it on my site. His blog post was the primer for this one and I give him full credit for getting me 98% to the goal line, but I ran into a snag specific to my environment. So I wanted to write this article to augment his in case someone runs into the same issues I did.
First things first. Lets discuss the naming convention used by Fortinet. Maybe this is the standard, but I am not a wireless guy so I will talk about this implementation specifically.
Mesh Root: This is the AP closest to the Fortigate or the WLC.
Mesh Leaf: This is the one furthest away from the Fortigate.
AP Profile
In my scenario, I configured a FAP-222E on the left-side on one of my switches. I initially turned off the 2.4GHz radio and only left the 5GHz, but later decided, what the heck, might as well turn it on.
NOTE: Best practice is to Clone the default AP Profile for the AP of your choice. This leaves the default to be reference or reverted to in case it is needed.
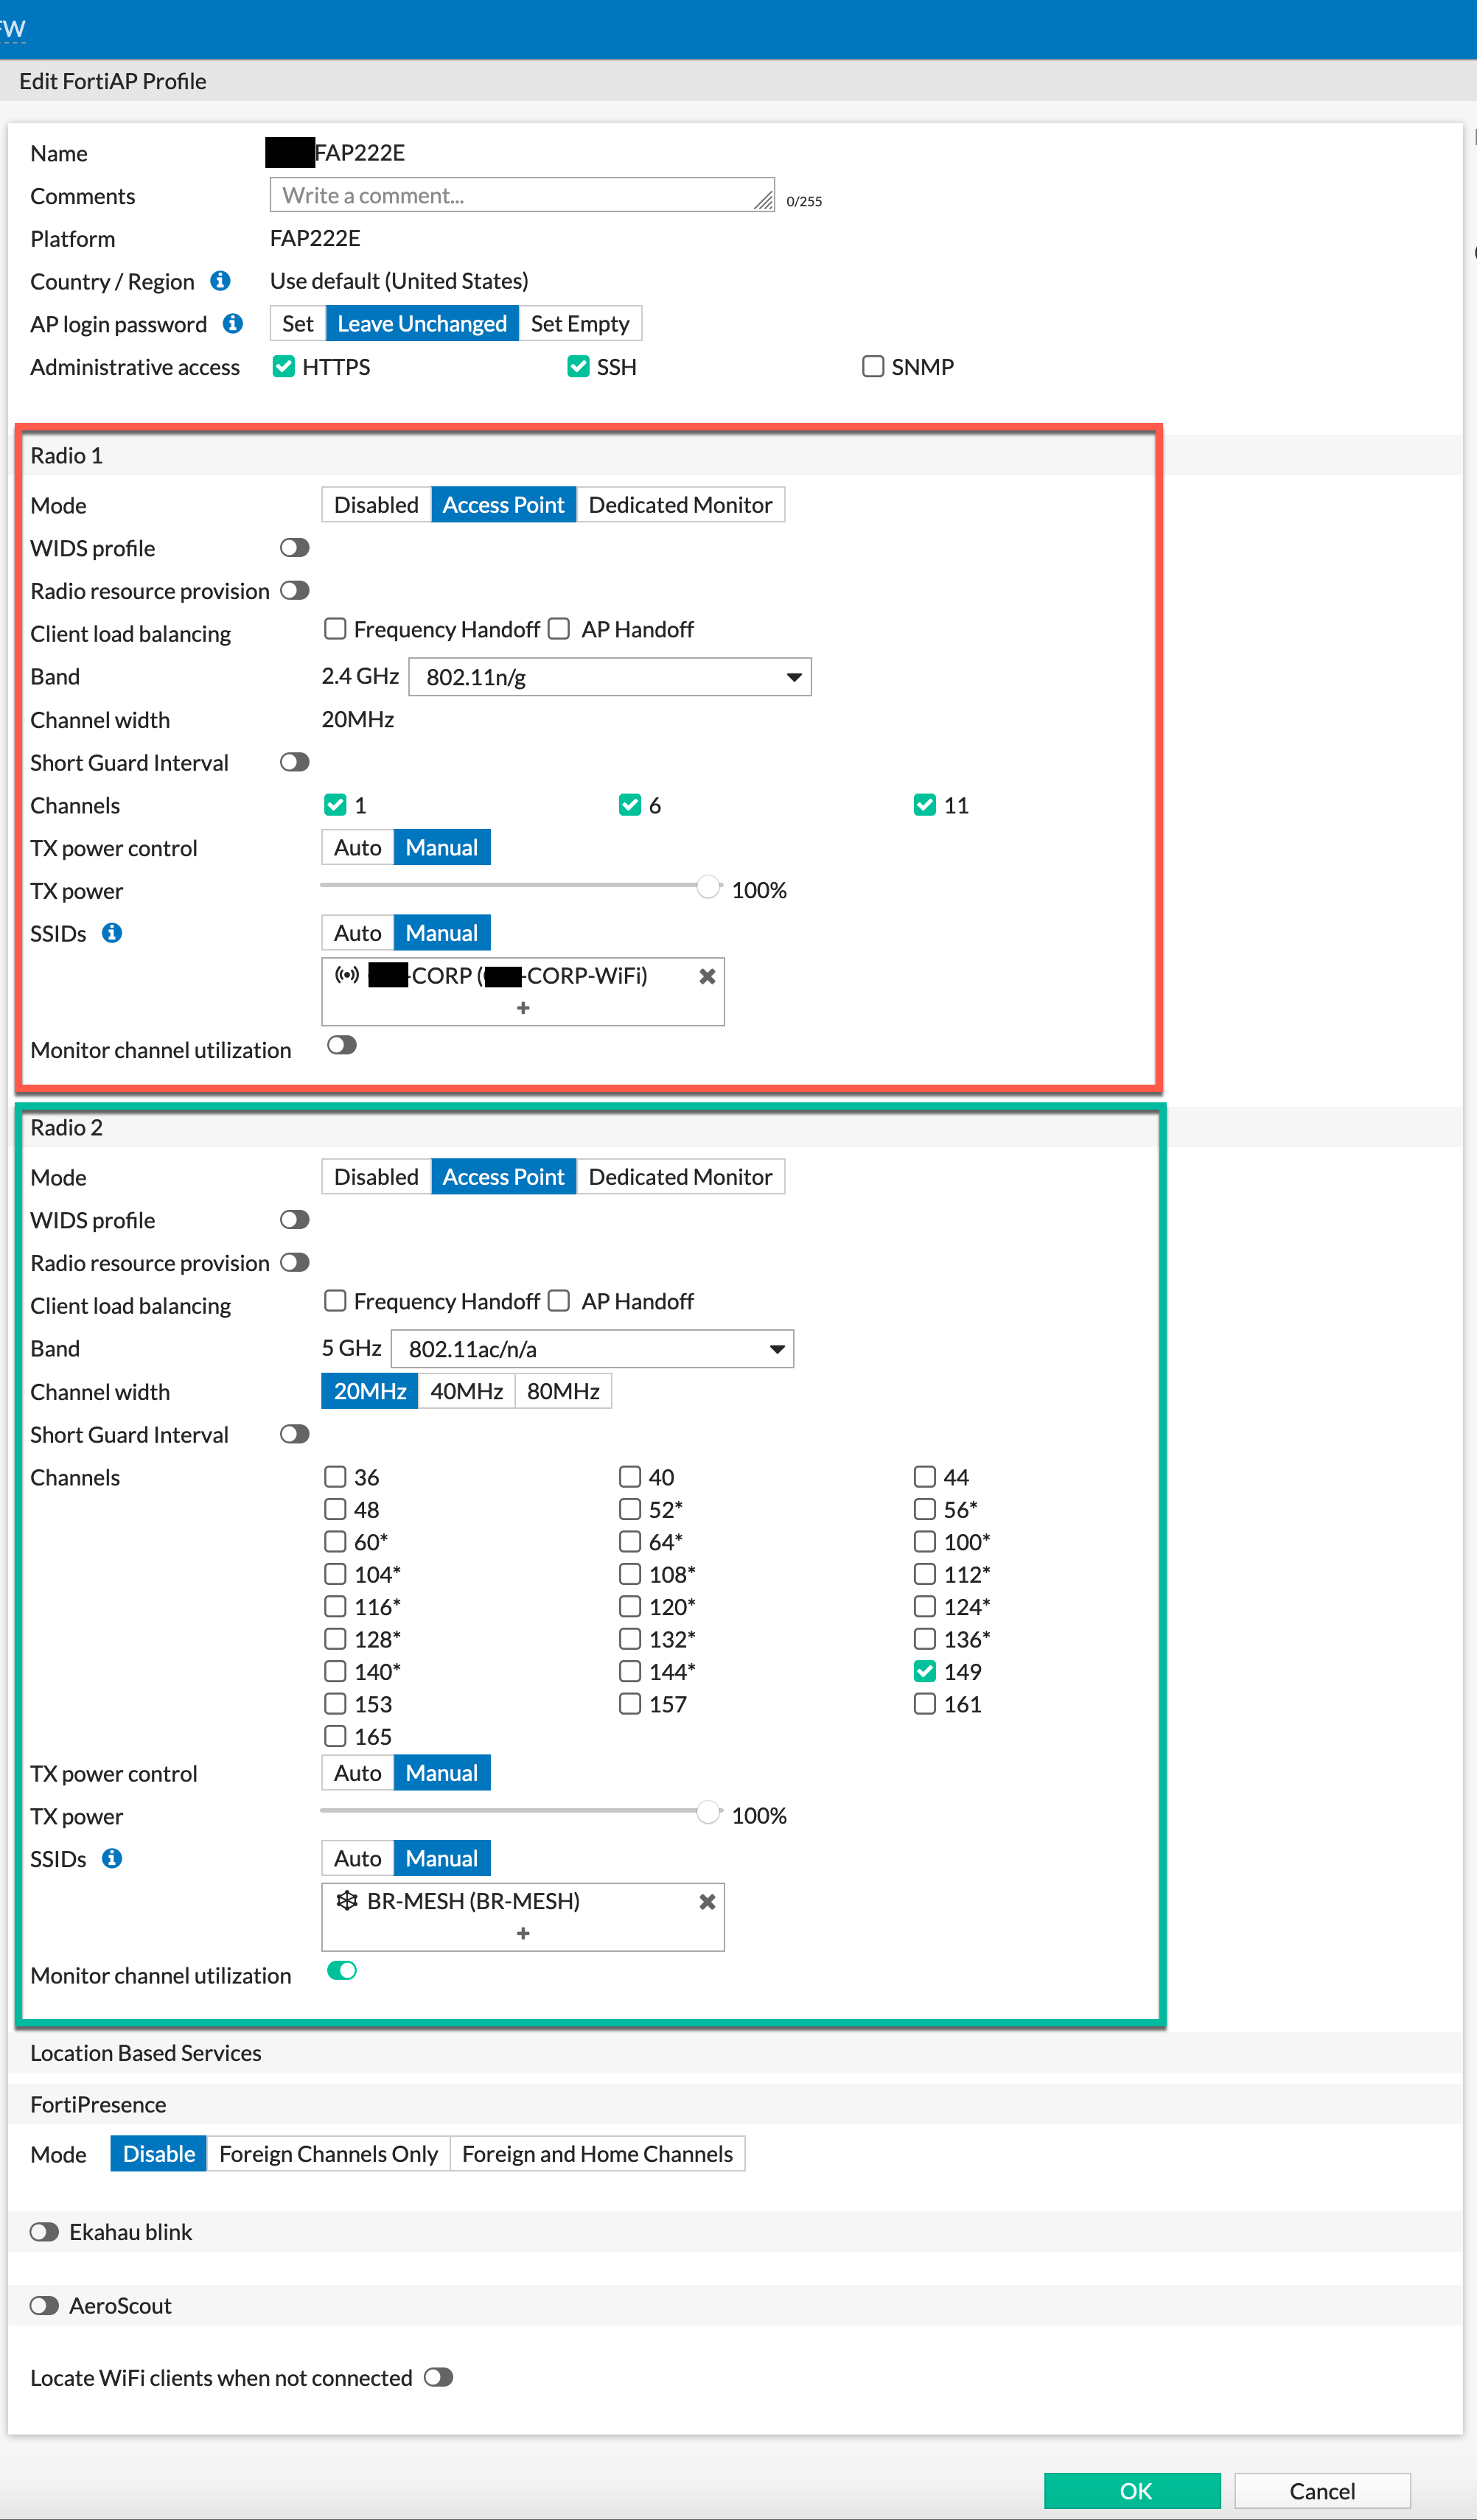
From the screenshot above, you can see the red square is the 2.4GHz radio and I have a standard tunneled SSID. It is ONLY advertising the CORP-WIFI SSID. Next, lets look at the 5GHz radio ( radio 2). Channel width is set to 20MHz, I chose only one Channel (149), and manually set the SSID to the BR-MESH SSID which as you can see is a meshed SSID.
Authorizing the Mesh Root AP
Creating the AP Management VLAN
The way I like to do this is to create a VLAN for the APs to connect. This VLAN does NOT have direct access out to the Internet or anywhere else. This prevents from someone disconnecting from the AP and plugging in and trying to connect to other segments or Internet. This configuration works on either a Fortiswitch (managed or un-managed through the Fortigate) or any other switch that support IEEE 802.1q (VLAN Trunks)
Authorizing the APs
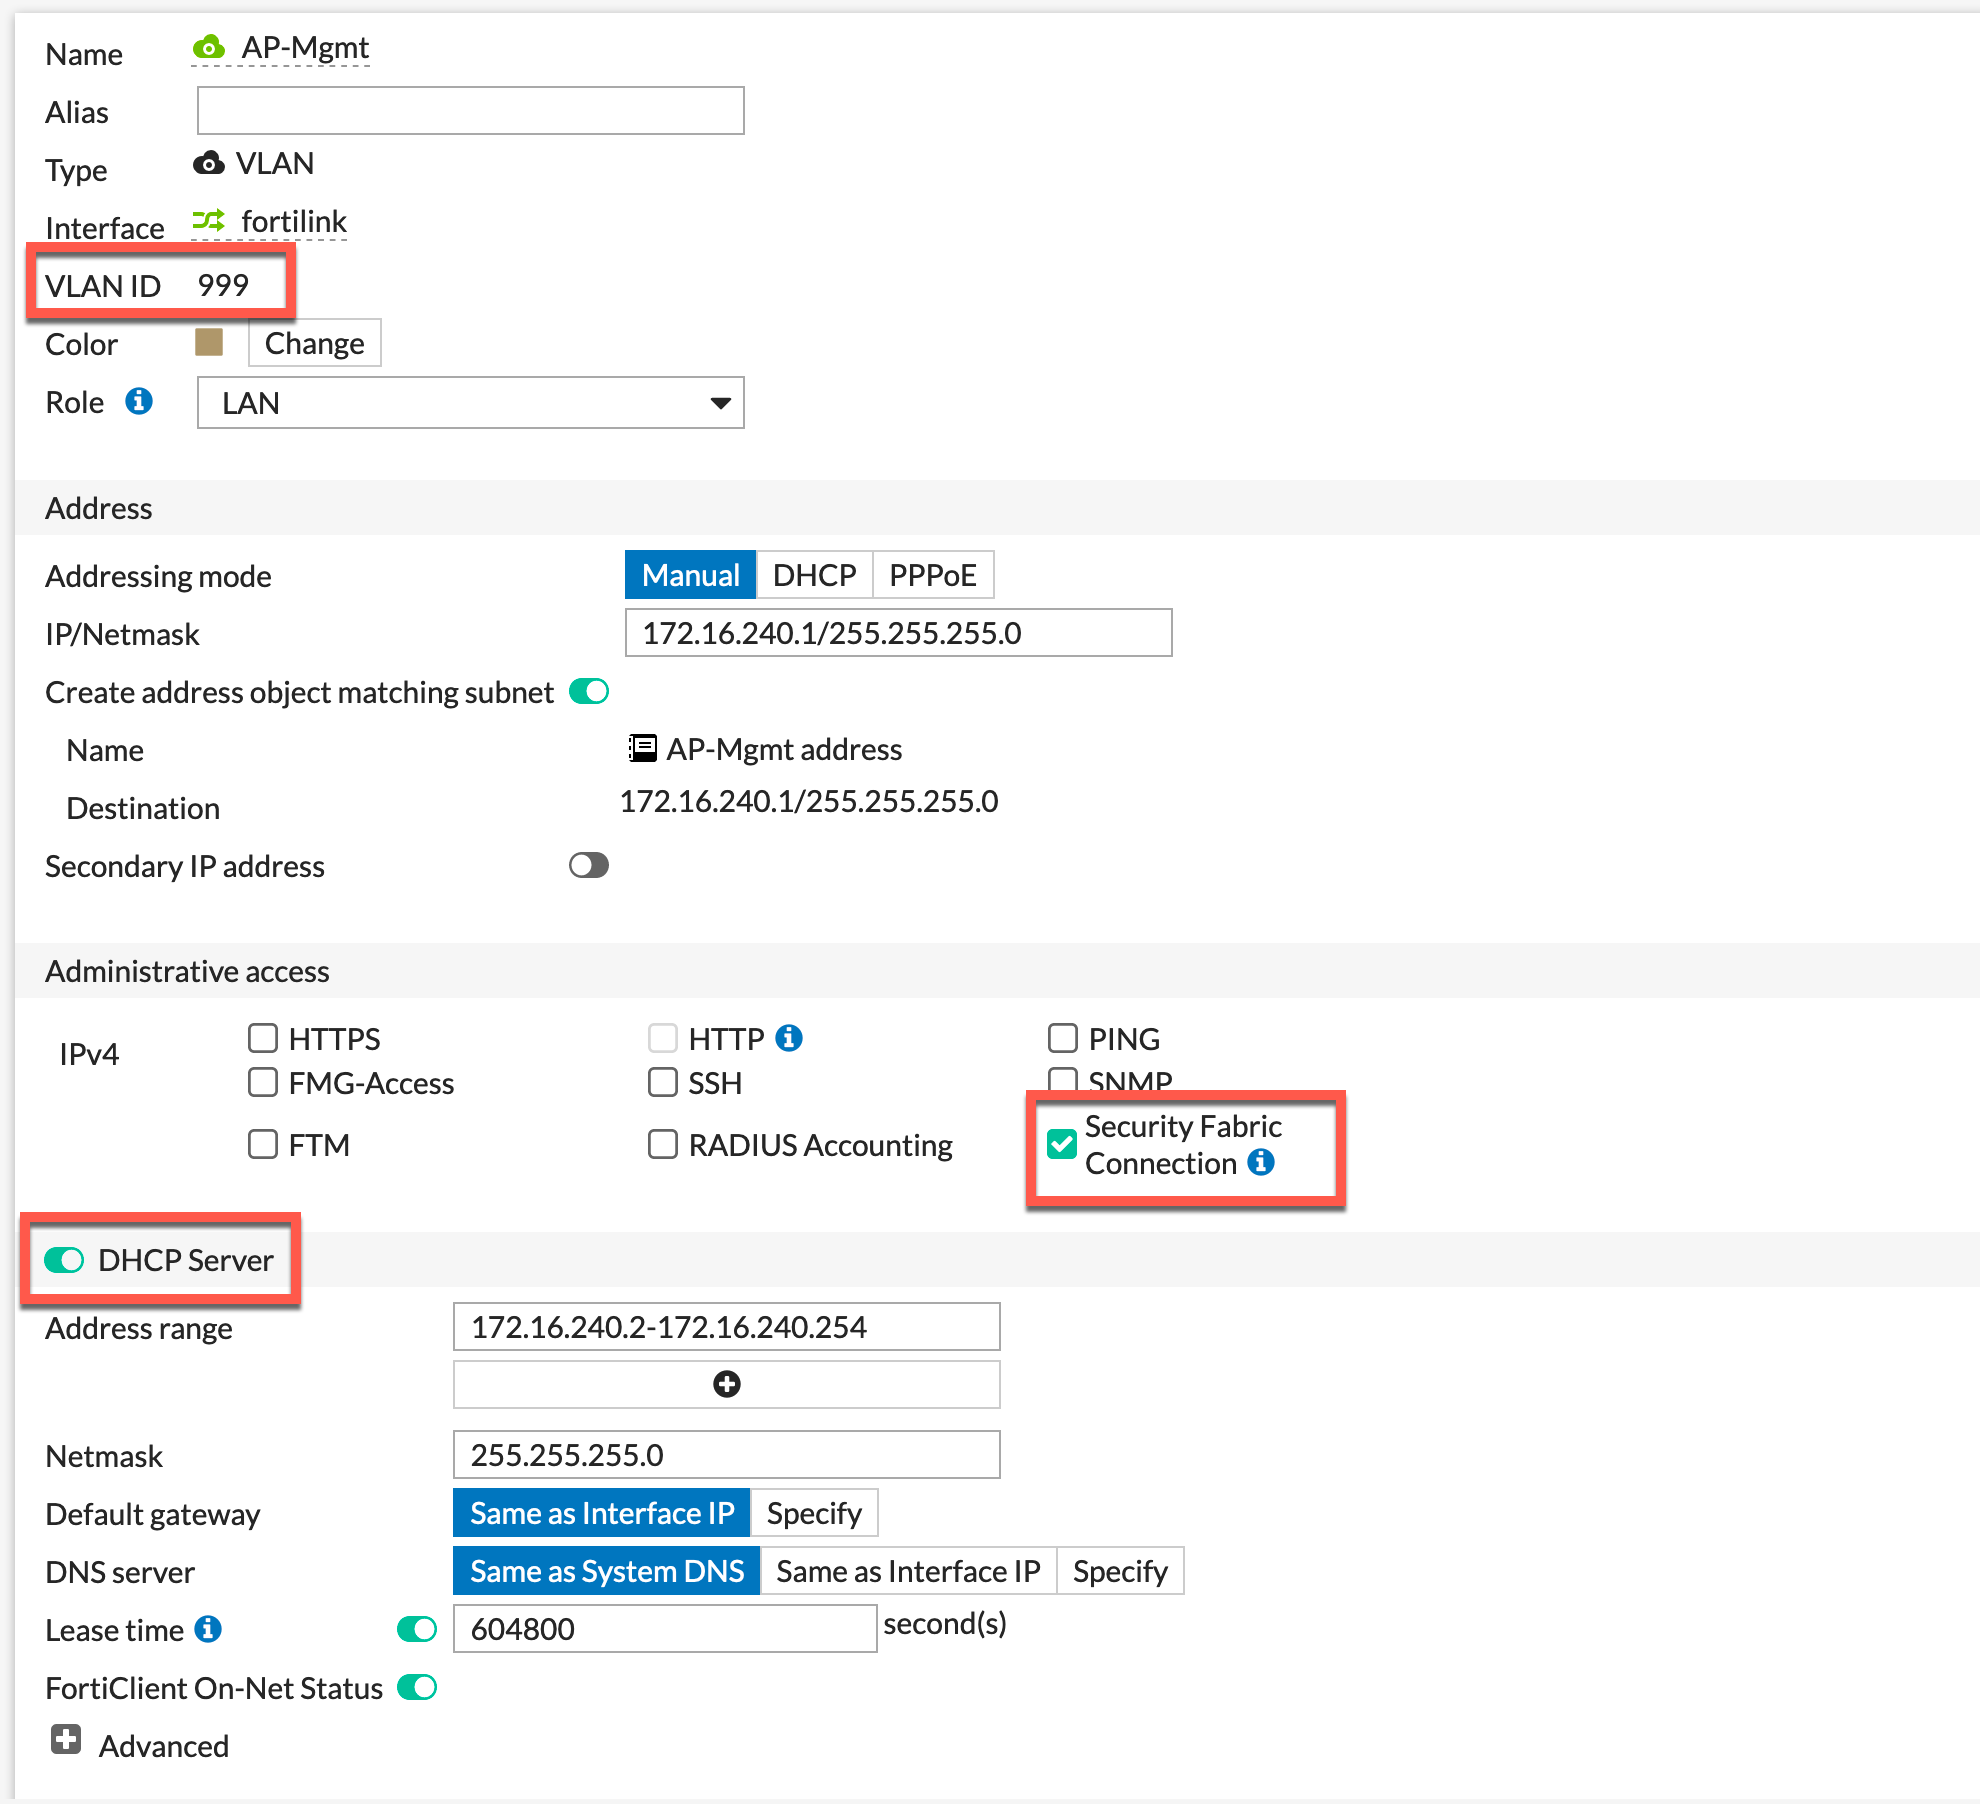
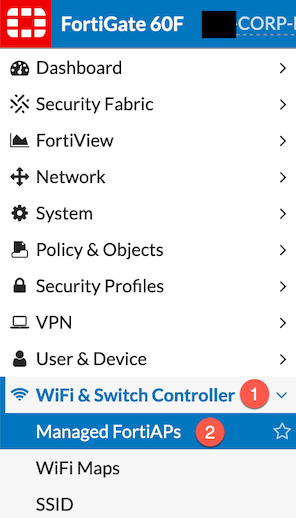
As you can see in the screenshot above, I have my VLAN999 created and have assigned an IP address, enabled the Security Fabric Connection on the Administrative Access section and finally configured DHCP. Once you configure VLAN 999 on whatever switch you are on, the AP should boot up, acquire an IP address on the 172.16.240.0/24 network. You will now need to go to WiFi & Switch Controller then Managed FortiAPs
You should have that AP sitting in a grayed out form. Right-Click on the grayed out AP and choose Authorize.
Assigning AP Profile
The AP will reboot and once it is stable on the network, right click and choose Assign Profile. Choose the modified profile we created above.
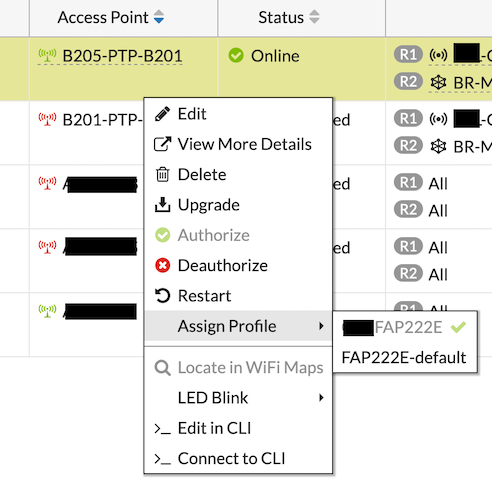
NOTE: Any subsequent changes you make to the profile that is assigned to any AP or group of APs will immediately be used. You do not need to re-apply the profile or restart the AP in most cases unless the changes require a reboot.
Authorizing the Mesh Leaf AP
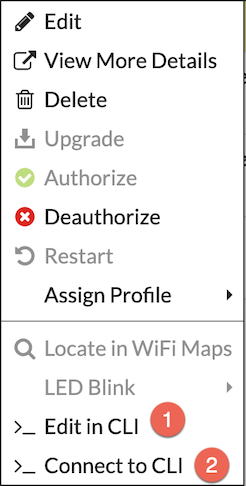
In my scenario, I plugged the Mesh Leaf AP into the root side of my network. I pushed the AP Profile down to it and authorized it. I then connected to the CLI. This is easier when it is on your network and managed by the Fortigate because you can right-click and choose Edit in CLI or Connect to CLI (make sure in the AP Profile section
Configuring Mesh on Leaf
Once you are on the CLI of the AP, you will need to run some commands on the LEAF AP(s). Yes you can have more than one Leaf.
cfg -a MESH_AP_TYPE=1
cfg -a MESH_AP_SSID=BR-MESH
cfg -a MESH_AP_PASSWD=0b6KISf6s3iS3dwRF3G27oSF7MAUQ4T57IhVvwsIuDH
cfg -a MESH_ETH_BRIDGE=1
cfg -a MESH_ETH_BRIDGE_VLANS=10,999,100,110
cfg -c
reboot
In my case VLAN 10 was for printers, VLAN 100 was for Data, VLAN 110 was for Voice and VLAN 999 was for the AP management (since we are going to be managing other APs on the right-side.
NOTE: Don’t make the same mistake I made thinking that type=1 was for Radio 1 and type=2 was for the Radio 2.
In my case, I put the bridged SSID information from above and the password I used in the GUI.
Note: This is a random password I used for this article. It is not used anywhere in the world 🙂 Just in case you are wondering.
FortiSwitch port Configuration
CORP-FW (port2) # get
port-name : port2
port-owner :
switch-id : S224DFTF<REMOVED>
speed : auto
status : up
poe-status : enable
poe-pre-standard-detection: enable
fortilink-port : 0
poe-capable : 1
stacking-port : 0
isl-local-trunk-name:
isl-peer-port-name :
isl-peer-device-name:
fgt-peer-port-name :
fgt-peer-device-name:
vlan : AP-Mgmt
allowed-vlans-all : enable
untagged-vlans : "qtn.fortilink"
type : physical
dhcp-snooping : trusted
dhcp-snoop-option82-trust: disable
arp-inspection-trust: untrusted
igmp-snooping : enable
igmps-flood-reports : disable
igmps-flood-traffic : disable
stp-state : enabled
stp-root-guard : disabled
stp-bpdu-guard : disabled
edge-port : enable
discard-mode : none
packet-sampler : disabled
sflow-counter-interval: 0
loop-guard : disabled
qos-policy : default
storm-control-policy: default
port-security-policy:
We want to make sure the port where the Mesh Root AP is plugged into, has the dhcp-snooping set to TRUSTED and the allowed-vlan-all set to enable. The other option is to specify the VLANs you want to pass to the remote right-side switch.

On a FortiSwitch, you can validate the ALL VLANs by either the cli output or in the GUI.
Stand Alone FortiSwitch
I am going to work on a separate lab where I tunnel VLAN 4096 to see if I can get the FortiSwitch to be managed with FortiLink. However here is my stand-alone switch configuration.
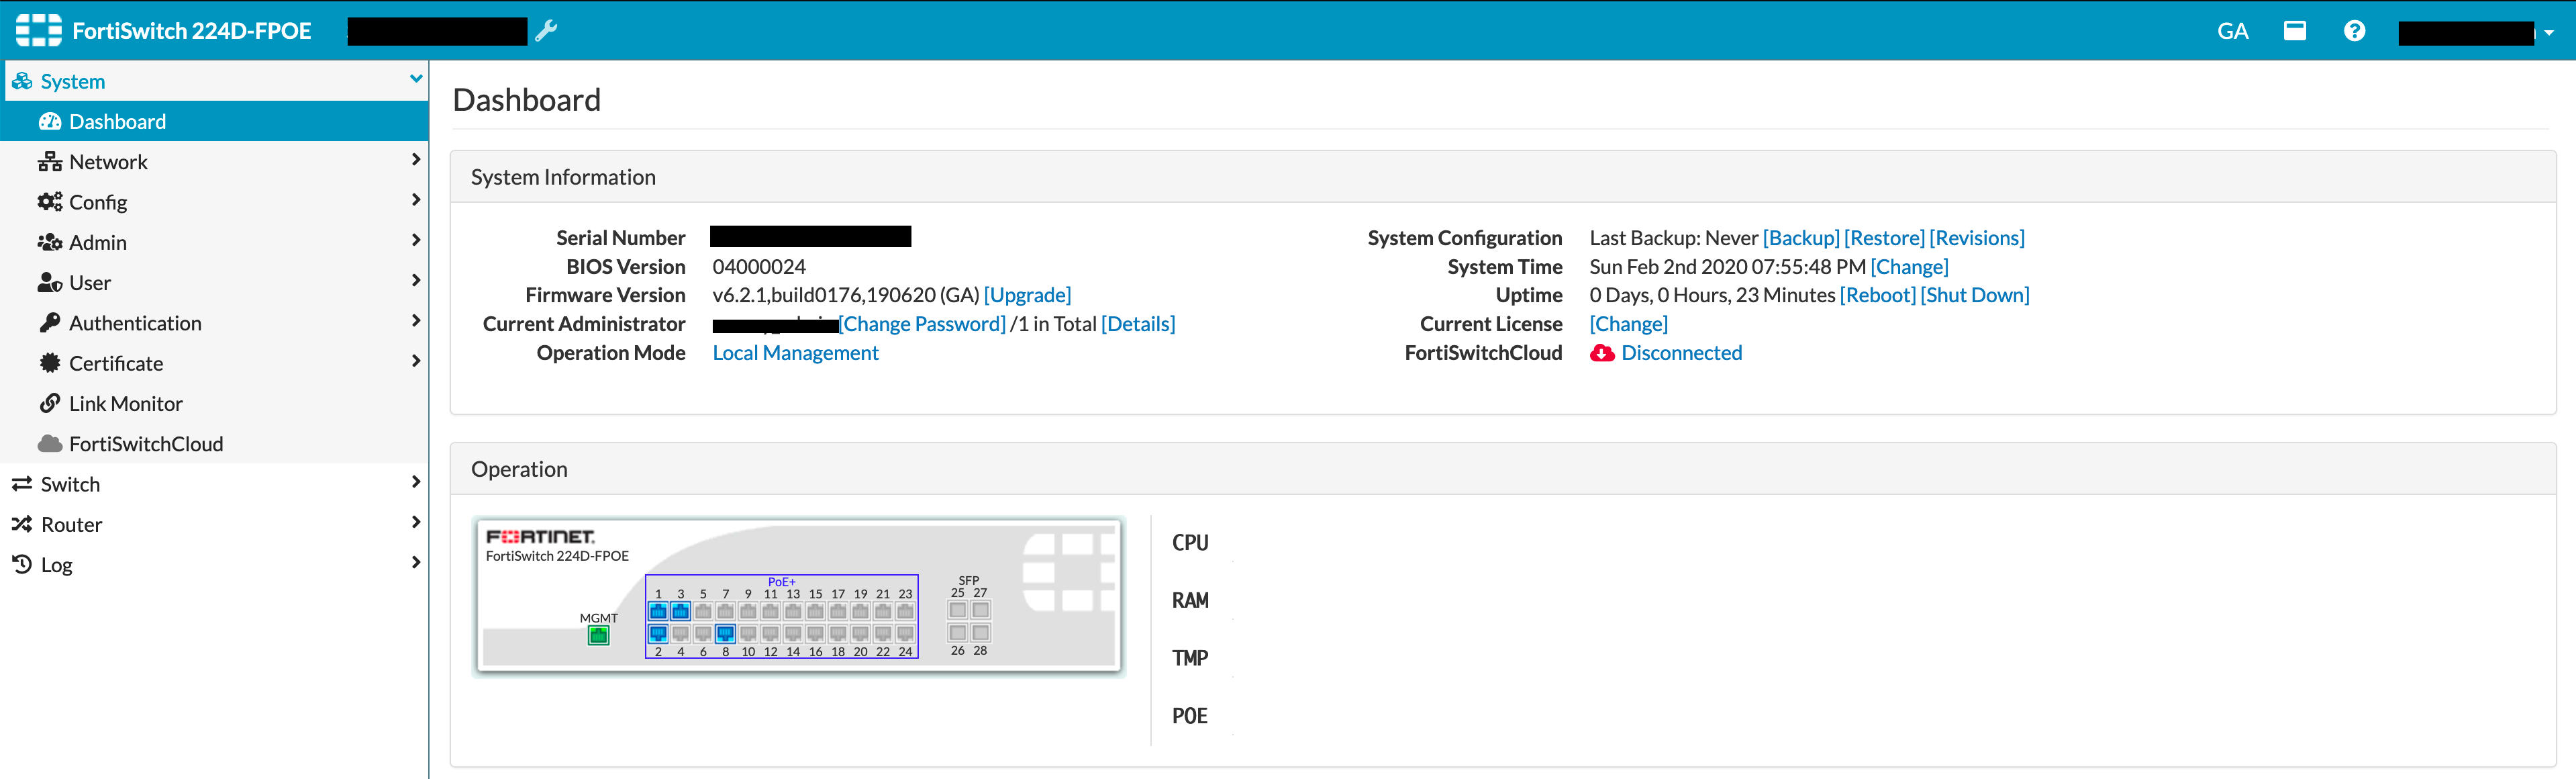
In my scenario, I was unable to manage the Fortiswitch on the right-side over FortiLink, however after finding this workaround due to customer timeframe and having to get this operational, I thought about the VLAN 4096 being used for Fortilink.
LLDP Med Profile
On my Stand-Alone switch, I created an LLDP-MED Profile to handle phones.
config switch lldp profile
       edit "Voice"
                     config med-location-service
                            edit "coordinates"
                      next
                            edit "address-civic"
                       next
                            edit "elin-number"
                       next
                     end
                    config med-network-policy
                          edit "voice"
                                 set dscp 46
                                 set status enable
                                 set vlan 110
                          next
                        end
          set med-tlvs inventory-management network-policy location-identification
          next
     end
Next we will configure the VLANs to be used on my ports
config switch vlan
    edit 999
    next
    edit 100
    next
    edit 110
    next
    edit 10
    next
end
Remember my VLANs are as such:
- VLAN 10 – Printers
- VLAN 100 – Data (PCs)
- VLAN 110 – Voice
- VLAN 999 – AP Management
Next we will configure the interface configuration
config switch interface
        edit "port1"
               set allowed-vlans 10,100,110,999
               set dhcp-snooping trusted
              set snmp-index 1
        next
        edit "port2"
                set snmp-index 2
         next
        edit "port3"
               set snmp-index 3
         next
         edit "port4"
             set snmp-index 4
        next
You will remember that my port1 is for the Bridge AP and port2-4 will be for standard APs. Notice they do not have a VLAN associated with them. This is because the native vlan is in fact vlan 999.
Next we are going to configure the internal interface which is on VLAN 999. We set it up for DHCP and then created a reservation.
config system interface
         edit "internal"
                set mode dhcp
                set allowaccess ping https http ssh
                set type physical
                set snmp-index 30
         next
end
To look at the GUI configuration for LLDP on a port, lets look at port5 , we can see that port5 has LLDP-MED as Voice which corresponds to the CLI output.
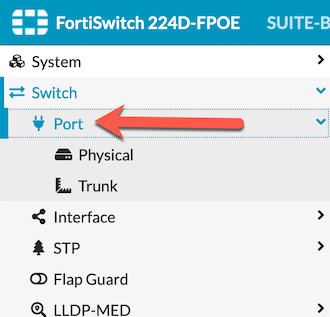
As you can see above, this is accessible via Switch then Port.

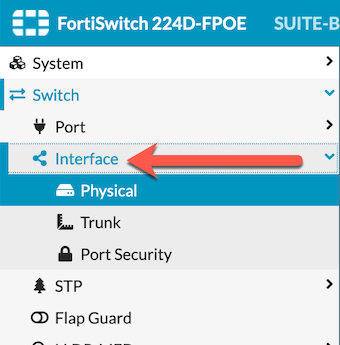
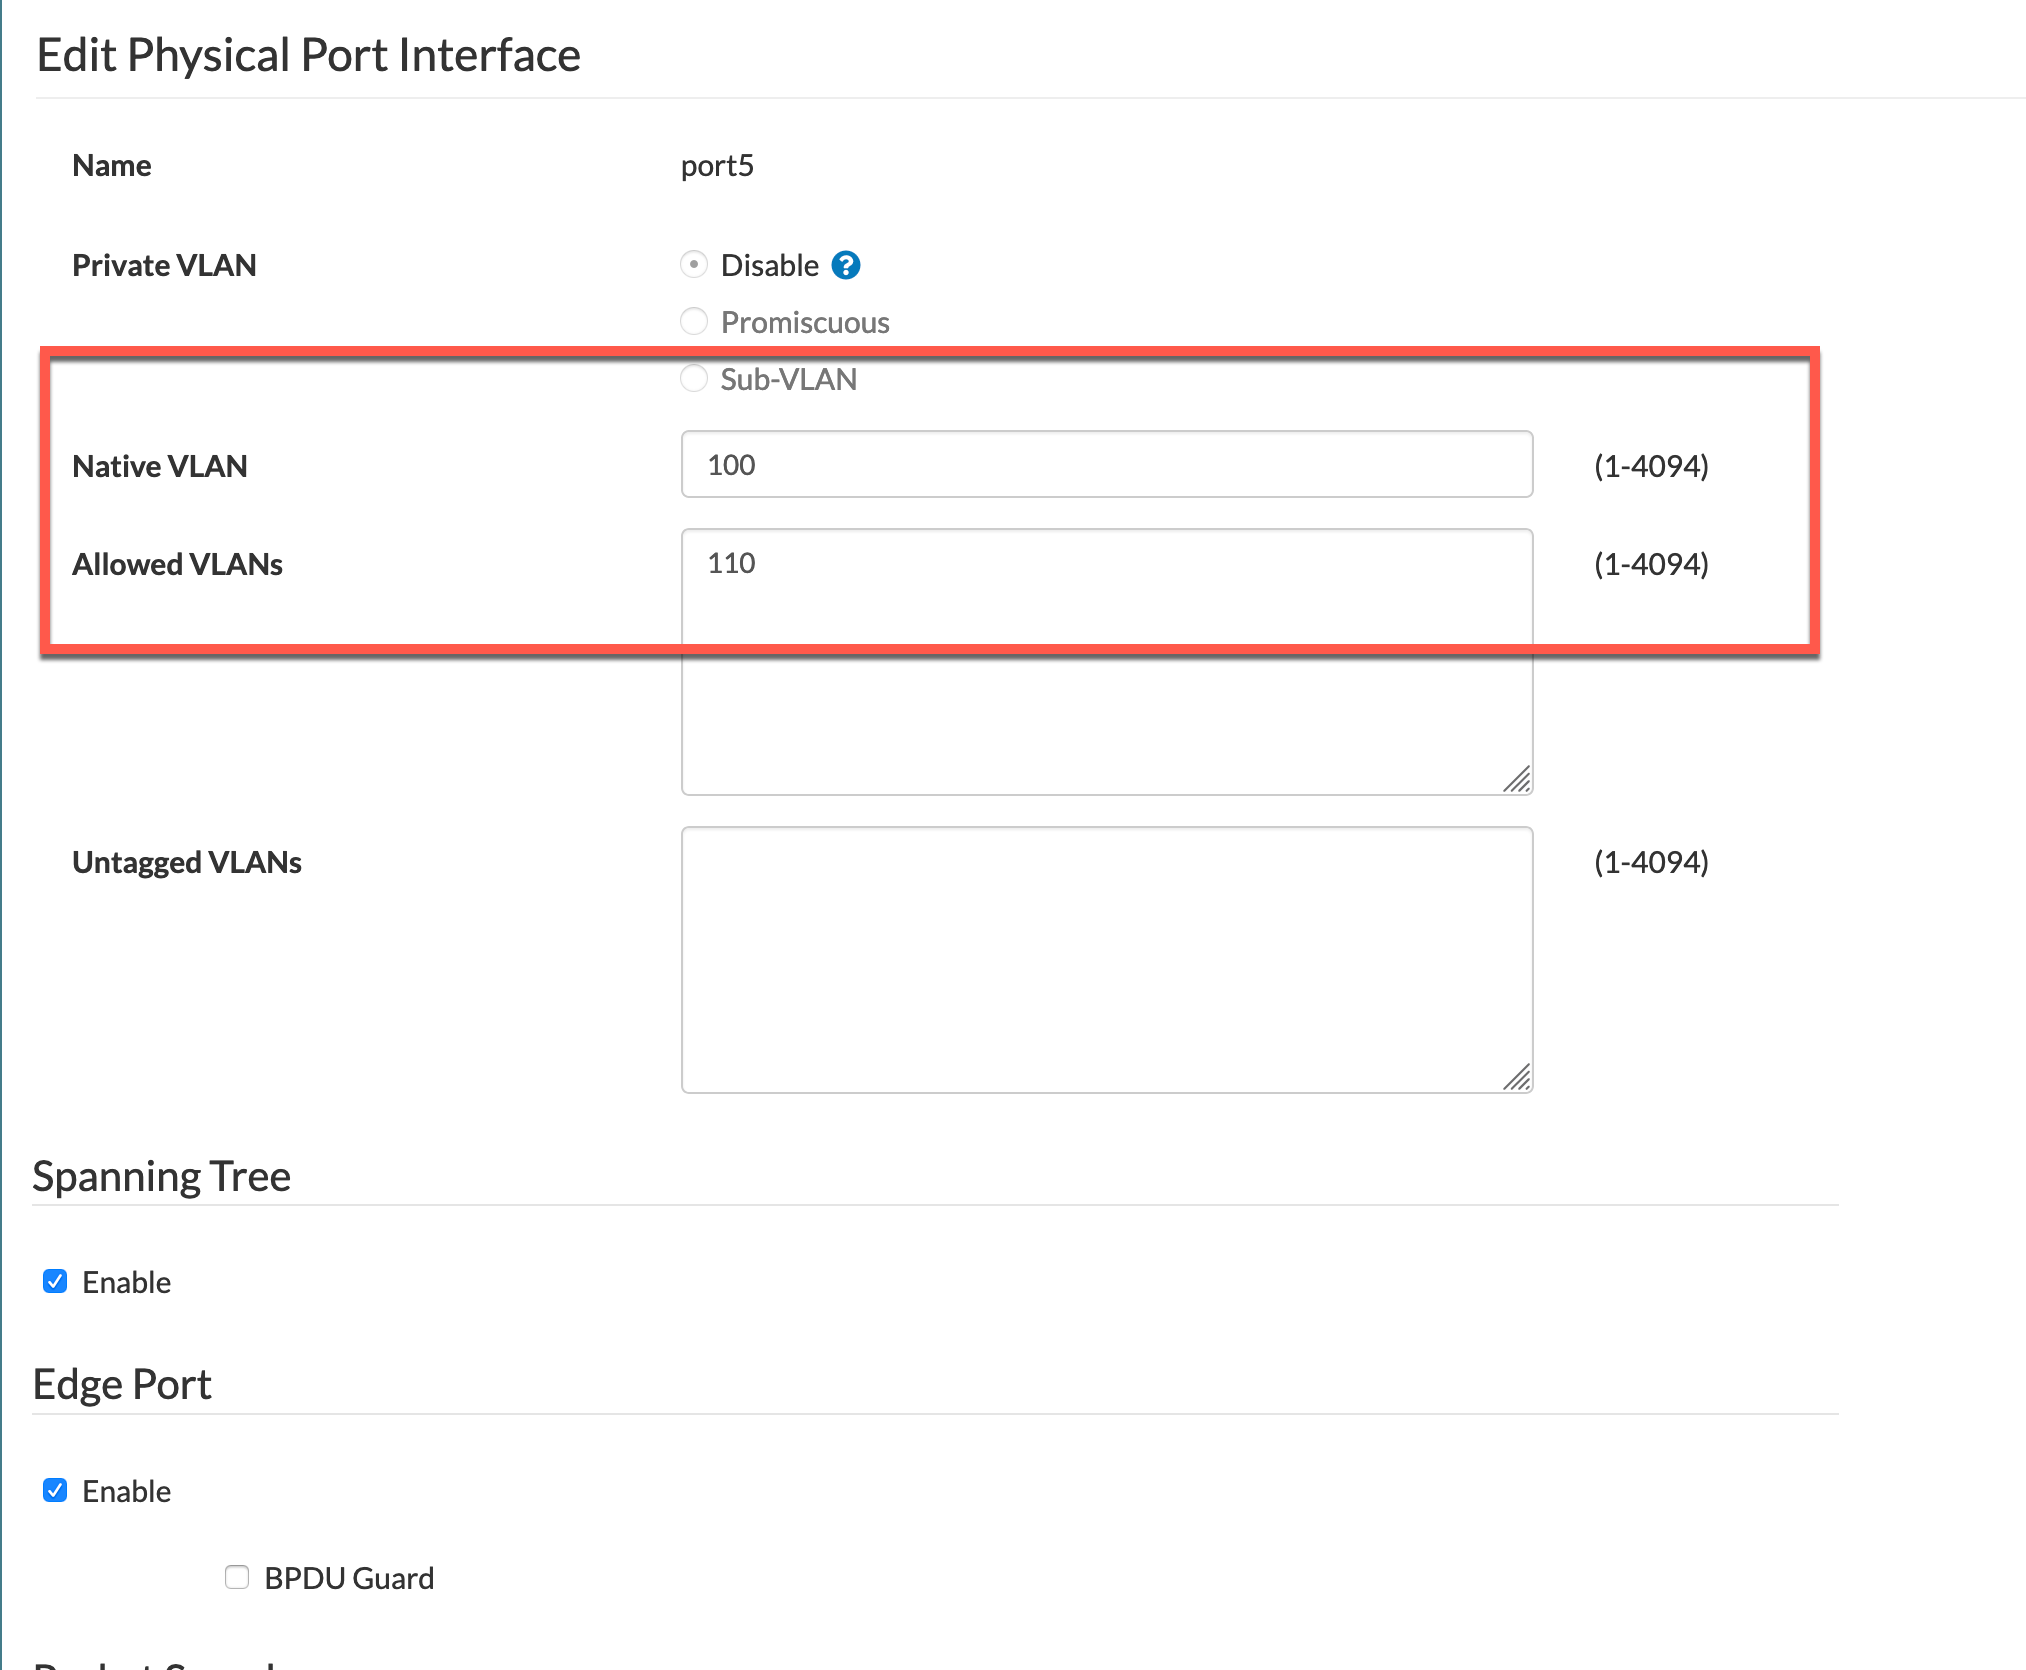
Next we will look at the VLAN configuration of the same port. For this one, you can go to Switch then Interface
How LLDP will Show MAC addresses on a switch
Remember folks, when a phone boots up, it does not know that it needs to tag its voice packets, so you will see the phones MAC address obtain an IP address on NATIVE VLAN, however once the switch see that it is a phone, the phone will reconfigure itself on the proper Voice VLAN (configured in the LLDP-MED configuration). So be careful trying to lock down the port to 2 MAC addresses thinking you will have the phone and the PC. You will actually have 3 MAC address; the phone on Native VLAN and the same MAC on the Voice VLAN, finally the PC on the Native VLAN.
Recent posts
-

-

DNS is one of those technologies that quietly underpins... Full Story
-

BGP issues on FortiGate firewalls usually trace back to... Full Story
-

Every time your laptop talks to your router, a... Full Story
-

If you've spent any time configuring NAT on a... Full Story
-

If you have spent any time configuring firewall policies... Full Story
-

High availability on FortiGate is one of those features... Full Story
-

If you've configured SD-WAN on a FortiGate, you've almost... Full Story
-

FortiLink is the management protocol that turns a FortiSwitch... Full Story
-

FortiSwitches are pretty rock solid from Mean Time Between... Full Story
-

This is a quicky tip. Have you ever gone... Full Story
-

DNS is one of those quiet pieces of internet... Full Story
-

This article is an updated version of the previous... Full Story
-

You will add ns2 as a secondary (slave) BIND9... Full Story
-

In the process of deploying my lab, I needed... Full Story
-

RFC 8805, used to be known as Self-Correcting IP... Full Story
-

Years back, I wrote an article about certificate pinning. ... Full Story
-

FortiGates have the ability to send alerts to Microsoft... Full Story
-

In this post, I am going to walk through... Full Story
-

Troubleshooting VoIP on a FortiGate can feel like trying... Full Story
-

Prior to FortiOS 7.0, there were three commands to... Full Story
-

In this post, I am going to go over... Full Story
-

What we are going to do: We are going... Full Story
-

Choosing between FGCP (FortiGate Clustering Protocol) and FGSP (FortiGate... Full Story
-

Creating a VLAN on macOS (The "Pro" Move) A... Full Story
-

This blog post explores the logic behind how macOS... Full Story
-

Pretty Fly for a Wi-Fi Tell My Wi-Fi Love... Full Story
-

Part of my daily gig is creating BoMs (Bill-of-Materials)... Full Story
-

ICMP introduces several security risks, but careful filtering, rate... Full Story
-

The command diag debug application dhcps -1 enables full... Full Story
-

In the world of FortiOS, execute tac report is... Full Story
-

LLDP; What is it The Link Layer Discovery Protocol... Full Story
-

What it actually does When you run diagnose fdsm... Full Story
-

Monkey Bites are bite-sized, high-impact security insights designed for... Full Story
-

I have run macOS in macOS with Parallels but... Full Story
-

Don't be confused with my other FortiNAC posts where... Full Story
-

This is the third session in a multi-part article... Full Story
-

Today I was configuring key-based authentication on a FortiGate... Full Story
-

Netcat, often called the "Swiss Army knife" of networking,... Full Story
-

At its core, IEEE 802.1X is a network layer... Full Story
-

In case you did not see the previous FortiNAC... Full Story
-

This is our 5th session where we are going... Full Story
-

Now that we have Wireshark installed and somewhat configured,... Full Story
-

The Philosophy of Packet Analysis Troubleshooting isn't about looking... Full Story
-

Do you use Sequence Groups In your Firewall Policies? ... Full Story
-

The other day, I opened my Wireshark for macOS... Full Story
-

1. Executive Summary Objective This guide walks through the... Full Story