Have you ever ordered a bunch of Fortinet gear... Full Story
By Manny Fernandez
March 13, 2021

DNSTracer and Dig for Troubleshooting DNS problems
When troubleshooting DNS issues, DNSTracer is a utility to visualize the patch taken by your DNS query. As most of my readers should know, DNS converts names to IP addresses. This is similar to the vanity numbers in the phone world like 1-800-Flowers . This is easier to remember than 1-800-356-8377. Thus, the creation of the DNS system in 1983 by Paul Mockapetris.
Important Terms
Some terms used in the DNS World
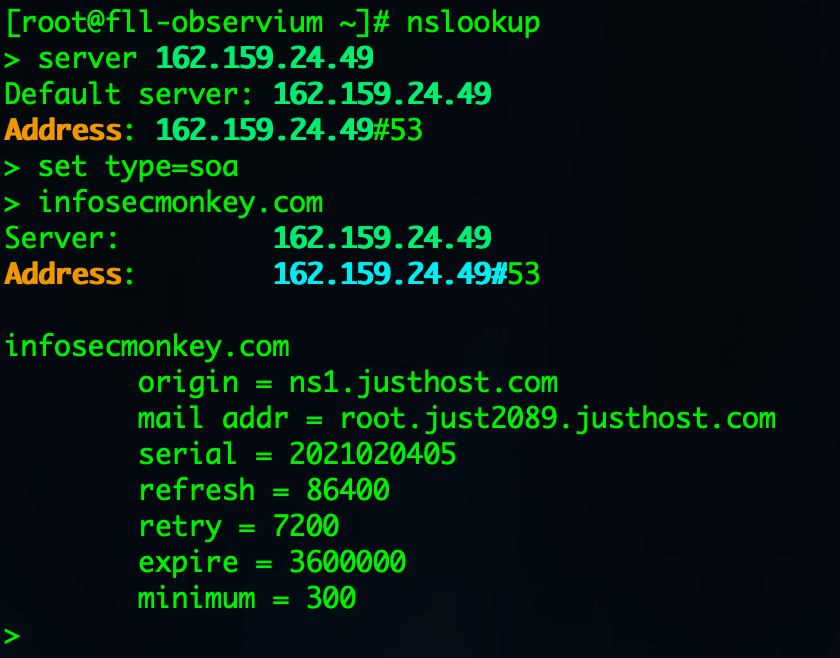
SOA – Start of Authority – This record appears at the beginning of a DNS zone file, and indicates the Authoritative Name Server for the current DNS zone, contact details for the domain administrator, domain serial number, and information on how frequently DNS information for this zone should be refreshed.
- Primary name server for the domain, in my case, ns1.justhost.com.
- The responsible party for the domain (root.just2089.justhost.com).
- A timestamp that changes whenever you update your domain (2021020405)
- The number of seconds before the zone should be refreshed. (1,000 hours)
- The number of seconds before a failed refresh should be retried. (24 Hours)
- The upper limit in seconds before a zone is considered no longer authoritative.(2 Hours)
- The negative result TTL (for example, how long a resolver should consider a negative result for a subdomain to be valid before retrying). (5M)
RNAME
Email address of the administrator responsible for this zone. (As usual, the email address is encoded as a name. The part of the email address before the @ becomes the first label of the name; the domain name after the @ becomes the rest of the name. In zone-file format, dots in labels are escaped with backslashes; thus the email address [email protected] would be represented in a zone file as john\.doe.example.com.)

SERIAL
Serial number for this zone. If a secondary name server slaved to this one observes an increase in this number, the slave will assume that the zone has been updated and initiate a zone transfer.

REFRESH
number of seconds after which secondary name servers should query the master for the SOA record, to detect zone changes. Recommendation for small and stable zones:[4] 86400 seconds (24 hours).

RETRY
number of seconds after which secondary name servers should retry to request the serial number from the master if the master does not respond. It must be less than Refresh. Recommendation for small and stable zones:[4] 7200 seconds (2 hours).

EXPIRE
number of seconds after which secondary name servers should stop answering request for this zone if the master does not respond. This value must be bigger than the sum of Refresh and Retry. Recommendation for small and stable zones:[4] 3600000 seconds (1000 hours).

TTL, a.k.a. MINIMUM
Time to live for purposes of negative caching. Recommendation for small and stable zones:[4] 3600 seconds (1 hour). Originally this field had the meaning of a minimum TTL value for resource records in this zone; it was changed to its current meaning by RFC 2308.[5]
Record Types
A Record - Address Mapping record. Also known as a DNS host record, stores a hostname and its corresponding IPv4 address.

CNAME Record - Canonical Name record - Can be used to alias a hostname to another hostname. When a DNS client requests a record that contains a CNAME, which points to another hostname, the DNS resolution process is repeated with the new hostname.

MX Record - Mail exchanger record - Specifies an SMTP email server for the domain, used to route outgoing emails to an email server.

NS Record - Name Server records  - Specifies that a DNS Zone, such as “infosecmonkey.com” is delegated to a specific Authoritative Name Server, and provides the address of the name server.

PTR Record - Reverse-lookup Pointer records  - Allows a DNS resolver to provide an IP address and receive a hostname (reverse DNS lookup).

CERT Record - Certificate record - Stores encryption certificates—PKIX, SPKI, PGP, and so on.

SRV Record - Service Location - A service location record, like MX but for other communication protocols.

TXT Record - Text Record - Typically carries machine-readable data such as opportunistic encryption, sender policy framework, DKIM, DMARC, etc.  This is sometimes used to prove ownership of a domain as well.
DNSTracer
To install it on macOS, you will need homebrew or macports. At least these are the two I have used. There are othersolutions out there. However in homebrew, you can issue the following command:
brew install dnstracer

Once installed you reference the man page by issuing the following command man dnstracer. To get out of the man page, simply type q.
DNSTRACER(8) General Commands Manual DNSTRACER(8)

NAME
dnstracer - trace a chain of DNS servers to the source

SYNOPSIS
dnstracer [options] name

DESCRIPTION
dnstracer determines where a given Domain Name Server (DNS) gets its
information from, and follows the chain of DNS servers back to the
servers which know the data.

Options are:

-c Disable local caching.

-C Enable negative caching.

-o Enable overview of received answers at the end.

-q queryclass
Change the query-class, default is A. You can either specify a
number of the type (if you're brave) or one of the following
strings: a, aaaa, a6, soa, cname, hinfo, mx, ns, txt and ptr.

-r retries
Number of retries for DNS requests, default 3.

-s server
DNS server to use for the initial request, default is aquired
from the system. If a dot is specified (.), A.ROOT-SERVERS.NET
will be used.

-v Be verbose on what sent or received.

:
DNSTRACER(8) General Commands Manual DNSTRACER(8)
Excerpt from the man page
First lets take a look the NS records for ford.com
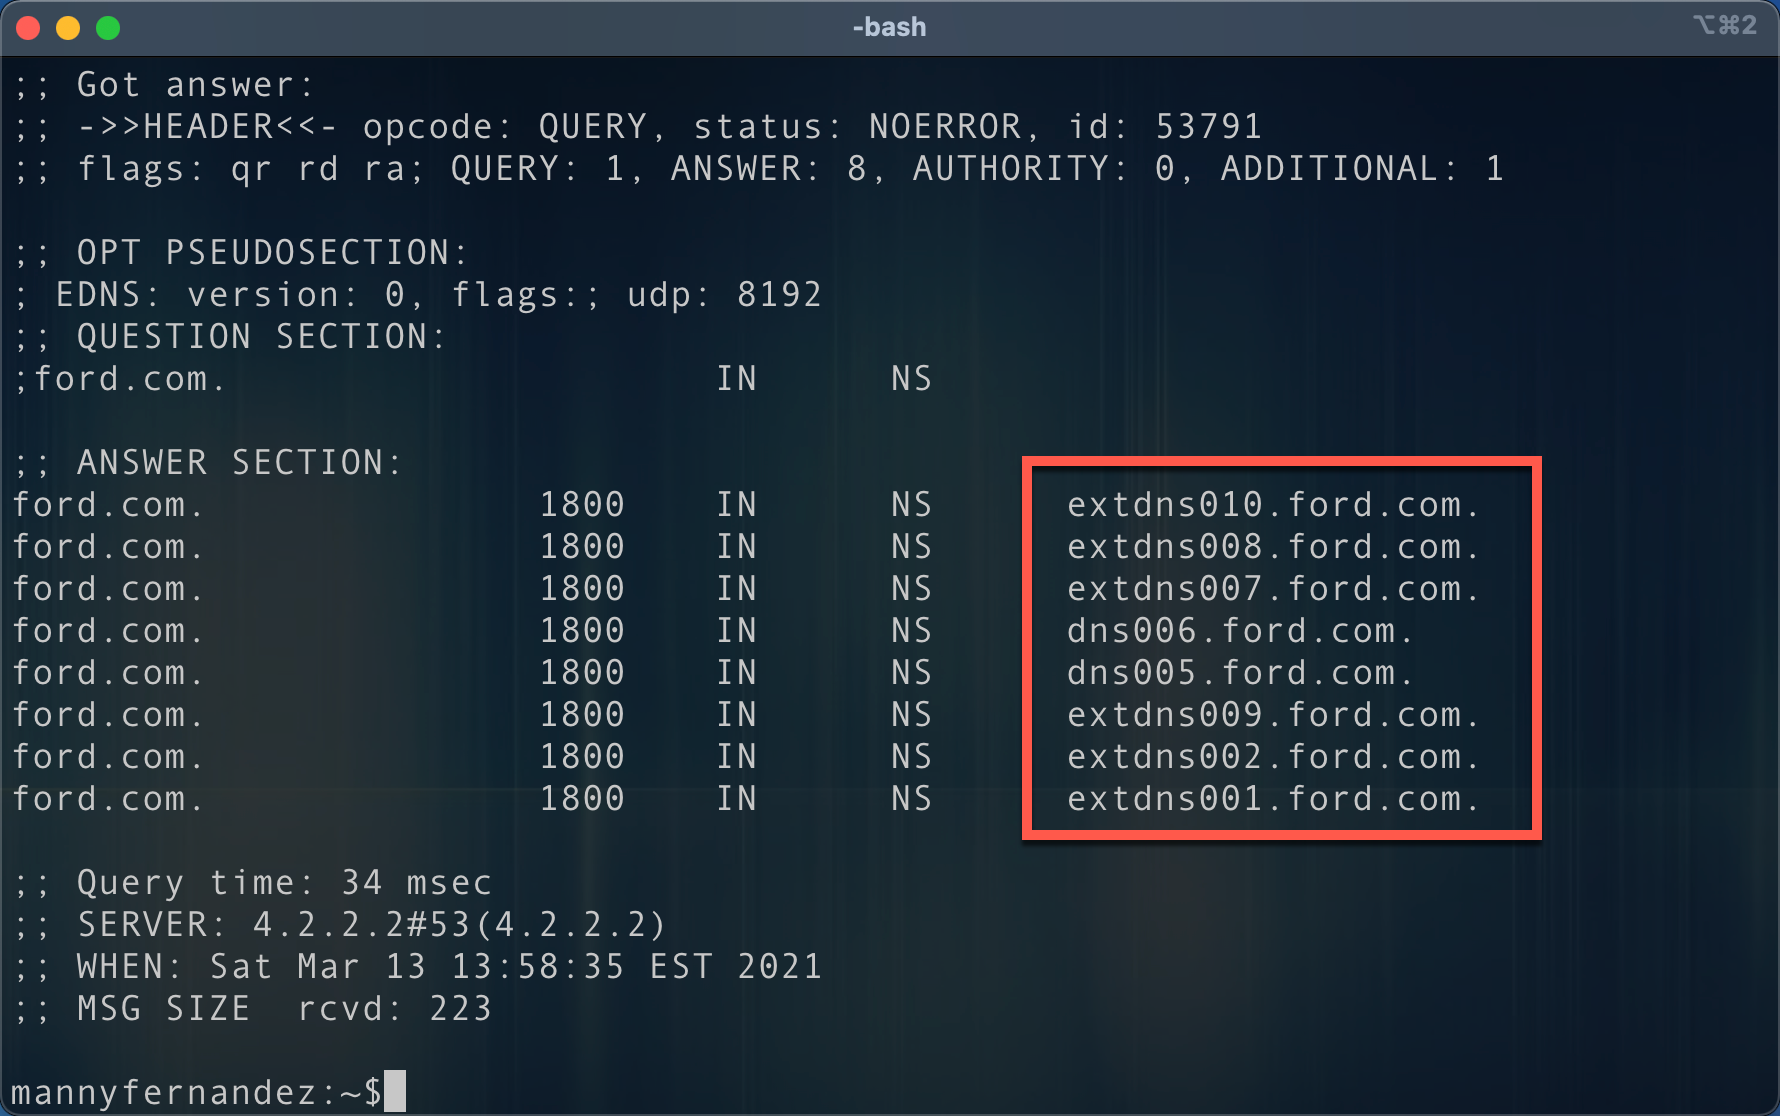
We can see quite a bit of NS servers for ford.com. Now lets run dnstrace
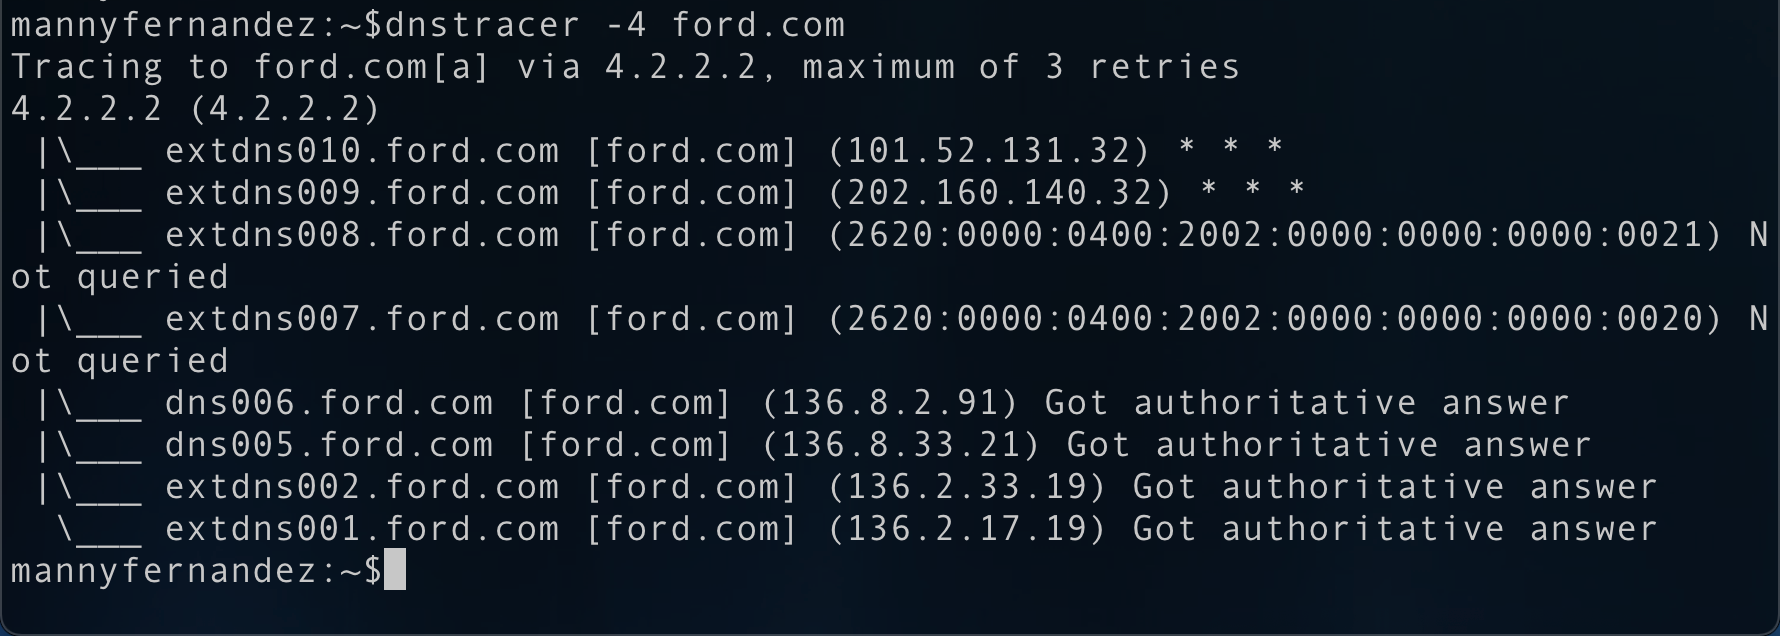
We can see that 4.2.2.2, the DNS resolver I am using on my laptop. The first two DNS servers did not respond to the query, the next two were skipped because I used the -4 which states that it will only do IPv4. We finally see the DNS servers that are responding with SOA.
DIG
Another tool I use almost daily is dig. Dig should have come by default on macOS and Linux. If you are in Windows….. you will need to install an application to use dig. Dig is fast and very useful. You can easily do a reverse lookup of an IP address by using a -x as an option.
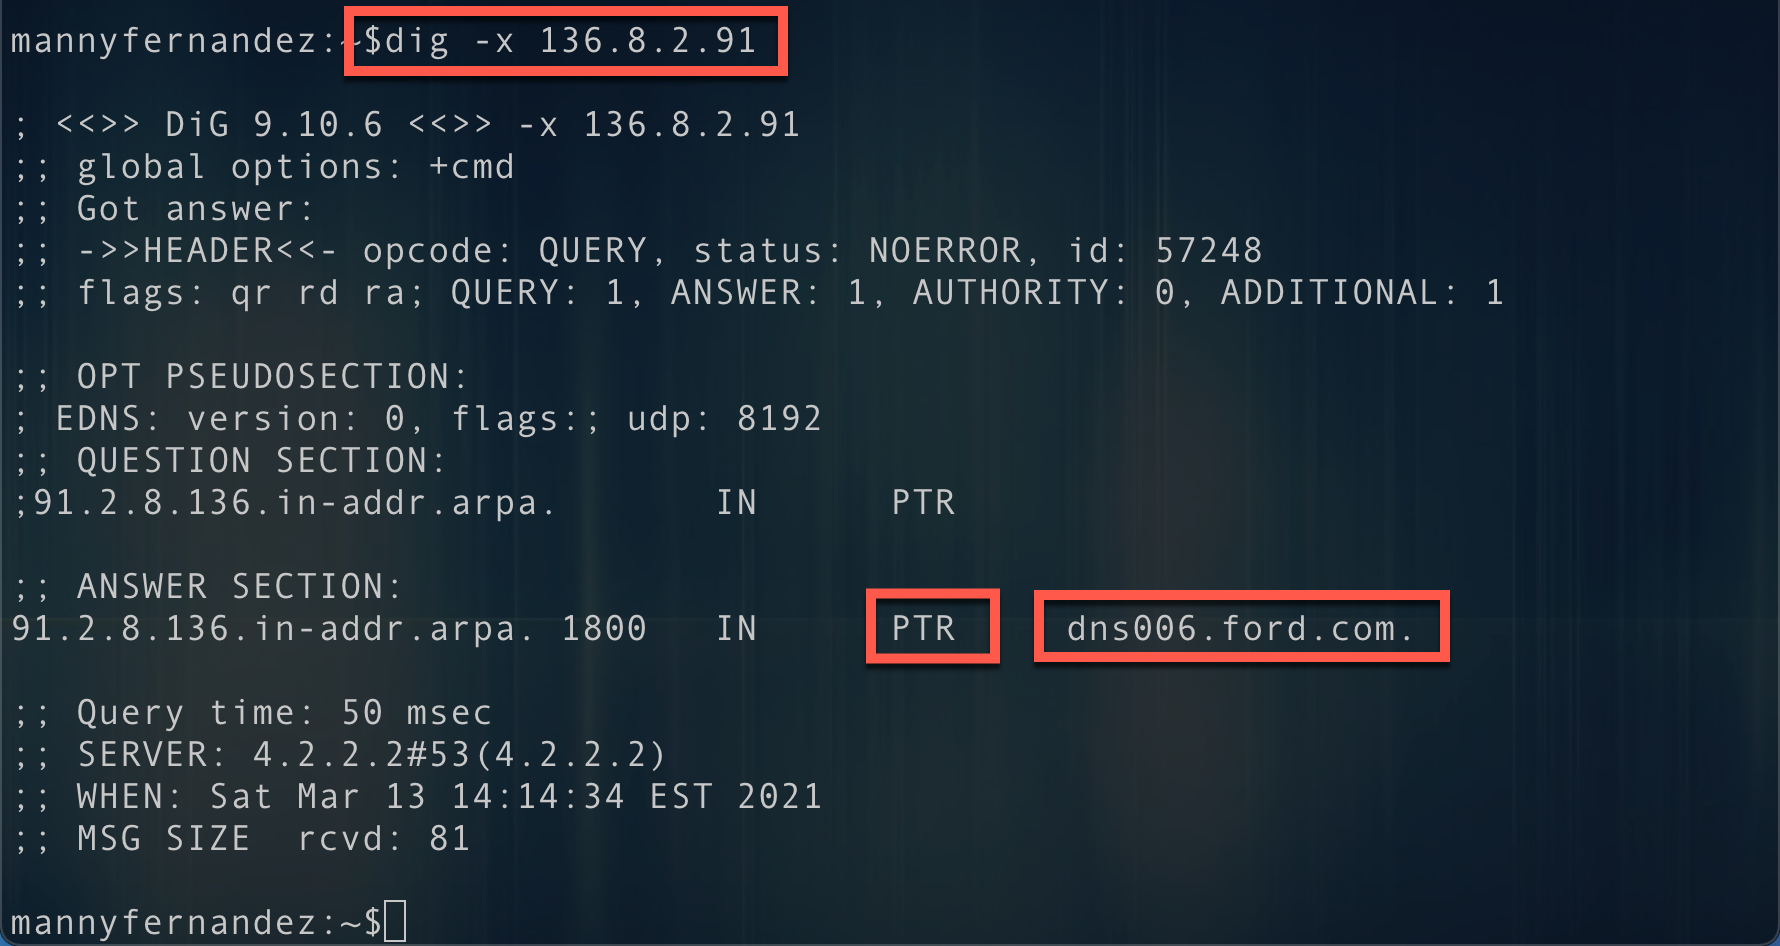
Here we can see that I ran a dig -x 136.8.2.91 which I got from the output of dnstrace and was able to see that the reverse or PTR record for 136.8.2.91 resolves to dns006.ford.com
You can also add the +short to not get

By default there is a lot of info that gets returned to you when you use dig . You can filter some of them out by using these keywords in the command line.
+nocomments – Turn off the comment lines
+noauthority – Turn off the authority section
+noadditional – Turn off the additional section
+nostats – Turn off the stats section
+noanswer – Turn off the answer section (this is kind of dumb but may fit your use case)
Specifying a DNS server to use with your dig command is easy, you can simply give it the DNS server IP using the @x.x.x.x (where x.x.x.x is the IP of the DNS server you want to use.
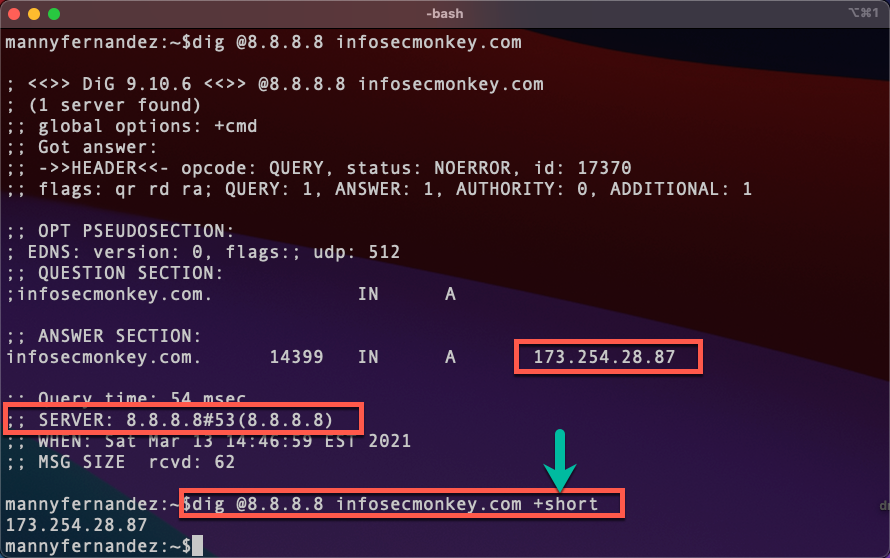
Here we can see that I used Google’s DNS server by using the @8.8.8.8 In the command line. Additionally, you can see I use the +short In conjunction with the specific server.
Persistence with DIG
If you want to ensure that every-time you run the dig command, that you have certain switches on by default, you can create a file in your user directory ~.digrc

We can see from the screenshot above that I have +noall +answer and +short as permanent switches when I run dig.
Wireshark Capture / Display Filters
Wireshark is an amazing tool. I have a base-line gauge of a technical person when I am do a screen-share and ask them if they have wireshark installed on their machine. If they do not, I already know that it will be challenging to discuss with them my findings.
Wireshark has both capture filters and display filters. It would be great if they were the same in both, but not really. They differ enough to make your life more difficult when you are rushing to figure something out.
 Here we se the capture filter in which case we will only capture traffic (both ways) that match
 port 53 (and yes, it means TCP and UDP)

Now we can filters by just adding dns to the filter search bar. You can be more deliberate in what you add there. You can combine the search criteria such as:
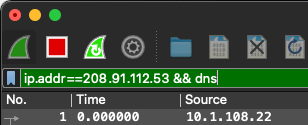
We have combined the two filter criteria with a && between them.
TCPDump
Tcpdump is a utility that comes by default in macOS and most Linux distros. For Windows you could try this site, although I have never used it so use at your own risk and your mileage may vary.

Here we can see the tcpdump command with a specified interface and the port 53 as the filter. You can save the output using the -w switch and a path.

Here we ran ran the same command but rather than having the output displayed on the screen, we are capturing it to a file on my Desktop named manny.cap

A great site I used to get some good cheat sheets from is Jeremy Stretch’s site.
Hope this helps.
Recent posts
-

-

Had a customer with over 200 static routes on... Full Story
-

This is a work in progress, I will be... Full Story
