Have you ever ordered a bunch of Fortinet gear... Full Story
By Manny Fernandez
June 26, 2020

Dynamic VLANs with Single SSID using FortiAP and FortiAuthenticator
First and foremost, a special shout out to a friend that helped with this config. Juan Perez, thank you brother.
Use Case: Customer wants a single SSID in his environment. He wants Teachers on a VLAN once they connect on a managed workstation (AD Member), Students on a different VLAN when THEY connect on managed workstation, Computers to authenticate and kept in a Computer VLAN until the user logs in, and a BYOD VLAN for the users connecting with personal devices. These use cases can be delivered via an 802.1x PEAP configuration on FortiAuthenticator
Setting up AD Groups
First lets create two groups and two test users.
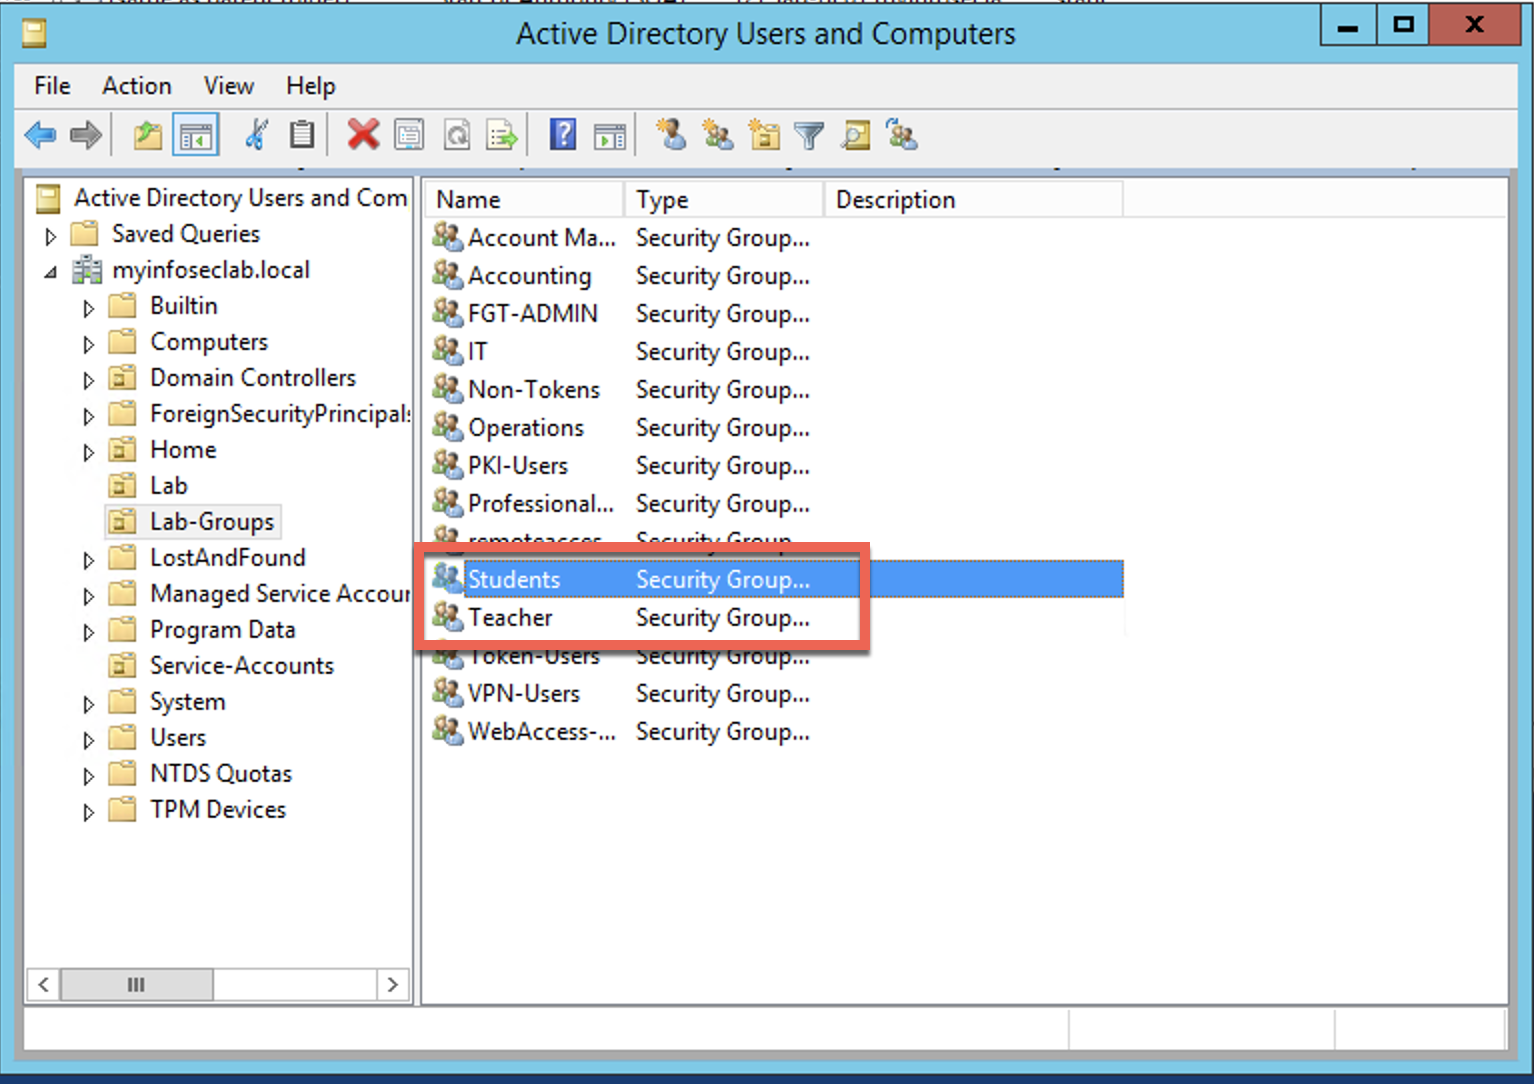
Here we create two AD groups; Teacher and Student
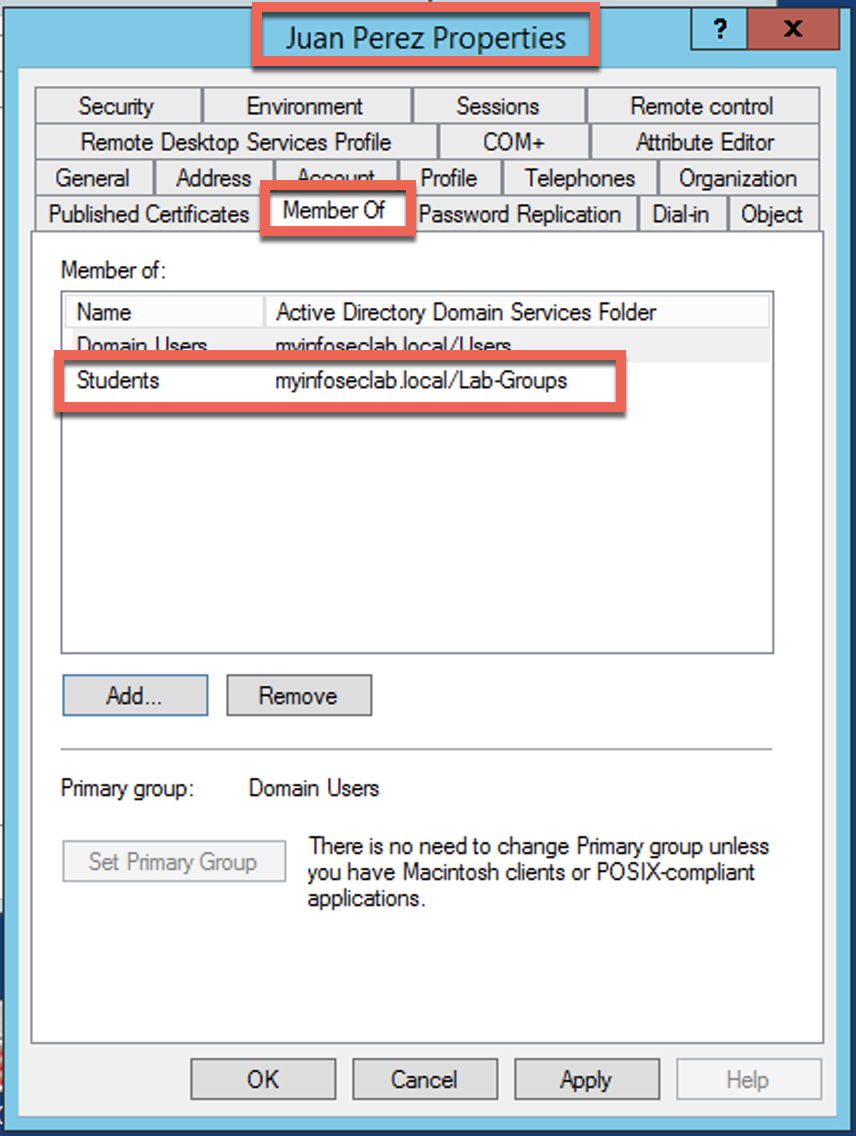
I then created a user and added him to the Student group.
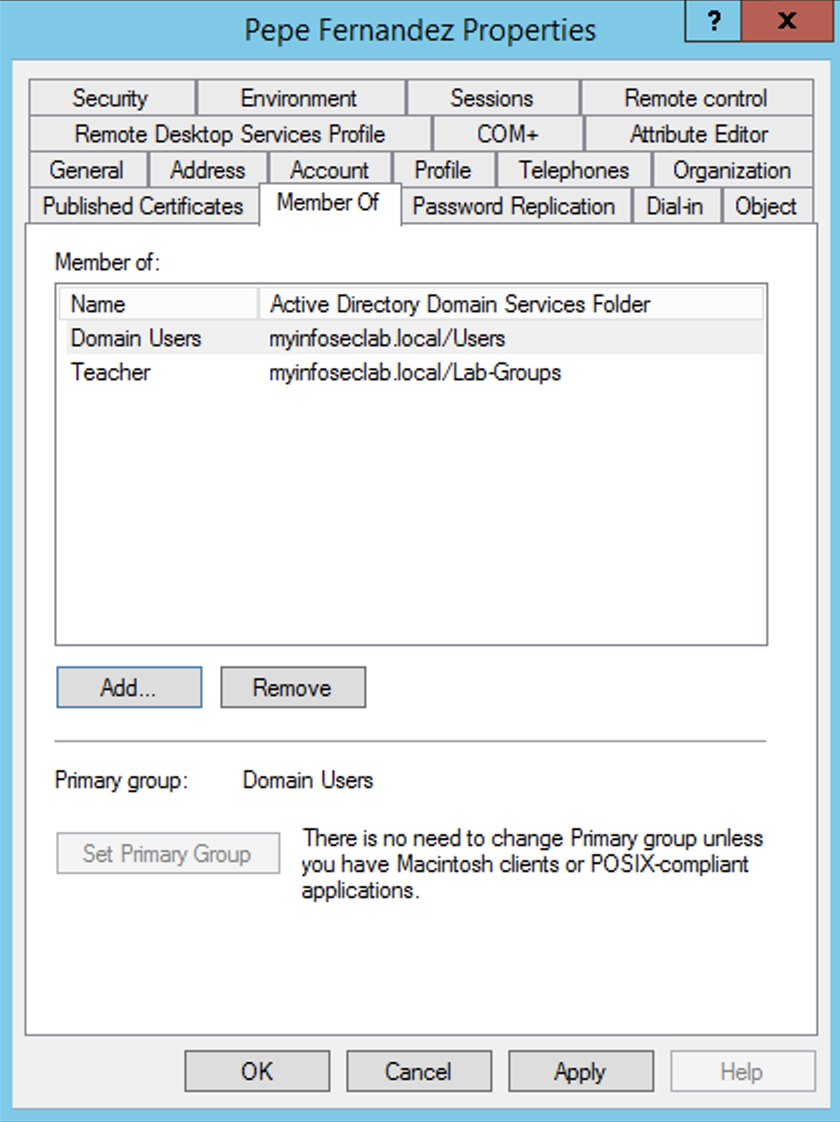
Likewise, I created a user and added HIM to the Teacher group.
FortiGate Configuration
Now we are going to configure the pieces we are going to need
Creating the VLAN Interface

Here we have the SSID at the top where all devices will connect to. We are create VLAN below this SSID interface. Each VLAN corresponds to the different types of connection we want to handle.
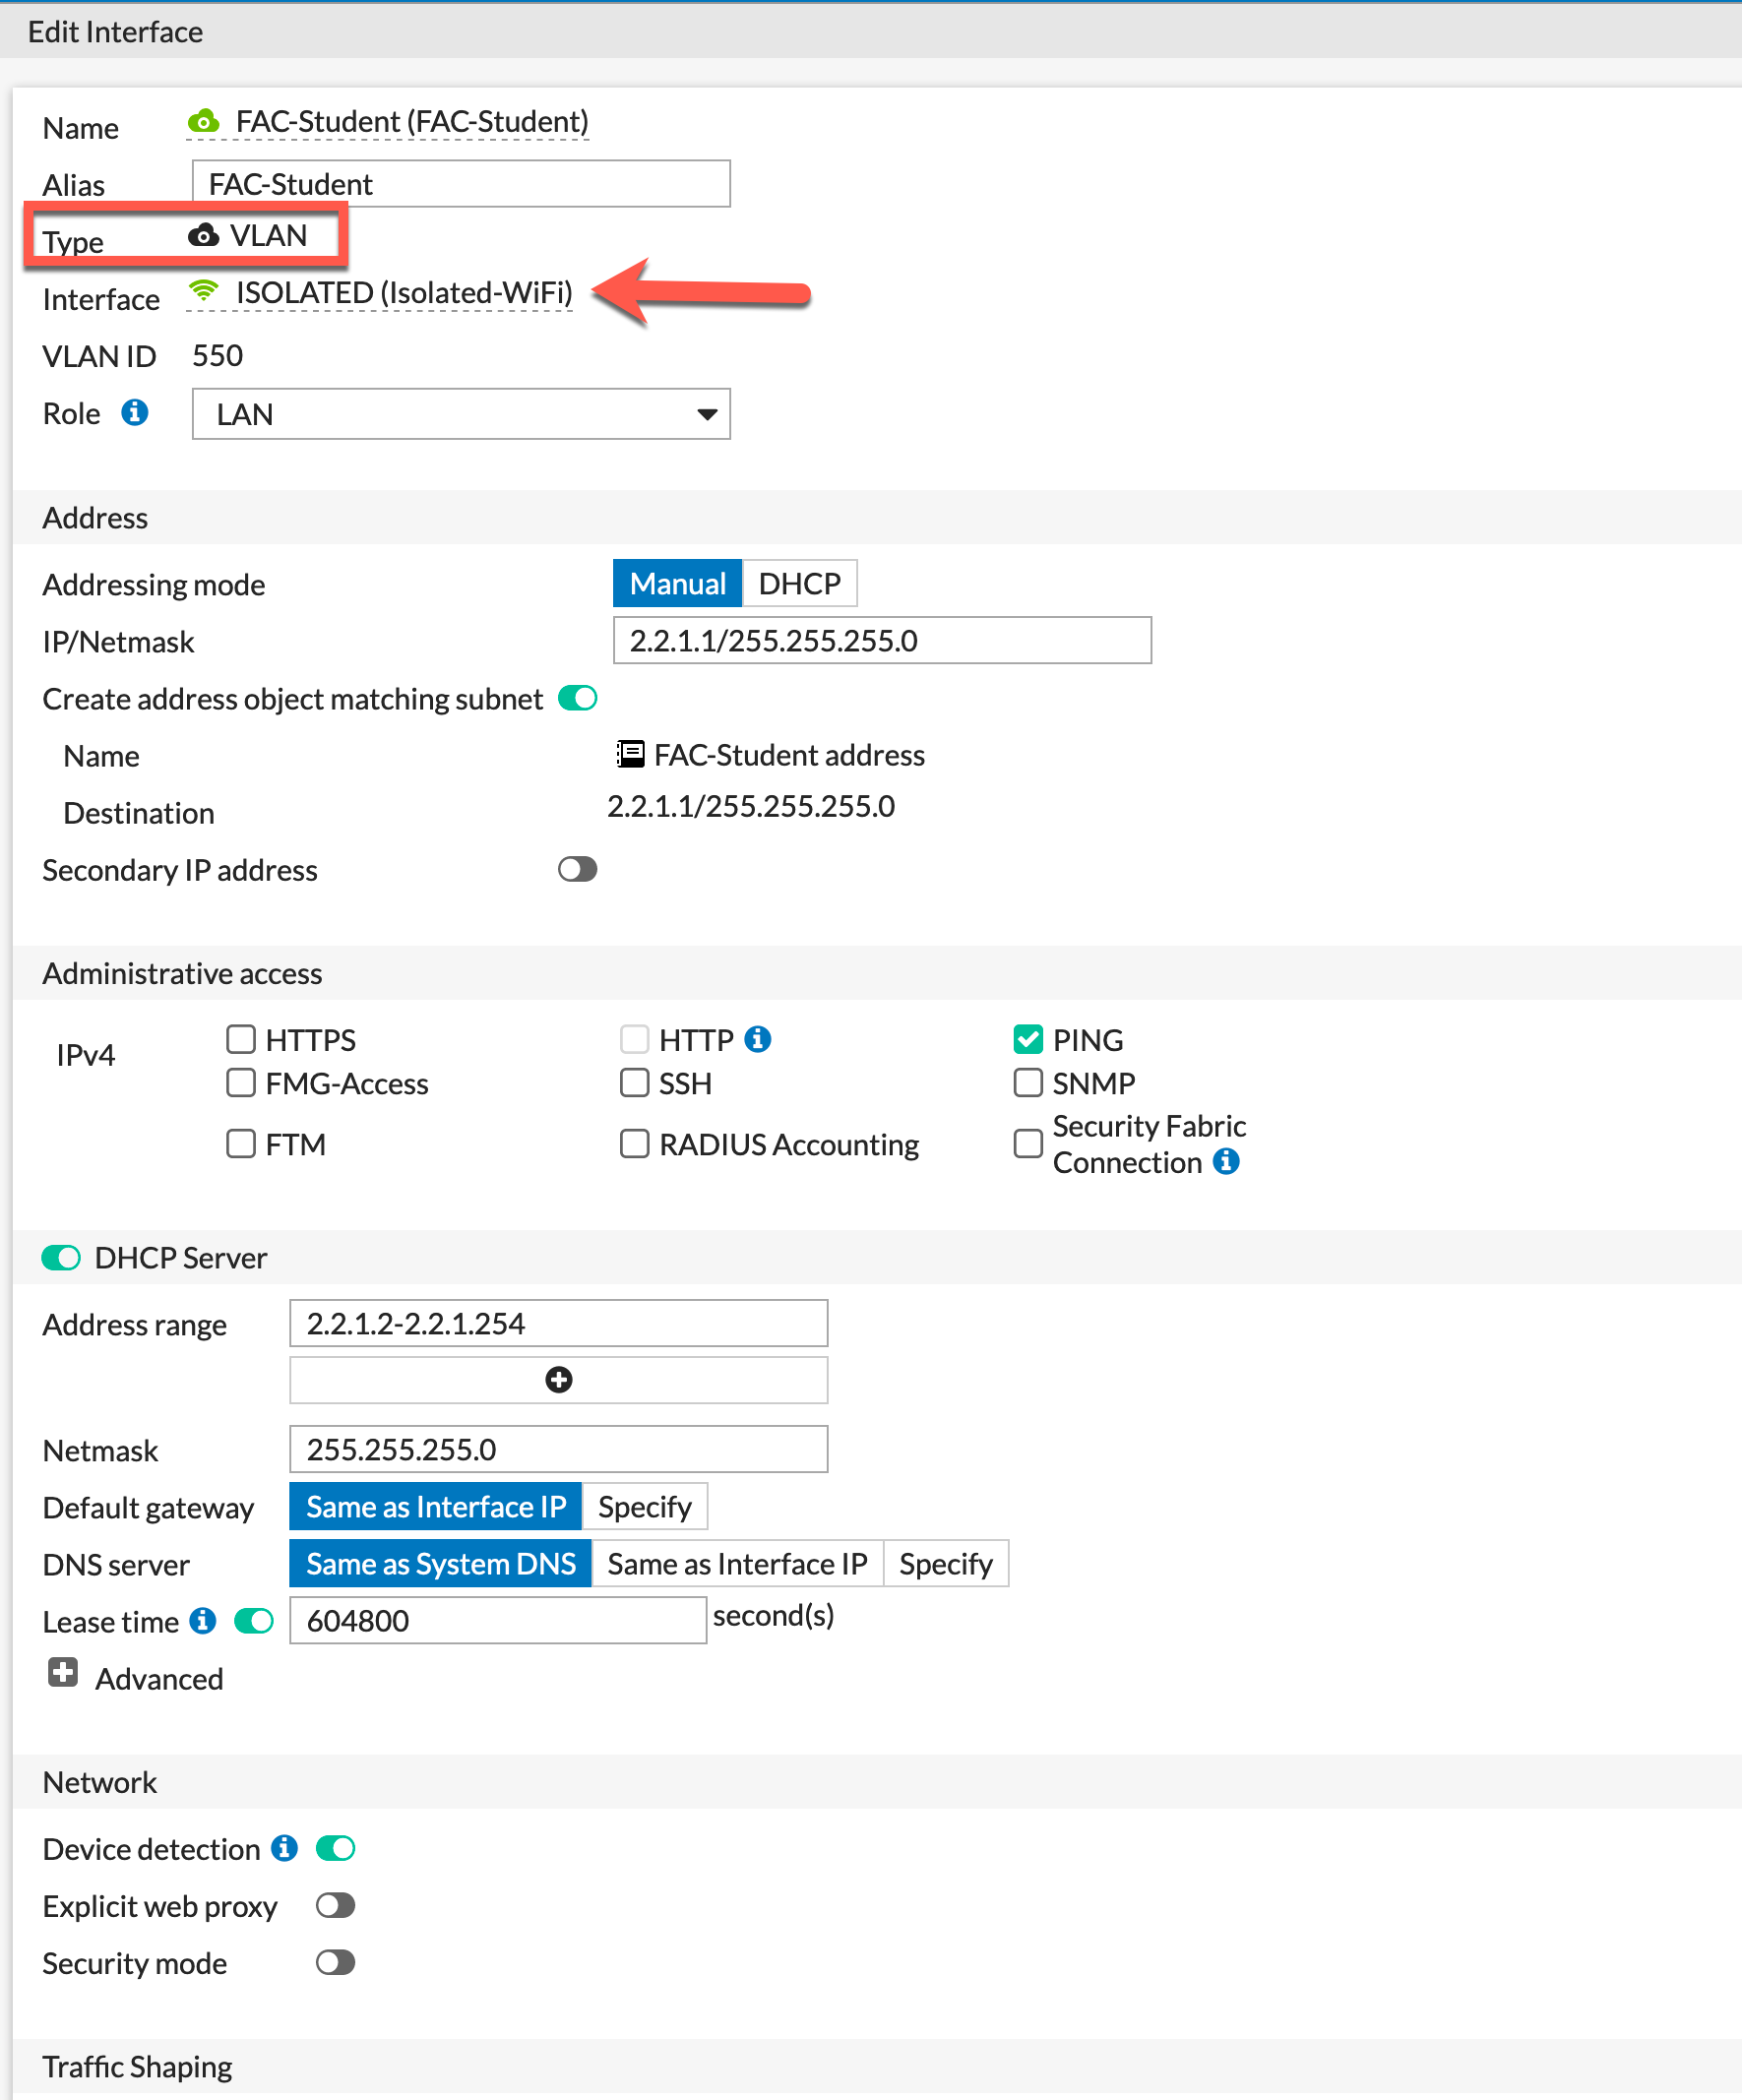
Here is an example of what an interface looks like. We can see it is a VLAN and it is attached to the ISOLATED interface. Assign an IP address and mask, enabled DHCP and save. Repeat for the other interfaces.
Creating RADIUS Server
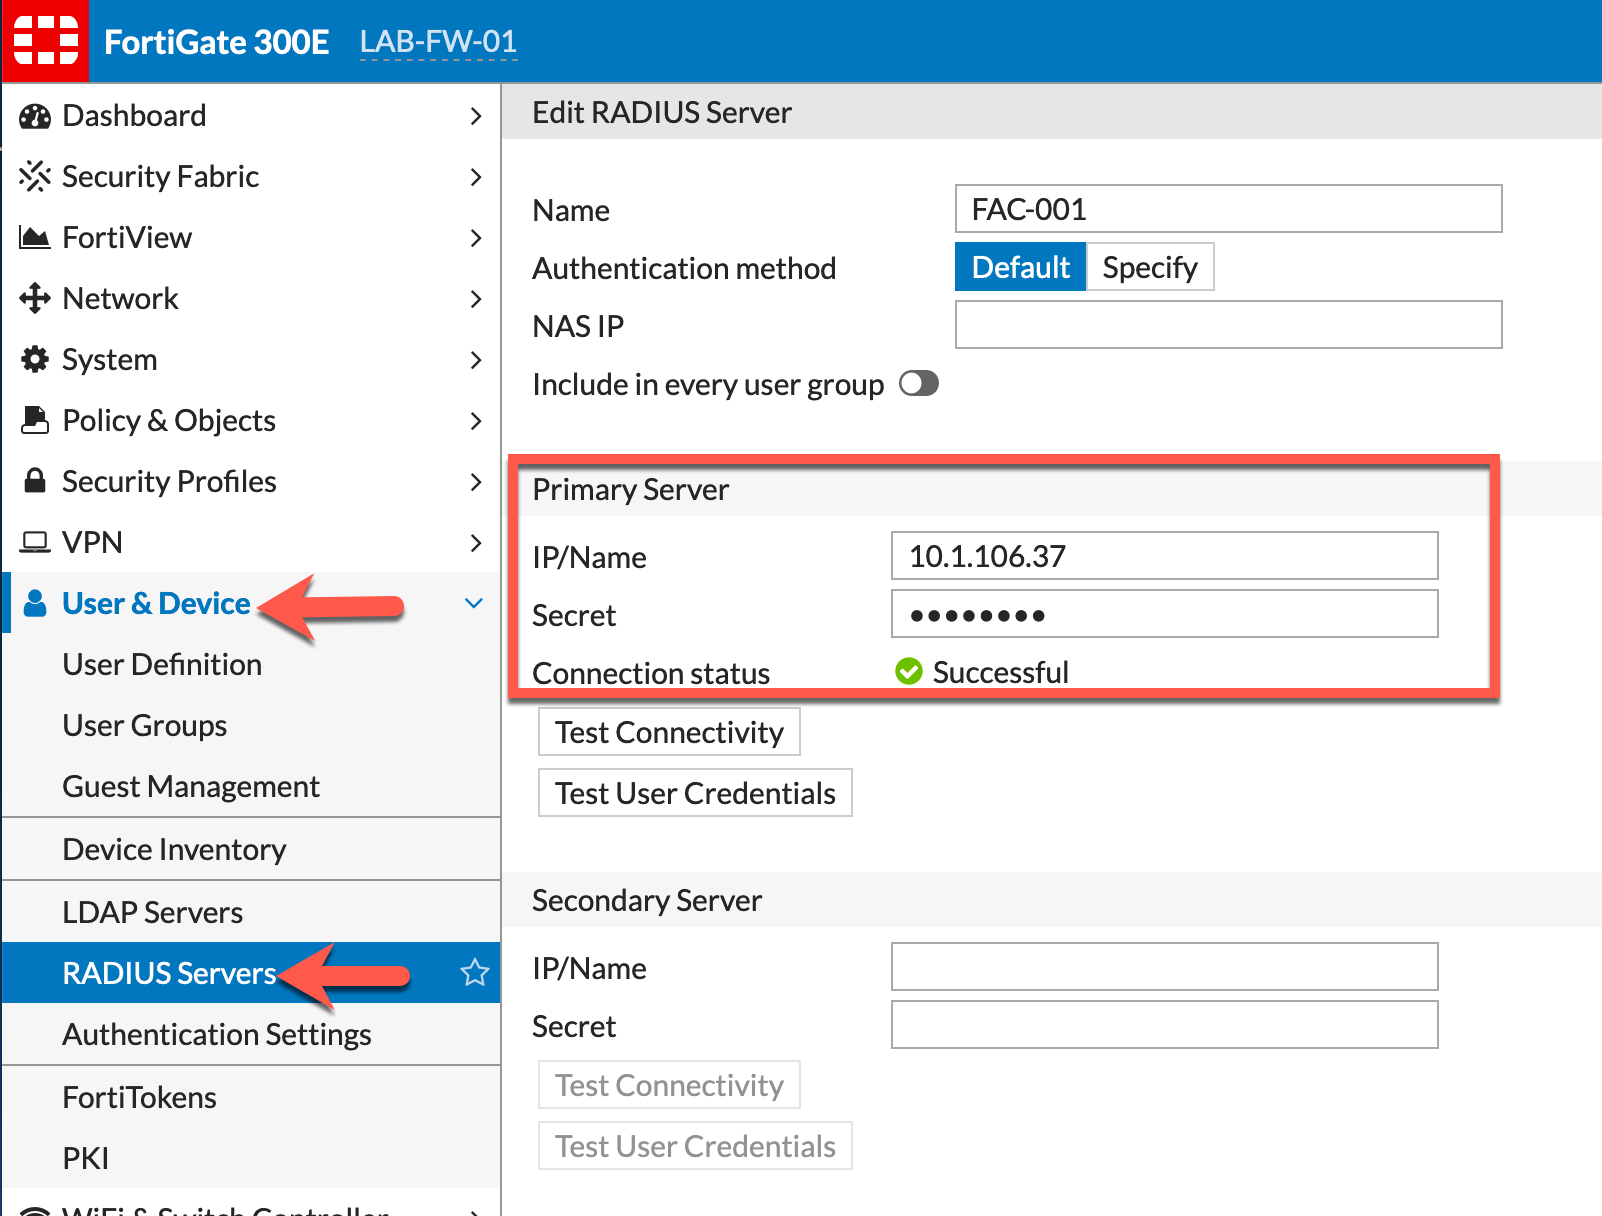
Go to User & Device (6.2.2 and below) RADIUS Server, then Create New. Enter the IP address of the FAC server and the Secret key.
SSID Configuration
On the SSID configured on the Fortigate, you will need to modify the config
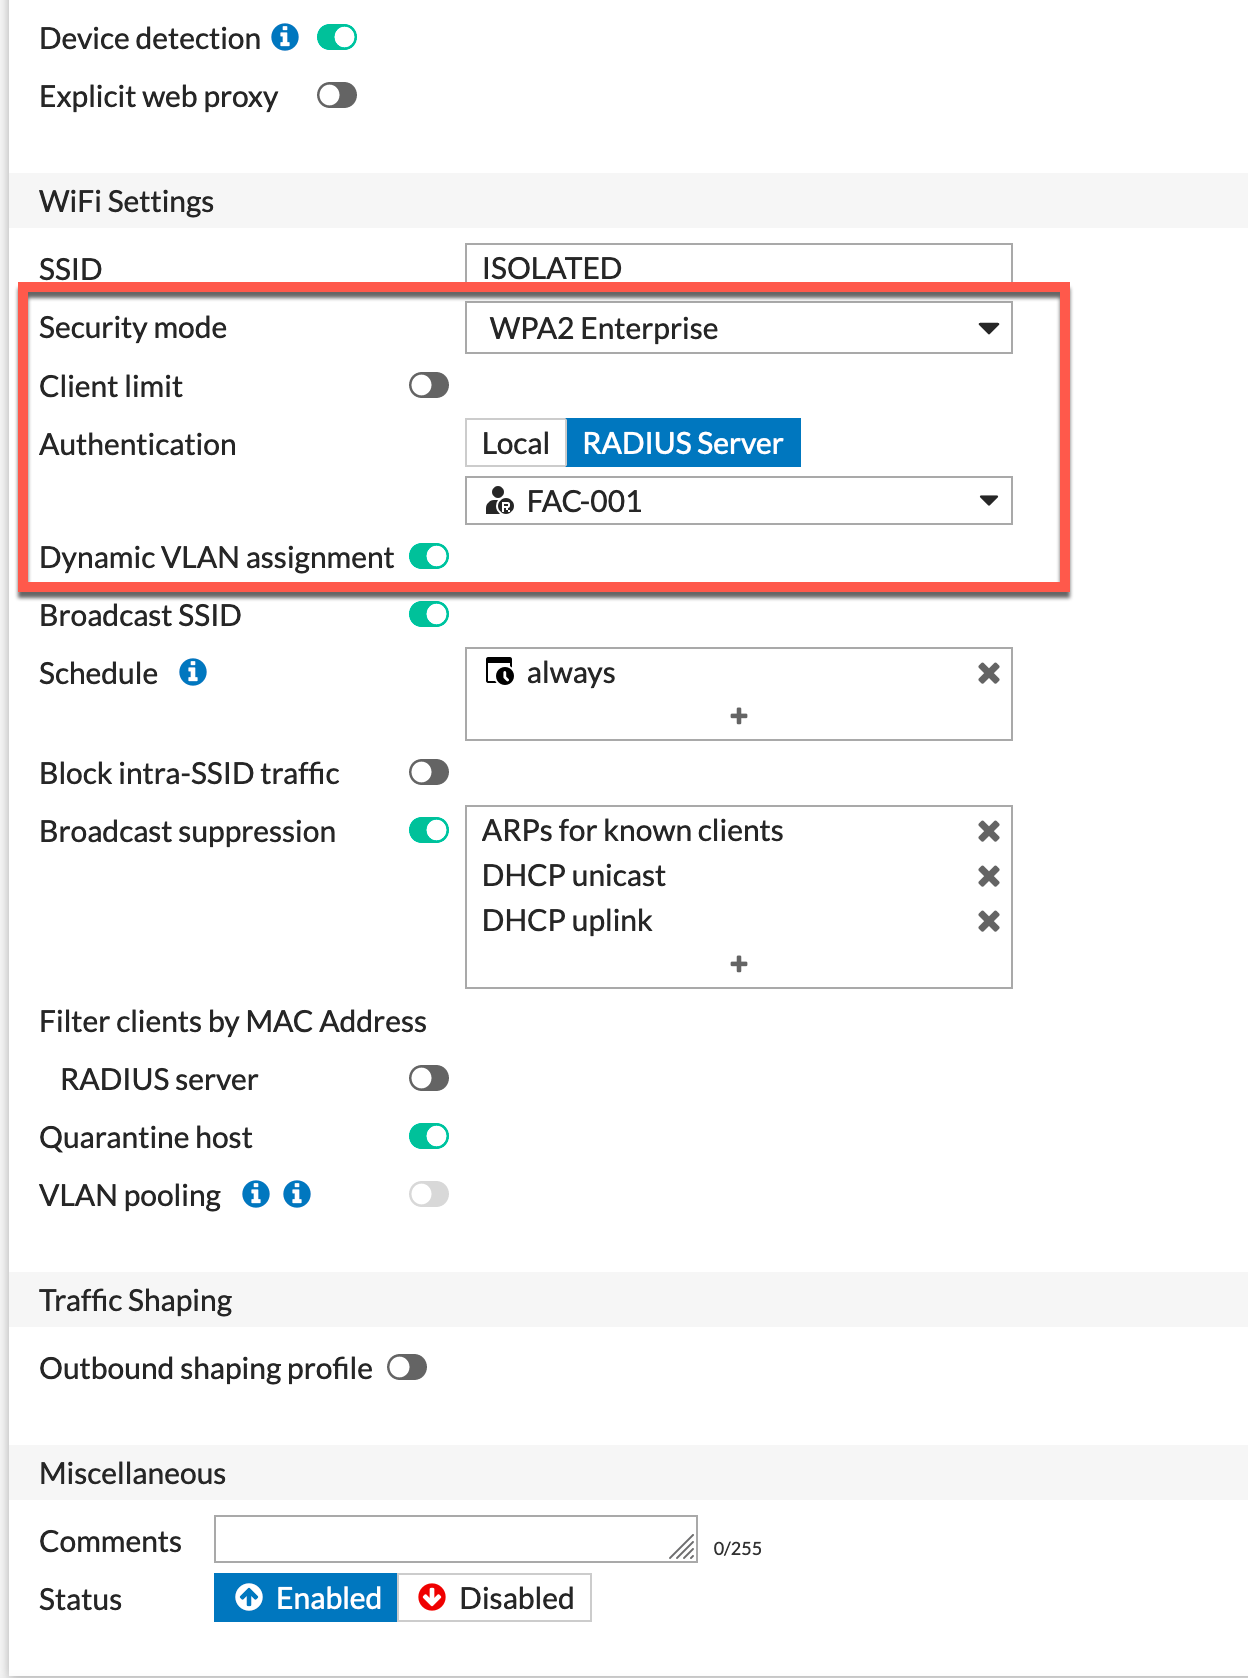
Here we can see that we are choosing WPA2 Enterprise as the Security Mode, Choose the RADIUS Server as the Authentication and from the drop-down, choose your RADIUS server you recently set up. You also want to enable the Dynamic VLAN assignment.
Policies
We are going to need policies for these devices to browse the Internet and specifically for the Computer , Teacher and Student networks, you will need to define access to the internal resources as needed.

In this example, I have only created the Outbound policies to permit Internet. But more will be needed.
Also remember to add either a Central NAT policy or configure the Policy NAT inside each policy.
FortiAuthenticator (FAC) Configuration
Now we will configure the FAC.
Creating FAC Groups
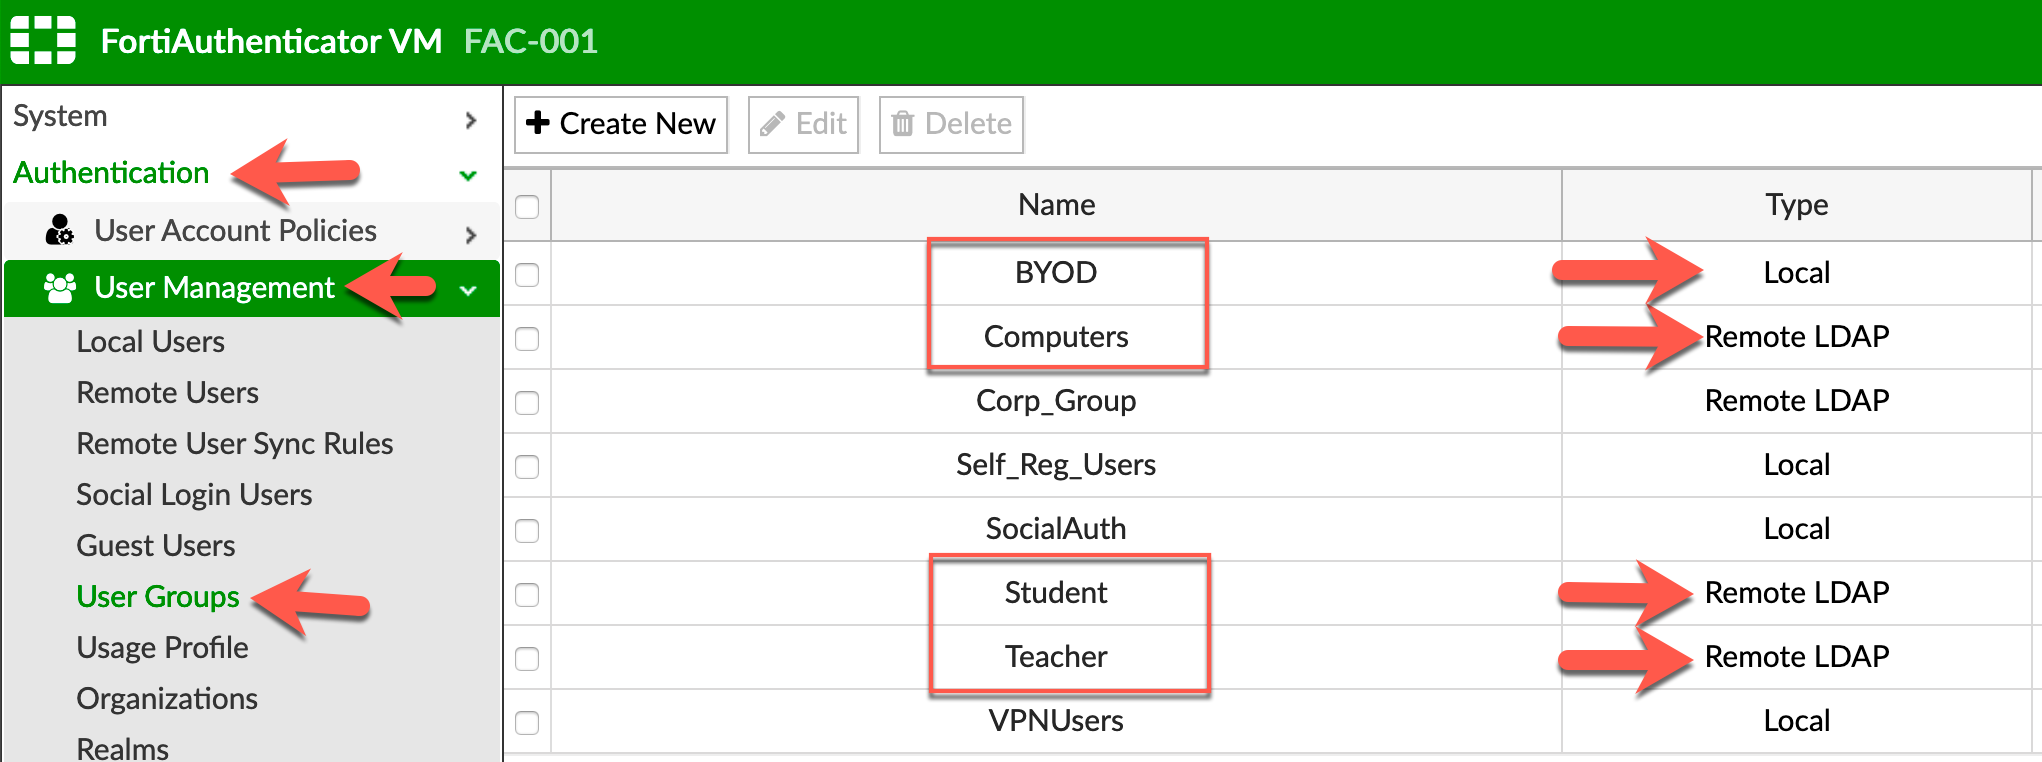
We need to create 4 groups representing the 4 types of users (Teachers, Students, Computers and BYOD). As you can see, these groups are either Local or Remote LDAP.
Each group is going to require some modifications
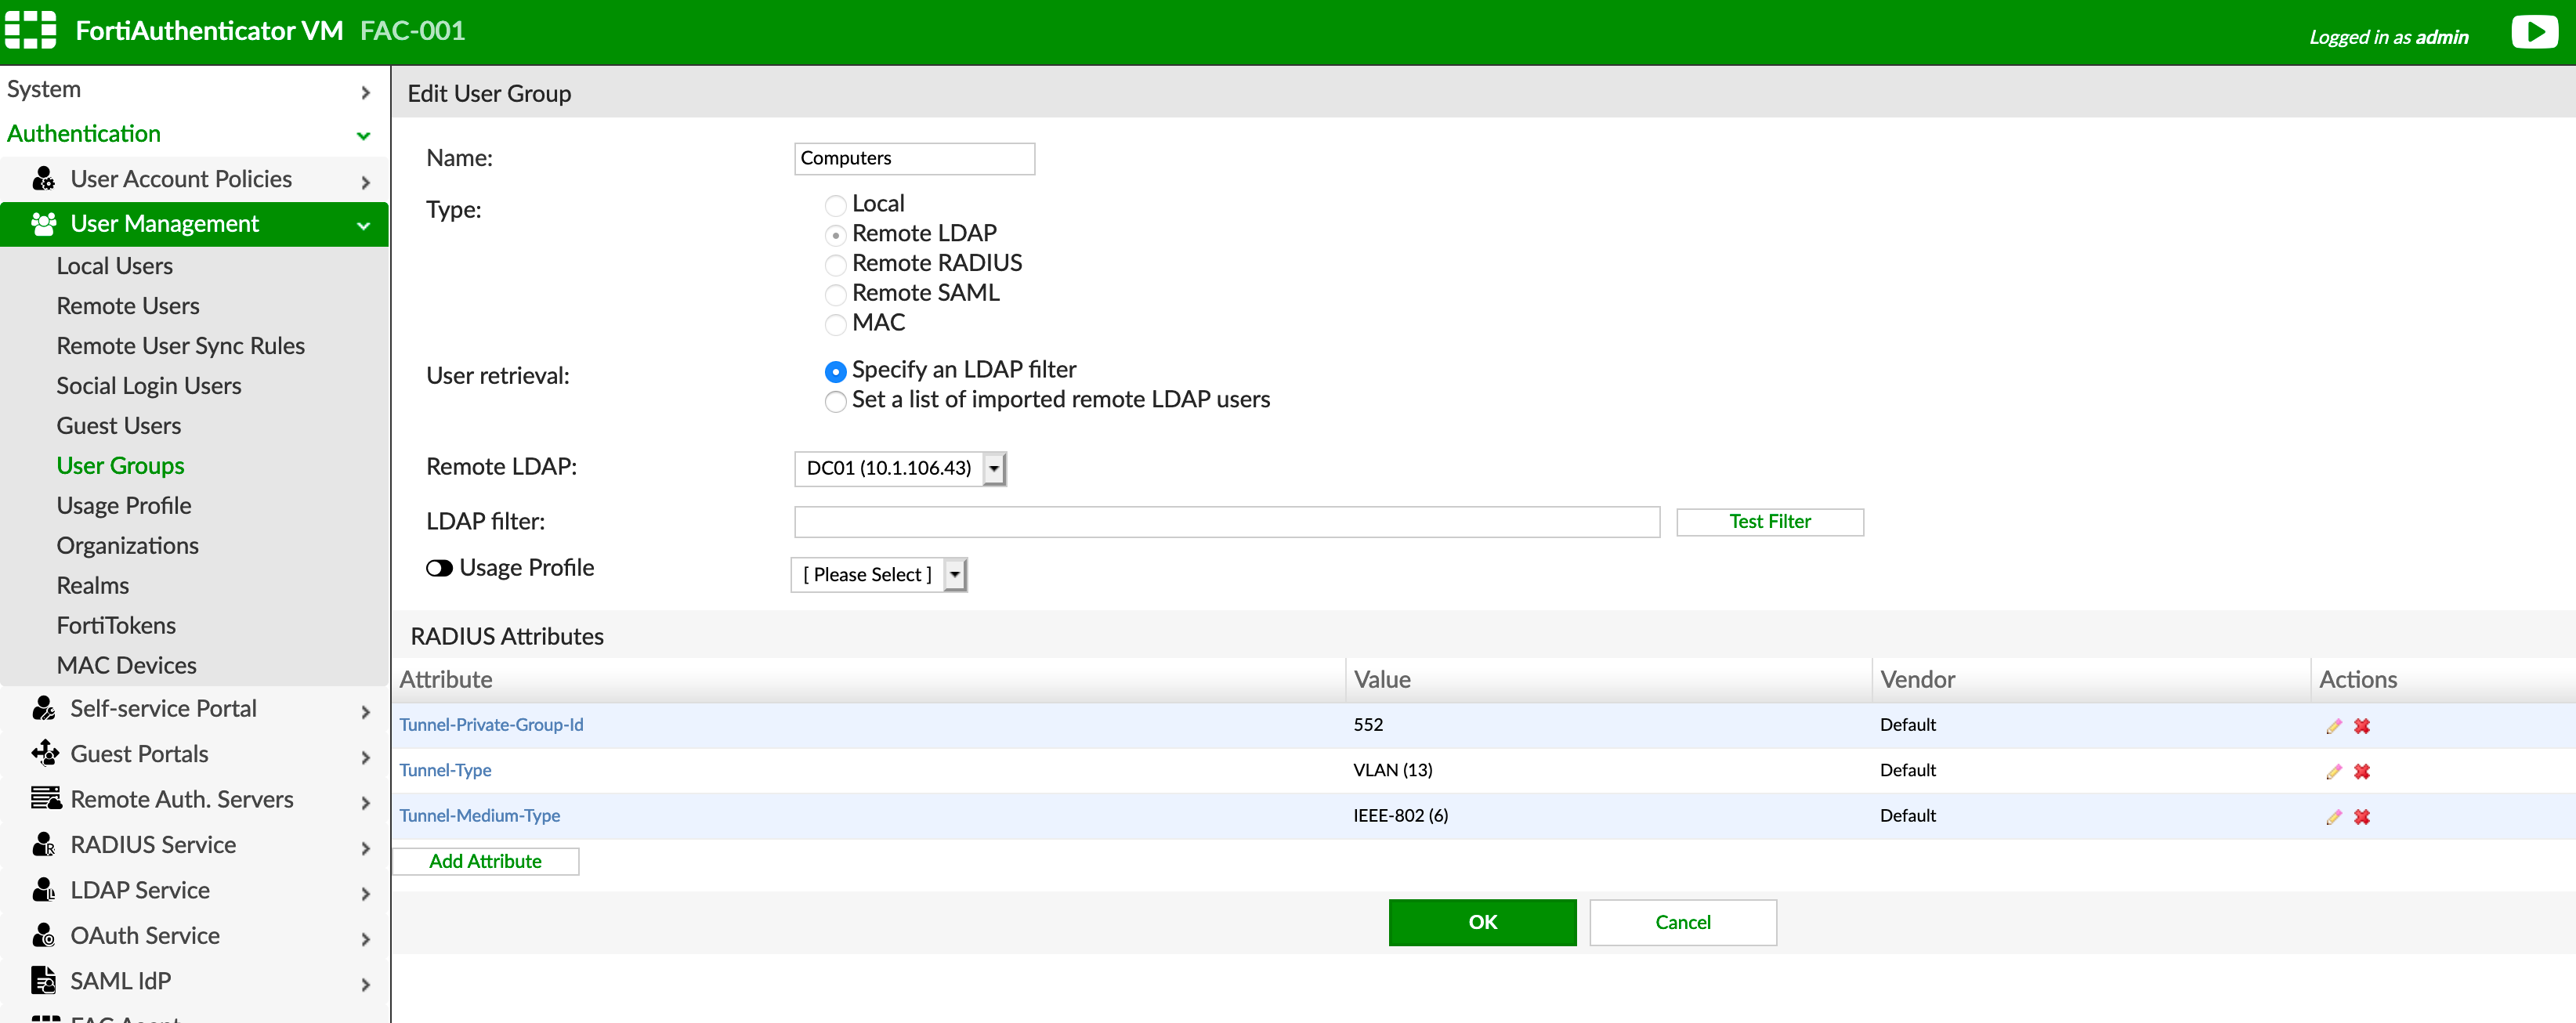

We are going to choose Default under the Vendor section. Then choose Tunnel-Private-Group-ID, then under the Value section you will need to enter the VLAN ID for this group.

Next, you need to add Tunnel-Type and choose VLAN from the drop down list.

Next we are going to configure Tunnel-Medium-Type and choose IEEE-802 from the drop down.
You will need to do the same to each group. Make sure you change the VLAN ID for each group.
For the Student and Teacher AD Group, you will need to create a filter so that it pulls the users from the respective AD groups.
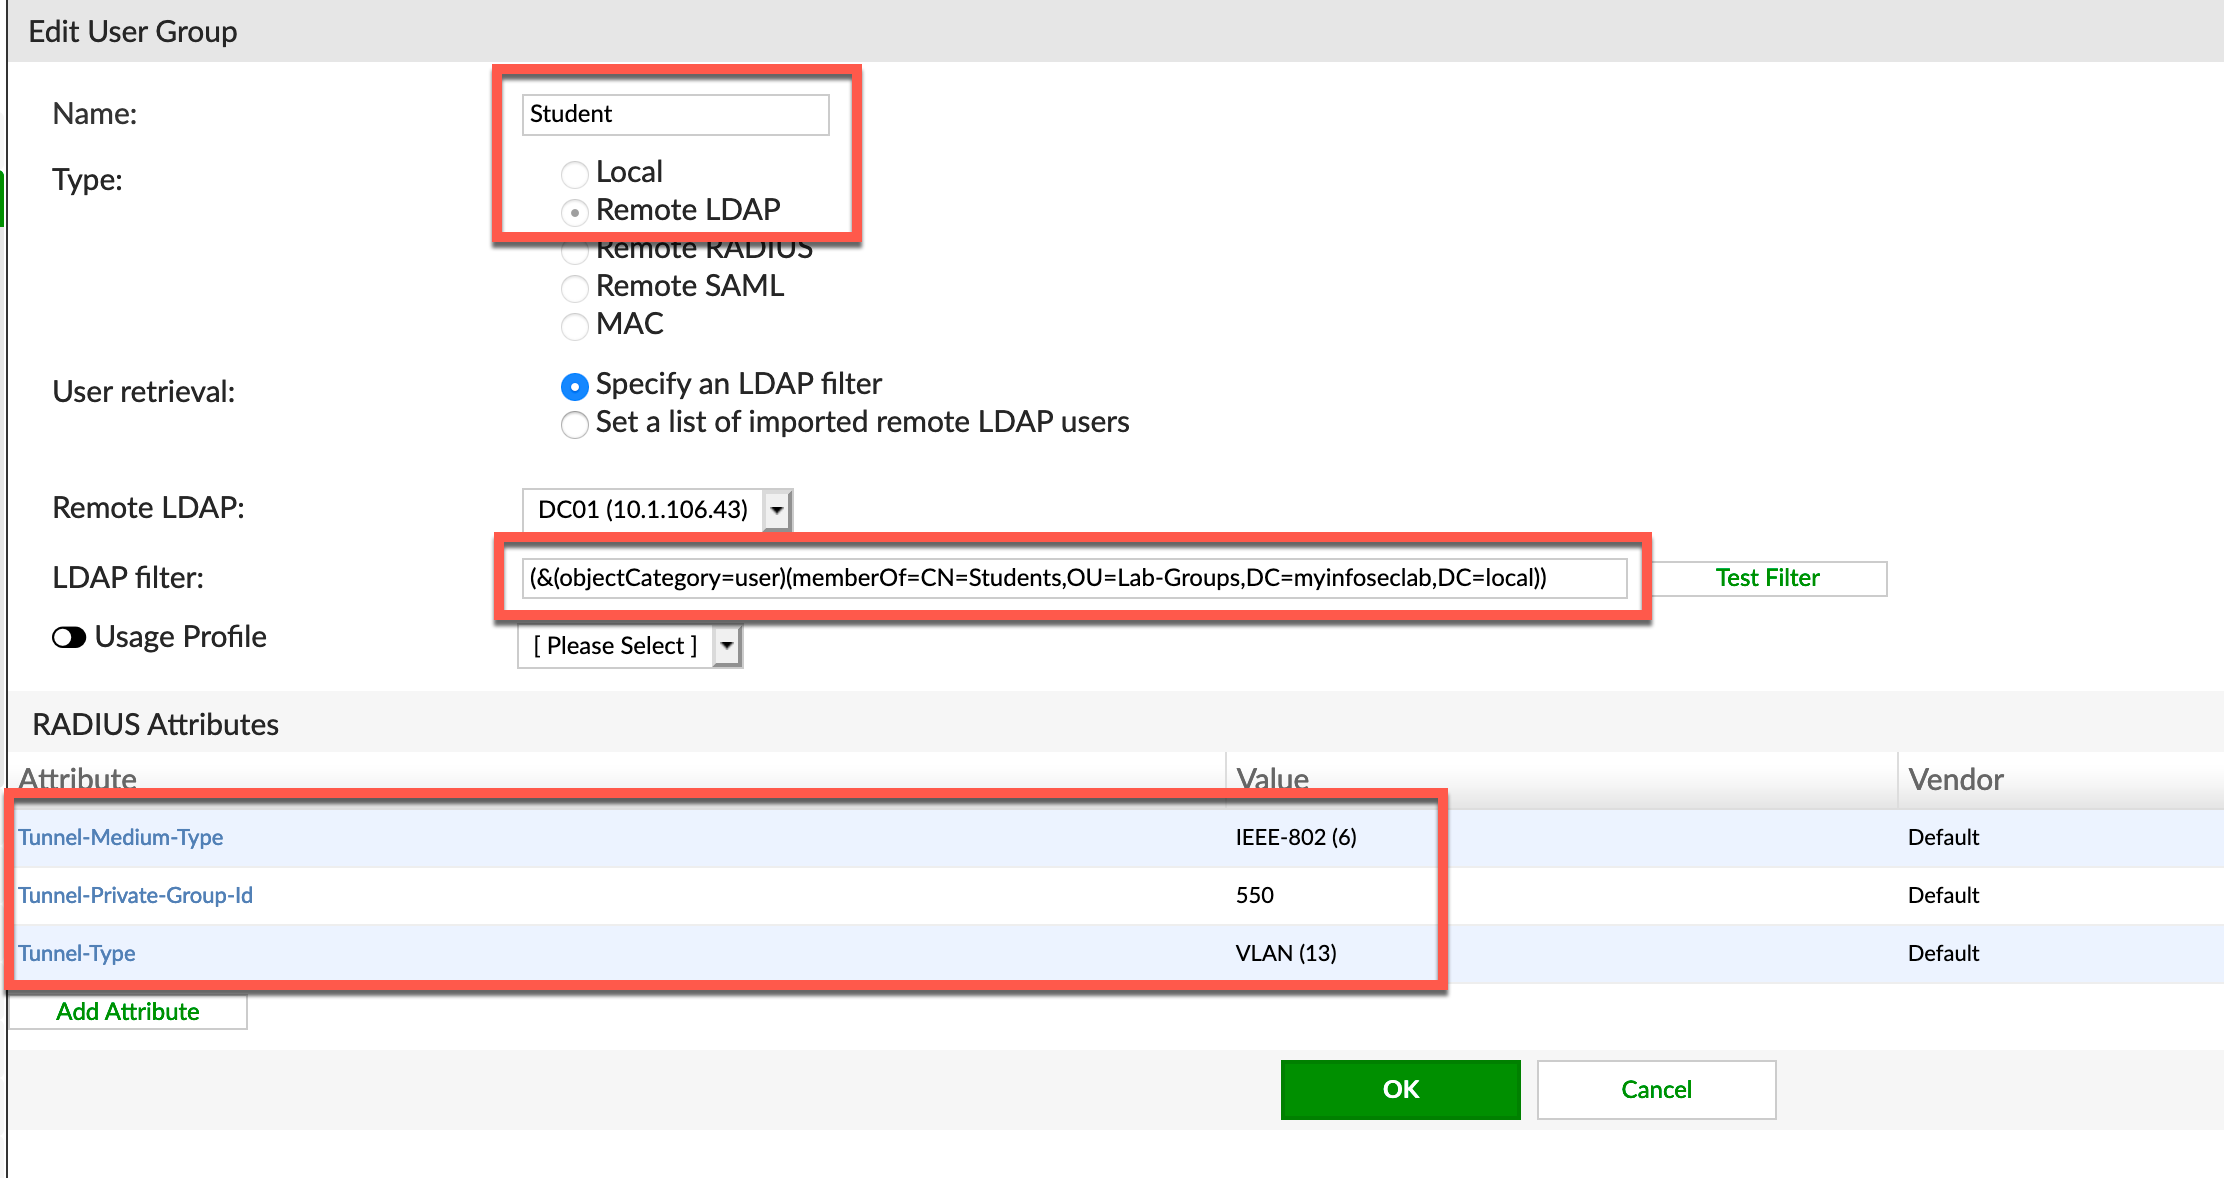
Here is the filter for the Student AD group. The filter is as follows:
(&(objectCategory=user)(memberOf=CN=Student,OU=Lab-Groups,DC=myinfoseclab,DC=local))
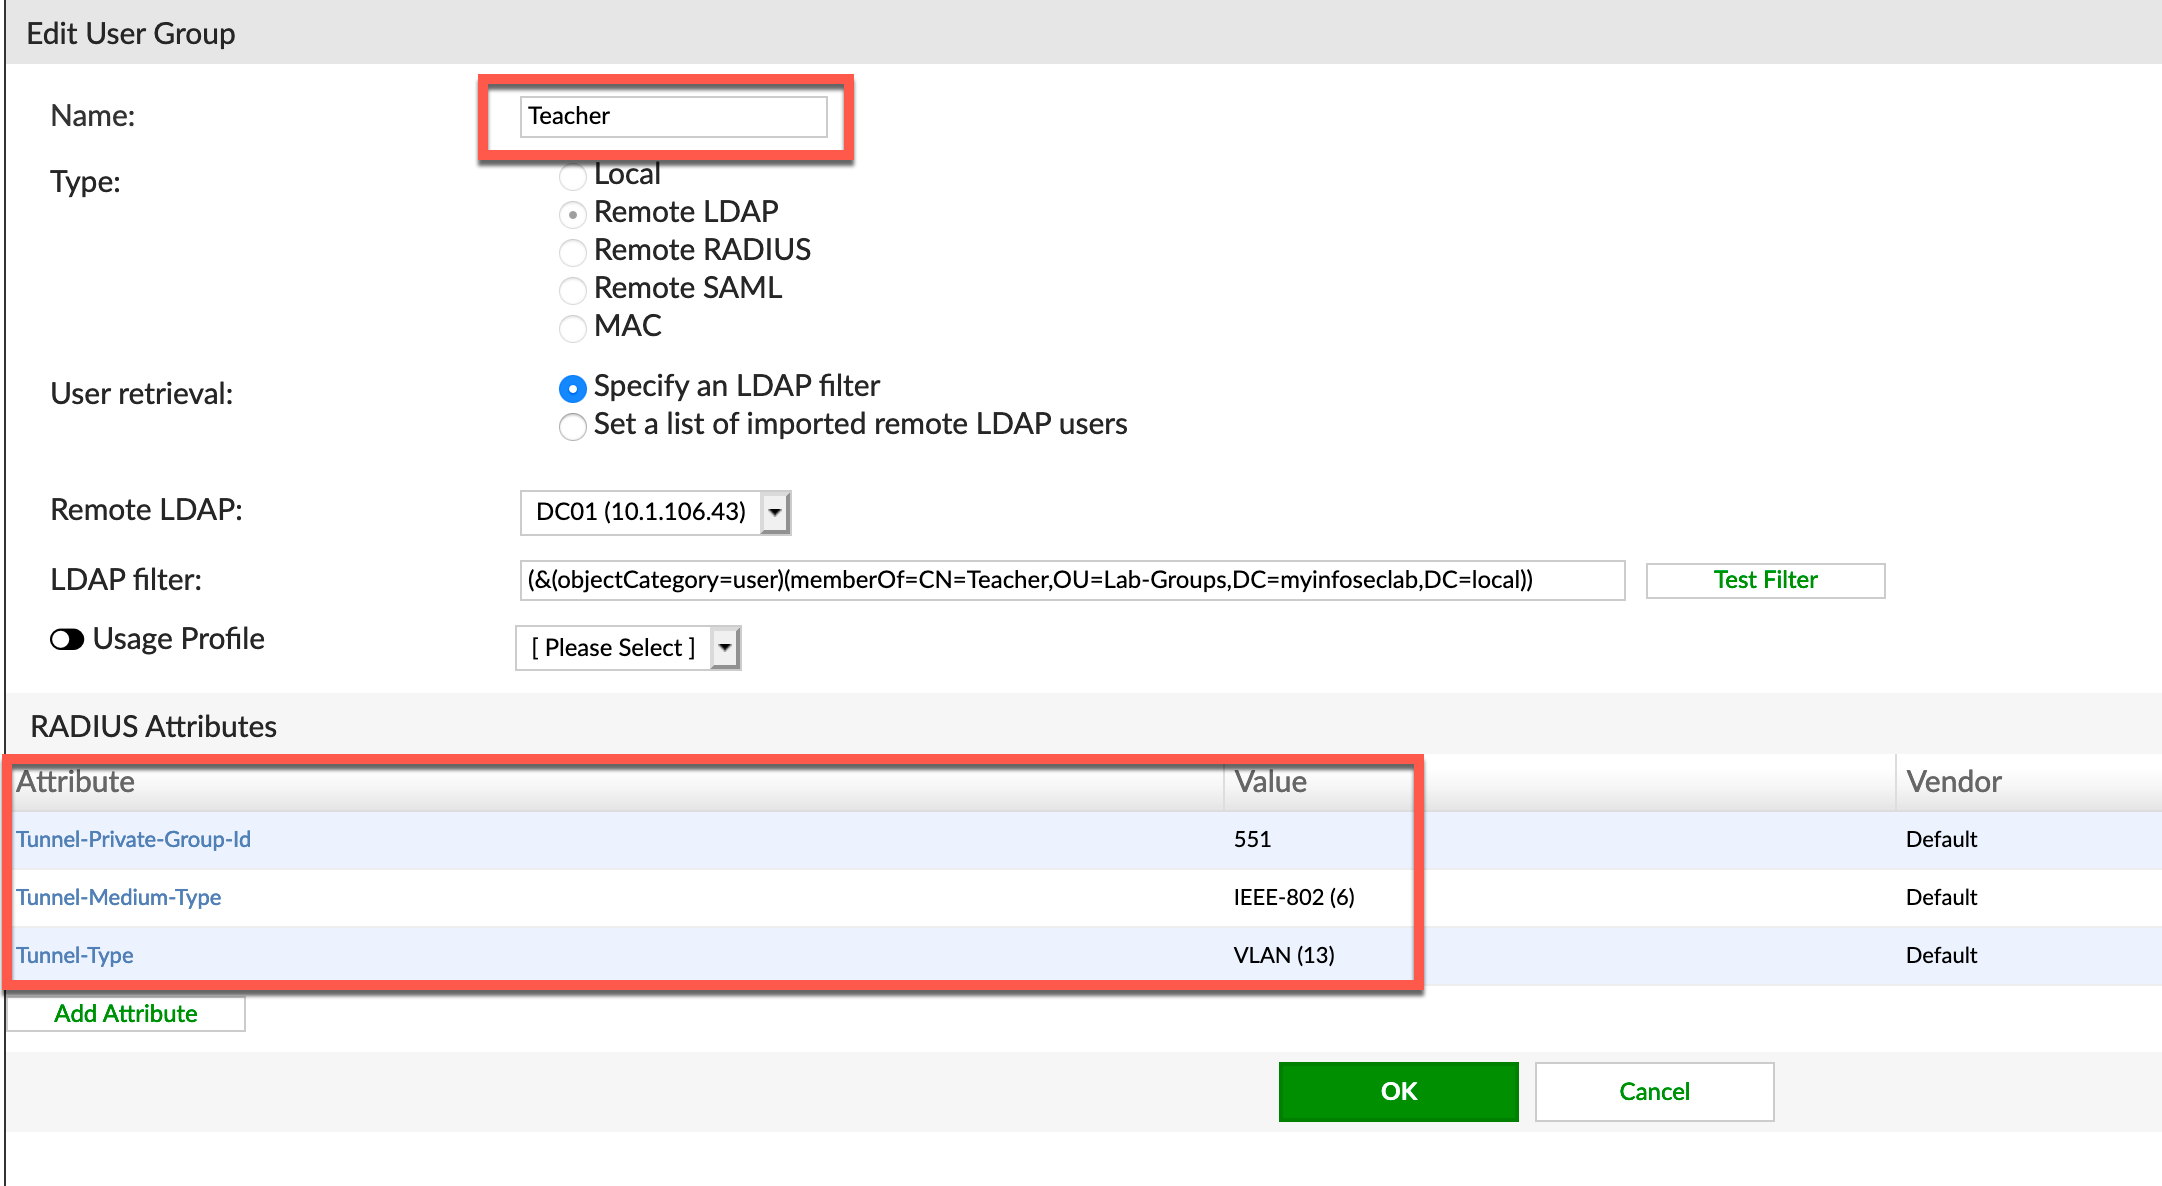
Here is the filter for the Teacher group.
(&(objectCategory=user)(memberOf=CN=Teacher,OU=Lab-Groups,DC=myinfoseclab,DC=local))
Creating RADIUS Client
Now we are going to configure the RADIUS Client
I want to make a point here. I have configured a RADIUS client previously for VPNs in a previous post. Within the same RADIUS client configuration, you can create multiple profiles that represent different options. So the same RADIUS client configuration will handle the remote access VPN as well as the WiFi configuration we are doing here.
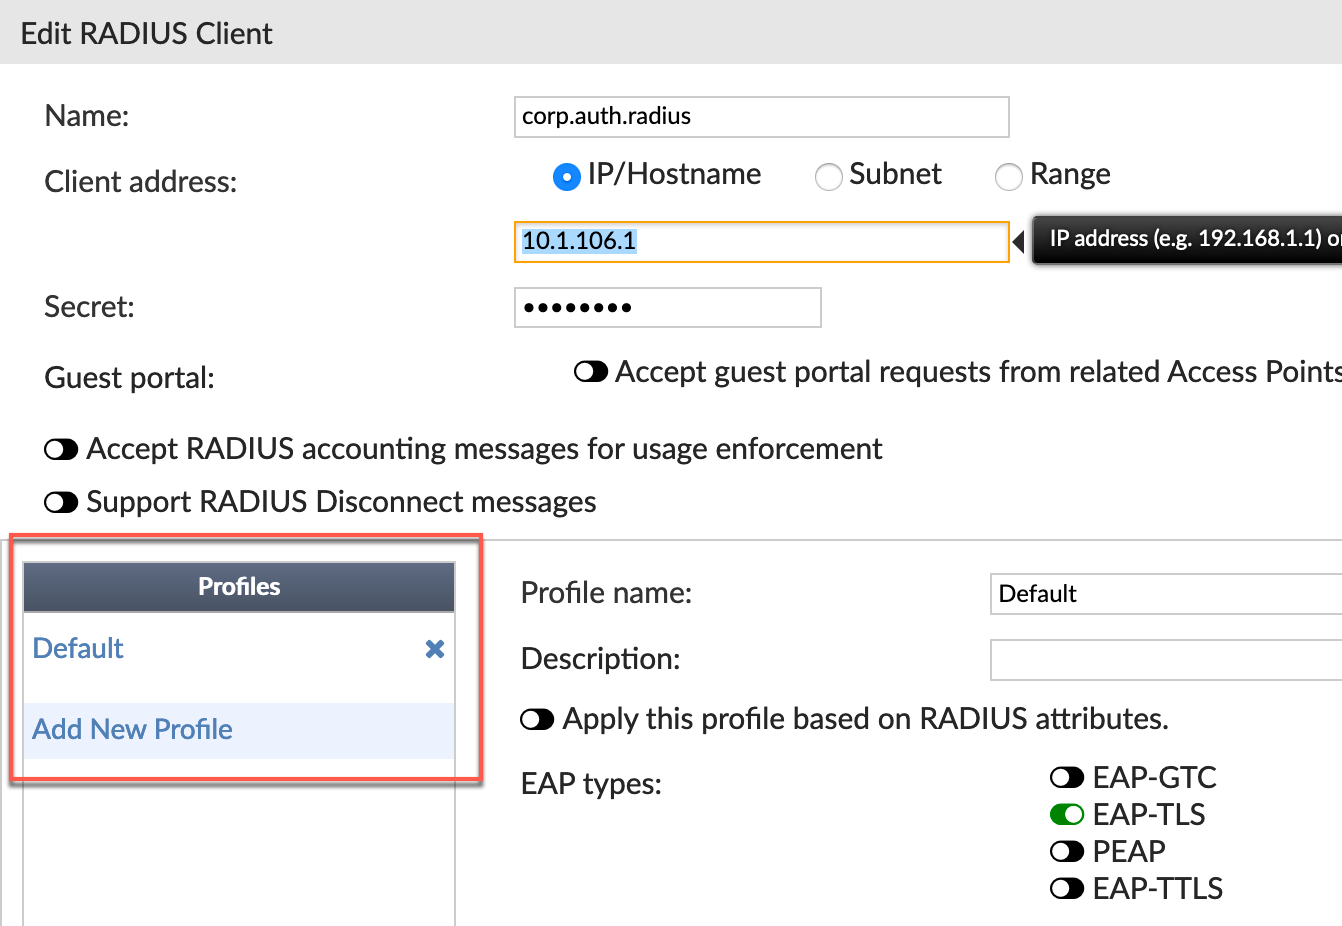
You can see the Profiles in the screenshot above.
Let’s get started with the profile configuration
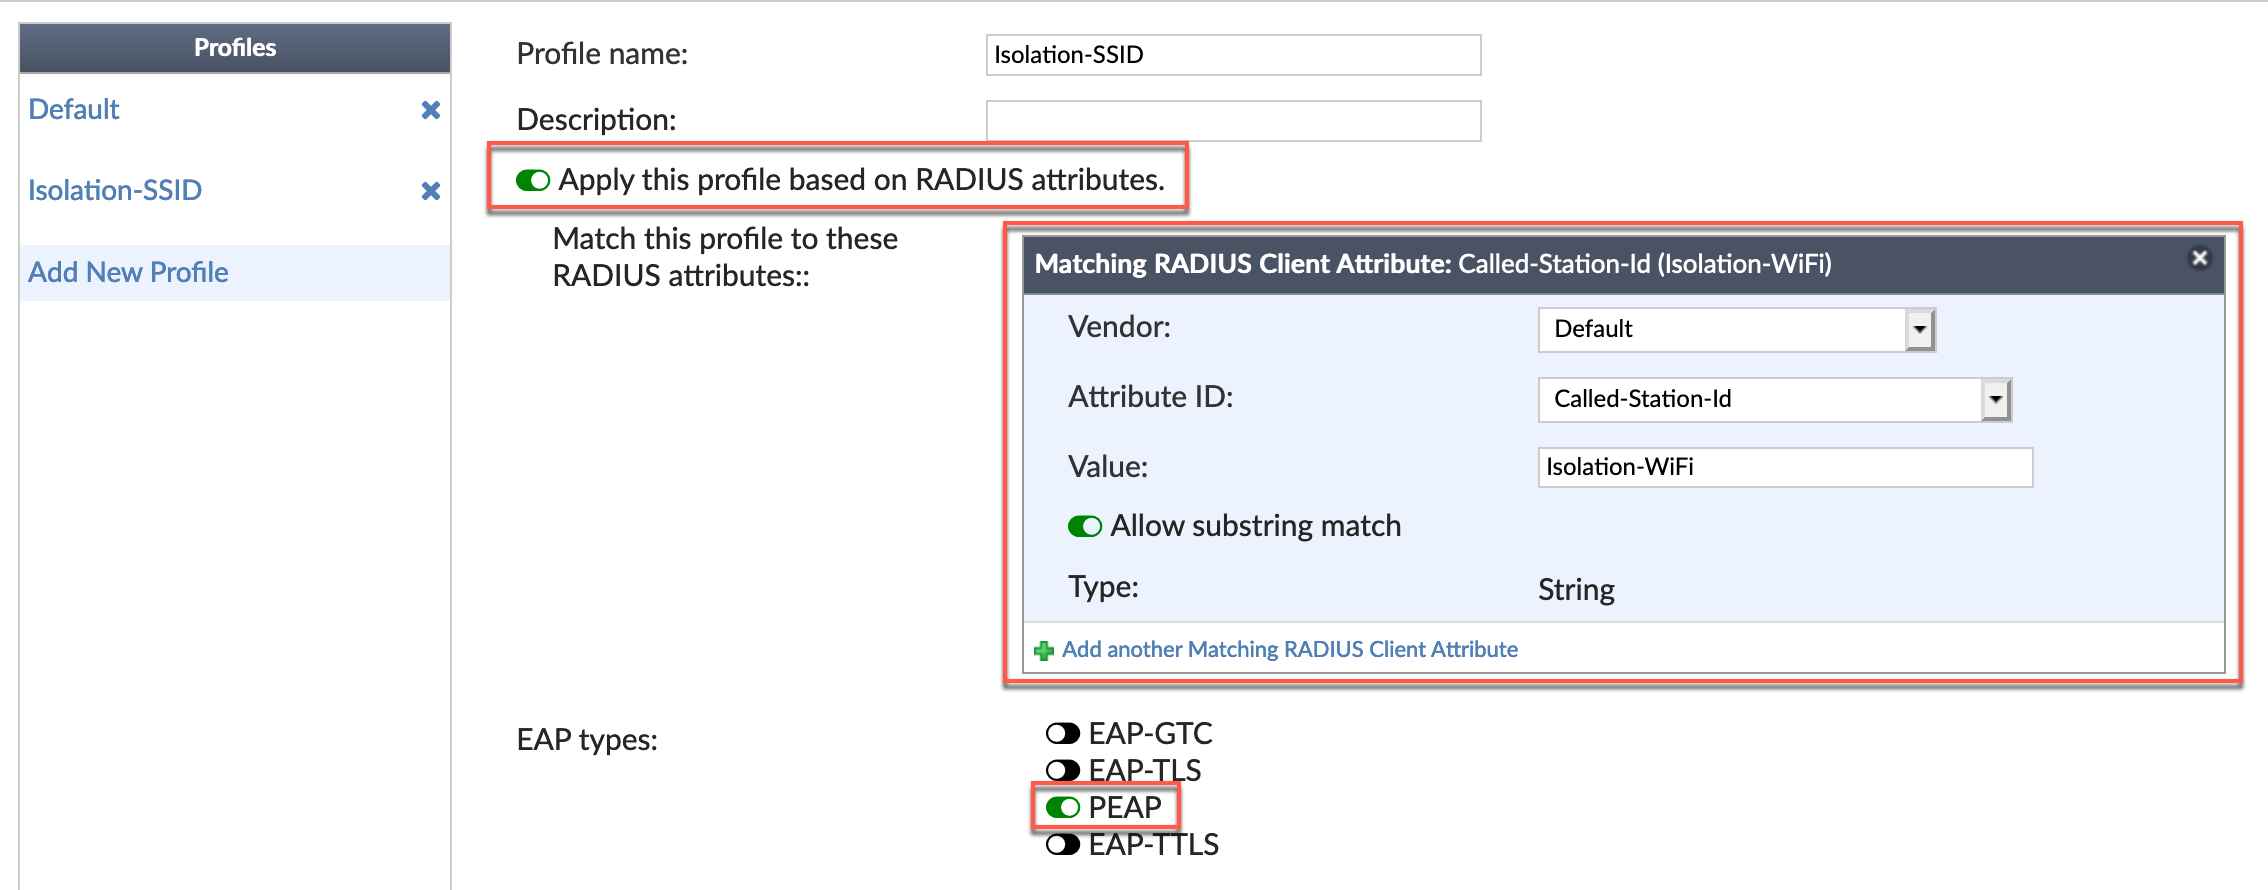
We will need to enable Apply this profile based on RADIUS attributes. Here we are defining the SSID name being sent to the RADIUS server. The Vendor is Default and the Attribute ID is available from the drop down and is Called-Station-id and the Value is the SSID exactly as it is configured on the FortiGate.

Now we need to configure the Device Authentication portion. We are going to configure the Only machine-authentication to the group we created earlier named Computer. Then configure Only user-authenticated to BYOD which we created earlier.

Now we see the final section of the RADIUS client configuration; User Authentication. Choose the Realm and enable the User Windows AD Domain authentication and save.
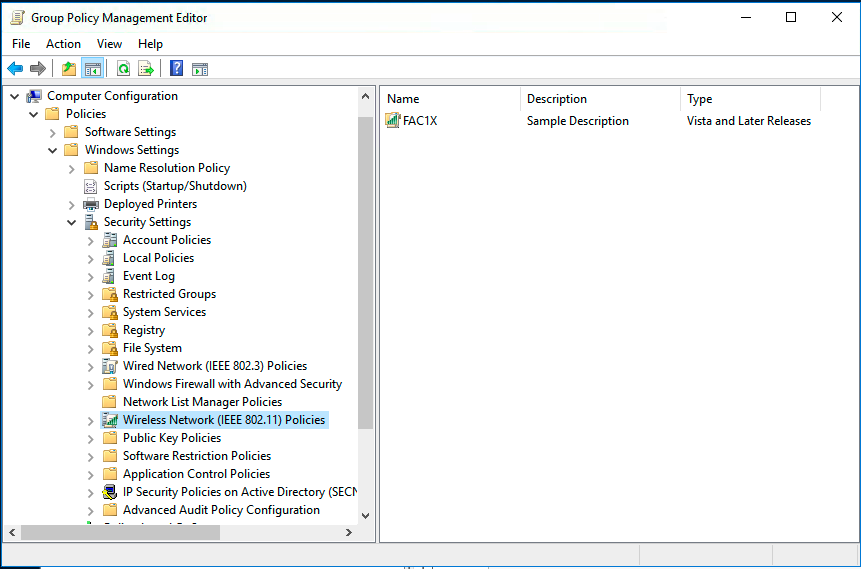
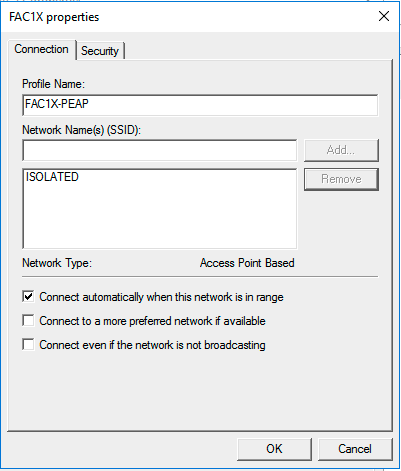
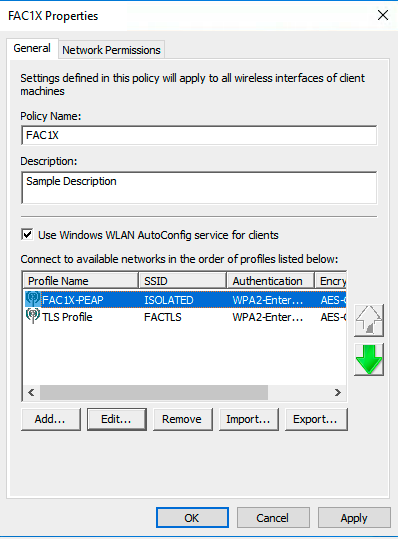
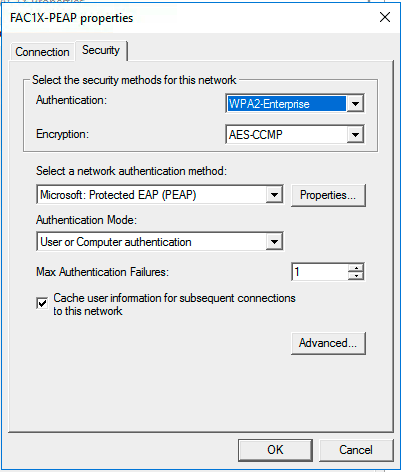
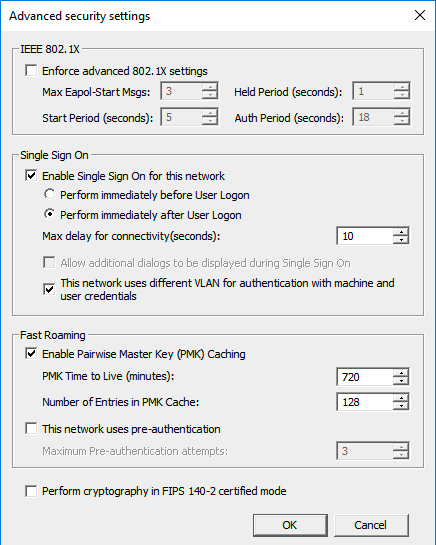
Setting up the WiFi GPO
Here is the configuration
Recent posts
-

-

Had a customer with over 200 static routes on... Full Story
-

This is a work in progress, I will be... Full Story
