Have you ever ordered a bunch of Fortinet gear... Full Story
By Manny Fernandez
July 15, 2019

Fortitoken Push Notification without FortiAuthenticator
One of the great features of the Fortigate Firewall platform is its versatility. Aside from having an Ethernet Switch and Wireless Access Point controller built-in to the platform, aside from the WAF, Load Balancer, Full DNS Server, SD WAN and the ASICs to name a very few, there is also the ability to do multi-factor authentication without the need for an additional server. All you need is FortiTokens (either hardware or electronic). In a past life, I deployed a lot of SecureID by RSA and aside from its complexity to configure and deploy, the user experience was the biggest challenge. Users did not grasp the pin/passcode/password amalgamation and was always a tough sell. In this post, I am going to show you how to configure push notification with just the Fortigate and FortiTokens. Note that the Fortigate comes with 2 “free” Electronic Tokens that can be used in this example. This eases the user experience substantially.
This video will show you the user experience. I have masked certain personal info with the Infosec Monkey logo.
What you will need:
- Fortigate Firewall
- FortiTokens (If you factory reset your box and do not have the 2 free tokens, send an email to [email protected])
Let’s get started.
I have a couple of prior post describing the deployment of FortiToken with AD and another with a more complex configuration of Certificate Pinning.
In this post, I will use a local user, meaning he will not be part of my Active Directory or my RADIUS environments. Please refer to the other post for details. Once you have the token assigned to the user, this post will be relevant.
Step 1 – Creating the user

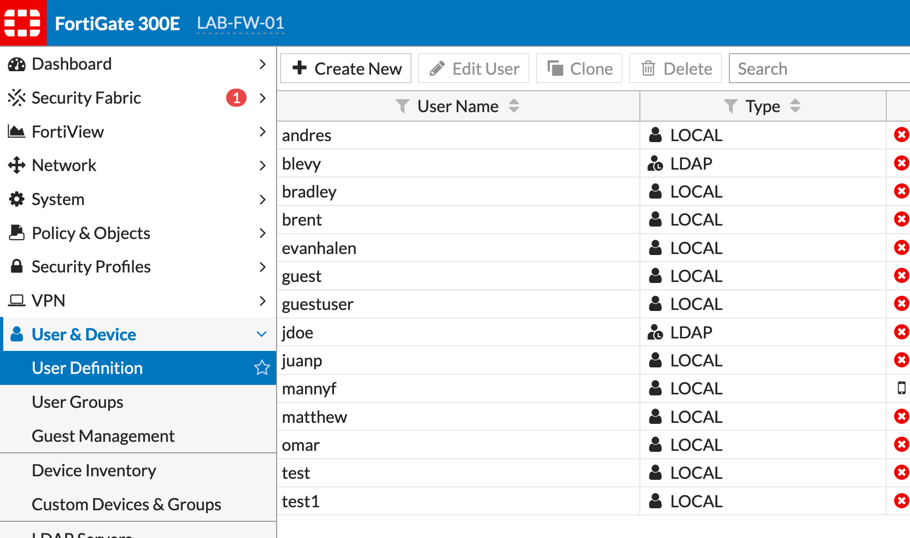
Choose the User & Device section, then User Definition. You will want to choose Create New

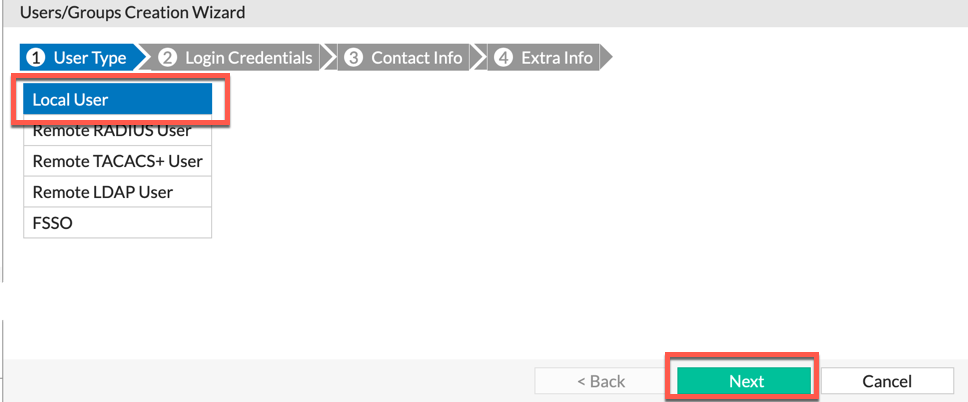
Ensure you choose Local User then choose Next

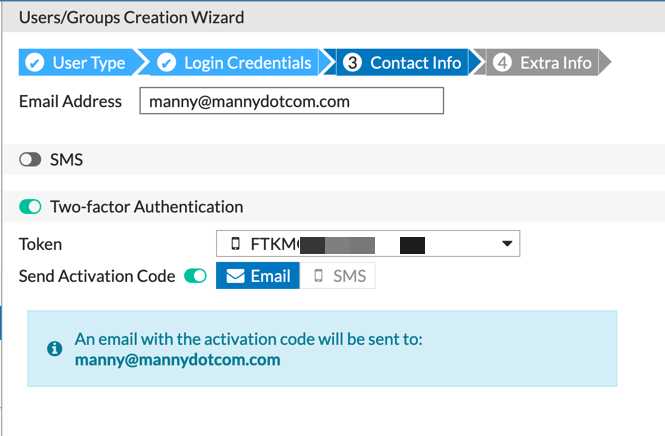
You will need to add a valid email to the account so that the token QR code can be sent to. Select the Two-factor Authentication radio button, then choose Send Activation Code and choose the drop down and choose an available token.
Step 2 – Configure the public facing Internet
In order for the Push to work, you will need to modify the Allowed Access on the public interface.

You need to add the FTM administrative access to the public interface. Make note of the IP address as you will need it in the subsequent steps.
Step 4 – Enabling Push from the Command Line
We will need to jump into the CLI to enable the feature.
config system ftm-push
set server-ip X.X.X.X
set status enable
end
Where X.X.X.X is your public IP address
Step 5 – VPN Connection
Now you can configure the Forticlient and when prompted, enter your username and password .
What you should expect:
- Configure the SSL VPN using Forticlient
- Go to Apple AppStore or Android Play Store
- Obtain the email you received from the Fortigate from Step 1 and scan the QR code with your Smart phone app you installed.
- When prompted for username and password, enter your credentials.
- The app will prompt you to either
AcceptorDeny
Hope this helps
Recent posts
-

-

Had a customer with over 200 static routes on... Full Story
-

This is a work in progress, I will be... Full Story
