At its core, IEEE 802.1X is a network layer... Full Story
By Manny Fernandez
March 6, 2026
Netcat As A Tool
Netcat, often called the “Swiss Army knife” of networking, was released in 1996 as a versatile Unix utility for reading and writing data across TCP/UDP network connections. Developed by Hobbit, the original version (1.10) revolutionized network troubleshooting, port scanning, and data transfer. It is widely used by administrators and security professionals for its power and simplicity. It has notoreoulsy been used by attackers. I remember using netcat with an Extended Unicode Directory Traversal Vulnerability where we did a file transfer from the IIS server of netcat and then launched netcat from the server allowing remote connection. Those were the days.
Lets get started.
Installing Netcat macOS
I am running macOS. I run Homebrew and will use it to install netcat.
brew install netcat
Now that you have you can test it by issuing the following command:
netcat -h
You should see something similar to me.
GNU netcat 0.7.1, a rewrite of the famous networking tool.
Basic usages:
connect to somewhere: netcat [options] hostname port [port] ...
listen for inbound: netcat -l -p port [options] [hostname] [port] ...
tunnel to somewhere: netcat -L hostname:port -p port [options]
Mandatory arguments to long options are mandatory for short options too.
Options:
-c, --close close connection on EOF from stdin
-e, --exec=PROGRAM program to exec after connect
-g, --gateway=LIST source-routing hop point[s], up to 8
-G, --pointer=NUM source-routing pointer: 4, 8, 12, ...
-h, --help display this help and exit
-i, --interval=SECS delay interval for lines sent, ports scanned
-l, --listen listen mode, for inbound connects
-L, --tunnel=ADDRESS:PORT forward local port to remote address
-n, --dont-resolve numeric-only IP addresses, no DNS
-o, --output=FILE output hexdump traffic to FILE (implies -x)
-p, --local-port=NUM local port number
-r, --randomize randomize local and remote ports
-s, --source=ADDRESS local source address (ip or hostname)
-t, --tcp TCP mode (default)
-T, --telnet answer using TELNET negotiation
-u, --udp UDP mode
-v, --verbose verbose (use twice to be more verbose)
-V, --version output version information and exit
-x, --hexdump hexdump incoming and outgoing traffic
-w, --wait=SECS timeout for connects and final net reads
-z, --zero zero-I/O mode (used for scanning)
Remote port number can also be specified as range. Example: '1-1024'
The Correct Version
Ensure you have the netcat with the -e available when you type the nc -h. In the past, the standard Windows port of Netcat did not support the -e flag by default. Instead, a workaround involving redirection or using the Windows-only -L flag (listen harder/persistent listen mode) in conjunction with other methods might be needed depending on the specific Windows version and implementation. The Nmap project’s ncat utility, which is a modern alternative, often includes similar functionality (often using –exec or similar options) on both platforms, but this is a different program from the traditional netcat. Some Linux installs also do not have the -e option available. On my test Linux box, this was the case…
sudo apt list --installed | grep netcat
netcat-openbsd/noble,now 1.226-1ubuntu2 amd64 [installed,automatic]
Removing Non E Compliant
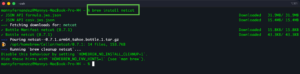
I ran the command to search the install packages, and found the netcat-openbsd version. To unintall it, you run the follwoing command:
sudo apt remove netcat-openbsd
Reading package lists... Done
Building dependency tree... Done
Reading state information... Done
The following packages will be REMOVED:
netcat-openbsd ubuntu-minimal
0 upgraded, 0 newly installed, 2 to remove and 179 not upgraded.
After this operation, 126 kB disk space will be freed.
Do you want to continue? [Y/n] y
(Reading database ... 154304 files and directories currently installed.)
Removing ubuntu-minimal (1.539.2) ...
Removing netcat-openbsd (1.226-1ubuntu2) ...
Processing triggers for man-db (2.12.0-4build2) ...
Installing Netcat on Linux
The primary differences between Netcat OpenBSD and traditional Netcat (often called “Classic” or “GNU” netcat) lie in their feature sets, command-line arguments (flags), and security posture. The one you want is
netcat-traditional.sudo apt install netcat-traditional
Testing if a UDP port is open
nc -zvu 10.1.106.61 53
Normally, when Netcat connects to a port, it stays open and waits for you to type something or for the server to send a response. In Zero-I/O mode, Netcat simply attempts to complete the “handshake” to see if the port is listening and then immediately drops the connection.
The Mechanism – It sends a packet to the target. If the target responds with a “SYN/ACK” (acknowledgment), Netcat knows the port is open, reports the success, and closes the session. When you add the -u flag (for UDP) to the -z flag, Netcat doesn’t look for a “successful connection” because UDP doesn’t “connect” in the traditional sense. Instead, it relies on the ICMP (Internet Control Message Protocol) response from the target.
The “Zero” Part – It indicates that 0 bytes of data are exchanged after the connection is established.
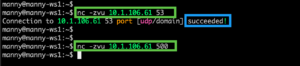
We can see that the UDP 53 responded succeeded while the UDP500 did not return a value.
Port Scan
You can use netcat as a portscanner using UDP as well as TCP by typing the following command.
nc -vnzu 10.1.106.61 1-65535

I removed some of the ports for brevity but you can see that the other ports failed while 22 is open.
Same with TCP just remove the u from the above command.
nc -vnz 10.1.106.61 1-65535

As a Chat Client/Server
We can use netcat as a rudamentary chat client and server. On the server side:
nc -l -p 32557
In this command, we are running the netcat command and telling it we are going to be as a listener with the -l and the -p denontes the port. The TCP 32557 is what I used to use as my IPTables firewall 100 Years ago 😂
On the client side, we will run the nc command with the following syntax:
nc 10.1.108.3 32557
The 10.1.108.3 is my WS1 and the 32557 is the port above.
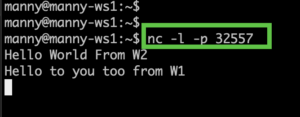
Here we can see WS1 running the server command from above,
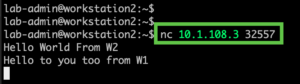
Her we can see WS2 running the client side. As we type on either one, the message appears on both devices.
Use Netcat As A Webserver
First thing to do is to create a .html file. We will create a basic .html file
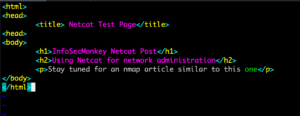
Obviously you can put anything in here.
<html>
<head>
<title> Netcat Test Page</title>
<head>
<body>
<h1>InfoSecMonkey Netcat Post</h1>
<h2>Using Netcat for network administration</h2>
<p>Stay tuned for an nmap article similar to this one</p>
</body>
</html>
Now lets run the command that will give us a temporary webserver
{ echo -ne "HTTP/1.1 200 OK\r\nContent-Length: $(stat -c%s index.html)\r\n\r\n"; cat index.html; } | nc -l -p 8081printf 'HTTP/1.1 200 OK\n\n%s' "$(cat index.html)" | netcat -l 8081
Here is the breakdown of command we ran.
The Grouped Command { ... ; }
The curly braces group multiple commands into a single unit. This ensures that the HTTP headers and the file content are sent into the pipe (|) as one continuous stream of data. Without this, nc might close the connection after the first part is sent.
The Header Construction
echo -ne "HTTP/1.1 200 OK\r\nContent-Length: $(stat -c%s index.html)\r\n\r\n"
-
-ne: Thentells echo not to add a trailing newline (since we handle them manually), andeenables “escape sequences” like\rand\n. -
\r\n(CRLF): This is the “Carriage Return + Line Feed.” While Linux uses\n, the official HTTP standard strictly requires\r\n. Many browsers will reject a response that only uses\n. -
Content-Length: This tells the browser exactly how many bytes to expect.-
$(stat -c%s index.html): This sub-command looks at the file on your disk and calculates its size in bytes automatically.
-
-
\r\n\r\n: This creates the mandatory blank line that separates the “envelope” (headers) from the “letter” (the HTML).
The Content
cat index.html; Immediately after the headers are echoed, this command dumps the actual text of your file into the stream.
The Netcat Listener
| nc -l -p 8081
-
-l: Listen mode. -
-p 8081: Explicitly defines the Port to listen on. Some versions ofncrequire the-pflag, whereas others just take the number. Using-pis generally safer for compatibility.
Since we ran the above command on WorkStation1 we will need the IP address for it. You can use ip a or ifconfig if you have the net-tools installed
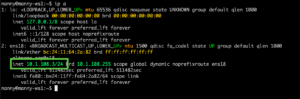
From a browser, connect to http://10.1.108.3:8081 (obviously change the IP to your IP where you are running netcat from)
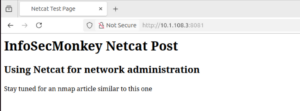
Here we can see our index.html rendered in the browser.
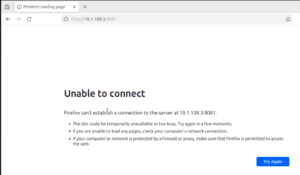
If we try to refresh the browser, we cannot see the idex.html since the netcat
Sending and Receiving Files
To receive a file using netcat, on the receiving side, we will run the following command:
nc -lvp 32557 > InfoSecMonkey.txt
To send the file we will run the following command:
nc 10.1.108.3 32557 < InfoSecMonkey.txt
Netcat is extrememly versitile and is in fact a McGyver of tools (I dated myself with this last line)

Recent posts
-

-

Netcat, often called the "Swiss Army knife" of networking,... Full Story
-

In case you did not see the previous FortiNAC... Full Story
-

This is our 5th session where we are going... Full Story
-

Now that we have Wireshark installed and somewhat configured,... Full Story
-

The Philosophy of Packet Analysis Troubleshooting isn't about looking... Full Story