If you've spent any time configuring user authentication on... Full Story
By Manny Fernandez
August 24, 2020

Setting up SSL Offload and Load Balancing for inbound connections on a FortiGate
Today I was working with a colleague of mine on a proof-of-concept for one of his customers. The requirements were the following:
- Install the SSL certificate on the FortiGate itself and NOT the server.
- Ability to scan inbound traffic using the IPS, Application control, and AV traffic.
- Ability to add additional servers and make them load-balanced.
I have a wildcard cert that I purchased for my lab. No real production value to it at all but it does allow me to test. The test was to create a VIP for my FortiAuthenticator and have the user connecting to it and be offered the wildcard cert instead of the factory Fortinet self-signed certificate installed by default on the FortiAuthenticator.
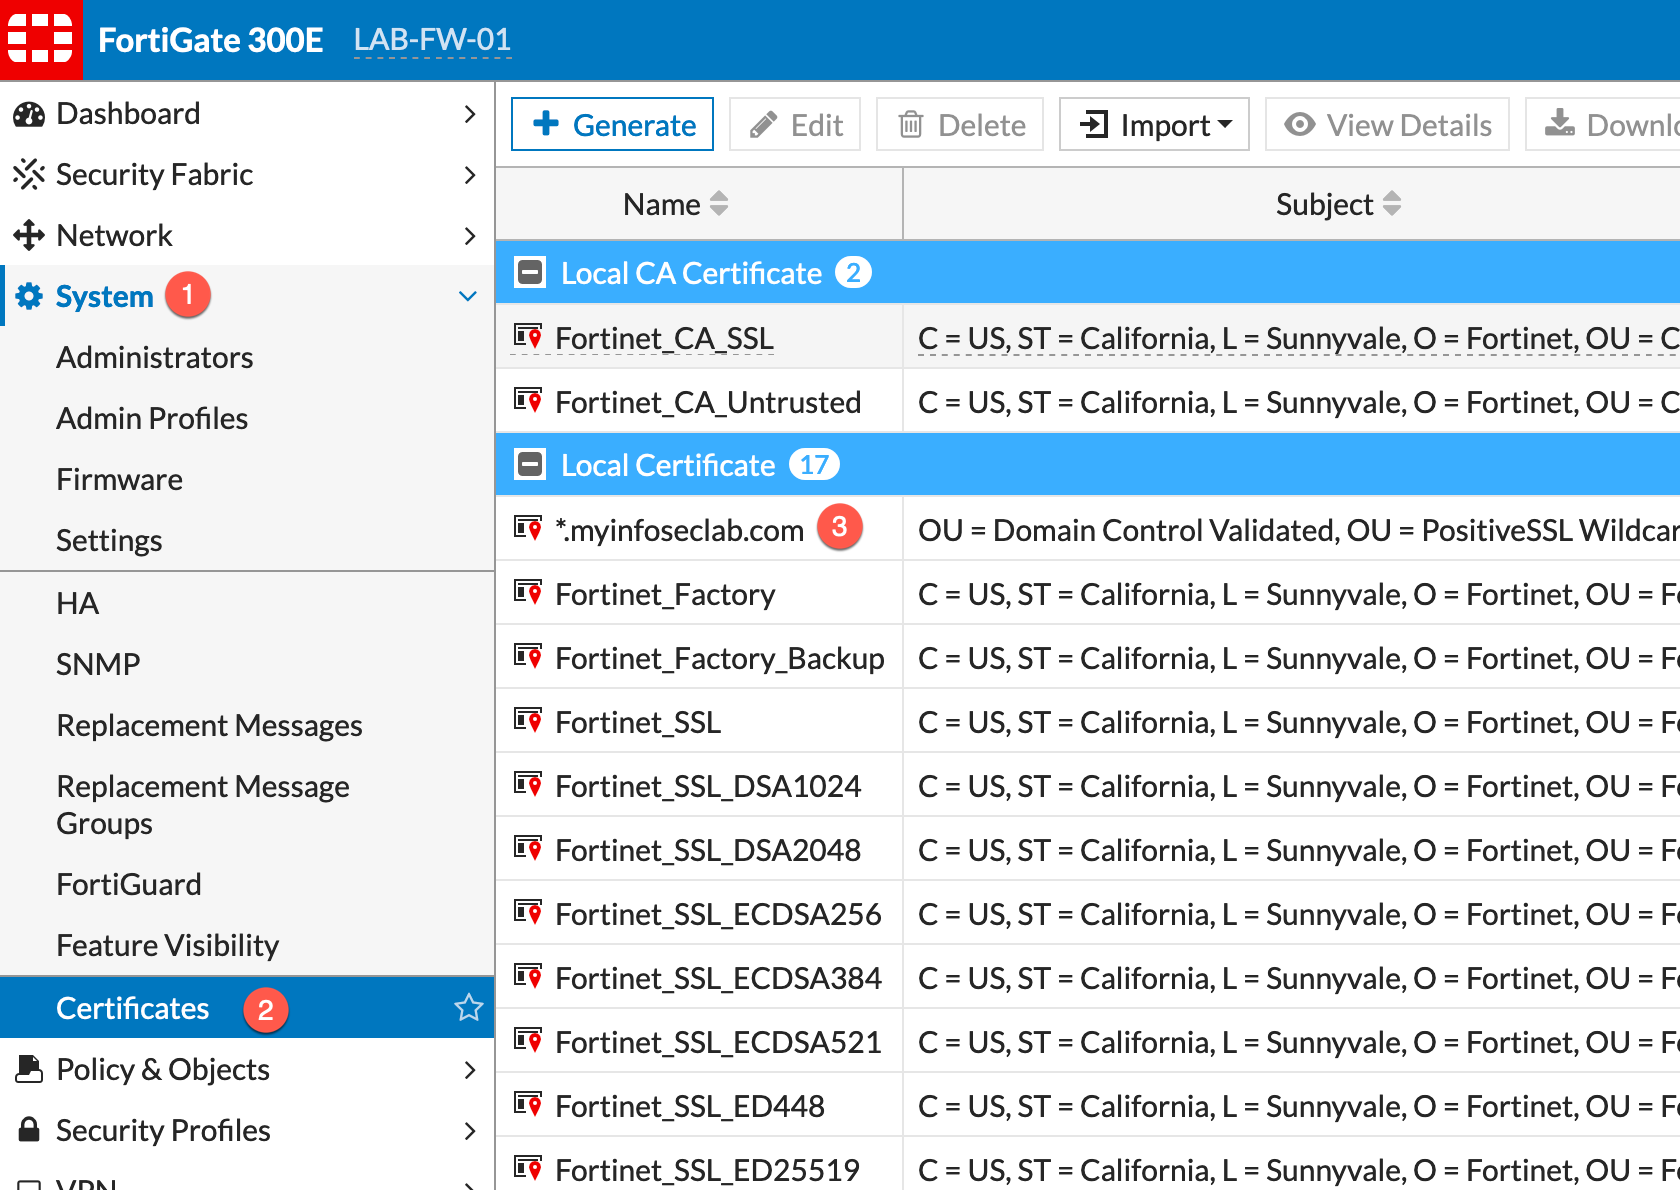
First thing you will need to do is install the certificate that will be presented. This can be a wildcard certificate (in my case) or a specific server certificate. You will need to go to:
- System
- Certificates
- Then Import (although mine has already been imported)
NOTE: If you do not see Certificates under System, you will need to go to Feature Visibility and enable it by choosing the radio button.
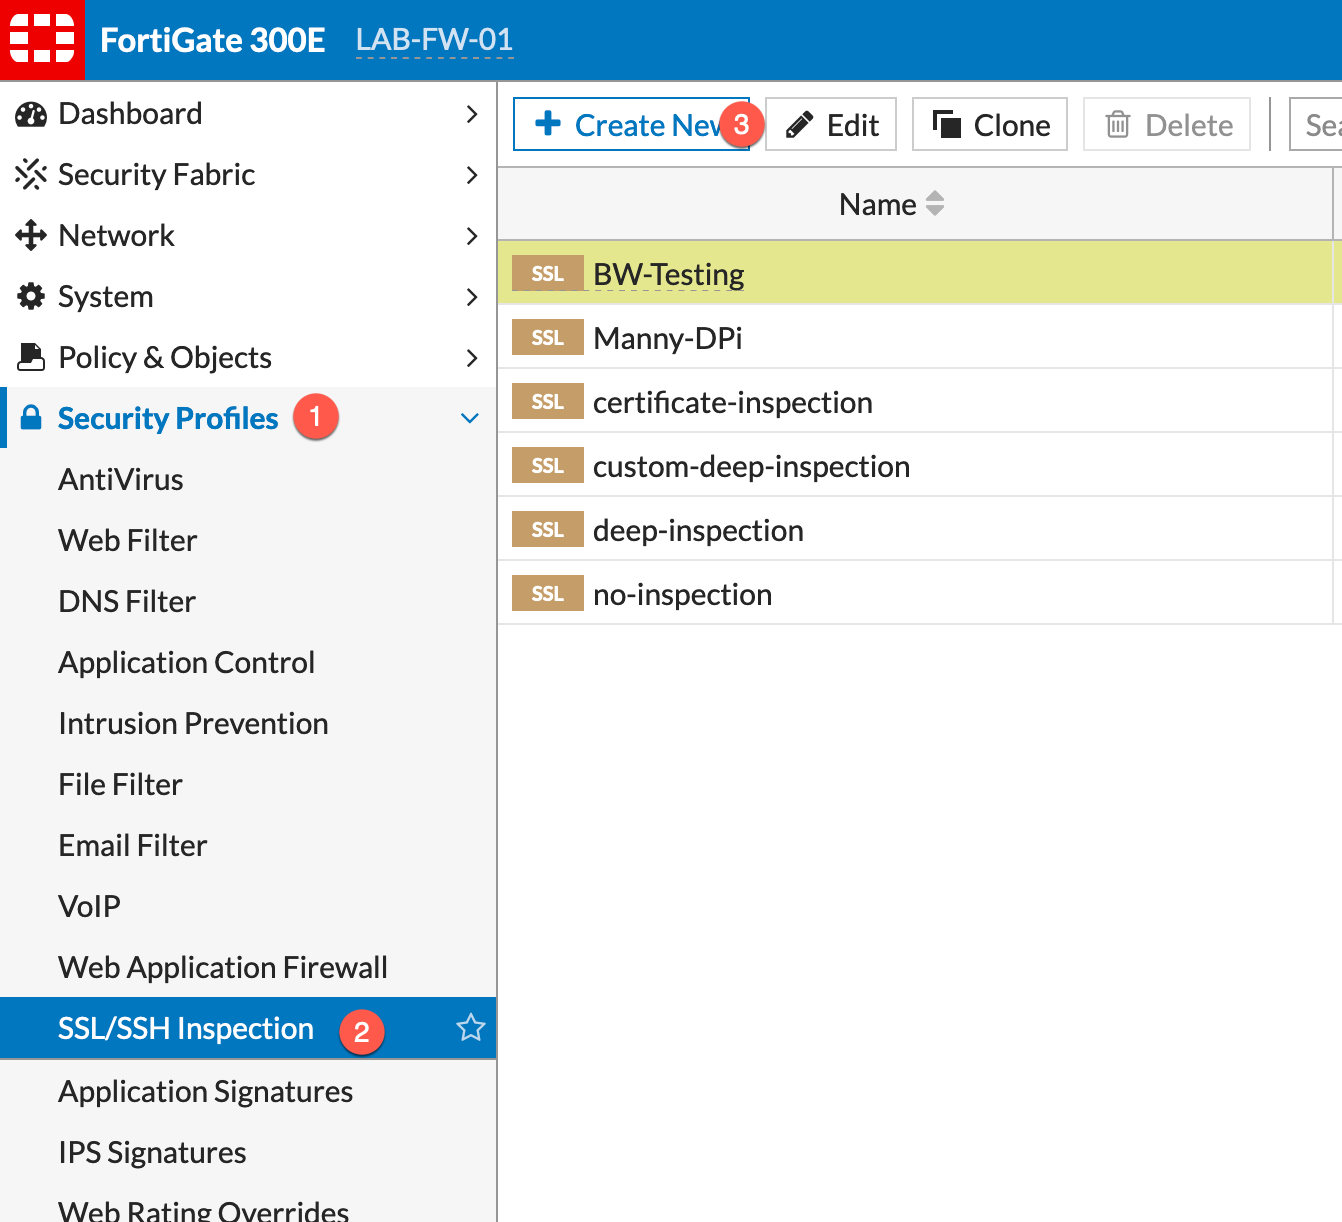
Now we will create an SSL/SSH Inspection profile.
- Security Profiles
- SSL/SSH Inspection
- Create New
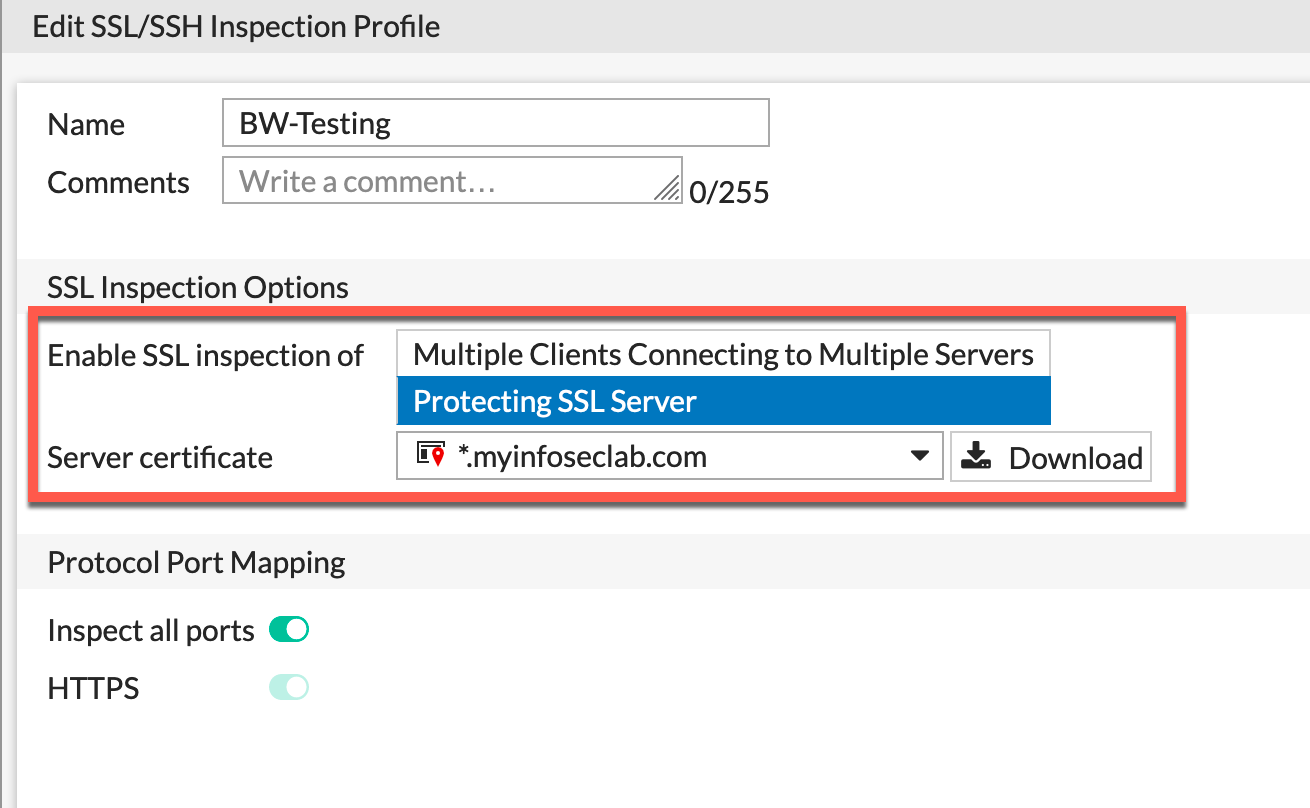
You need to give it a name, then choose Protecting SSL Server. Finally, you will choose the drop down and choose the certificate which you are going to present to the users.
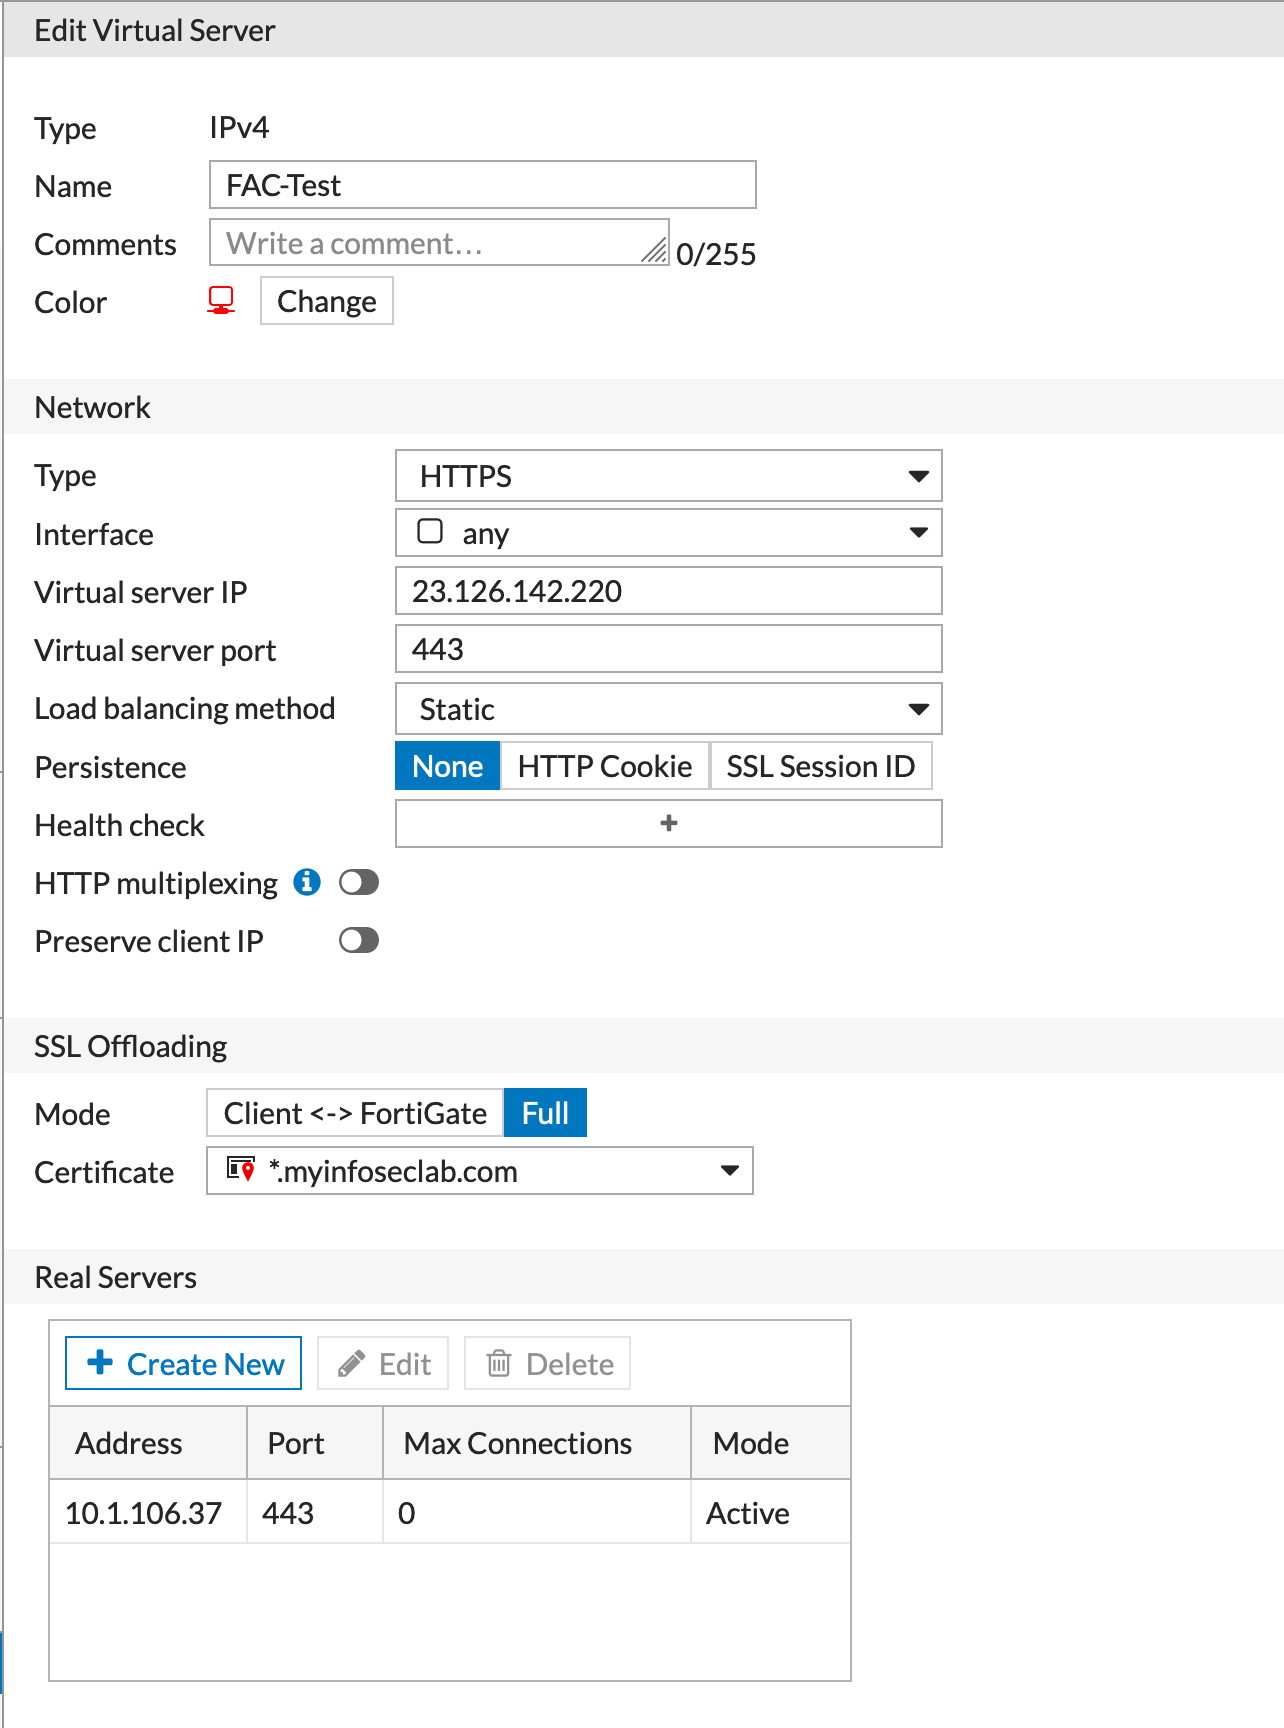
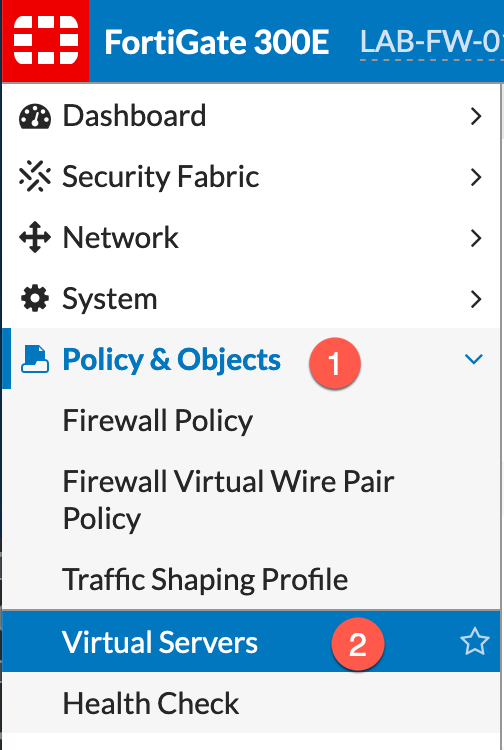
Now we need to create the Virtual Server located under Policy & Objects then Virtual Servers.
Above, you can see we are changing the mode to Full and then you will need to select the certificate. You need to then add the Real Servers and the necessary ports.
Connection Types
HTTP
Select HTTP to load balance only HTTP sessions with the destination port number that matches the Virtual Server Port setting. Change Virtual Server Port to match the destination port of the sessions to be load balanced (usually port 80 for HTTP sessions). You can enable HTTP Multiplexing. You can also set Persistence to HTTP Cookie to enable cookie-based persistence.
HTTPS
Select HTTPS to load balance only HTTPS sessions with the destination port number that matches the Virtual Server Port setting. Change Virtual Server Port to match the destination port of the sessions to be load balanced (usually port 443 for HTTPS sessions). You can enable HTTP Multiplexing. You can also set Persistence to HTTP Cookie to enable cookie-based persistence, or you can set Persistence to SSL Session ID.
IMAPS
Select IMAPS to load balance only IMAPS sessions with the destination port number that matches the Virtual Server Port setting. Change Virtual Server Port to match the destination port of the sessions to be load balanced (usually port 993 for IMAPS sessions). You can also set Persistence to SSL Session ID.
POP3S
Select POP3S to load balance only POP3S sessions with the destination port number that matches the Virtual Server Port setting. Change Virtual Server Port to match the destination port of the sessions to be load balanced (usually port 995 for POP3S sessions). You can also set Persistence to SSL Session ID.
SMTPS
Select SMTPS to load balance only SMTPS sessions with the destination port number that matches the Virtual Server Port setting. Change Virtual Server Port to match the destination port of the sessions to be load balanced (usually port 465 for SMTPS sessions). You can also set Persistence to SSL Session ID.
SSL
Select SSL to load balance only SSL sessions with the destination port number that matches the Virtual Server Port setting. Change Virtual Server Port to match the destination port of the sessions to be load balanced. You can also set Persistence to SSL Session ID.
TCP
Select TCP to load balance only TCP sessions with the destination port number that matches the Virtual Server Port setting. Change Virtual Server Port to match the destination port of the sessions to be load balanced.
UDP
Select UDP to load balance only UDP sessions with the destination port number that matches the Virtual Server Port setting. Change Virtual Server Port to match the destination port of the sessions to be load balanced.
IP
Select IP to load balance all sessions accepted by the security policy that contains this virtual server.
Load Balancing Method
Static
The traffic load is statically spread evenly across all real servers. Sessions are not assigned according to how busy individual real servers are. This load balancing method provides some persistence because all sessions from the same source address always go to the same real server. Because the distribution is stateless, so if a real server is added, removed, or goes up or down, the distribution is changed and persistence might be lost.
Round Robin
Directs new requests to the next real server. This method treats all real servers as equals regardless of response time or the number of connections. This method does not direct requests to real servers that down or non responsive.
Weighted
Real servers with a higher weight value receive a larger percentage of connections. Set the real server weight when adding a real server.
Least Session
Directs requests to the real server that has the least number of current connections. This method works best in environments where the real servers or other equipment you are load balancing all have similar capabilities. This load balancing method uses the FortiGate session table to track the number of sessions being processed by each real server. The FortiGate unit cannot detect the number of sessions actually being processed by a real server.
Least RTT
Directs sessions to the real server with the lowest round trip time. The round trip time is determined by a ping health check monitor. The default is 0 if no ping health check monitors are added to the virtual server.
First Alive
Directs sessions to the first live real server. This load balancing schedule provides real server failover protection by sending all sessions to the first live real server. If a real server fails, all sessions are sent to the next live real server. Sessions are not distributed to all real servers so all sessions are processed by the first real server only.
HTTP Host
Load balances HTTP host connections across multiple real servers using the host’s HTTP header to guide the connection to the correct real server.
Health Checks
You can also enable the Health Checks
In the FortiGate GUI, you can configure health check monitoring so that the FortiGate unit can verify that real servers are able respond to network connection attempts.
If a real server responds to connection attempts, the load balancer continues to send sessions to it. If a real server stops responding to connection attempts, the load balancer
assumes that the server is down and does not send sessions to it. The health check monitor configuration determines how the load balancer tests real servers. You can use a single health check monitor for multiple load balancing configurations. You can configure TCP, HTTP, and Ping health check monitors. You usually set the health check monitor to use the same protocol as the traffic being load balanced to it. For example, for an HTTP load balancing configuration, you would normally use an HTTP health check monitor.
Firewall Policy
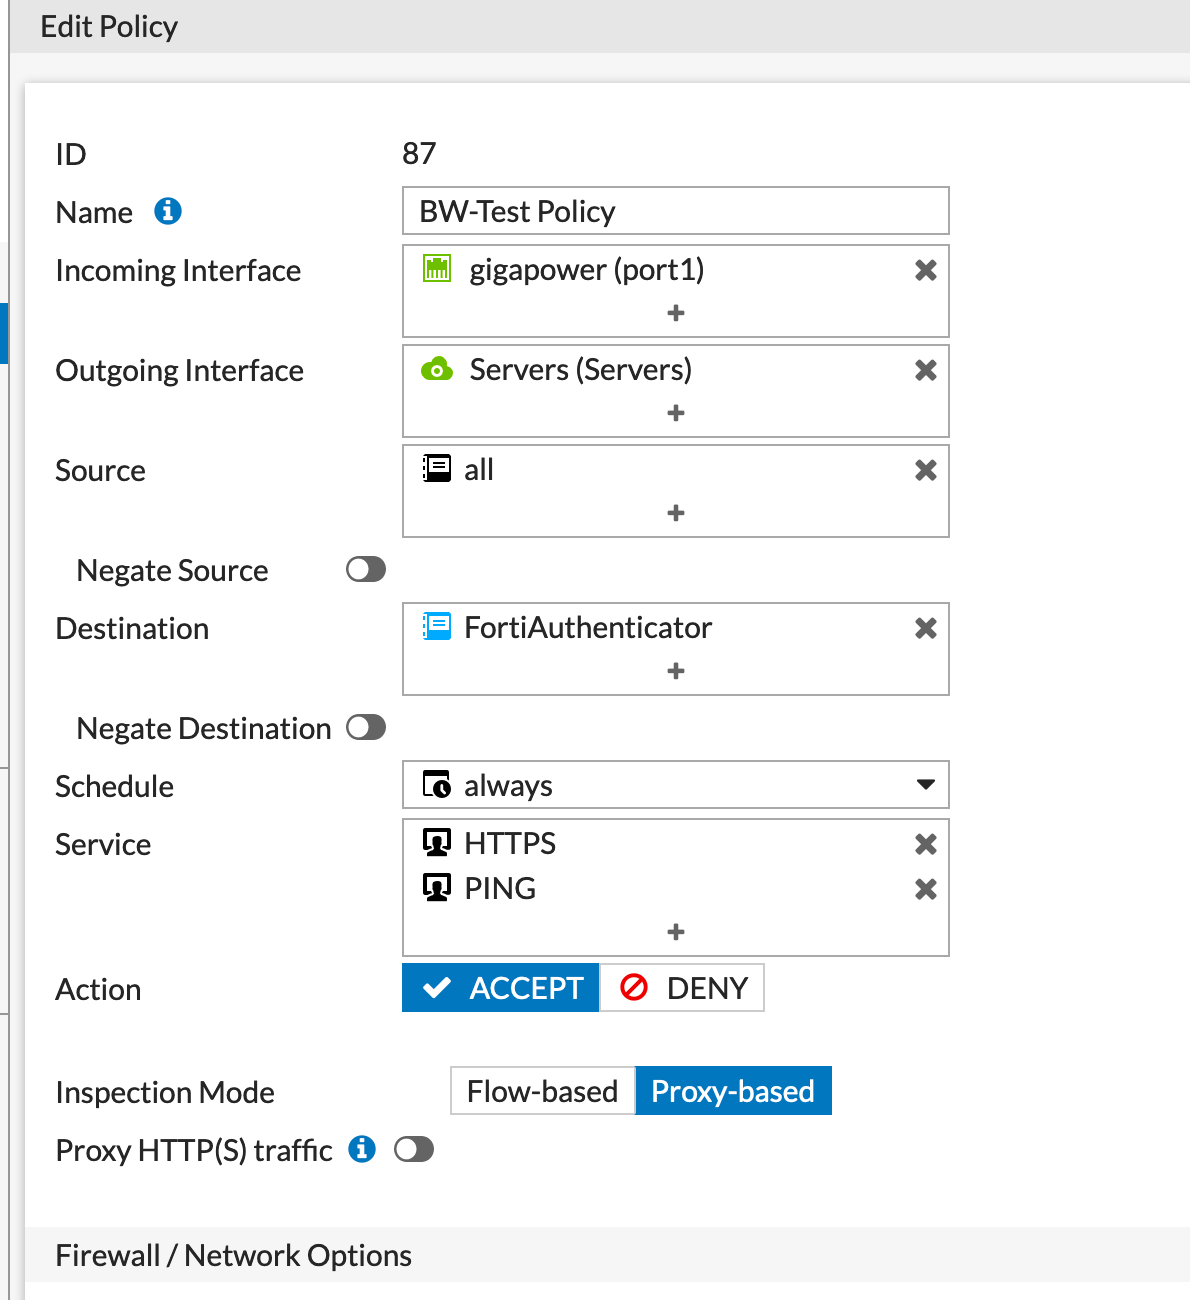
Now you will now need to create the policy. As you can see on my policy, I have created a policy from my gigapower to the Servers VLAN from all source IPs to the FortiAuthenticator as the destination and the traffic I want to allow (e.g. HTTPS and ping). YOU MUST HAVE THE POLICY IN Proxy-based.
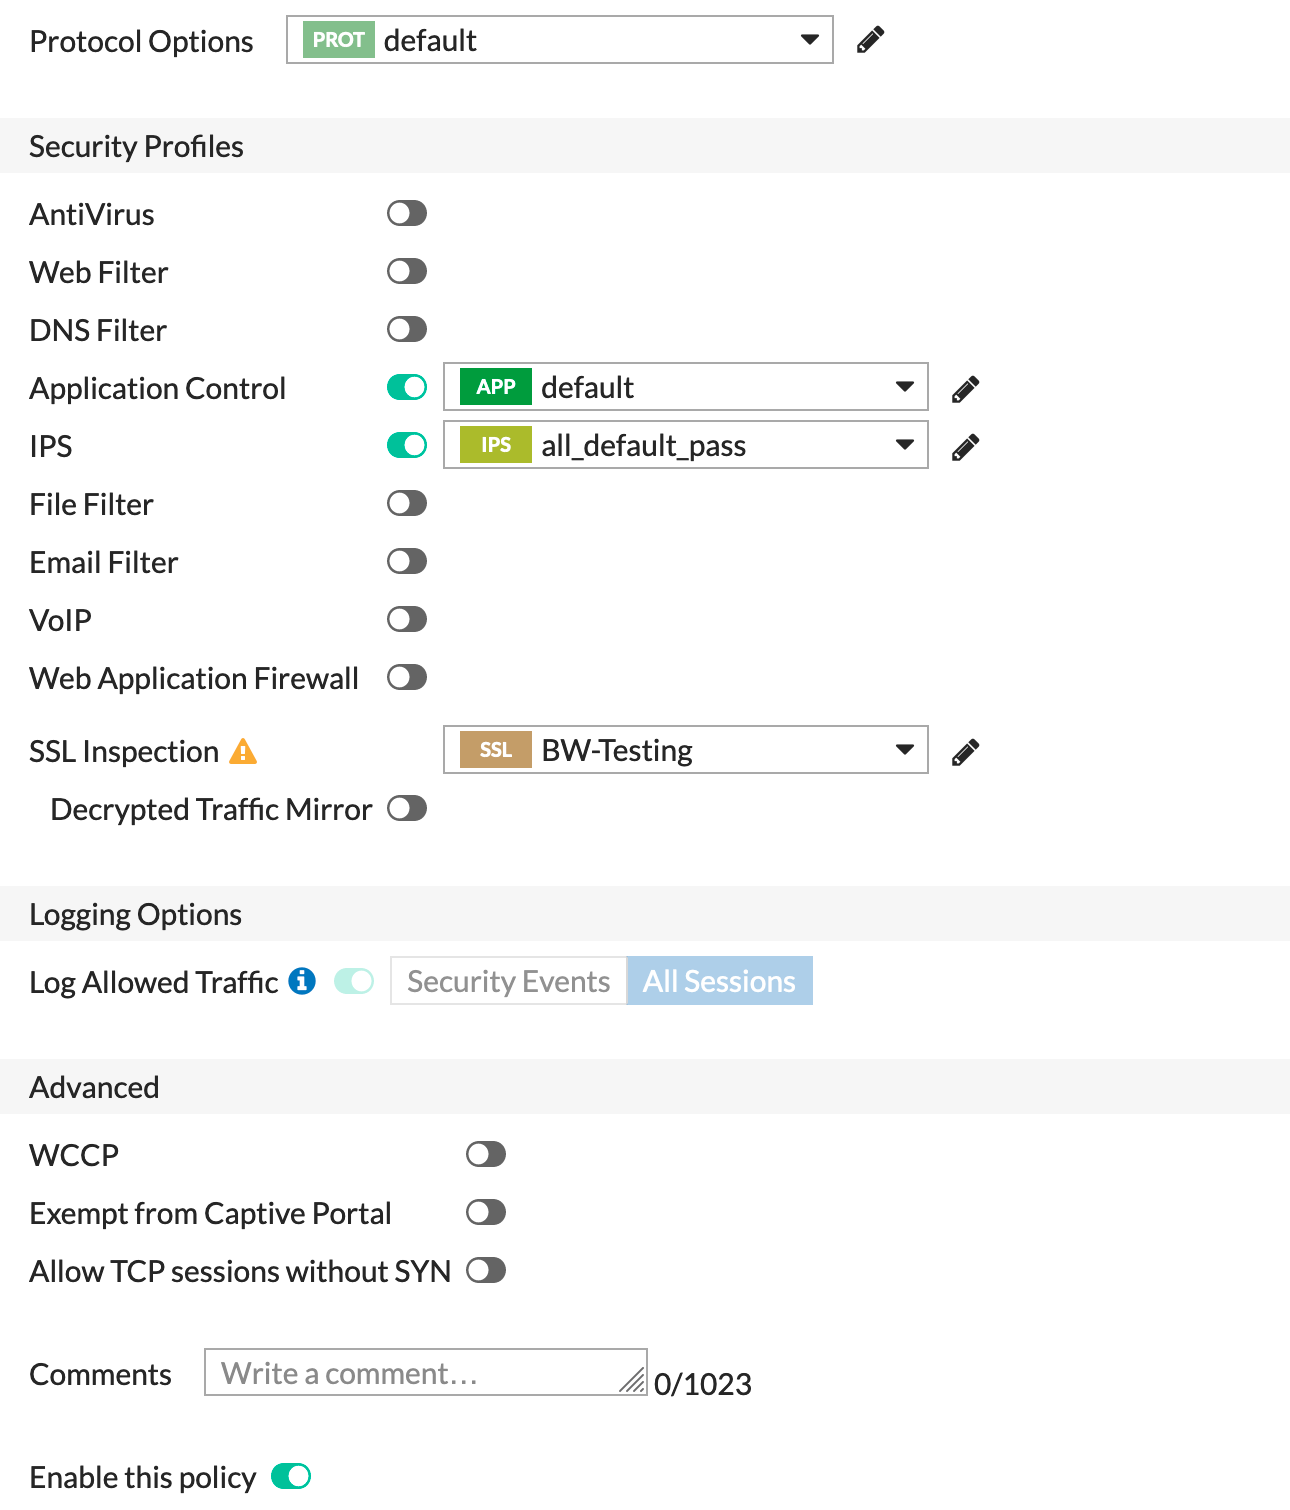
Now we need to choose the IPS and any other Security Profiles you want to use. The most import portion here is the SSL Inspection. Choose the SSL/SSH Inspection that you created earlier.
Hope this helps
Recent posts
-

-

DNS is one of those technologies that quietly underpins... Full Story
-

BGP issues on FortiGate firewalls usually trace back to... Full Story
-

Every time your laptop talks to your router, a... Full Story
-

If you've spent any time configuring NAT on a... Full Story
-

If you have spent any time configuring firewall policies... Full Story
-

High availability on FortiGate is one of those features... Full Story
-

If you've configured SD-WAN on a FortiGate, you've almost... Full Story
-

FortiLink is the management protocol that turns a FortiSwitch... Full Story
-

FortiSwitches are pretty rock solid from Mean Time Between... Full Story
-

This is a quicky tip. Have you ever gone... Full Story
-

DNS is one of those quiet pieces of internet... Full Story
-

This article is an updated version of the previous... Full Story
-

You will add ns2 as a secondary (slave) BIND9... Full Story
-

In the process of deploying my lab, I needed... Full Story
-

RFC 8805, used to be known as Self-Correcting IP... Full Story
-

Years back, I wrote an article about certificate pinning. ... Full Story
-

FortiGates have the ability to send alerts to Microsoft... Full Story
-

In this post, I am going to walk through... Full Story
-

Troubleshooting VoIP on a FortiGate can feel like trying... Full Story
-

Prior to FortiOS 7.0, there were three commands to... Full Story
-

In this post, I am going to go over... Full Story
-

What we are going to do: We are going... Full Story
-

Choosing between FGCP (FortiGate Clustering Protocol) and FGSP (FortiGate... Full Story
-

Creating a VLAN on macOS (The "Pro" Move) A... Full Story
-

This blog post explores the logic behind how macOS... Full Story
-

Pretty Fly for a Wi-Fi Tell My Wi-Fi Love... Full Story
-

Part of my daily gig is creating BoMs (Bill-of-Materials)... Full Story
-

ICMP introduces several security risks, but careful filtering, rate... Full Story
-

The command diag debug application dhcps -1 enables full... Full Story
-

In the world of FortiOS, execute tac report is... Full Story
-

LLDP; What is it The Link Layer Discovery Protocol... Full Story
-

What it actually does When you run diagnose fdsm... Full Story
-

Monkey Bites are bite-sized, high-impact security insights designed for... Full Story
-

I have run macOS in macOS with Parallels but... Full Story
-

Don't be confused with my other FortiNAC posts where... Full Story
-

This is the third session in a multi-part article... Full Story
-

Today I was configuring key-based authentication on a FortiGate... Full Story
-

Netcat, often called the "Swiss Army knife" of networking,... Full Story
-

At its core, IEEE 802.1X is a network layer... Full Story
-

In case you did not see the previous FortiNAC... Full Story
-

This is our 5th session where we are going... Full Story
-

Now that we have Wireshark installed and somewhat configured,... Full Story
-

The Philosophy of Packet Analysis Troubleshooting isn't about looking... Full Story
-

Do you use Sequence Groups In your Firewall Policies? ... Full Story
-

The other day, I opened my Wireshark for macOS... Full Story
-

1. Executive Summary Objective This guide walks through the... Full Story