At its core, IEEE 802.1X is a network layer... Full Story
By Manny Fernandez
December 27, 2025
Ubuntu UFW (Uncomplicated Firewall); The complete How To
Years ago, in another life, I started an MSSP before there were MSSPs. I had started a business when the large company I was working for was puffing smoke. I was focusing on Checkpoint FW1 and Cisco PIX primarily although I had worked on everything from Novell Border Manager, to Sidewinder (when it was Secure Computing), to Raptor Firewall (when it was Axent) and everything in between. One day, my partner and I presented two quotes to the customer; one for Checkpoint and one for PIX. He barked at both. I then told him we could take some of his old computers and install Linux which was open source and no support hoping he would turn it down. He called my bluff and said that he not only wanted 1 firewall but wanted another one in Boston and a VPN between the two sites. We sprang into action and after many sleepless nights, we got Linux running ipTables, FreeSWAN for the VPN and later we stumbled onto FirewallBuilder which I am glad to report is still around. At any rate, I parlayed that into an entire managed firewall business which was netting me 200K a month. Grant you, this was in the early 2000’s so that was big money then.
Phase II of the business was an entire back end we built on Webmin. We used remote logging to send logs to our SOC and built RBACLs into the GUI. It is still available online as well. Here is an article I wrote about it here on InfoSecMonkey.
In this article, I will cover the Uncomplicated Firewall running on Ubnuntu known as UFW.
First thing you are going to need is an install of Ubuntu Workstation or Server. No GUI is required although I will cover a GUI front-end for it.
First, lets check if the package is installed on our system.
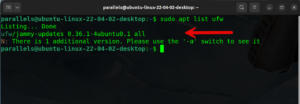
We can do this by typing sudo apt list ufw and enter. You can see where the red arrow is after the word all there is nothing. This means it did not find it on my system.
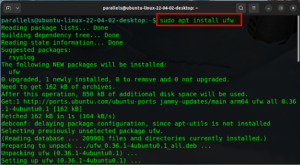
We will then install it by typing sudo apt install ufw and enter. You may need to give your password again. This will go through and install all necessary packages.
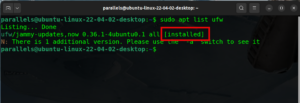
Now if we run the command again, we can see that we have the keyword installed after the command validating that the UFW package is installed.
Now lets check to see if we have IPv6 enabled and some of the defaults.
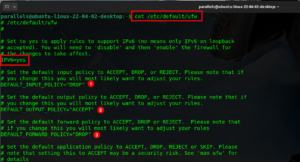
By typing vi /etc/default/ufw and enter Note. you can use whatever editor you want, I am old school and use vi.
You can see in the screenshot above that IPV6 Is set to yes meaning it is enabled. Additionally, you can see that by default, the input policy (1) Is set to Drop meaning anything coming into this device, will be dropped. Also, we can see the output policy (2) is set to Accept meaning all outbound access from this device will be permitted. And finally, we can see the forward policy Is also set to Drop. The forwarding policy controls what gets routed on your machine.
Obviously, if you will be connecting to the Linux device remotely, you want to ensure you have access to SSH in to the device.
To see the status of the UFW on the Ubuntu device, give the following command sudo ufw status and enter.

Here you can see that in my case, the UFW is inactive .
Before we do anything else, we want to make sure we have access into the device. We will need to permit SSH connections.
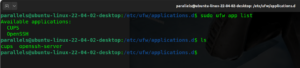
In UFW, you have the concept of App Profiles. This is not comparative to the application identification on products such as FortiGate and Palo Alto Networks. You can see the list of app profiles In two ways, one way is to go to the directory housing them and running an ls on them or you can type the following command
sudo ufw app list
The output is essentially the same.
Creating an App Profile
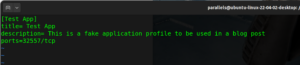
Although there is an app profile created by default for SSH, we are going to create one for a fictitious application using TCP 30557 and we will call it testapp.
I used the app profile for openssh and copied it as testapp.
There are many repositories on-line where communities have created many of those app profiles. One of them is here.
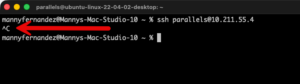
Now lets add that OpenSSH app profile on the UFW. First, with UFW disabled, I can connect to it via SSH without a problem.
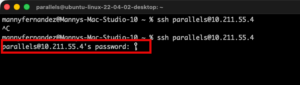
I enabled the UFW on the Linux host by typing sudo ufw enable and enter

With the default policy being to drop everything, my ssh connection from my macOS failed.
To enable OpenSSH app profile on the UFW, you type sudo ufw allow OpenSSH and enter. NOTE: If you app profile has spaces, you will need to wrap it in "" for it to work.
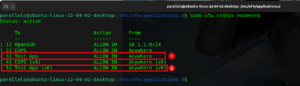
Now I can give the sudo ufw status command and I get the IPv4 and IPv6 versions of the OpenSSH app profile shown as active.
Now when I try my connection again, I get a prompt to enter my password.
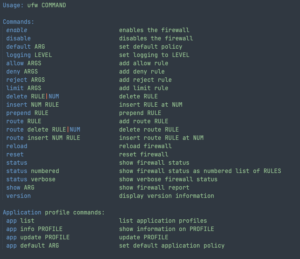
UFW commands
The most important ones while you are learning is how to enable and disable it. Those are simple enough sudo ufw enabled and sudo ufw disable`
Allow inbound SSH to Linux Device
Lets say you only want to allow OpenSSH from a particular Source IP
sudo ufw allow from 10.1.1.40 to any app "OpenSSH"
Additionally, you can use the ports such as
sudo ufw allow from 10.1.1.40 proto tcp to any port 22
Note: You can also use a subnet in the source such as 10.1.1.0/24
sudo ufw allow from 10.1.1.0/24 proto tcp to any port 22
Denying Outbound Traffic
In the olden days of worms that would send themselves out using SMTP, you needed to block outbound traffic. Today its still a problem but mostly blocking SMB, and for some instances I block everything and only permit POS traffic to their POS hosts and nothing else.
To block outbound SMTP, we can issue the following command
sudo ufw deny out 25 although these days, you need other ports such as
sudo ufw deny out 465 or sudo ufw deny out 587 or sudo ufw deny out 2525
Deleting Rules
When you want to view the configuration of the UFW rules or policies, you can use the sudo ufw status numbered and the policies will show a number.
To delete the rule in question, you can use the number of the rule. See below
Lets say we want to delete rule 3 and rule 5, I can run the command sudo ufw delete 3,
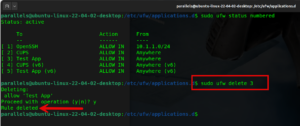
Now we want to delete rule number 5, your first instinct is to say, “I already know I want to delete rule 3 and rule 5” so the logical command you would run would be sudo ufw delete 5 however …….
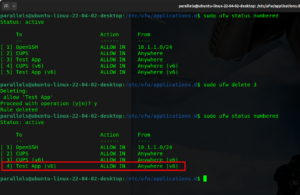
As we can see, rule 5 does not exist. Which would not be as bad as having a rule 5 that you inadvertently delete.
NOTE: Firewall Rule numbers are not rule IDs like in the FortiGate platform that the policy ID can be moved up adn down as needed but it is unique to that particular rule or policy.
Blocking based on interface
You can also drop connections from hosts on particular interfaces. This can be just blocking connection from a port but can also be used to block spoofed packets.
sudo ufw deny in on eth1 from 10.1.1.0/24
in this example, the IP address on the inside of this device is 10.1.1.0/24 and we do not want to allow any traffic from an inside to come in from an outside interface.
GUI Management
There are a few GUIs for UFW, the standard one used is GUFW. To install it,

Once installed you can run the gufw app.
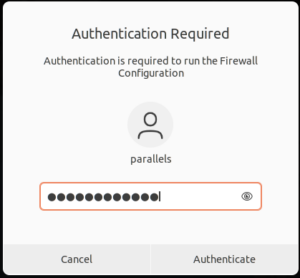
You will be asked to authenticate with your password. Then hit Authenticate
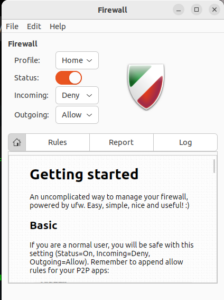
You can have different profiles for Home, Work or Public but we can see that the status is on.
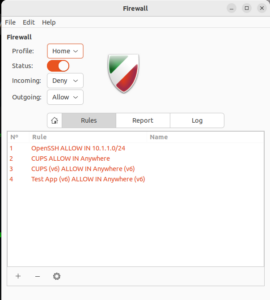
Finally you can see the Rules section showing your active rules.
Logging
By default, the logging is set to low which will only capture packets that are blocked. The levels are off, low, medium, high and full
Low: Default setting. Logs all blocked packets that do not match current rules, plus packets matching specific “log” rules you define.
Medium: Includes low level logs, plus logs for invalid packets, new connections, and rate-limited logging.
High/Full: Include logs for nearly all packets, with slight differences in rate limiting.
The log file is written by default to /var/log/ufw.log
When troubleshooting, I like to tail the file with tail /var/log/wfw.log
If you want to change the default location, you will need to modify the rsyslog.d file
sudo vi /etc/rsyslog.d/20-ufw.conf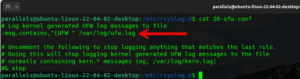
Ensure you have rsyslog.d installed, if not
sudo apt install rsyslog
You can cat or tail the file
parallels@ubuntu-linux-22-04-02-desktop:/var/log$ cat ufw.log
Dec 27 17:23:27 ubuntu-linux-22-04-02-desktop kernel: [359729.412545] [UFW BLOCK] IN=enp0s5 OUT= MAC=00:1c:42:f4:e4:cc:9e:76:0e:75:83:64:08:00 SRC=10.211.55.2 DST=10.211.55.4 LEN=64 TOS=0x08 PREC=0x40 TTL=64 ID=0 DF PROTO=TCP SPT=56525 DPT=22 WINDOW=65535 RES=0x00 CWR ECE SYN URGP=0
Dec 27 17:23:27 ubuntu-linux-22-04-02-desktop kernel: [359730.412697] [UFW BLOCK] IN=enp0s5 OUT= MAC=00:1c:42:f4:e4:cc:9e:76:0e:75:83:64:08:00 SRC=10.211.55.2 DST=10.211.55.4 LEN=64 TOS=0x08 PREC=0x40 TTL=64 ID=0 DF PROTO=TCP SPT=56525 DPT=22 WINDOW=65535 RES=0x00 SYN URGP=0
Dec 27 17:23:27 ubuntu-linux-22-04-02-desktop kernel: [359731.412677] [UFW BLOCK] IN=enp0s5 OUT= MAC=00:1c:42:f4:e4:cc:9e:76:0e:75:83:64:08:00 SRC=10.211.55.2 DST=10.211.55.4 LEN=64 TOS=0x08 PREC=0x40 TTL=64 ID=0 DF PROTO=TCP SPT=56525 DPT=22 WINDOW=65535 RES=0x00 SYN URGP=0
Dec 27 17:23:27 ubuntu-linux-22-04-02-desktop kernel: [359732.412582] [UFW BLOCK] IN=enp0s5 OUT= MAC=00:1c:42:f4:e4:cc:9e:76:0e:75:83:64:08:00 SRC=10.211.55.2 DST=10.211.55.4 LEN=64 TOS=0x08 PREC=0x40 TTL=64 ID=0 DF PROTO=TCP SPT=56525 DPT=22 WINDOW=65535 RES=0x00 SYN URGP=0
Dec 27 17:23:27 ubuntu-linux-22-04-02-desktop kernel: [359733.413703] [UFW BLOCK] IN=enp0s5 OUT= MAC=00:1c:42:f4:e4:cc:9e:76:0e:75:83:64:08:00 SRC=10.211.55.2 DST=10.211.55.4 LEN=64 TOS=0x08 PREC=0x40 TTL=64 ID=0 DF PROTO=TCP SPT=56525 DPT=22 WINDOW=65535 RES=0x00 SYN URGP=0
Dec 27 17:23:27 ubuntu-linux-22-04-02-desktop kernel: [359734.415960] [UFW BLOCK] IN=enp0s5 OUT= MAC=00:1c:42:f4:e4:cc:9e:76:0e:75:83:64:08:00 SRC=10.211.55.2 DST=10.211.55.4 LEN=64 TOS=0x08 PREC=0x40 TTL=64 ID=0 DF PROTO=TCP SPT=56525 DPT=22 WINDOW=65535 RES=0x00 SYN URGP=0
Dec 27 17:23:27 ubuntu-linux-22-04-02-desktop kernel: [359736.415638] [UFW BLOCK] IN=enp0s5 OUT= MAC=00:1c:42:f4:e4:cc:9e:76:0e:75:83:64:08:00 SRC=10.211.55.2 DST=10.211.55.4 LEN=64 TOS=0x08 PREC=0x40 TTL=64 ID=0 DF PROTO=TCP SPT=56525 DPT=22 WINDOW=65535 RES=0x00 SYN URGP=0
Dec 27 17:23:27 ubuntu-linux-22-04-02-desktop kernel: [359740.415648] [UFW BLOCK] IN=enp0s5 OUT= MAC=00:1c:42:f4:e4:cc:9e:76:0e:75:83:64:08:00 SRC=10.211.55.2 DST=10.211.55.4 LEN=64 TOS=0x08 PREC=0x40 TTL=64 ID=0 DF PROTO=TCP SPT=56525 DPT=22 WINDOW=65535 RES=0x00 SYN URGP=0
Hope this helps.
Recent posts
-

-

In case you did not see the previous FortiNAC... Full Story
-

This is our 5th session where we are going... Full Story
-

Now that we have Wireshark installed and somewhat configured,... Full Story
-

The Philosophy of Packet Analysis Troubleshooting isn't about looking... Full Story