At its core, IEEE 802.1X is a network layer... Full Story
By Manny Fernandez
February 8, 2026
Deploying FortiAutenticator on ProxMox Server
Prep Work
Download the FAC_VM64_KVM-vX-buildXXXX-FORTINET.out.kvm.zip
Extract the fackvm.qcow2 file from the zip file above.
Minimum 4 GB RAM, 2 vCPUs, and a 60 GB secondary disk for logging/database storage.
Create the VM Shell
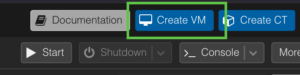
1. In the Proxmox GUI, click Create VM.
2. General – Assign a Name (e.g., FAC-01) and a VM ID (e.g., 111).

3. OS – Select Do not use any media. Set Type to Linux and Version to 6.x - 2.6 Kernel.

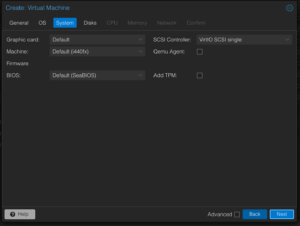
4. System – Leave defaults (ensure QEMU Agent is off unless you plan to install it later).
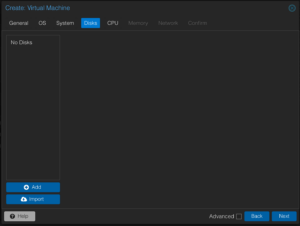
5. Disks – Delete the default scsi0 disk. We will import the real disk via CLI.
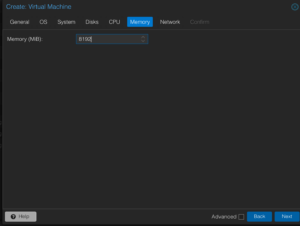
6. CPU/Memory – Assign at least 2 Cores and 4096 MiB RAM.

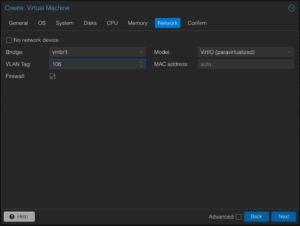
7. Network – Select your bridge (e.g., vmbr1). Set the Model to VirtIO (paravirtualized).
8. Confirm – Do not start the VM after creation.
Upload and Import the Image
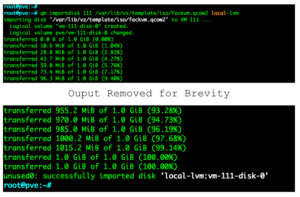
1. Upload the fackvm.qcow2 file to your Proxmox node (use the Proxmox ISO Images upload tool or SCP it to /var/lib/vz/template/qcow/).
2. Open the Proxmox Shell and run the following command to import the disk into your VM’s storage:
Example – qm importdisk 111 /var/lib/vz/template/iso/fackvm.qcow2 local-lvm.
Attach the Disks and Configure Boot
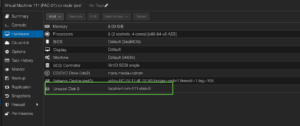
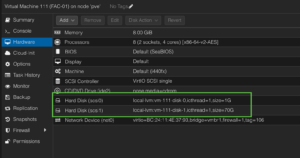
1. Go back to the Proxmox GUI VM 111 Hardware.
2. You will see an Unused Disk 0. Double-click it and click Add.
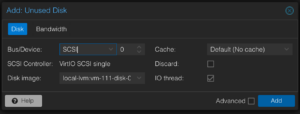
Use VirtIO Block for best performance.
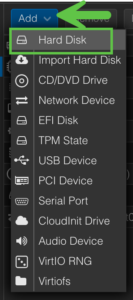
Add Log Disk
Click Add Hard Disk. Create a second disk (at least 60 GB) on the same controller. FortiAuthenticator requires this second disk to initialize its database.
Initial Configuration
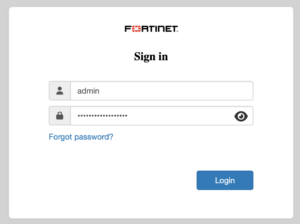
1. Start the VM and open the Console.
2. Once booted, log in with: Username: admin
Password: (Leave blank/Empty)
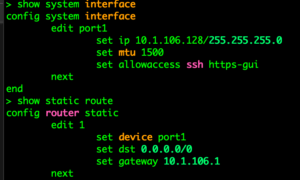
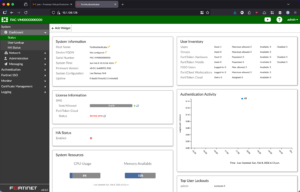
Configure the initial IP address to access the Web UI:
Now you can open a browser and connect to the https://%The_IP_You_Gave_It
Hope this helps
Recent posts
-

-

In case you did not see the previous FortiNAC... Full Story
-

This is our 5th session where we are going... Full Story
-

Now that we have Wireshark installed and somewhat configured,... Full Story
-

The Philosophy of Packet Analysis Troubleshooting isn't about looking... Full Story