If you've spent any time configuring user authentication on... Full Story
By Manny Fernandez
February 19, 2020

FortiProxy, FortiGate & WCCP
Explicit Proxy has been included on the Fortigate since early on. However because of competitive reason, Fortinet spun off the Explicit Proxy features into a stand-alone platform. Although Proxy services are still available. I believe, and this is my opinion, that Fortinet was unable to compete with the likes of competitors such as Blue Coat (Now part of Symantec). Although the Fortigate had many of the features, Gardner categorized it as either a UTM or Enterprise Firewall. Now the FortiProxy has its own development team and today it is a full stand-alone product. Enough of that though.
Credit: I want to give credit to Kevin Tracy, CSE at Fortinet and Alex Saija, SLED SE at Fortinet. They both offered their help on configuring this at a customer location.
WCCP
Web Cache Communication Protocol (WCCP), was developed by Cisco Systems. It was developed to redirect traffic transparently and with redundancy to a web-cache or proxy platform. Cisco has their own proxy solution that competes with FortiProxy and Blue Coat, although I do not run into it often. Not sure about the longevity of the product. Cisco has been known to acquire products quickly but can also cut their losses even quicker and dump the products. However credit should be given to Cisco for WCCP.
Explicit Proxy
In explicit proxy, the browser is specifically (or explicitly) defined with the proxy server’s IP address. When the device tries to connect to a website (http, https or SOCKS), the connection is intercepted by the proxy server and the server will make the connection for you.
Transparent Proxy
With Transparent Proxy you have the same basic function as Explicit Proxy but does not require you to configure the browser. Typically, the gateway will intercept the connection and process it.
Here is my scenario

- Workstation will attempt to connect to the Internet
- The FortiGate will receive the packet and forward using WCCP to the FortiProxy.
- FortiProxy will cache the connections, CAN enforce Web Content, IPS, Application control, etc.
- FortiProxy send the traffic back to the Fortigate and then out to the Internet.
10.10.10.200 - FortiProxy (3)
10.10.10.254 - FortiGate (2)
On the FortiProxy
Enabling WCCP Cache Engine
On the FortiProxy, you will need to enable WCCP
config system settings
     set wccp-cache-engine enable
end
Configuring the WCCP Service Group
Next thing will be to configure the WCCP Service Group. A service group consists of one or more FortiProxy units configured as WCCP servers (or routers) and one or more FortiProxy WCCP clients working together to cache a specific type of traffic.
config system wccp
      edit "90"
         set cache-id 10.10.10.200
         set router-list "10.10.10.254"
         set ports-defined destination
         set ports 80 443
         set primary-hash src-port
         set protocol 6
     next
end
Enabling WCCP on the Interface
Now we will need to enable WCCP on the interface that will communicate over WCCP.
config system interface
     edit "port1"
        set ip 10.10.10.200 255.255.255.0
        set allowaccess ping https ssh http
        set type physical
        set explicit-web-proxy enable
        set explicit-ftp-proxy enable
        set snmp-index 1
        set wccp enable
       next
    end
Validating
Displaying the WCCP Stats.
diagnose test application wccp 2

vdom-root: work mode:cache working NAT first_phy_id=6
  interface list:
    intf=port2, gid=6 phy_id=6
  service list:
    service: 90, cache_id=10.10.10.200, group=0.0.0.0, auth(no)
       forward=1, return=1, cache_engine=1 assign=1.
    router list:
      10.10.10.254
    port list:
      80 443
    ecache_id=10.10.10.200
Displaying the cache status
diagnose test application wccp 6

service-90 in vdom-root
erouter_list: 1 routers in total
    0. 10.10.10.254
    receive_id:1391 change_number:1
    cache servers seen by this router:
            0. 10.10.10.200 weight:0 (*Designated Web Cache)
Here are the options that were used above.
(1) Display WCCP stats
(2) Display WCCP config
(3) Display WCCP cache servers
(4) Display WCCP services
(5) Display WCCP assignment
(6) Display WCCP cache status
As you can see in the output, we used the (2) to validate the status and (6) to validate the cache status.
Creating a Transparent Proxy Policy
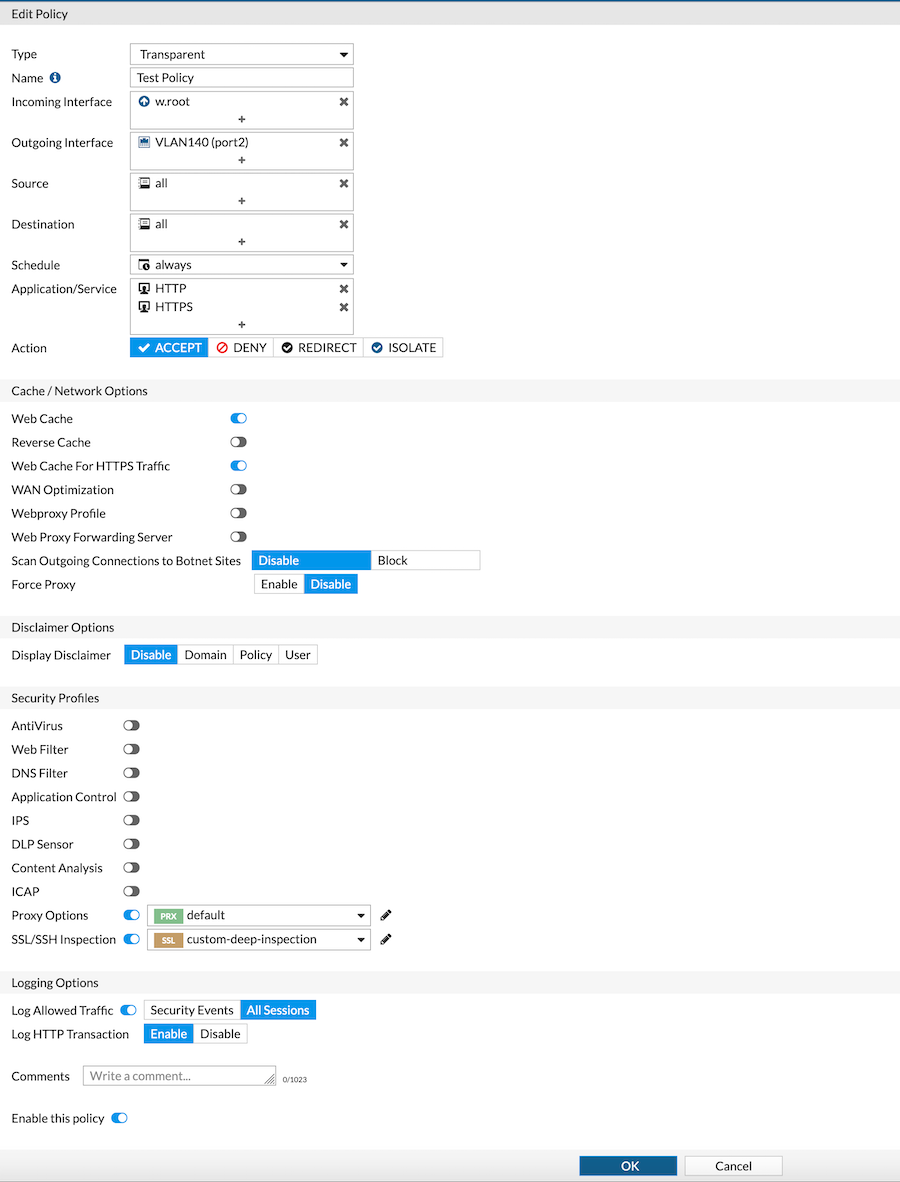
Next we will need to create a Transparent Policy on the FortiProxy. Ensure that the Incoming Interface is w.rootand the Outgoing Interface is the port that is facing the FortiGate. As you can see in the screenshot above, you can configure the Security Profiles as you would on the FortiGate.
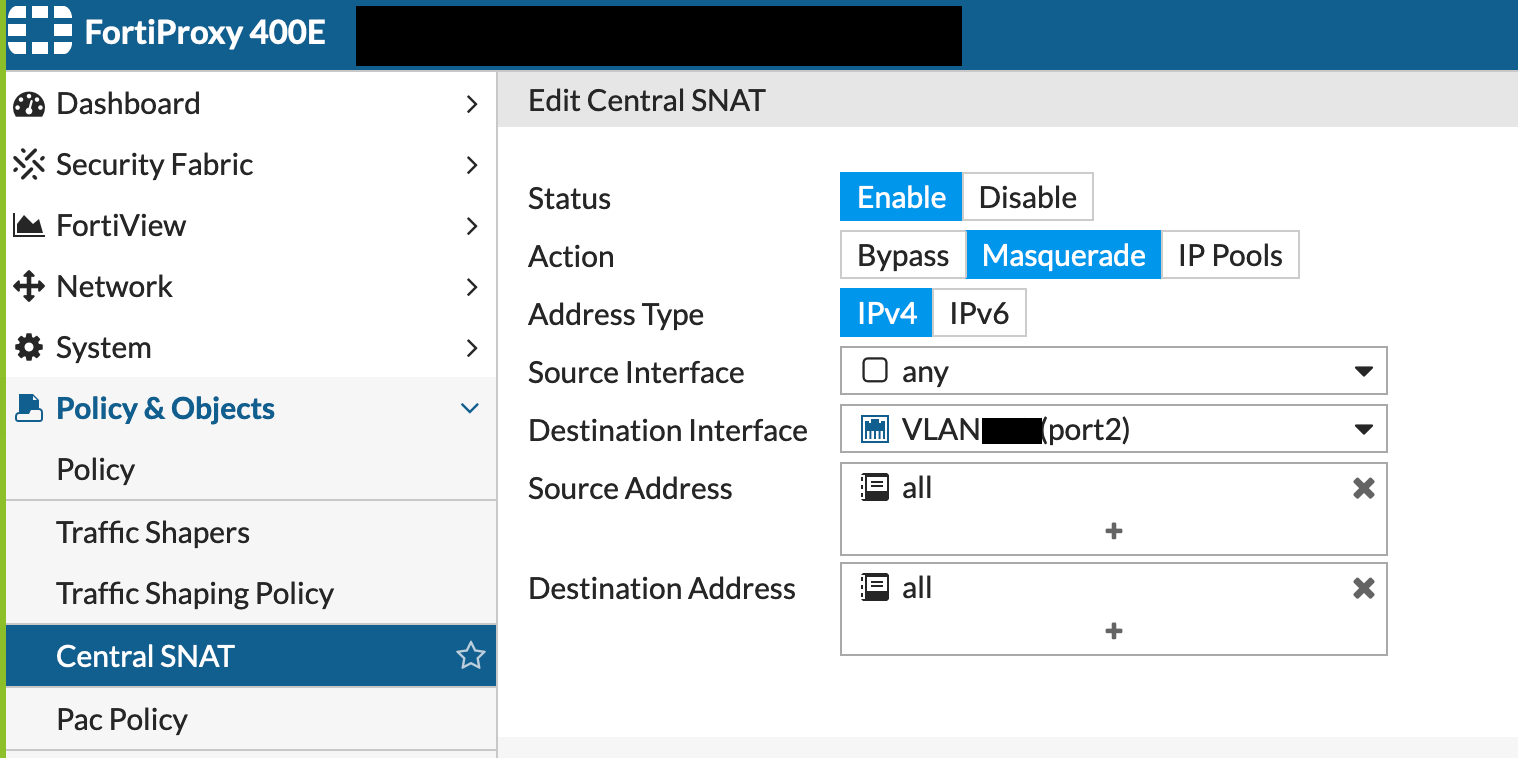
NAT
On the FortiProxy, you will need to configure a NAT. Go to Central NAT section and create an entry where Source Interface is any and the Destination Interface as the port connected to the FortiGate.
On the FortiGate
Now on to the FortiGate. Lets start with configuring WCCP on the FortiGate.
Configuring WCCP on FortiGate
config system wccp
    edit "90"
       set router-id 10.10.10.254
       set server-list 10.10.10.0 255.255.255.0
    next
end
Enabling WCCP on FortiGate Interface
Next you need to enable WCCP on the interface
config system interface
    edit "port10"
       set vdom "root"
       set ip 10.10.10.254 255.255.255.0
       set allowaccess ping https ssh snmp http fgfm
       set type physical
       set device-identification enable
       set device-identification-active-scan enable
       set role lan
       set wccp enable
    next
end
Creating a WCCP Policy on FortiGate
Lets create a new policy on the Fortigate

Here you can see the Incoming and Outgoing Interfaces and in my case, I used a single workstation to test named Dummy-Address1 . As you can see we are choosing HTTP and HTTPS.
Enabling WCCP on the Policy
Prior to 6.2.3, you will need to enable WCCP via the CLI. This is easily done by right clicking on the policy and choosing Edit in CLI
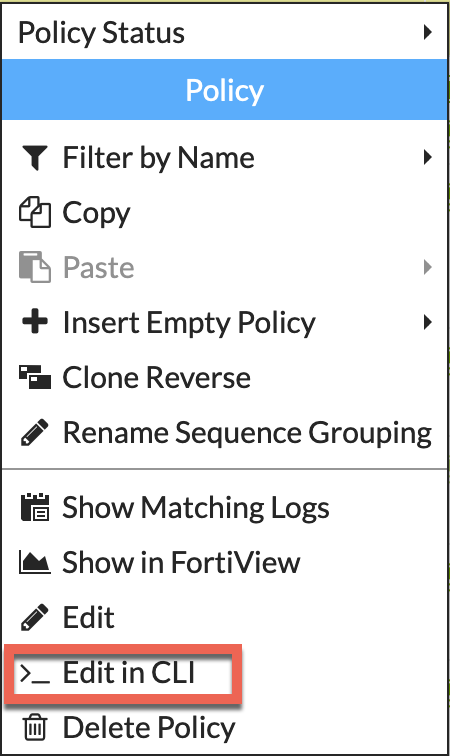
Once you are in the CLI, you can enable WCCP by entering set wccp enable
config firewall policy
    edit 16
        set name "Dummy Test WCCP"
        set srcintf "port10"
        set dstintf "port9"
        set srcaddr "Dummy-Address1"
        set dstaddr "all"
        set action accept
        set status disable
        set schedule "always"
        set service "HTTP" "HTTPS"
        set logtraffic all
        set wccp enable
        set fsso disable
     next
end
If you are running 6.2.3 and above, you should be able to turn on Policy Advanced Options I recently wrote an article on how to enable this.

When you follow the article, you can enable WCCP from the GUI.
NOTE: Remember to install your subordinate CA certificate and the corresponding certificate chain if applicable. This will be used to perform SSL decryption on the FortiProxy.
And there you have it. Hope this helps.
Recent posts
-

-

DNS is one of those technologies that quietly underpins... Full Story
-

BGP issues on FortiGate firewalls usually trace back to... Full Story
-

Every time your laptop talks to your router, a... Full Story
-

If you've spent any time configuring NAT on a... Full Story
-

If you have spent any time configuring firewall policies... Full Story
-

High availability on FortiGate is one of those features... Full Story
-

If you've configured SD-WAN on a FortiGate, you've almost... Full Story
-

FortiLink is the management protocol that turns a FortiSwitch... Full Story
-

FortiSwitches are pretty rock solid from Mean Time Between... Full Story
-

This is a quicky tip. Have you ever gone... Full Story
-

DNS is one of those quiet pieces of internet... Full Story
-

This article is an updated version of the previous... Full Story
-

You will add ns2 as a secondary (slave) BIND9... Full Story
-

In the process of deploying my lab, I needed... Full Story
-

RFC 8805, used to be known as Self-Correcting IP... Full Story
-

Years back, I wrote an article about certificate pinning. ... Full Story
-

FortiGates have the ability to send alerts to Microsoft... Full Story
-

In this post, I am going to walk through... Full Story
-

Troubleshooting VoIP on a FortiGate can feel like trying... Full Story
-

Prior to FortiOS 7.0, there were three commands to... Full Story
-

In this post, I am going to go over... Full Story
-

What we are going to do: We are going... Full Story
-

Choosing between FGCP (FortiGate Clustering Protocol) and FGSP (FortiGate... Full Story
-

Creating a VLAN on macOS (The "Pro" Move) A... Full Story
-

This blog post explores the logic behind how macOS... Full Story
-

Pretty Fly for a Wi-Fi Tell My Wi-Fi Love... Full Story
-

Part of my daily gig is creating BoMs (Bill-of-Materials)... Full Story
-

ICMP introduces several security risks, but careful filtering, rate... Full Story
-

The command diag debug application dhcps -1 enables full... Full Story
-

In the world of FortiOS, execute tac report is... Full Story
-

LLDP; What is it The Link Layer Discovery Protocol... Full Story
-

What it actually does When you run diagnose fdsm... Full Story
-

Monkey Bites are bite-sized, high-impact security insights designed for... Full Story
-

I have run macOS in macOS with Parallels but... Full Story
-

Don't be confused with my other FortiNAC posts where... Full Story
-

This is the third session in a multi-part article... Full Story
-

Today I was configuring key-based authentication on a FortiGate... Full Story
-

Netcat, often called the "Swiss Army knife" of networking,... Full Story
-

At its core, IEEE 802.1X is a network layer... Full Story
-

In case you did not see the previous FortiNAC... Full Story
-

This is our 5th session where we are going... Full Story
-

Now that we have Wireshark installed and somewhat configured,... Full Story
-

The Philosophy of Packet Analysis Troubleshooting isn't about looking... Full Story
-

Do you use Sequence Groups In your Firewall Policies? ... Full Story
-

The other day, I opened my Wireshark for macOS... Full Story
-

1. Executive Summary Objective This guide walks through the... Full Story