If you've spent any time configuring user authentication on... Full Story
By Manny Fernandez
March 31, 2020

How I use Wireshark in My Daily Grind
When I am working with someone on a GTM or a Zoom type solution and I ask, “Do you have Wireshark installed on your computer”, if they tell me no, I am immediately suspect. OK maybe not but it does show a level of knowledge on the end user if they in fact have Wireshark. I have a motto I have lived by in my network years, “When in doubt, sniff it out”. Sniffer apps such as Sniffer Pro, TCPDump, and Wireshark have been paramount for my success in the field. Most of the times, I use it as a tool to show how it is NOT my fault , rather the other side’s. Usually I send them a PCAP with the pertinent info, a doc explaining my theory and two things happen; 1. They fix the problem and say thank you. 2. They fix the problem and tell me they did nothing. Either way, I win because the problem is solved which is all I really want.
Wireshark has a multitude of sample captures if you want to step up your packet capture foo.
In this article I will go through some of the basic filters I use regularly in Wireshark. It is not an exhaustive list but rather some of my “go to’s”
Lets get started.
Filters
There are two types of filters in Wireshark; capture filters and display filters. Unfortunately, they are not interchangeable, however they are not difficult and there are many “cheat sheets” out there that can help you, especially if you are not using them on a daily basis.
It sounds obvious but I will cover it here.
Capture Filter – With these filters, only the packets that match the filter will be captured and saved to a pcap or to the buffer.
Display Filter – With the display filter, you can filter out what you are looking at from the throng of data you captured with or without the capture filter.
Capture Filters
Exclusion
Have you ever started a capture on a device you are SSH’d to and then find that you are sifting through your own connection packets? Here is a filter to use when you want to exclude your connection. Lets say your IP address is 10.1.1.50 and the destination is 10.1.1.60 in this example:
port not 22 # This one will not capture any of your standard SSH port traffic.
dst host not 10.1.1.60 #This will capture everything EXCEPT traffic to 10.1.1.60
If you do not want to see broadcast as an example, you could use
not broadcast
If for example, you do not want to capture other possibly non important packets such as broadcast, multicast and spanning tree, you can use the simple but affective filter of
ip
Inclusion
Including hosts and networks
In this example, we only want to capture traffic to / or from a particular range of addresses. The use case for this filter is you do not want to capture packets from the local machine connect to Dropbox , iCloud Drive, etc. You only want to focus on a range of IP addresses
host 10.1.1.60 # This will only capture traffic to and from this host
net 10.1.1.0/24 #This will only capture traffic to and from the 10.1.1.0/24 subnet. Nothing else.
You can also be deliberate with the direction of the traffic, for instance, I may only want to see the traffic that is sourced from 10.1.30.0/24 or source IP of 10.1.30.1 in this example:
src host 10.1.30.1
src net 10.1.30.0/24
Port filtering
If you only want to capture DNS packets as an example, you can use the following filters
port 53
You can also negate the capture as we did above under Exclusion by using:
not port 53
In addition to that, you may only want to capture UDP DNS traffic and not TCP, you can specify the protocol
udp port 53
The Wireshark GUI does a good job checking syntax when you are creating your filters see below:
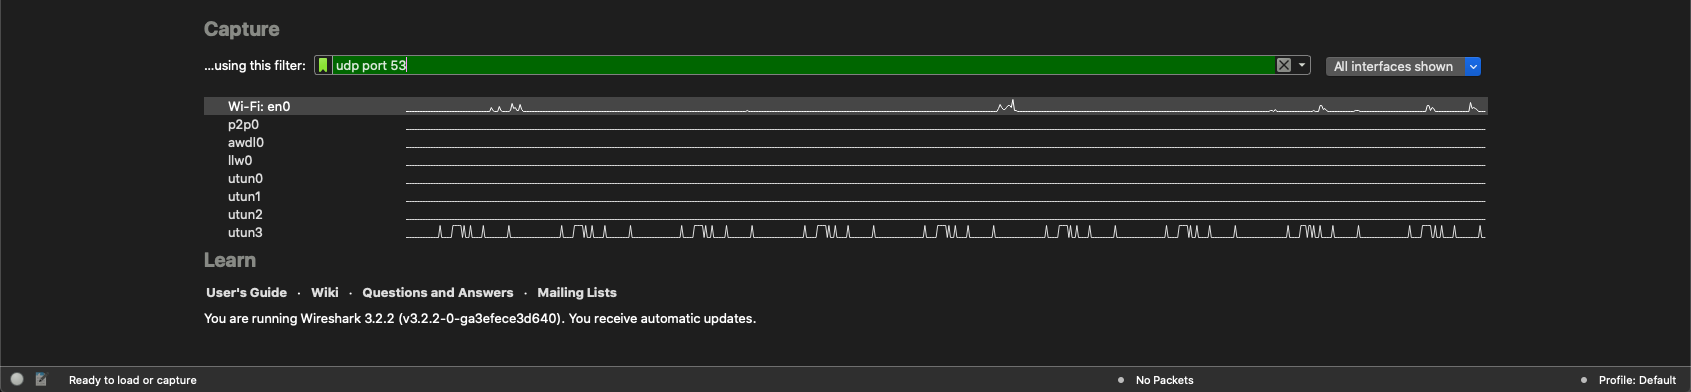
As you can see in the screenshot, this is the correct syntax as the bar is green.
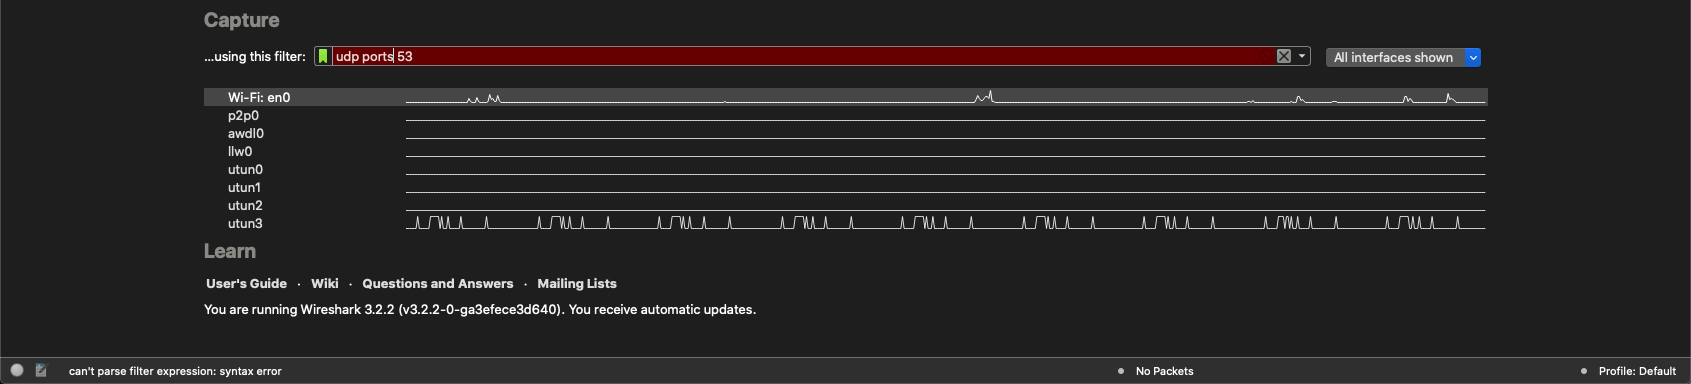
In this example, I added an s to the port command and Wireshark see that it is not correct and shows a red bar instead.
Displays Filters
Display filters are very useful when you do not have the advent of performing the capture yourself in which case you used capture filters. Here are some of the ones I use regularly:
Inclusion
Filtering only a particular IP address
ip.addr==10.1.1.60 # This will show you any traffic to / from the 10.1.1.60.
If you want to only see traffic being sourced from 10.1.1.60 you can use the following filter.
ip.src==10.1.1.60
You can interchange src with dst to get the same effect but destination instead of source.
You can also include a particular subnet by using the following:
ip.addr==10.1.1.0/24
If you are looking for a particular protocol, Wireshark is smart enough to know what you are talking about, most of the time.
dns or dhcp
Remember you can use the or and and operators to use filter more than one protocol
You can also use port and protocol
udp.port==53
if you wanted to ONLY see the source UDP 53 packets
udp.srcport==53
Remember you can use the or and and operators to use filter more than one protocol
If you only wanted to view GET requests in your capture
http.request.method == "GET"
If you wanted to see only response code of 200, (e.g. AWS S3)
http.response.code==200
Exclusion
If you want to exclude an IP addresses you can use ! in front of it.
!ip.addr==10.1.1.60
This holds true for protocols as well
!udp
Searching for strings
In the past I have had to search through a huge pcap file to find a computer name. You can do this with string filtering. If you choose the magnifying glass, then you can enter the packet detail then choose string ,then enter the search criteria and then Find
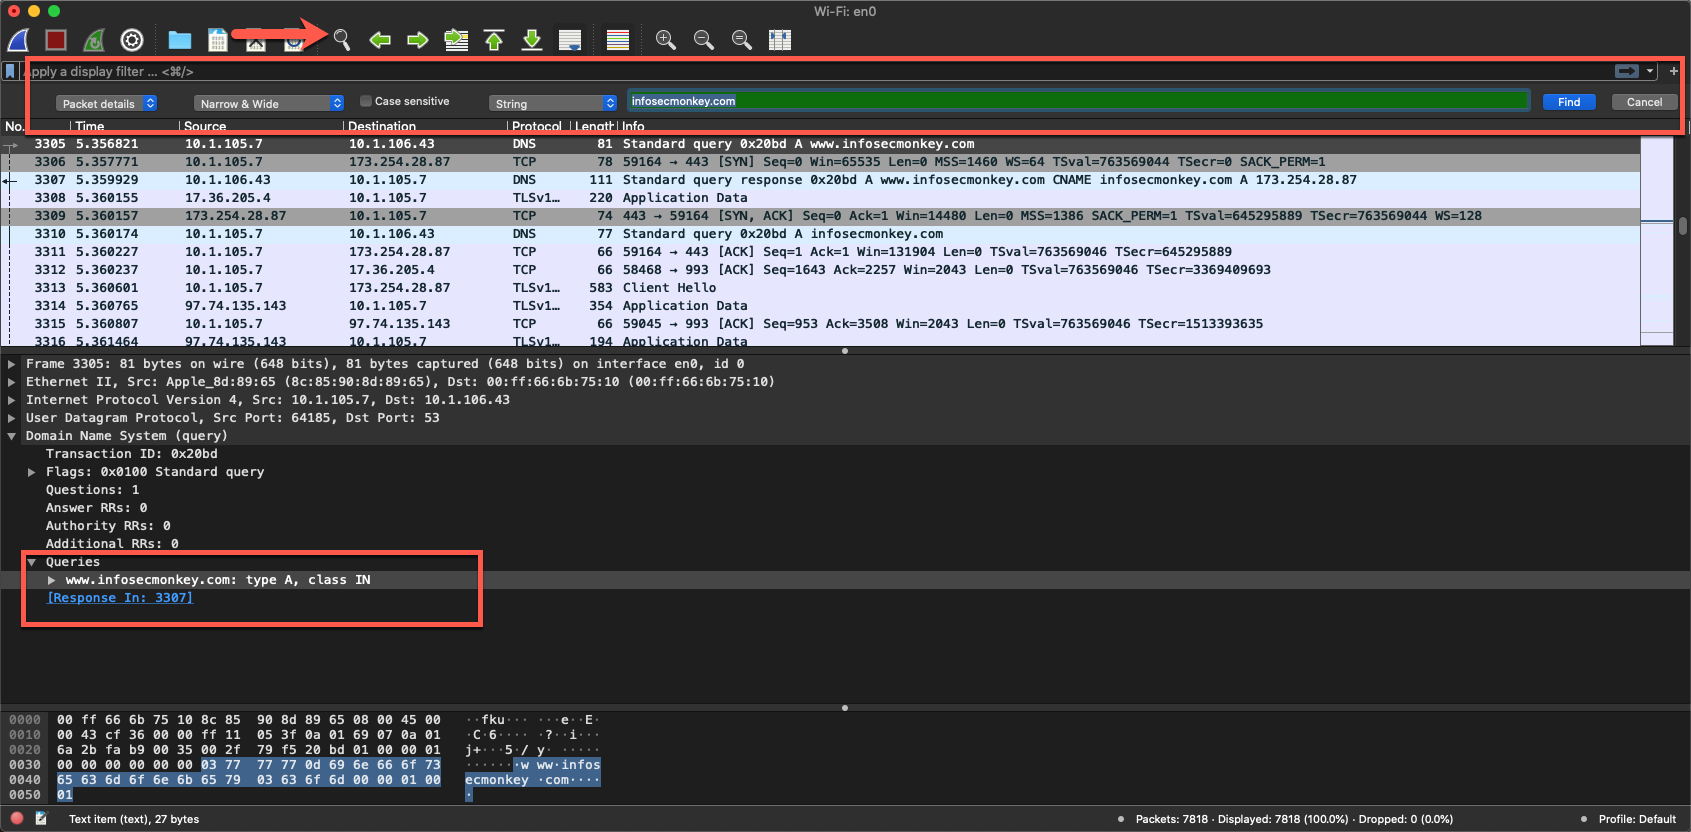
As you can see here, I was looking for infosecmonkey and found it in a packet.
TShark
TShark is part of Wireshark and allows you use the command line to capture. Here is an example from a friend of mine (William Mendez) that was running this in his environment
tshark -i 1 -ta -s 68 -F pcap -f "udp port 53" -b filesize:100000 -b files:100 -a files:100 -w capture.pcap
Lets break it down
- tshark – this is the executable
- -i – This identifies the interface to be used,
- 1 is the interface itself
- -ta set the timestamp format, in this case
ais equal toabsolute- ad – absolute with date
- adoy – absolute using date and year (e.g. YYYY/DOY)
- d – delta. Since the last packet
- dd – since the last packet ‘displayed’ was captured.
- e – epoch
- r – relative
- u – UTC
- ud – UTC with date
- udoy – UTC with date using day of year
- -s This sets the snaphot-length (e.g. no more than
snapshot-lengthwhen capturing data - 68 – Is the
snapshot-length - -F Is the file format to capture
- pcap – is the format from the
-Foption - -f , this defines the capture filter
- udp port 53 – Customer only wanted UDP 53 traffic to be captured.
- -b stands for ring-buffer which essentially tells
tsharkto use the different options to capture the file - filesize – Self explanatory and tells
tsharkto use 10000 kb each - files – how many files it will create in this example
100 - -a Stand for
autostopoptions are :- duration
- files
- filesize
- packets
- 100 the number of files it will write before
-aautostopping.
As I mentioned before, this is not an exhaustive list of filters, commands and options. These are however the ones I use most often and thought I would share with you.
Hope this helps.
Recent posts
-

-

DNS is one of those technologies that quietly underpins... Full Story
-

BGP issues on FortiGate firewalls usually trace back to... Full Story
-

Every time your laptop talks to your router, a... Full Story
-

If you've spent any time configuring NAT on a... Full Story
-

If you have spent any time configuring firewall policies... Full Story
-

High availability on FortiGate is one of those features... Full Story
-

If you've configured SD-WAN on a FortiGate, you've almost... Full Story
-

FortiLink is the management protocol that turns a FortiSwitch... Full Story
-

FortiSwitches are pretty rock solid from Mean Time Between... Full Story
-

This is a quicky tip. Have you ever gone... Full Story
-

DNS is one of those quiet pieces of internet... Full Story
-

This article is an updated version of the previous... Full Story
-

You will add ns2 as a secondary (slave) BIND9... Full Story
-

In the process of deploying my lab, I needed... Full Story
-

RFC 8805, used to be known as Self-Correcting IP... Full Story
-

Years back, I wrote an article about certificate pinning. ... Full Story
-

FortiGates have the ability to send alerts to Microsoft... Full Story
-

In this post, I am going to walk through... Full Story
-

Troubleshooting VoIP on a FortiGate can feel like trying... Full Story
-

Prior to FortiOS 7.0, there were three commands to... Full Story
-

In this post, I am going to go over... Full Story
-

What we are going to do: We are going... Full Story
-

Choosing between FGCP (FortiGate Clustering Protocol) and FGSP (FortiGate... Full Story
-

Creating a VLAN on macOS (The "Pro" Move) A... Full Story
-

This blog post explores the logic behind how macOS... Full Story
-

Pretty Fly for a Wi-Fi Tell My Wi-Fi Love... Full Story
-

Part of my daily gig is creating BoMs (Bill-of-Materials)... Full Story
-

ICMP introduces several security risks, but careful filtering, rate... Full Story
-

The command diag debug application dhcps -1 enables full... Full Story
-

In the world of FortiOS, execute tac report is... Full Story
-

LLDP; What is it The Link Layer Discovery Protocol... Full Story
-

What it actually does When you run diagnose fdsm... Full Story
-

Monkey Bites are bite-sized, high-impact security insights designed for... Full Story
-

I have run macOS in macOS with Parallels but... Full Story
-

Don't be confused with my other FortiNAC posts where... Full Story
-

This is the third session in a multi-part article... Full Story
-

Today I was configuring key-based authentication on a FortiGate... Full Story
-

Netcat, often called the "Swiss Army knife" of networking,... Full Story
-

At its core, IEEE 802.1X is a network layer... Full Story
-

In case you did not see the previous FortiNAC... Full Story
-

This is our 5th session where we are going... Full Story
-

Now that we have Wireshark installed and somewhat configured,... Full Story
-

The Philosophy of Packet Analysis Troubleshooting isn't about looking... Full Story
-

Do you use Sequence Groups In your Firewall Policies? ... Full Story
-

The other day, I opened my Wireshark for macOS... Full Story
-

1. Executive Summary Objective This guide walks through the... Full Story