In FortiOS 7.4, Fortinet enhanced the ability to do... Full Story
By Manny Fernandez
February 11, 2019

Site-to-Site VPN Between Fortigates using Certificates instead of PSK
Had a customer running Checkpoint that needed to create a Site-to-Site VPN using a dynamic IP on the remote (Fortigate) side using a FortiExtender. The head-in device is a Checkpoint Running R80. So I decided to do a blog post on using certificates to authenticate site-to-site VPNs since the CP only supports certs for aggressive mode.
For this example, I have used an internal CA server I deployed running OpenSSL on a CentOS Distro. I created a blog post about it here. The idea here is to have a centralized CA server that will sign all the CSRs from remote firewalls. My lab is a voice 101E and a lab 300E Fortigate.
Here are the files you are going to need (asside from the Linux install).
CA.cert
CSR from both firewalls
CRTs from both firewalls (once you sign them)
You will need to have ‘Certificates’ selected under ’System’ ‘Feature Visibility’ for this exercise.
Lets get started.

The first thing you will need to do is generate a new CSR on each of the firewalls. You need to go to ’System’, ‘Certificate’ and then choose ‘Generate’ at the top left of the screen.
Next, you will need to fill out the information for your environment.
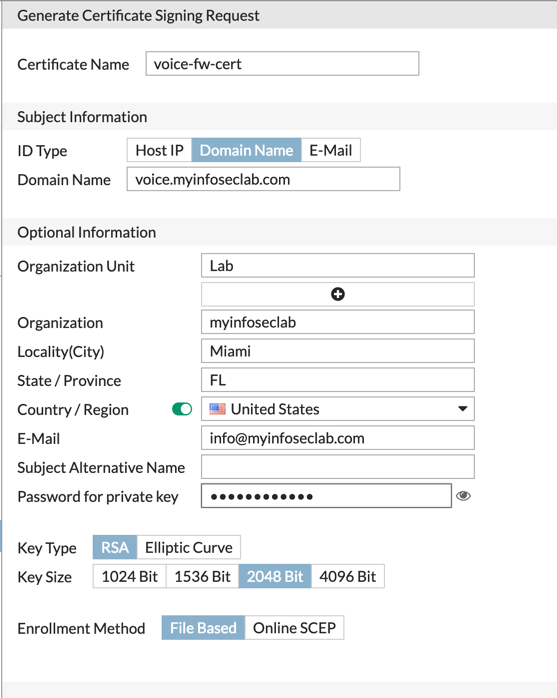
Here you can see that this is the ‘voice’ firewall. Once you have filled it in and saved it, ensure that you have selected the proper certificate the has a ‘pending’ status (may need to scroll to the right) and then choose download.
You will need to transfer this file to the CA server (if you are doing it from a different machine). I use SCP but you are welcome to use something of your choosing. I would suggest something secure for obvious reasons.
Rinse and repeat for the other firewall(s).
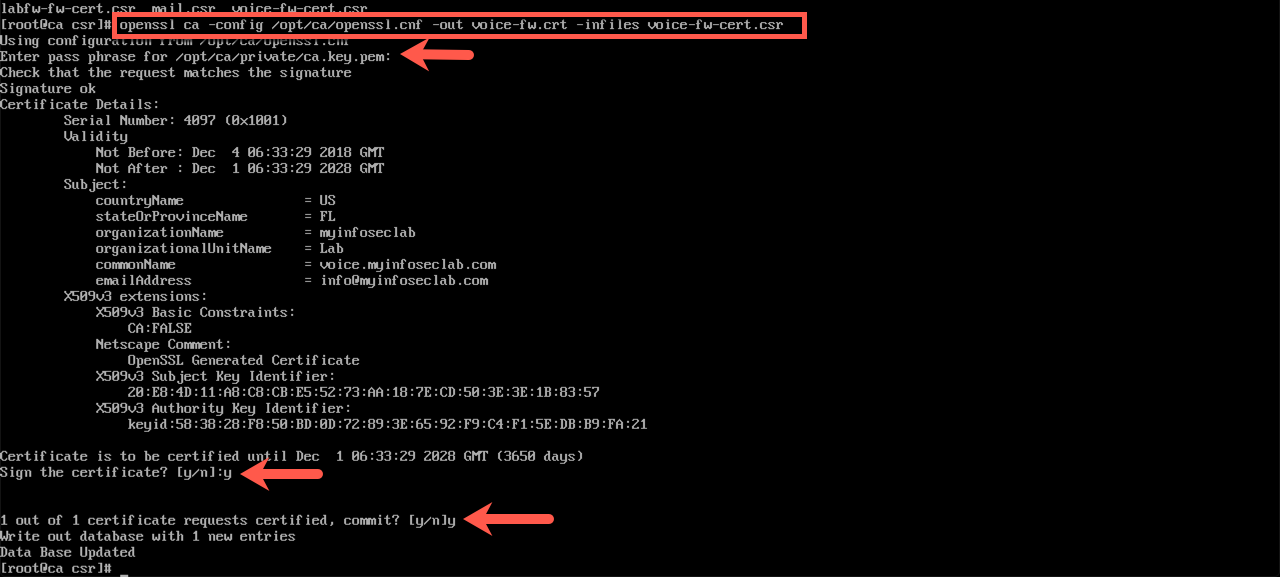
Once you have the two CSR’s on the CA server (I put them in a /opt/ca/csr folder I created as a temporary repository), you will need to run the following command from the proper ‘pwd’
openssl ca -config /opt/ca/openssl.cnf -out %output-name-of-cert%.crt -infiles %name-of-the-csr%.csr
Obviously, you will need to change the file names to match yours.
Now we can start the import process into the respective Fortigates. Lets start with the CA

Now you will click on ‘Import’ then choose ‘CA Certificate‘

Choose ‘File’ and not ‘Online SCEP’ (Although SCEP is a viable option if you have it set up. I did not have it for this post). Choose the .crt for the CA. This will install it under the ‘External CA Certificates‘ (Rinse and Repeat)
Now import your certificate
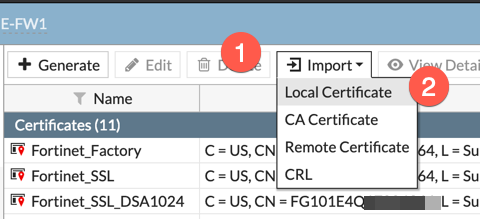
Go to ‘System’. ‘Certificates’ and then choose ‘Import’ then ‘Local Certificate’. Point it to your local Fortigate’s CRT file.

You should now see your Certificate Under the ‘Certificates’ section and the CA under the ‘External CA Certificates’
Now for the VPN. You can either use the wizard with the Fortigate to Fortigate VPN or do what I do, ‘Custom’.
Create a meaningful name (Not something like VPN1) and choose ‘Next’

Now under the ‘Authentication’ section you will need to change the ‘Method’ to ’Signature’ (Pre-Shared Key is the default).
Next you will need to choose your local certificate under the ‘Certificate Name’.
Now under the ‘Accept Types’ you will need to create a PKI user.
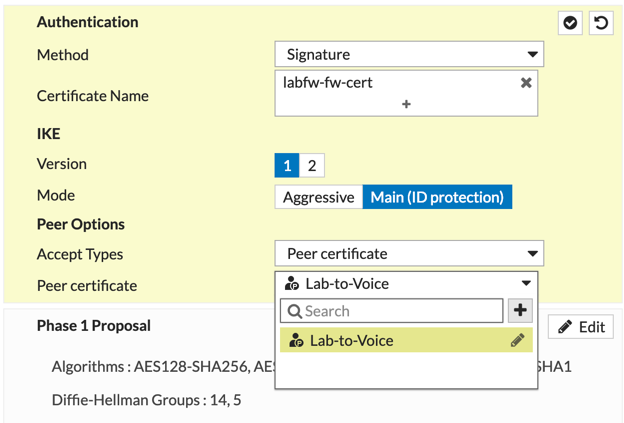
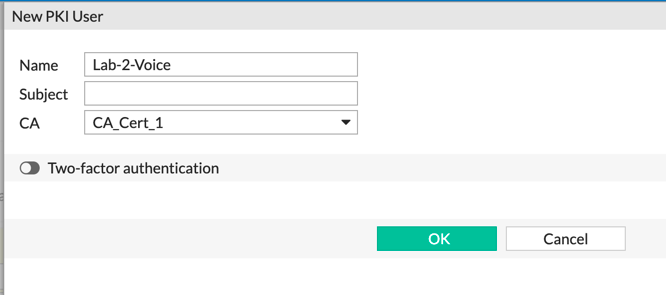
To create the PKI user, you hit the ‘+’ sign and it will show you the screenshot above. Enter a meaningful name and choose the ‘CA_Cert_1’ (or the name it added) and then hit ‘OK’. (Rinse and Repeat)
Ensure you have the policies set up as well as the routes.

Once you have the Policies in place and the routes, you can go to ‘Monitor’, ‘IPsec Monitor’ and you should be able to bring up and validate the VPN. Above you can see that the ‘User Name’ fields shows the information from the remote Certificate.
Hope this helps.
Recent posts
-

-

Apple shortcuts have been an amazing addition to IOS. ... Full Story
-

Years ago, when I started using FortiGates, I had... Full Story
