If you've spent any time configuring user authentication on... Full Story
By Manny Fernandez
January 3, 2019
Using OpenSSL to Provision Wildcard Certificate
I have my lab set up with plenty of gear from Fortinet, Cisco, Palo Alto and Checkpoint. In order to test everything, I wanted to use a wildcard certificate since it would be too costly buying certs for each system individually. When using networking equipment, it is not that easy to generate a CSR and still have access to the private key. In comes the ever so powerful and versatile OpenSSL.
Here is what you will need to do.
1. Ensure you have OpenSSL installed on your computer. I have been spoiled because I ran Linux for 8 years and have run MacOS for another 7 years now so it has come by default on all my systems. If you are running Windows, I am sure there is a port for Windows.
2. Generate a CSR and private key.
3. Make sure you add a password.
4. Get the CSR signed and download the .crt file.
5. Install certificate
I created a folder on my ‘Desktop’ to make it easy to manuver. From this folder, I ran the following command…
openssl req -new -newkey rsa:2048 -nodes -keyout myinfoseclab.key -out myinfoseclab.csr
OpenSSL is so versatile, you can use it to split certificates, convert from different formats, act as a CA and so much more. Here is what the commands do:
req - tells the openssl that you want a new request (csr)


-new Generate a new certificate request. The user is prompted for the
relevant field values. The actual fields prompted for and their
maximum and minimum sizes are specified in the configuration file
and any requested extensions.


-newkey arg
Create a new certificate request and a new private key. The
argument takes one of several forms.


rsa:nbits generates an RSA key nbits in size. If nbits is omit-
ted the default key size is used.


dsa:file generates a DSA key using the parameters in file.


param:file generates a key using the parameters or certificate in
file.


All other algorithms support the form algorithm:file, where file
may be an algorithm parameter file, created by the genpkey
-genparam command or an X.509 certificate for a key with appro-
priate algorithm. file can be omitted, in which case any parame-
ters can be specified via the -pkeyopt option.


-nodes Do not encrypt the private key.


-keyout file
The file to write the newly created private key to. If this
option is not specified, the filename present in the configura-
tion file is used.
-out file
The output file to write to, or standard output if not specified.
Once you run the command, you will be asked a series of questions regarding country, org, org unit, state, etc. For a wildcard, make sure you where it asks for ‘comman name’ that you enter the ‘*.’ infront of the domain name (e.g. *.myinfoseclab.com).
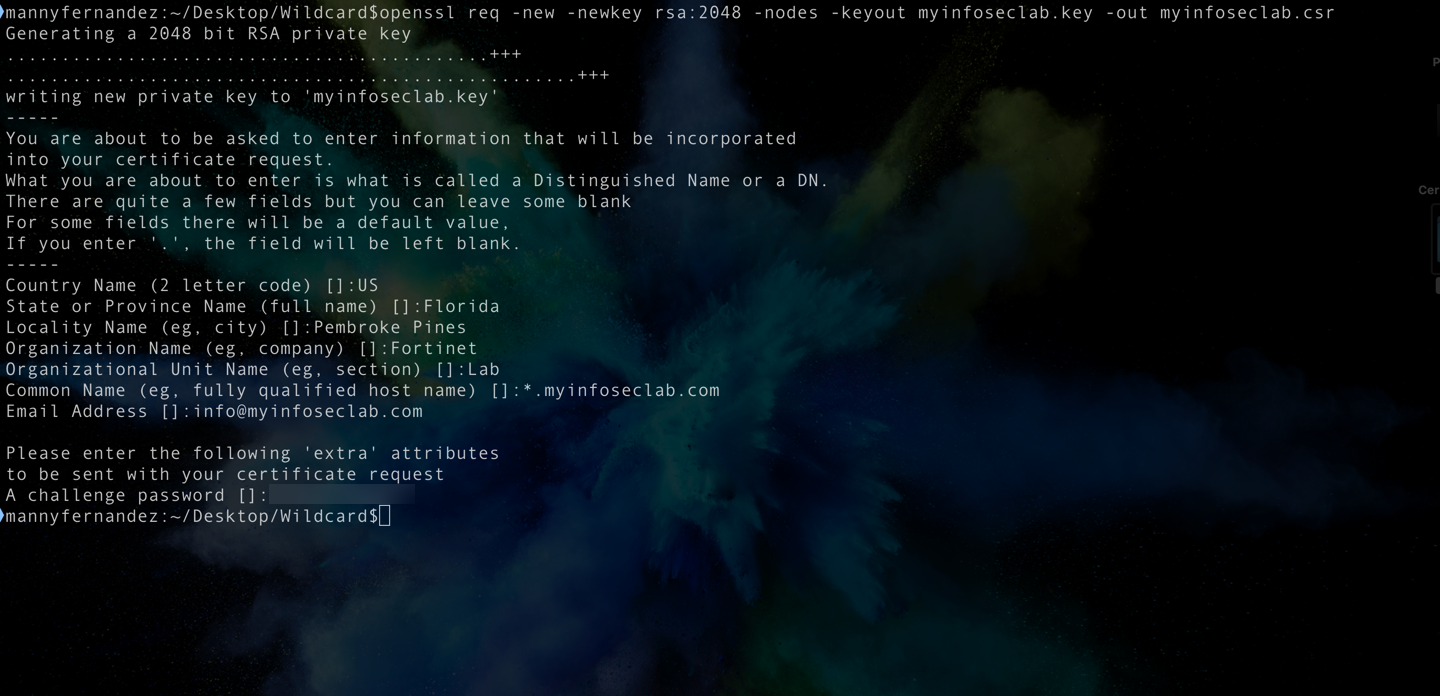
In the screenshot, you can see where I added the information. The password is obviously blurred out, but you will have a password for yours. Make sure you remember it.
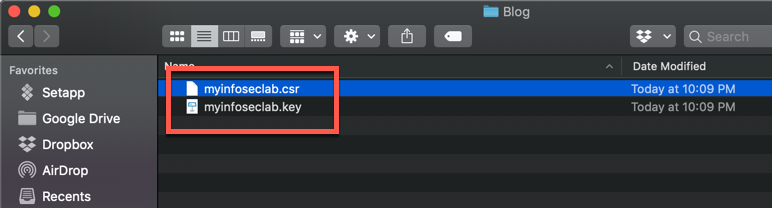
You should now have two files in your folder.
Open the .csr file with a text editor
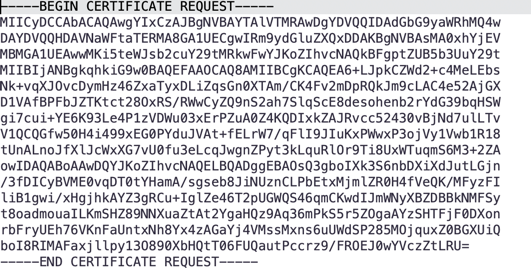
AND, NO THAT IS NOT THE REAL CSR, I generated a new one to post 😉
Enter that into your CA provider’s portal and validate it (usually via an email to hostmaster, postmaster, administrator etc).
One you get the .crt file from the CA provider, you will need it and the .key file you generated above. These will be the two files you will need and the password.
On a Fortigate, you will need to go to your ‘Certificate’ screen, choose ‘Import’, choose ‘Local Certificate’ then ‘Certificate’
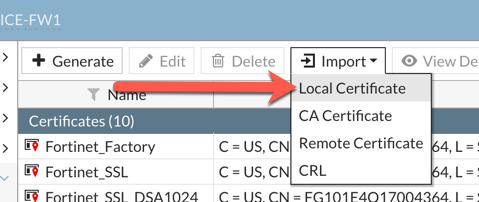
The you are going to choose ‘Certificate’.
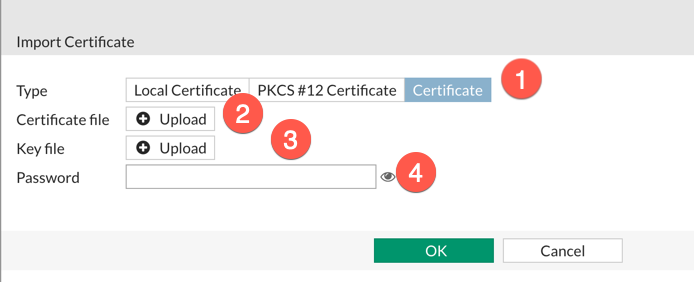
For Certificate, choose you .crt file you got back from the CA provider.
For Key File, choose your .key file
and Finally, you password.
That should do it. Hope this helps.
Recent posts
-

-

DNS is one of those technologies that quietly underpins... Full Story
-

BGP issues on FortiGate firewalls usually trace back to... Full Story
-

Every time your laptop talks to your router, a... Full Story
-

If you've spent any time configuring NAT on a... Full Story
-

If you have spent any time configuring firewall policies... Full Story
-

High availability on FortiGate is one of those features... Full Story
-

If you've configured SD-WAN on a FortiGate, you've almost... Full Story
-

FortiLink is the management protocol that turns a FortiSwitch... Full Story
-

FortiSwitches are pretty rock solid from Mean Time Between... Full Story
-

This is a quicky tip. Have you ever gone... Full Story
-

DNS is one of those quiet pieces of internet... Full Story
-

This article is an updated version of the previous... Full Story
-

You will add ns2 as a secondary (slave) BIND9... Full Story
-

In the process of deploying my lab, I needed... Full Story
-

RFC 8805, used to be known as Self-Correcting IP... Full Story
-

Years back, I wrote an article about certificate pinning. ... Full Story
-

FortiGates have the ability to send alerts to Microsoft... Full Story
-

In this post, I am going to walk through... Full Story
-

Troubleshooting VoIP on a FortiGate can feel like trying... Full Story
-

Prior to FortiOS 7.0, there were three commands to... Full Story
-

In this post, I am going to go over... Full Story
-

What we are going to do: We are going... Full Story
-

Choosing between FGCP (FortiGate Clustering Protocol) and FGSP (FortiGate... Full Story
-

Creating a VLAN on macOS (The "Pro" Move) A... Full Story
-

This blog post explores the logic behind how macOS... Full Story
-

Pretty Fly for a Wi-Fi Tell My Wi-Fi Love... Full Story
-

Part of my daily gig is creating BoMs (Bill-of-Materials)... Full Story
-

ICMP introduces several security risks, but careful filtering, rate... Full Story
-

The command diag debug application dhcps -1 enables full... Full Story
-

In the world of FortiOS, execute tac report is... Full Story
-

LLDP; What is it The Link Layer Discovery Protocol... Full Story
-

What it actually does When you run diagnose fdsm... Full Story
-

Monkey Bites are bite-sized, high-impact security insights designed for... Full Story
-

I have run macOS in macOS with Parallels but... Full Story
-

Don't be confused with my other FortiNAC posts where... Full Story
-

This is the third session in a multi-part article... Full Story
-

Today I was configuring key-based authentication on a FortiGate... Full Story
-

Netcat, often called the "Swiss Army knife" of networking,... Full Story
-

At its core, IEEE 802.1X is a network layer... Full Story
-

In case you did not see the previous FortiNAC... Full Story
-

This is our 5th session where we are going... Full Story
-

Now that we have Wireshark installed and somewhat configured,... Full Story
-

The Philosophy of Packet Analysis Troubleshooting isn't about looking... Full Story
-

Do you use Sequence Groups In your Firewall Policies? ... Full Story
-

The other day, I opened my Wireshark for macOS... Full Story
-

1. Executive Summary Objective This guide walks through the... Full Story