If you've spent any time configuring user authentication on... Full Story
By Manny Fernandez
December 20, 2018
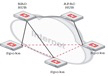
Multi-Regional AD VPN using Fortigate Firewalls and BGP
Disclaimer: This was a client installation. All names and locations have been changed to protect the privacy of the customer. Any similarity to your or your customer’s network is purely coincidental.
The Problem:
We had a customer that has a large footprint in China as well as other parts of the world. As many of you know, when China gets upset at the US, they block IKE/ESP and essentially kill access to China for many companies. Customer has an International Private Leased Circuit (IPLC) between China and the US.
Requirements:
1. Must be dynamic.
2. Must be flexible enough to do ad-hoc changes to a site.
3. All sites must be able to communicate with each other during normal regional access.
4. If China is disconnected due to geo-political issues, the IPLC remains operational and should be used to route all traffic between the two regions.
5. Centrally Managed.
The solution:
AD VPN with two hubs. One in each region. Both Hubs should be BGP Route Reflectors, Spoke in Region APAC should be able to communicate with Spokes in NAO (North America and Others)

HUB SITE
Lets start with the North America and Other Region (NAO)
First we will configure the basic IP addresses. In my example, ‘Port1’ represents the Internet for the Hub. Also, ‘Port4’ represents the IPLC (International Private Leased Circuit), The other interfaces are tunnel interfaces with IP addresses assigned to them. PLEASE NOTE I AM USING 6.0.2 FOR THIS CONFIG. Some commands will fail if you are running later code.
config system interface
    edit "port1"
       set vdom "root"
       set ip 1.1.10.1 255.255.255.0
       set allowaccess ping https http fgfm
       set type physical
       set alias "outside"
       set role wan
       set snmp-index 3
    next
    edit "port4"
       set vdom "root"
       set ip 20.20.20.1 255.255.255.252
       set allowaccess ping https ssh http
       set type physical
       set alias "IPLC"
       set snmp-index 6
    next
    edit "spoke"
       set vdom "root"
       set ip 10.20.10.1 255.255.255.255
       set allowaccess ping
       set type tunnel
       set remote-ip 10.20.20.254 255.255.255.0
       set snmp-index 12
       set interface "port1"
    next
    edit "HUB-to-HUB"
       set vdom "root"
       set ip 10.255.255.1 255.255.255.255
       set allowaccess ping
       set type tunnel
       set remote-ip 10.255.255.2 255.255.255.255
       set snmp-index 13
       set interface "port1"
    next
end
As you can see, the ‘HUB-to-HUB’ and ’spoke’ are part of ‘port1’ and type is tunnel. Note, this will be auto-created in a later step and you will need to come back and assign the IP addresses and other commands not shown.
The section on the ‘spoke’ interface, that refers to a remote IP can be anything not being used.
set remote-ip 10.20.20.254 255.255.255.0
Make sure you pick a subnet that can handle the number of spokes you are going to have.
Now we will configure the Phase I for both the Site-to-Site (HUB-to-HUB) and the Spokes (spoke).
config vpn ipsec phase1-interface
    edit "spoke"
       set type dynamic
       set interface "port1"
       set peertype any
       set proposal aes256-sha256
       set add-route disable
       set auto-discovery-sender enable
       set net-device enable
       set psksecret <REMOVED>
    next
    edit "HUB-to-HUB"
        set interface "port1"
        set local-gw 1.1.10.1
        set peertype any
        set proposal aes256-sha256
        set auto-discovery-forwarder enable
        set remote-gw 1.1.11.1
        set psksecret <REMOVED>
    next
end
Now for Phase II. With this config, we are using 0.0.0.0/0 in both Local and Remote. This is the default and thus, not needed in the configuration.
config vpn ipsec phase2-interface
    edit "spoke"
        set phase1name "spoke"
        set proposal aes256-sha256
        set keepalive enable
    next
    edit "HUB-to-HUB"
        set phase1name "HUB-to-HUB"
        set proposal aes256-sha256
        set auto-negotiate enable
    next
end
Now that the VPN is configured, we can move on to the IPv4 policy portion.
config firewall policy
    edit 0
        set name "IPLC Traffic"
        set srcintf "port4"
        set dstintf "port4"
        set srcaddr "all"
        set dstaddr "all"
        set action accept
        set status enable
        set schedule "always"
        set service "ALL"
        set logtraffic all
   next
   edit 0
        set name "HUB-to-HUB"
        set srcintf "HUB-to-HUB"
        set dstintf "HUB-to-HUB"
        set srcaddr "all"
        set dstaddr "all"
        set action accept
        set status enable
        set schedule "always"
        set service "ALL"
        set logtraffic all
        set global-label "Site-to-Site"
    next
    edit 0
        set name "Spoke to Spoke"
        set srcintf "spoke"
        set dstintf "spoke"
        set srcaddr "all"
        set dstaddr "all"
        set action accept
        set status enable
        set schedule "always"
        set service "ALL"
        set logtraffic all
     next
     edit 0
        set name "HUB-to-Spokes"
        set srcintf "HUB-to-HUB"
        set dstintf "spoke"
        set srcaddr "all"
        set dstaddr "all"
        set action accept
        set status enable
        set schedule "always"
        set service "ALL"
        set logtraffic all
     next
     edit 0
        set name "Spokes-to-HUB"
        set srcintf "spoke"
        set dstintf "HUB-to-HUB"
        set srcaddr "all"
        set dstaddr "all"
        set action accept
        set status enable
        set schedule "always"
        set service "ALL"
        set logtraffic all
        set comments "Reverse of HUB-to-Spokes"
     next
     edit 0
        set name "IPLC-to-Spoke"
        set srcintf "port4"
        set dstintf "spoke"
        set srcaddr "all"
        set dstaddr "all"
        set action accept
        set status enable
        set schedule "always"
        set service "ALL"
        set logtraffic all
     next
     edit 0
        set name "Spoke-to-IPLC"
        set srcintf "spoke"
        set dstintf "port4"
        set srcaddr "all"
        set dstaddr "all"
        set action accept
        set status enable
        set schedule "always"
        set service "ALL"
        set logtraffic all
        set comments "Reverse of IPLC-to-Spoke"
     next
Essentially, you need to permit from the Hub to the Hub, from Hub to Spoke, From the IPLC to Hubs and Spokes, and Spokes to IPLC and Hubs.
We are now going to configure the Prefix lists that will be used to massage the routes and influence how these routes are learned and advertised.
config router prefix-list
    edit "US"
        config rule
            edit 1
               set prefix 192.168.6.0 255.255.255.0
               unset ge
               unset le
            next
            edit 2
               set prefix 192.168.7.0 255.255.255.0
               unset ge
               unset le
            next
            edit 3
               set prefix 192.168.8.0 255.255.255.0
               unset ge
               unset le
            next
            edit 4
                set prefix 192.168.9.0 255.255.255.0
                unset ge
                unset le
            next
       end
       next
     edit "APAC"
       config rule
           edit 1
               set prefix 192.168.1.0 255.255.255.0
               unset ge
               unset le
           next
           edit 2
               set prefix 192.168.2.0 255.255.255.0
               unset ge
               unset le
           next
           edit 3
               set prefix 192.168.3.0 255.255.255.0
               unset ge
               unset le
            next
            edit 4
               set prefix 192.168.4.0 255.255.255.0
               unset ge
               unset le
             next
          end
             next
      edit "US-IPLC"
         config rule
            edit 1
              set prefix 192.168.6.0 255.255.255.0
              unset ge
              unset le
           next
           edit 2
             set prefix 192.168.7.0 255.255.255.0
             unset ge
             unset le
           next
           edit 3
             set prefix 192.168.8.0 255.255.255.0
             unset ge
             unset le
          next
          edit 4
            set prefix 192.168.9.0 255.255.255.0
            unset ge
            unset le
         next
         end
    edit "APAC-IPLC"
       config rule
          edit 1
            set prefix 192.168.1.0 255.255.255.0
            unset ge
            unset le
         next
         edit 2
            set prefix 192.168.2.0 255.255.255.0
            unset ge
            unset le
         next
         edit 3
            set prefix 192.168.3.0 255.255.255.0
            unset ge
            unset le
         next
         edit 4
            set prefix 192.168.4.0 255.255.255.0
            unset ge
            unset le
         next
       end
    next
end
As we can see in the snippet above, we are defining the routes we are going to reflect to all the spoke sites. We have separate prefix lists because we want to influence routes learned from APAC when advertising them to NAO and visa versa.
The ‘route-map’ statements will be used to set the local preference of the routes.
config router route-map
    edit "LP-90"
       config rule
          edit 1
              set set-local-preference 90
         next
    edit "LP-800"
        config rule
          edit 1
             set set-local-preference 800
          next
      end
One sets the Local Preference (LP) to 90 and the other 800.
config router bgp
set as 65000
set router-id 10.20.10.1
config neighbor
edit "10.255.255.2"
set ebgp-enforce-multihop enable
set next-hop-self enable
set soft-reconfiguration enable
set interface "HUB-to-HUB"
set prefix-list-in "APAC"
set prefix-list-out "US"
set remote-as 65100
set route-map-in "LP-800"
next
edit "20.20.20.2"
set ebgp-enforce-multihop enable
set soft-reconfiguration enable
set interface "port4"
set prefix-list-in "APAC"
set prefix-list-out "US"
set remote-as 65100
set route-map-in "LP-90"
next
end
config neighbor-group
edit "advp_peers"
set next-hop-self enable
set remote-as 65000
set route-reflector-client enable
next
end
config neighbor-range
edit 1
set prefix 10.20.10.0 255.255.255.0
set neighbor-group "advp_peers"
next
end
For the NAO network, we have chosen the ASN of 65000 while in APAC we are going to use 65100. In the above snippet, we can see the route-maps in use for both in and out respectively.
Now for the NAO spoke configuration. This configuration is much easier since there is not router-reflector, route-maps, prefix-lists etc.
SPOKE CONFIGURATION
config system interface
edit "wan1"
set vdom "root"
set ip 1.1.5.1 255.255.255.0
set allowaccess ping https ssh http fgfm
set type physical
set role wan
set snmp-index 1
next
edit "internal"
set vdom "root"
set ip 192.168.5.1 255.255.255.0
set allowaccess ping https ssh http fgfm capwap
set type hard-switch
set stp enable
set device-identification enable
set role lan
set snmp-index 6
set secondary-IP enable
end
next
edit "NAO-PRIMARY"
set vdom "root"
set ip 10.20.10.5 255.255.255.255
set allowaccess ping
set type tunnel
set remote-ip 10.20.10.1 255.255.255.0
set snmp-index 25
set interface "wan1"
next
end

As with the hub site configuration, the tunnel interface will be created when you create the VPN.

config vpn ipsec phase1-interface
edit "NAO-PRIMARY"
set interface "wan1"
set peertype any
set proposal aes256-sha256
set add-route disable
set auto-discovery-receiver enable
set remote-gw 1.1.10.1
set psksecret <REMOVED>
next
end
config vpn ipsec phase2-interface
edit "NAO-PRIMARY"
set phase1name "NAO-PRIMARY"
set proposal aes256-sha256
set auto-negotiate enable
next
end
Now we configure the Phase I and Phase II. As in the Hub configuration, we are using quad ‘0’s (0.0.0.0/0) as the Phase II selectors.
config firewall policy
edit 1
set srcintf "internal"
set dstintf "wan1"
set srcaddr "all"
set dstaddr "all"
set action accept
set status enable
set schedule "always"
set service "ALL"
set nat enable
next
edit 2
set name "To Hub and other Spokes"
set srcintf "internal"
set dstintf "NAO-PRIMARY"
set srcaddr "all"
set dstaddr "all"
set action accept
set status enable
set schedule "always"
set service "ALL"
set logtraffic all
next
edit 3
set name "From Hub and Other Spokes"
set srcintf "NAO-PRIMARY"
set dstintf "internal"
set srcaddr "all"
set dstaddr "all"
set action accept
set status enable
set schedule "always"
set service "ALL"
set logtraffic all
set comments "Reverse of To Hub and other Spokes"
next
end
Above, you see the IPv4 Policies and they are specific to ‘internal’ which is going to allow communication from behind the Fortigate and back in from the remote sites. You CAN be selective here but it is outside the scope of this post.
Next we will configure BGP on the spoke.
config router static
edit 1
set gateway 1.1.5.254
set device "wan1"
next
edit 2
set dst 10.20.10.0 255.255.255.0
set device “NAO-PRIMARY"
next
end
This is going to tell the Spoke Fortigate how to get out to the “Internet” and all other “Spoke” sites via the NAO-PRIMARY tunnel interface.
config router bgp
set as 65000
set router-id 10.20.10.5
config neighbor
edit "10.20.10.1"
set next-hop-self enable
set soft-reconfiguration enable
set remote-as 65000
next
end
config network
edit 1
set prefix 192.168.5.0 255.255.255.0
next
end
For the APAC Region, I will not put the interface configuration or the route-maps and prefix-lists as they are the same as the NAO Regional HUB. The following is the BGP configuration for the APAC Hub.
config router bgp
set as 65100
set router-id 10.20.30.1
config neighbor
edit "10.255.255.1"
set ebgp-enforce-multihop enable
set next-hop-self enable
set soft-reconfiguration enable
set interface "HUB-to-HUB"
set prefix-list-in "US"
set prefix-list-out "APAC"
set remote-as 65000
set route-map-in "LP-800"
next
edit "20.20.20.1"
set next-hop-self enable
set soft-reconfiguration enable
set interface "port16"
set prefix-list-in "US"
set prefix-list-out "APAC"
set remote-as 65000
set route-map-in "LP-90"
next
end
config neighbor-group
edit "advp_peers"
set next-hop-self enable
set remote-as 65100
set route-reflector-client enable
next
end
config neighbor-range
edit 1
set prefix 10.20.30.0 255.255.255.0
set neighbor-group "advp_peers"
next
end
As you can see, there is a different ASN for the APAC sites.
What this configuration will give you is the following:
- NAO spoke sites will dynamically build tunnel to the NAO hub site.
- NAO spoke sites will dynamically build site-to-site tunnels with other spokes as needed.
- NAO Hub will advertise all of the NAO sites via BGP to all the remote sites.
- NAO Hub will advertise all routes it knows of the APAC Hub.
- When the APAC hubs receives routes from NAO, it will change the local preference based on route-map
- When the NAO Hub(s) receive routes from APAC, it too will change the local preference based on route-map.
- When you ping an APAC site from an NAO site, it will know what WAN IP address that remote site has and will establish the tunnel.
- Once no more data is passing across the VPN, the tunnel is torn down.
- Same scenario when communicating inter-region as well as intra-region.
- If the Internet fails between APAC and NAO, all APAC sites will communicate with APAC Hub and route to NAO via the IPLC circuit. Conversely, if NAO sites want to communicate, they too will be routed over IPLC via the NAO Hub.
Special Thanks to my team for working with me, especially Omar Ortiz. The man is a BGP savant.
Recent posts
-

-

DNS is one of those technologies that quietly underpins... Full Story
-

BGP issues on FortiGate firewalls usually trace back to... Full Story
-

Every time your laptop talks to your router, a... Full Story
-

If you've spent any time configuring NAT on a... Full Story
-

If you have spent any time configuring firewall policies... Full Story
-

High availability on FortiGate is one of those features... Full Story
-

If you've configured SD-WAN on a FortiGate, you've almost... Full Story
-

FortiLink is the management protocol that turns a FortiSwitch... Full Story
-

FortiSwitches are pretty rock solid from Mean Time Between... Full Story
-

This is a quicky tip. Have you ever gone... Full Story
-

DNS is one of those quiet pieces of internet... Full Story
-

This article is an updated version of the previous... Full Story
-

You will add ns2 as a secondary (slave) BIND9... Full Story
-

In the process of deploying my lab, I needed... Full Story
-

RFC 8805, used to be known as Self-Correcting IP... Full Story
-

Years back, I wrote an article about certificate pinning. ... Full Story
-

FortiGates have the ability to send alerts to Microsoft... Full Story
-

In this post, I am going to walk through... Full Story
-

Troubleshooting VoIP on a FortiGate can feel like trying... Full Story
-

Prior to FortiOS 7.0, there were three commands to... Full Story
-

In this post, I am going to go over... Full Story
-

What we are going to do: We are going... Full Story
-

Choosing between FGCP (FortiGate Clustering Protocol) and FGSP (FortiGate... Full Story
-

Creating a VLAN on macOS (The "Pro" Move) A... Full Story
-

This blog post explores the logic behind how macOS... Full Story
-

Pretty Fly for a Wi-Fi Tell My Wi-Fi Love... Full Story
-

Part of my daily gig is creating BoMs (Bill-of-Materials)... Full Story
-

ICMP introduces several security risks, but careful filtering, rate... Full Story
-

The command diag debug application dhcps -1 enables full... Full Story
-

In the world of FortiOS, execute tac report is... Full Story
-

LLDP; What is it The Link Layer Discovery Protocol... Full Story
-

What it actually does When you run diagnose fdsm... Full Story
-

Monkey Bites are bite-sized, high-impact security insights designed for... Full Story
-

I have run macOS in macOS with Parallels but... Full Story
-

Don't be confused with my other FortiNAC posts where... Full Story
-

This is the third session in a multi-part article... Full Story
-

Today I was configuring key-based authentication on a FortiGate... Full Story
-

Netcat, often called the "Swiss Army knife" of networking,... Full Story
-

At its core, IEEE 802.1X is a network layer... Full Story
-

In case you did not see the previous FortiNAC... Full Story
-

This is our 5th session where we are going... Full Story
-

Now that we have Wireshark installed and somewhat configured,... Full Story
-

The Philosophy of Packet Analysis Troubleshooting isn't about looking... Full Story
-

Do you use Sequence Groups In your Firewall Policies? ... Full Story
-

The other day, I opened my Wireshark for macOS... Full Story
-

1. Executive Summary Objective This guide walks through the... Full Story