Have you ever ordered a bunch of Fortinet gear... Full Story
By Manny Fernandez
April 9, 2019

Configuring LDAP Authentication for Remote Access VPN
The Fortigate platform allows for multiple authentication options for VPNs. In the past, I used a lot of Cisco ASA and with it, AnyConnect for remote access VPN. One of the issues I would run into on ASAs was the limited Authentication methods for a single VPN configuration. Granted, you could create additional Remote Access VPNs and have each use separate authentication methods (e.g. LDAP, RADIUS, Local). Fortigate allows you to use all of the authentication methods under a single VPN Portal. It DOES support realms which allow you to manage different versions of the VPN configuration (e.g. split-tunnel enabled on one and split-tunnel disabled on the other).
In this post, I am going to give you a quick tutorial on configuring SSL VPNs to use Active Directory to authenticate users. Lets get started.
You will need to create a Service Account with Domain Admin access. Then create a Security Group (preferably something you are not already using for anything else) and give it a descriptive name (e.g. VPN Users)
Creating the LDAP Server Configuration on the Fortigate
Log into the Fortigate and Choose (1) ‘User & Devices’ then (2) ‘LDAP Servers’, then choose (3) ‘Create’.

Now we will configure the different options:
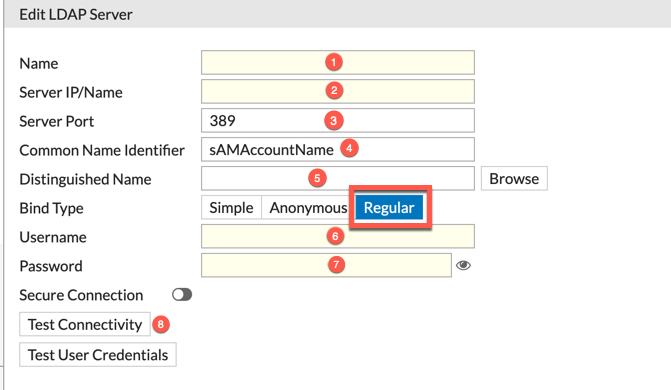
- Give the LDAP Server a descriptive name
- Provide the IP address of FQDN (Ensure the Fortigate can ping it by name)
- Server port (usually 389)
- Common Name Identifier – I do not use the ‘CN’, I use ‘sAMAccountName’ (and yes, case sensitive)
- Distinguished Name – You can use the ‘Browse’ button and select the base level (I usually choose the root).
- Provide the username using thee @domainname option. I have used it with the LDIF format but with the domain name is much easier. (NOTE: You need to select ‘Regular’ to have it show the Username and Password field).
- Password – Self explanitory
- The choose ‘Test Connectivity’. This will check that you can log in with the bound username. To ensure that the user has enough credentials, you the ‘Test User Credentials’ button.
Obtaining the LDIF Name for the bound username
To get the LDIF format for the user, head to the CLI of the DC and run the following command:
dsquery user -samid
You can also do it via the GUI. Launch ‘Active Directory Users and Computers’ and ensure you go to ‘View’ then choose ‘Advanced Features’.
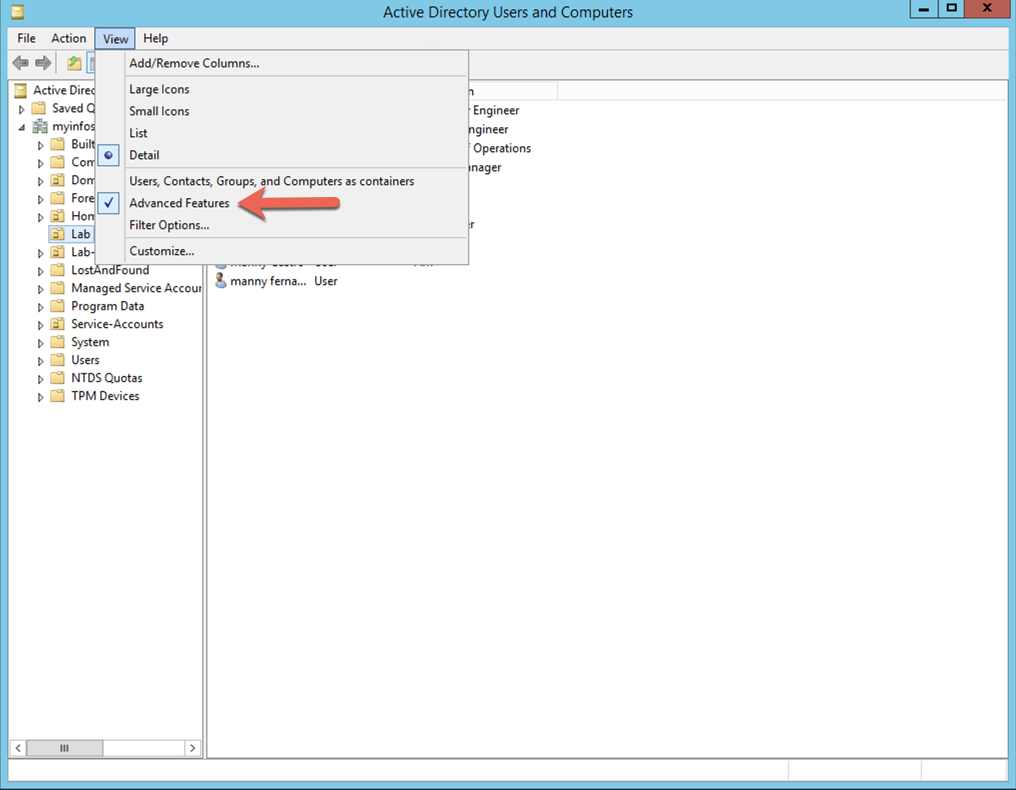
Look for the user you want to use in the LDAP configuration and go to the properties of that user.
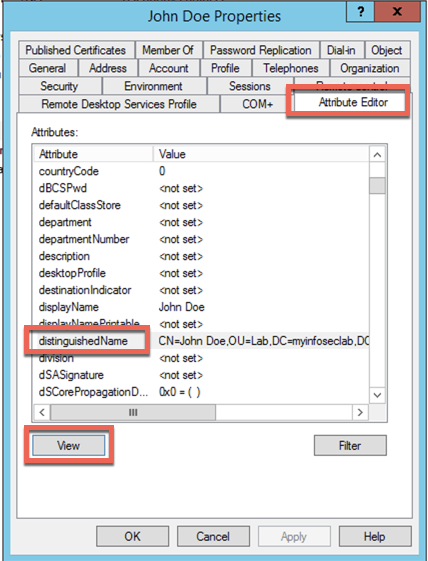
Scroll over to the ‘Attribute Editor’ tab, scroll down to the ‘distinguishedName’ section and choose ‘View’
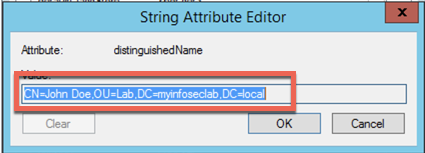
Copy this section and use that in the Fortigate LDAP user configuration page.
Once you have the LDAP configured and you are getting a successful connection, we will move on to the next section.
Configuring the Group
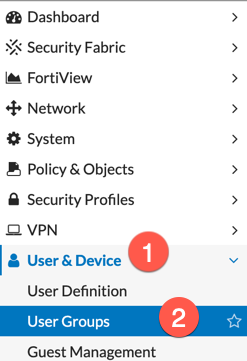
Browse over to the (1) ‘Users & Device’ again, this time choosing (2) ‘User Groups’
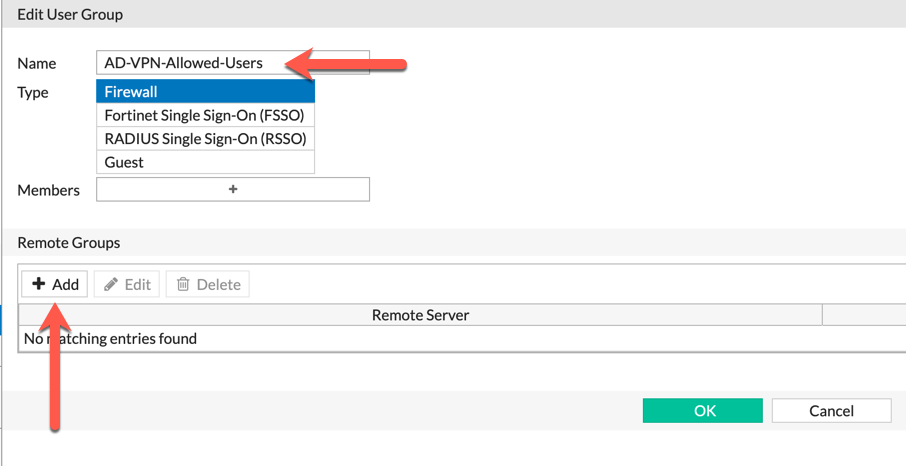
Next, we are going to give this group a name (I like to use the ‘AD’ in the beginning so that I can easily tell that it is an Active Directory group, RADIUS would have a ‘RA’ and local accounts would have a ‘LOCAL’ as a prefix.
Choose the ‘Remote Groups’ and NOT ‘Members’.
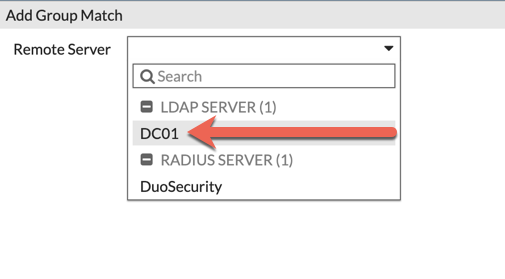
From the drop-down list, choose the LDAP server you created in the first steps. You should now be seeing the query results of the LDAP query. Here you will be able to choose the Group that will be authorized to VPN in.

Now, you choose the (1) ‘Groups’ Tab, then enter the name or partial name in the (2) search bar and choose the search button. Once your group comes up in the (3) results, Right click and (4) choose ‘+ Add Selected’ then choose OK.
Configuring the VPN
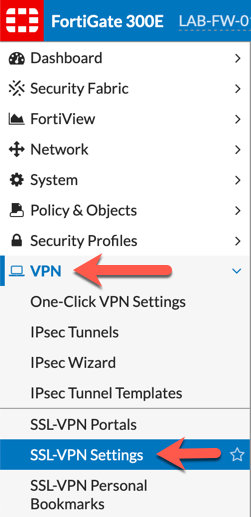
Browse over to ‘VPN’, then choose ‘SSL-VPN Settings’

Under the ‘Authentication/Portal Mapping’ section (close to the bottom of the screen), Select ‘Create New’
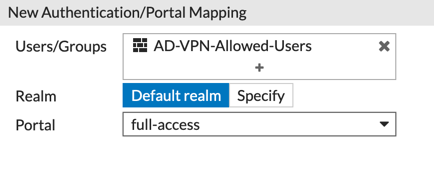
From the drop-down, select the newly created User Group from the previous section, the select what Portal they will use.
Here is where I was saying that Fortigate allows for multiple authentication types and even authentication groups to be used in the same portal.
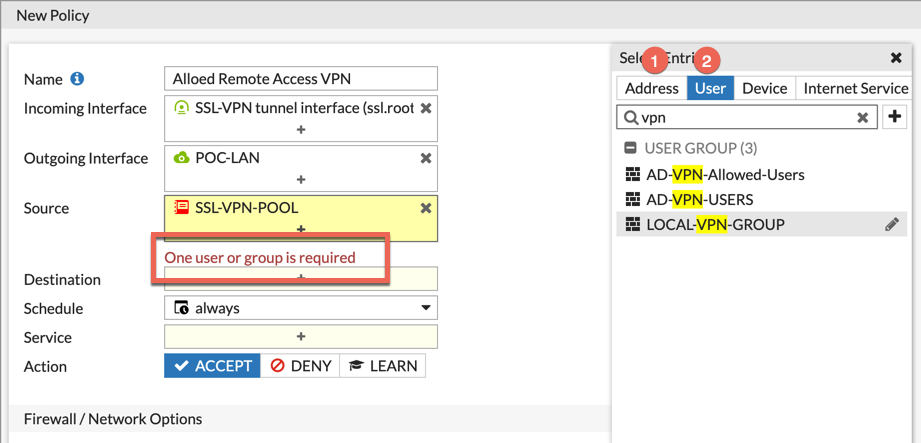
Now for the Policy. When you create the policy, as soon as you choose the ‘Incoming Interface’ you will see that the Fortigate will require you to choose an (1) address and a (2) User or User Group. Ensure that the Group you created earlier is in this list. You can add multiple users and/or groups to the ‘User’ section.
And there you go. Hope this helps.
Recent posts
-

-

Had a customer with over 200 static routes on... Full Story
-

This is a work in progress, I will be... Full Story
