In today’s rapidly evolving network landscape, securing users everywhere... Full Story
By Manny Fernandez
April 10, 2018

Fortigate SSL Decryption with Microsoft CA Server
This article has a prequel to it which shows how to deploy the CA server where this article assumes you have already done this.
In order to deploy Fortigate’s SSL Decryption feature without getting the untrusted certificate error, you will need to import the Fortigate’s Certificate into your PC and Server environments. This can be extremely difficult from a logistics perspective. The easier way, IMHO, is to use Microsoft’s CA services. You can use the GPO services to push out the certificate into the Trusted CA container.
There are a few steps in doing this. One is creating the Subordinate CA Template on the CA server, then exporting the certicate with the private key, using openssl to extract the actual certifcate and finally, importing the certifcates into the Fortigate.
Lets start with the CA server. First, you will need to either install a new CA server if you do not already have one. You can do this using the server roles. I suggest using the AD integrated deployment method. Ensure you have the web enrollment option selected as well as we will be using that.
Launch MMC and add the Certificate Authority snapin. Also add the Certificate Template and Certificate snapins. Ensure that your user or User Group have the ‘enroll’ permission enabled.

When adding the Certificate snap-in, Select the My User Account

Now launch the browser from either the CA server itself or from your PC. On the server, you can access the URL by pointing the browser to https://localhost/certsrv or from a PC https://IPaddressOfCA/certserv.

Accept the certificate warning.

Now choose Request a certificate

Choose advanced certificate request

Select Create and submit a request to this CA

Choose Yes on the warning message that pops up.

Fill out the form with your particulars but ensure that you choose at least 2048 as the key size.

Again, choose Yes on the warning message that will pop up.

Now choose Install this certificate. Once the certificate is installed, we will need to move over to the MMC.

Navigate to Personal Certificates and look for your certificate. Look at the Friendly Name to find it if you have many certificates and double click it.

Make sure the dates are correct. Then choose the Details tab and choose Basic Constraints and ensure that CA is displayed and choose Copy to File.

Select Next

Ensure that you Export the keys.

Now choose Next

Assign a password and choose Next.

Save the certificate in .pfx format to a known location.

Now select Finish

You should have gotten a confirmation pop-up.
Once you have the file, move it to a machine that has ‘openssl’ installed on it.
Now we will export the Private Keys out of the PFX file. You will need to run the following commands (replace with your file name)
openssl pkcs12 -in blogcert.pfx -nocerts -out privatekey.key

You will be prompted for the password you entered steps above.
Now we export the Certificate out of the PFX file.
openssl pkcs12 -in blogcert.pfx -clcerts -nokeys -out certfilename.crt

Once again, it will ask you for the password. Once this has completed, you should have your original file, a .key file, and a .crt file. (Depending on the -in and -out files you may have different extensions.)
Once you have two spearate files (.key and the .crt) you can import as a local certificate into the Fortigate.

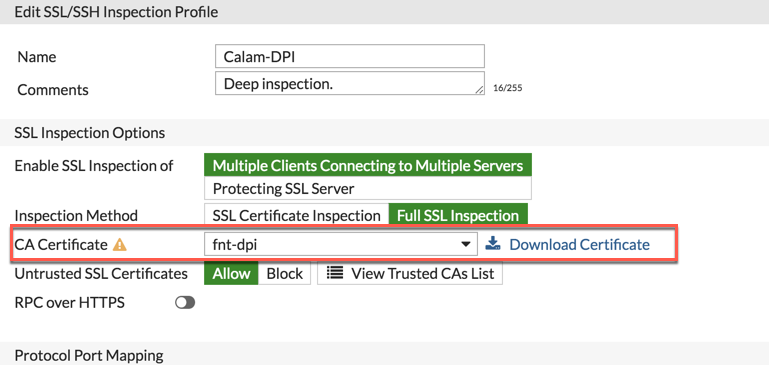
Once you have the certificate imported into the Fortigate, go to the Security Profile, SSL/SSH inspection and choose the CA certificate from the previous step.
Although there are a lot of steps in this blog post, it is acually very easy to set up.
Ensure that you enable deep packet inspection in the policy itself

Here is a link to push the certifcate via GPO
Comments are closed.
Recent posts
-

-

Have you ever ordered a bunch of Fortinet gear... Full Story
-

Had a customer with over 200 static routes on... Full Story
Hi there, You have done an incredible job. I will definitely digg it and personally suggest to my friends. I am sure they’ll be benefited from this site.