Have you ever ordered a bunch of Fortinet gear... Full Story
By Manny Fernandez
November 17, 2019

FortiOS to PANOS Site-to-Site VPN
In this article, I am using “WAY OLD” PAN OS. Mostly because I no longer own an updated PAN box. I am going to be installing a VM in a couple of weeks and will be doing some compare and contrast articles and some PAN VM to Fortigate VMs performance comparison so stay tuned, this could get interesting.
In PAN, rather than creating a VPN in one section, as in the Fortigate, it is broken down into pieces similar to Cisco. Cisco creates separate phase I and phase II sections and then a crypto map and an access list, etc. In the case of PAN, you need to set up what I like to call “the ingredients” for the VPN and then create the VPN “dish” itself. If you understand IPSec it’s not that bad.
PANOS Configuration

The graphic above was part of a deliverable I created for a customer a while back when I was running service for a reseller and installing PAN, Fortigate and plenty of Cisco ASAs. It give you a good overview of what each “ingredient” does.
Phase I
Most of these sections will be under Network and then on the left, you will see the options to configure the next few sections.
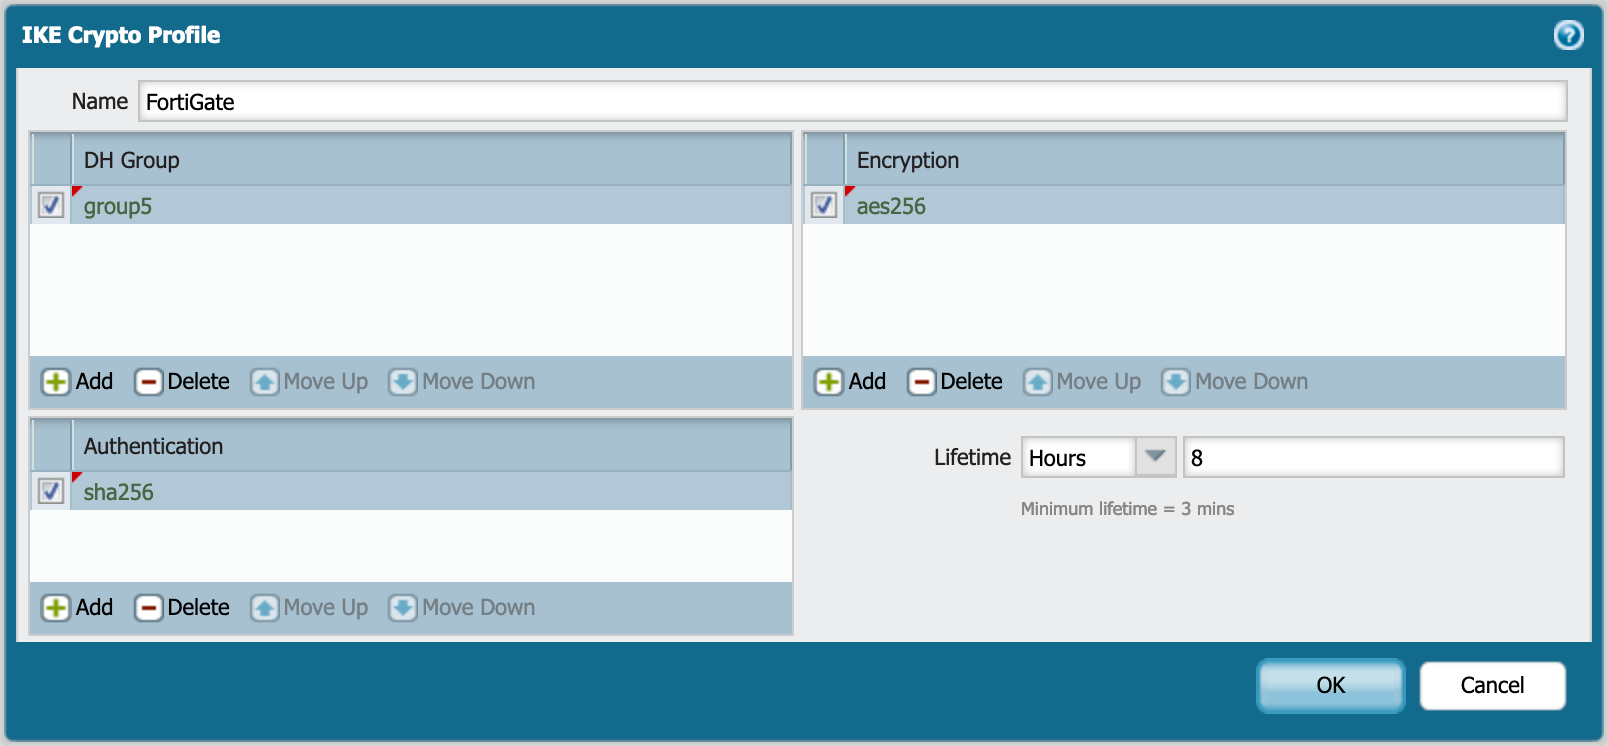
In this section, we will configure the Phase I proposals. As you can see below, we have the IKE Crypto Profile and within it, we can see that we are using AES256 as the encryption scheme, the hashing or Authentication is SHA256 with a Diffie-Hellman (DH) group of 5.
Phase II
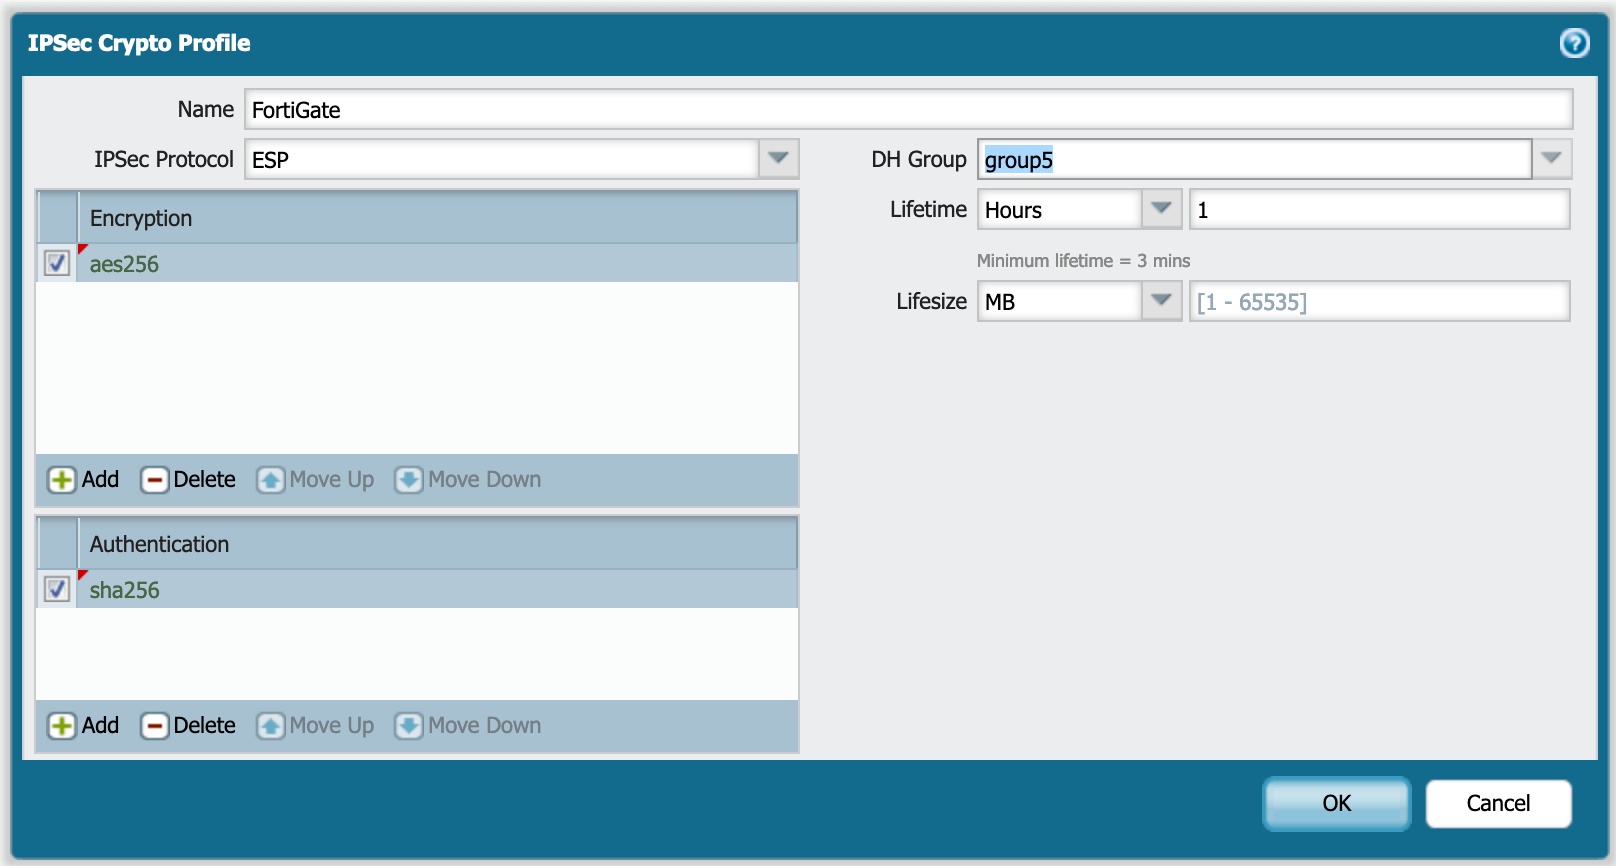
In the IPSec Crypto Profile section, you will define your Phase II proposals. A you can see below, we are using:
- Encapsulation Security Payload (ESP)
- AES256 for the encryption scheme.
- SHA256 for the hash or
Authentication - DH group5 (Only applicable with PFS)
IKE Gateway
Next we will create the gateway where we will define the remote peer IP, pre-shared key, and the IKE Crypto Profile.
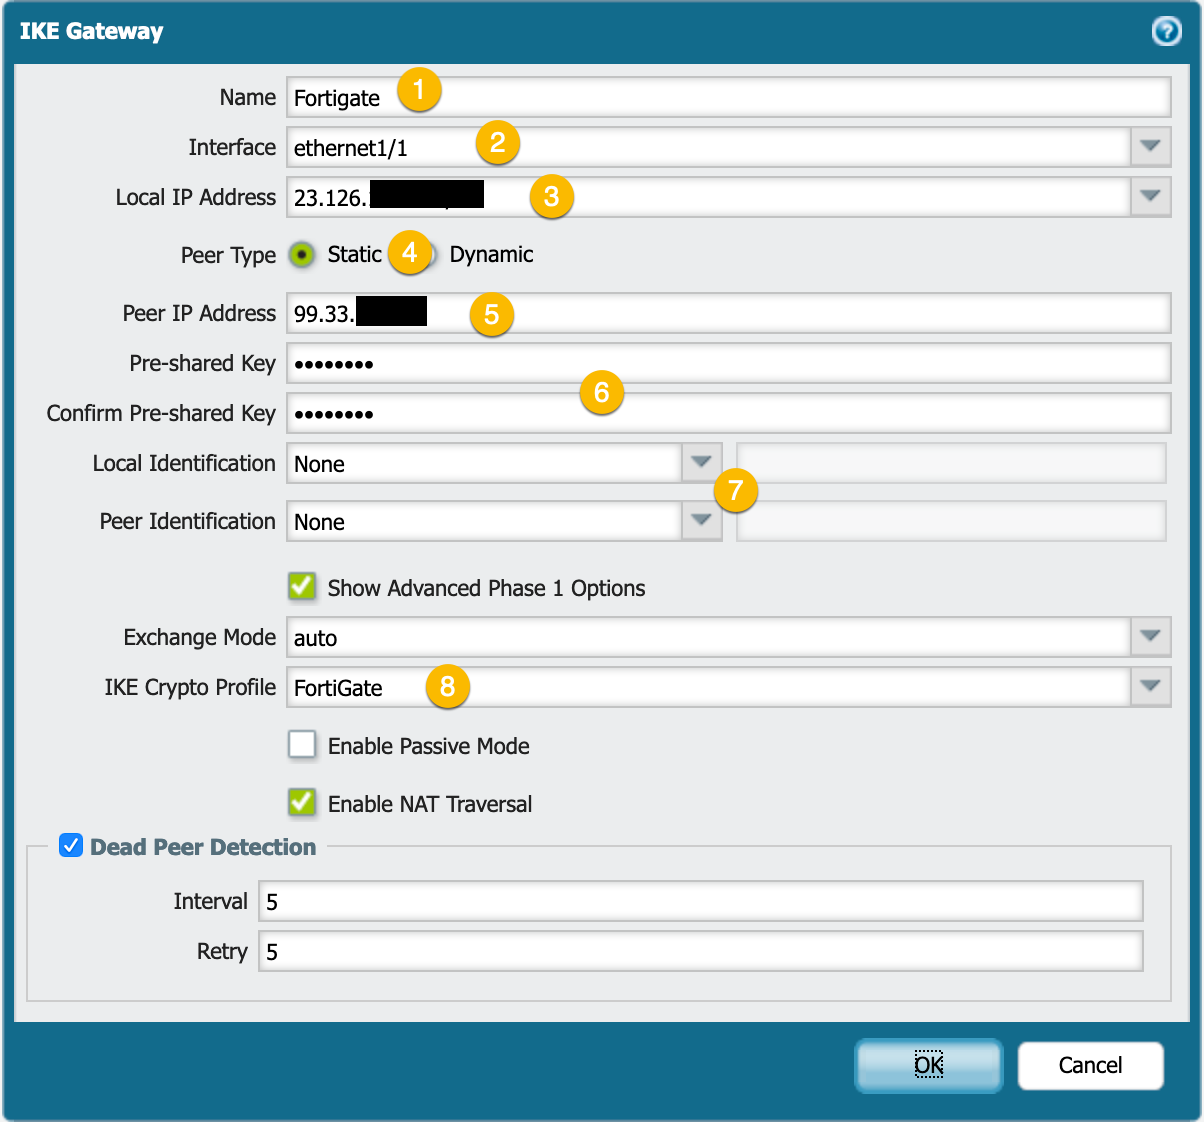
Under the IKE Gateway configuration, we will define:
- Name the IKE Gateway
- Choose the outgoing interface
- By choosing the drop-down, you will be able to choose the IP that is assigned to the chosen interface (item 2).
- Here you can choose weather the peer will have a static IP or if it will be dynamic.
- Define the remote peer IP address.
- Enter and validate the Pre-Shared Key.
- If you are using
Local IdentificationandRemote Identification, you can define those values here. - Choose the drop down and choose the
IKE Crypto Profilewe created in thePhase Isection.
Create a Zone
Again, you will need to go to Network then Zones then choose the add button.

Interface Management
If you want to allow ping as an example to the Palo Alto device, you will need to define it under the Interface Mgmt section which is under the Network tab.
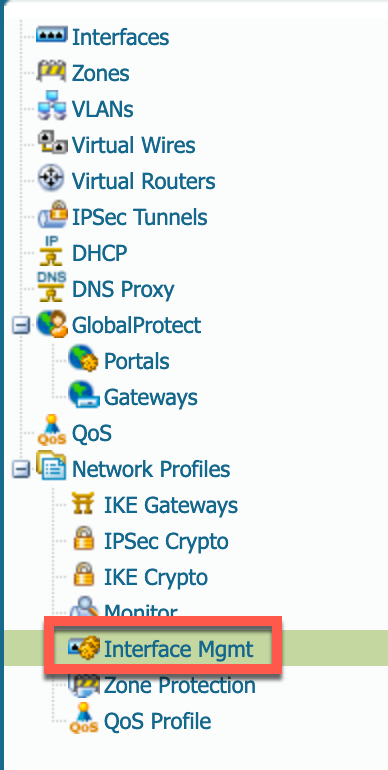
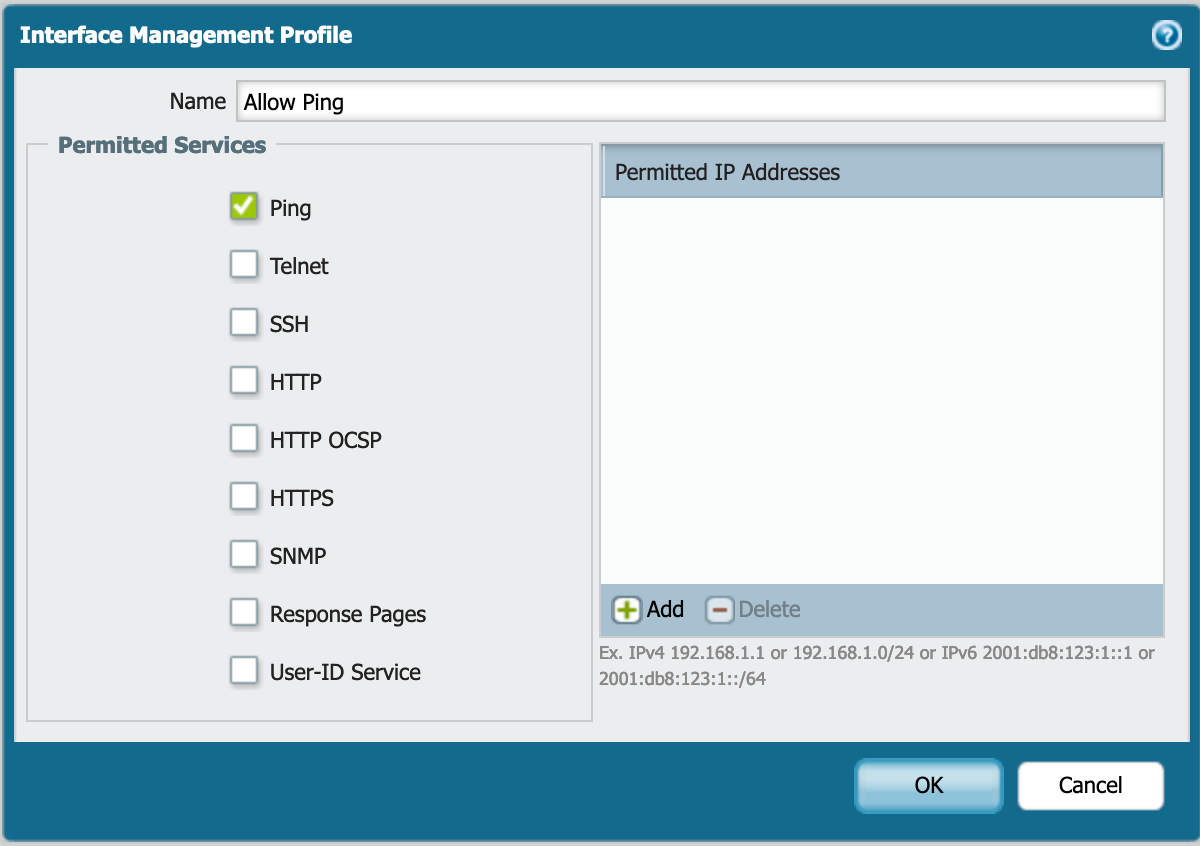
Here you can choose what you want to allow in this profile.
Tunnel Interface
We will need to create a Tunnel Interface

- Go to the
Networktab - Then
Interfacesthen - Choose
Tunnel.
You will need to create a new Tunnel Interface

Click the Add button the bottom left of the screen.
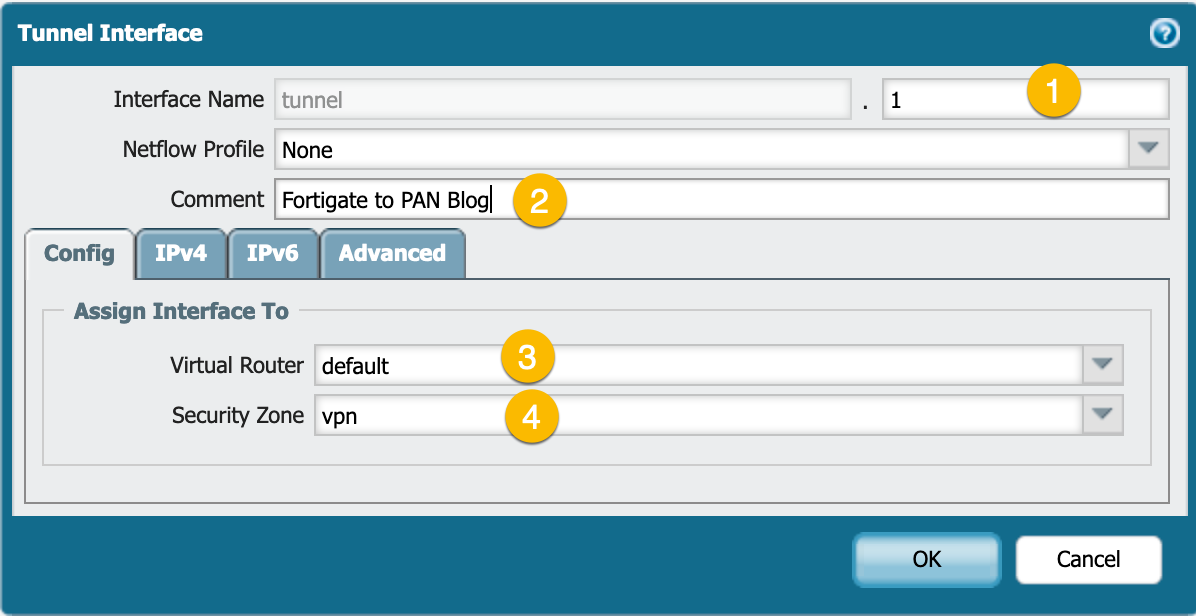
- Assign a number not being used already.
- Optional – (but recommended) Give it a name.
- Choose the virtual router you will use.
- Select the Security Zone we created earlier.
You can add the Interface Mgmt profile we created before by clicking the Advanced button under the Tunnel Interface configuration.
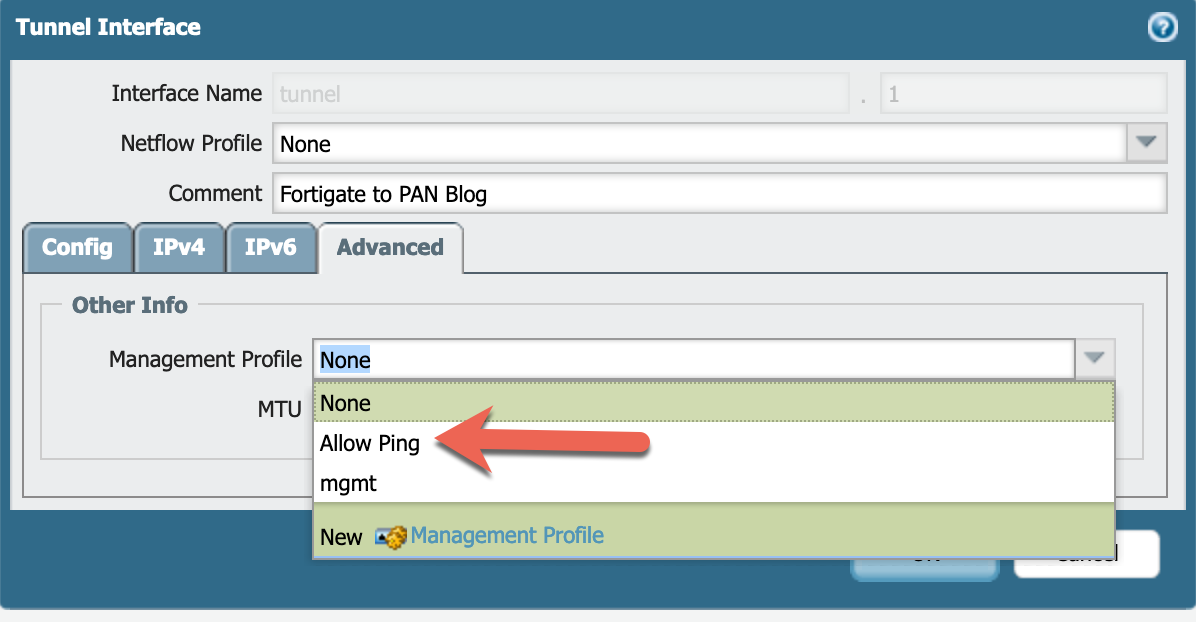
Then choose OK
IPSec Tunnel
Finally we put the ingredients together to form the dish (VPN Tunnel).
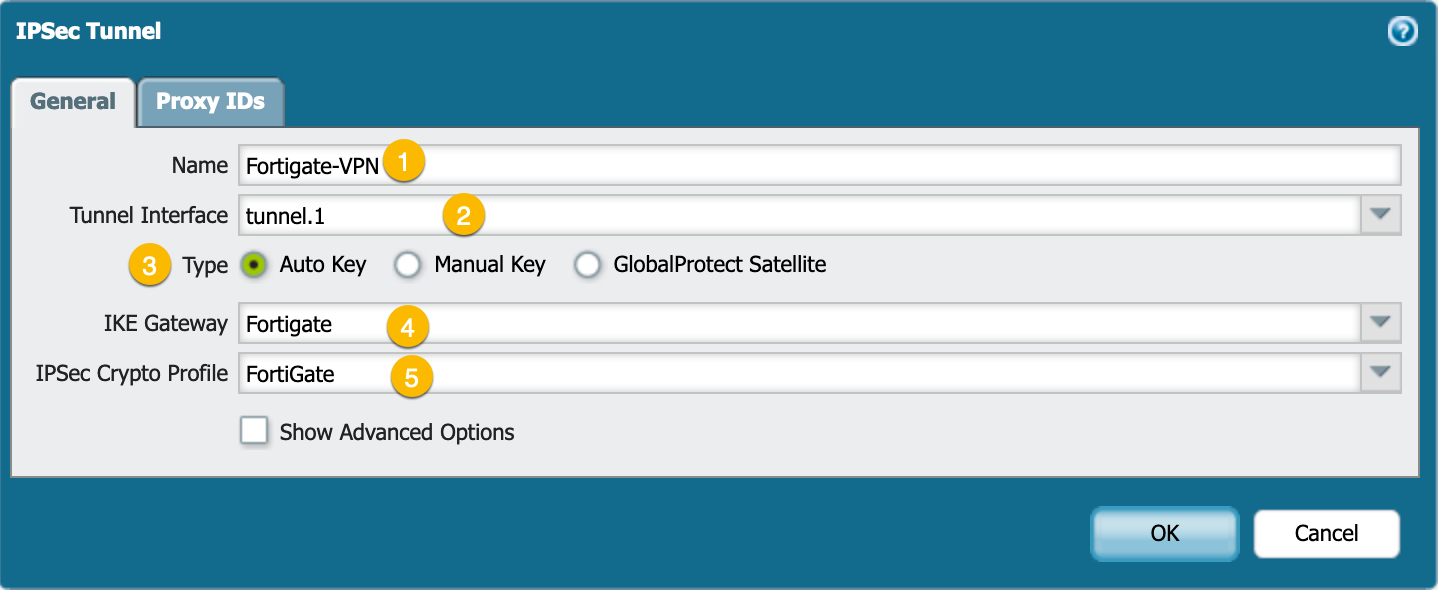
In the screenshot above, you can see:
- The Name of the IPSec Tunnel
- Tunnel Interface choose the drop-down and choose the interface we created above.
- Auto or Manual Key, I have only used
Auto Key - Choose the IKE Gateway we created in the previous step.
- Choose the IPsec Crypto Profile created in the previous few steps.
Next choose the Phase II selectors or the IP addresses you will be presenting in the VPN to the remote peers. This defines what is interesting traffic.
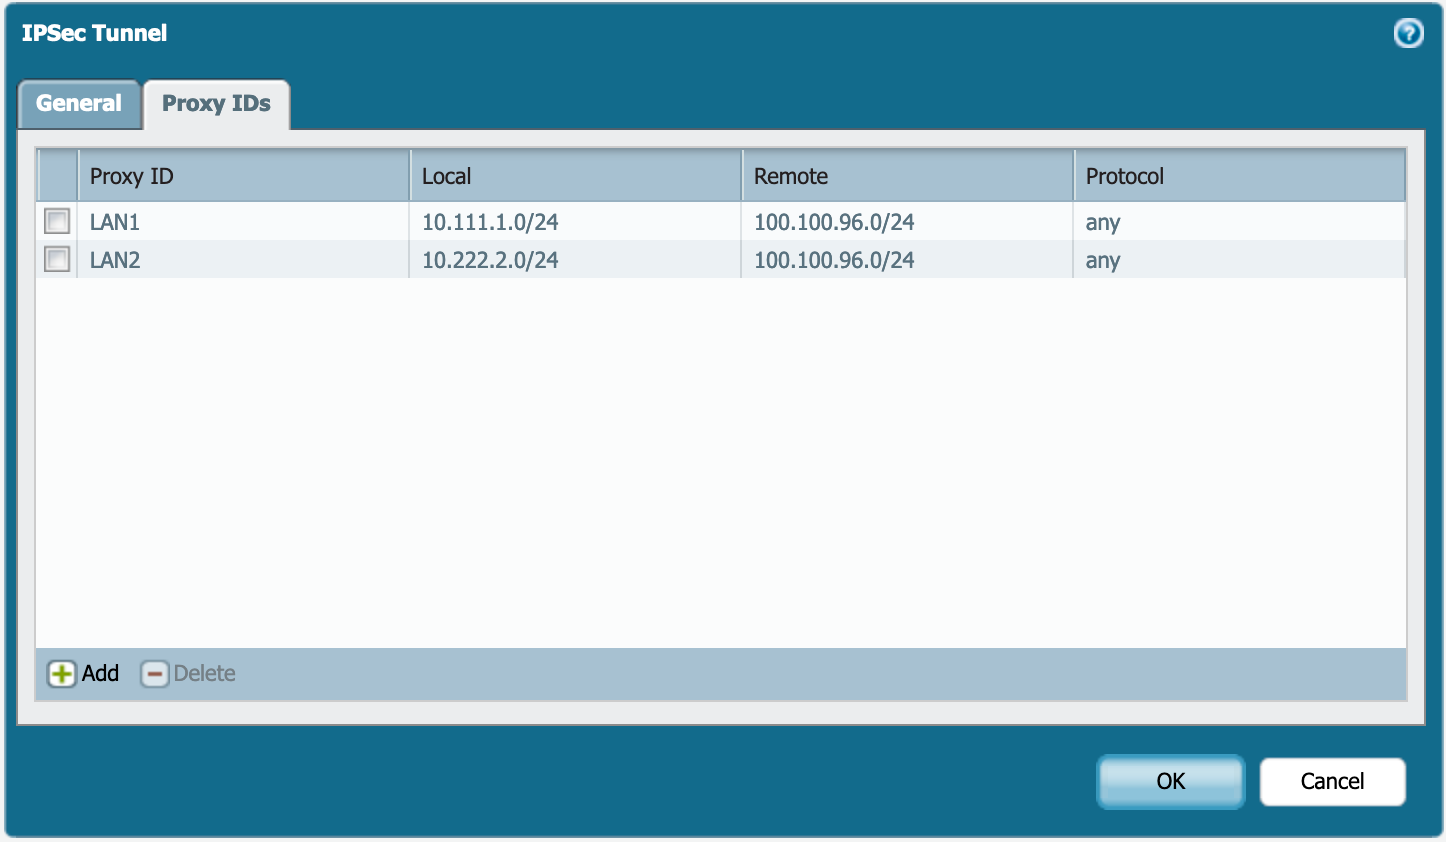
NOTE: For a true route-based VPN, you can leave this alone and it will default to 0.0.0.0/0/.
Firewall Policies
Now we will create a policy to permit traffic in and out of the tunnel.

You will need to go to Policies tab, then choose Security. Now click the Add button on the bottom left.
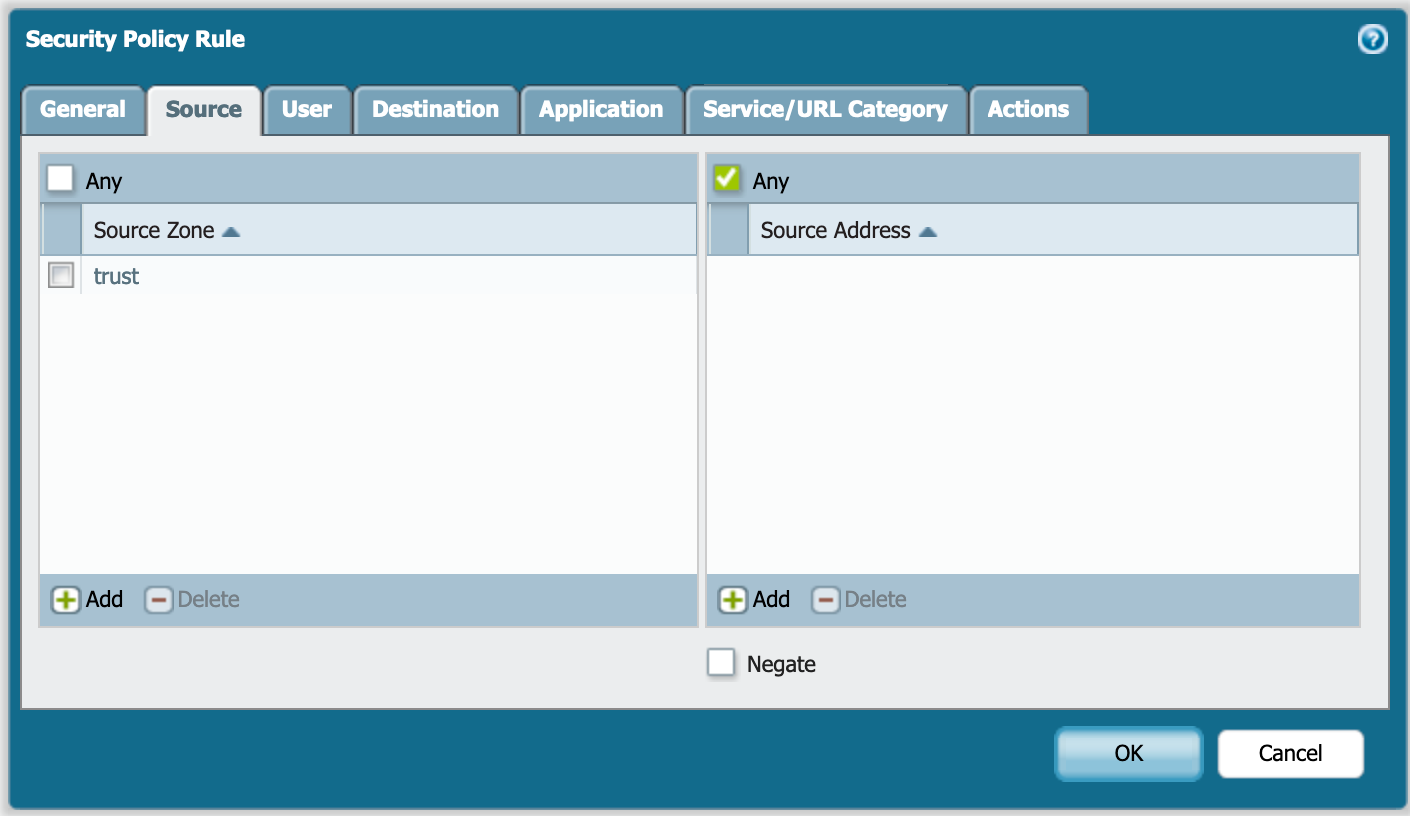
Choose a source zone and choose Source Address as needed.
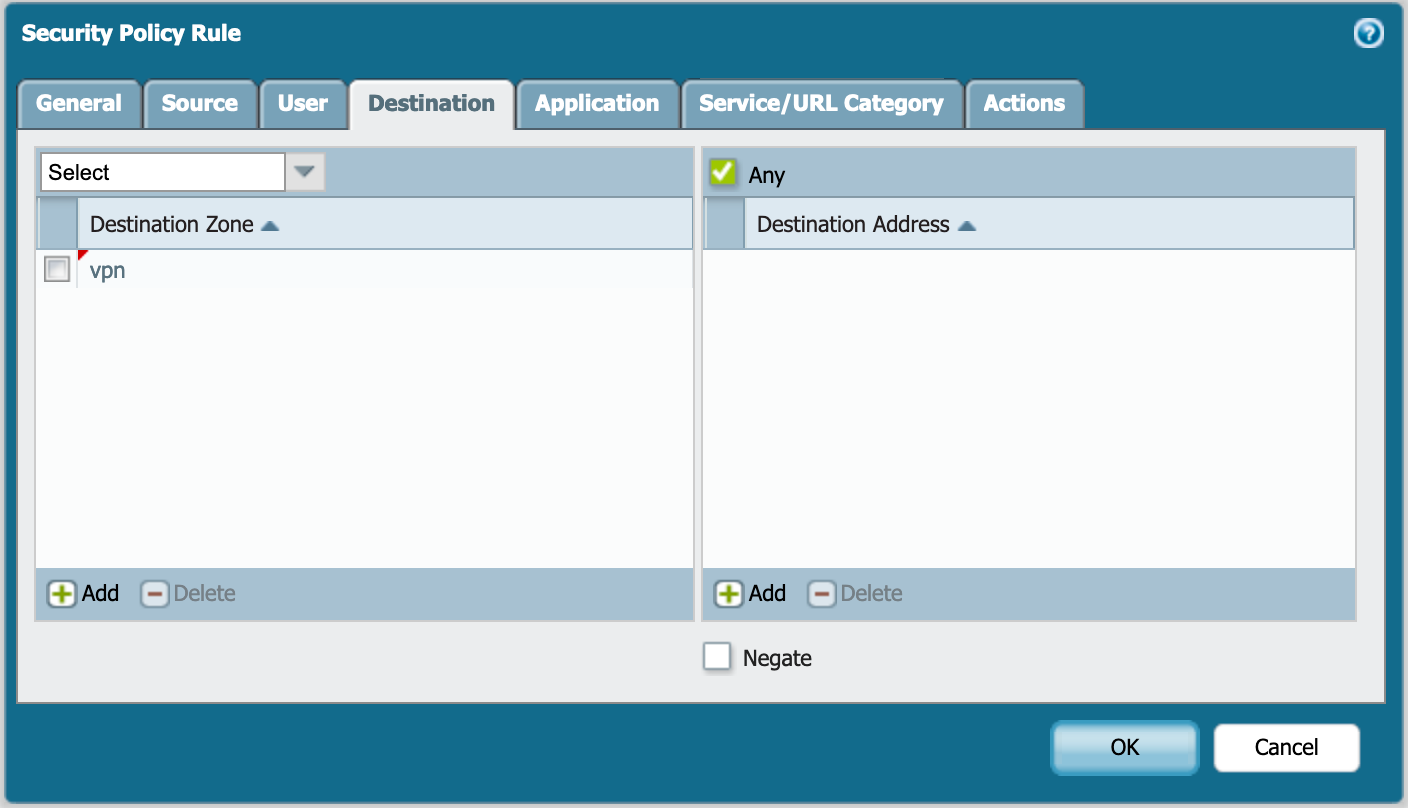
Now choose the VPN zone we created earlier.
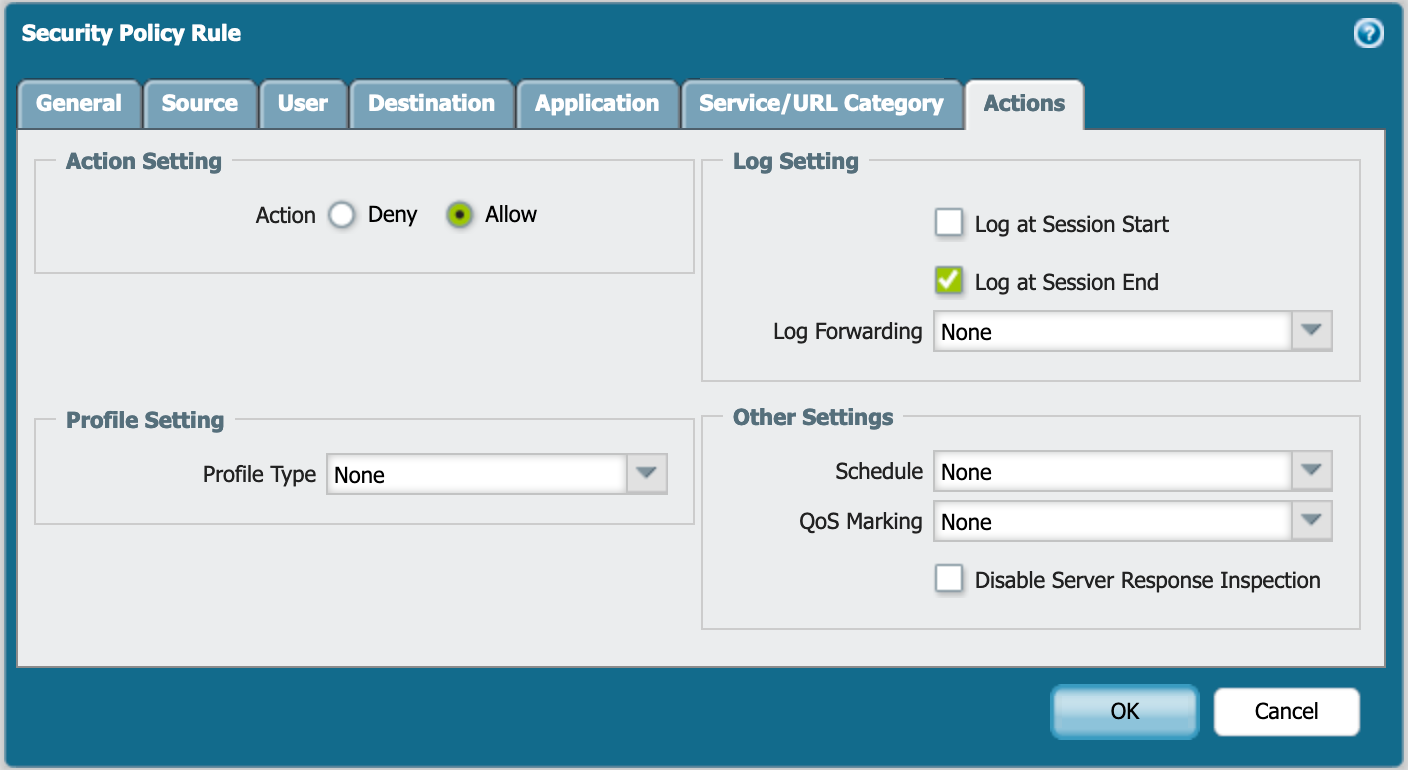
Choose the Application and Service / URL Category as needed. The Actions tab will tell you what to do with the matching traffic. In our case, we want to Allow . Additionally, you can send logs to an external syslog if desired.
Commit
Now that you have finished the configuration for the PAN side, you will need to commit the changes.

FortiOS Configuration
IMHO, the Fortigate is much easier to configure from a number of steps perspective. Lets get started.
Phase I
Go to VPN and choose IPsec Tunnel then choose Create New
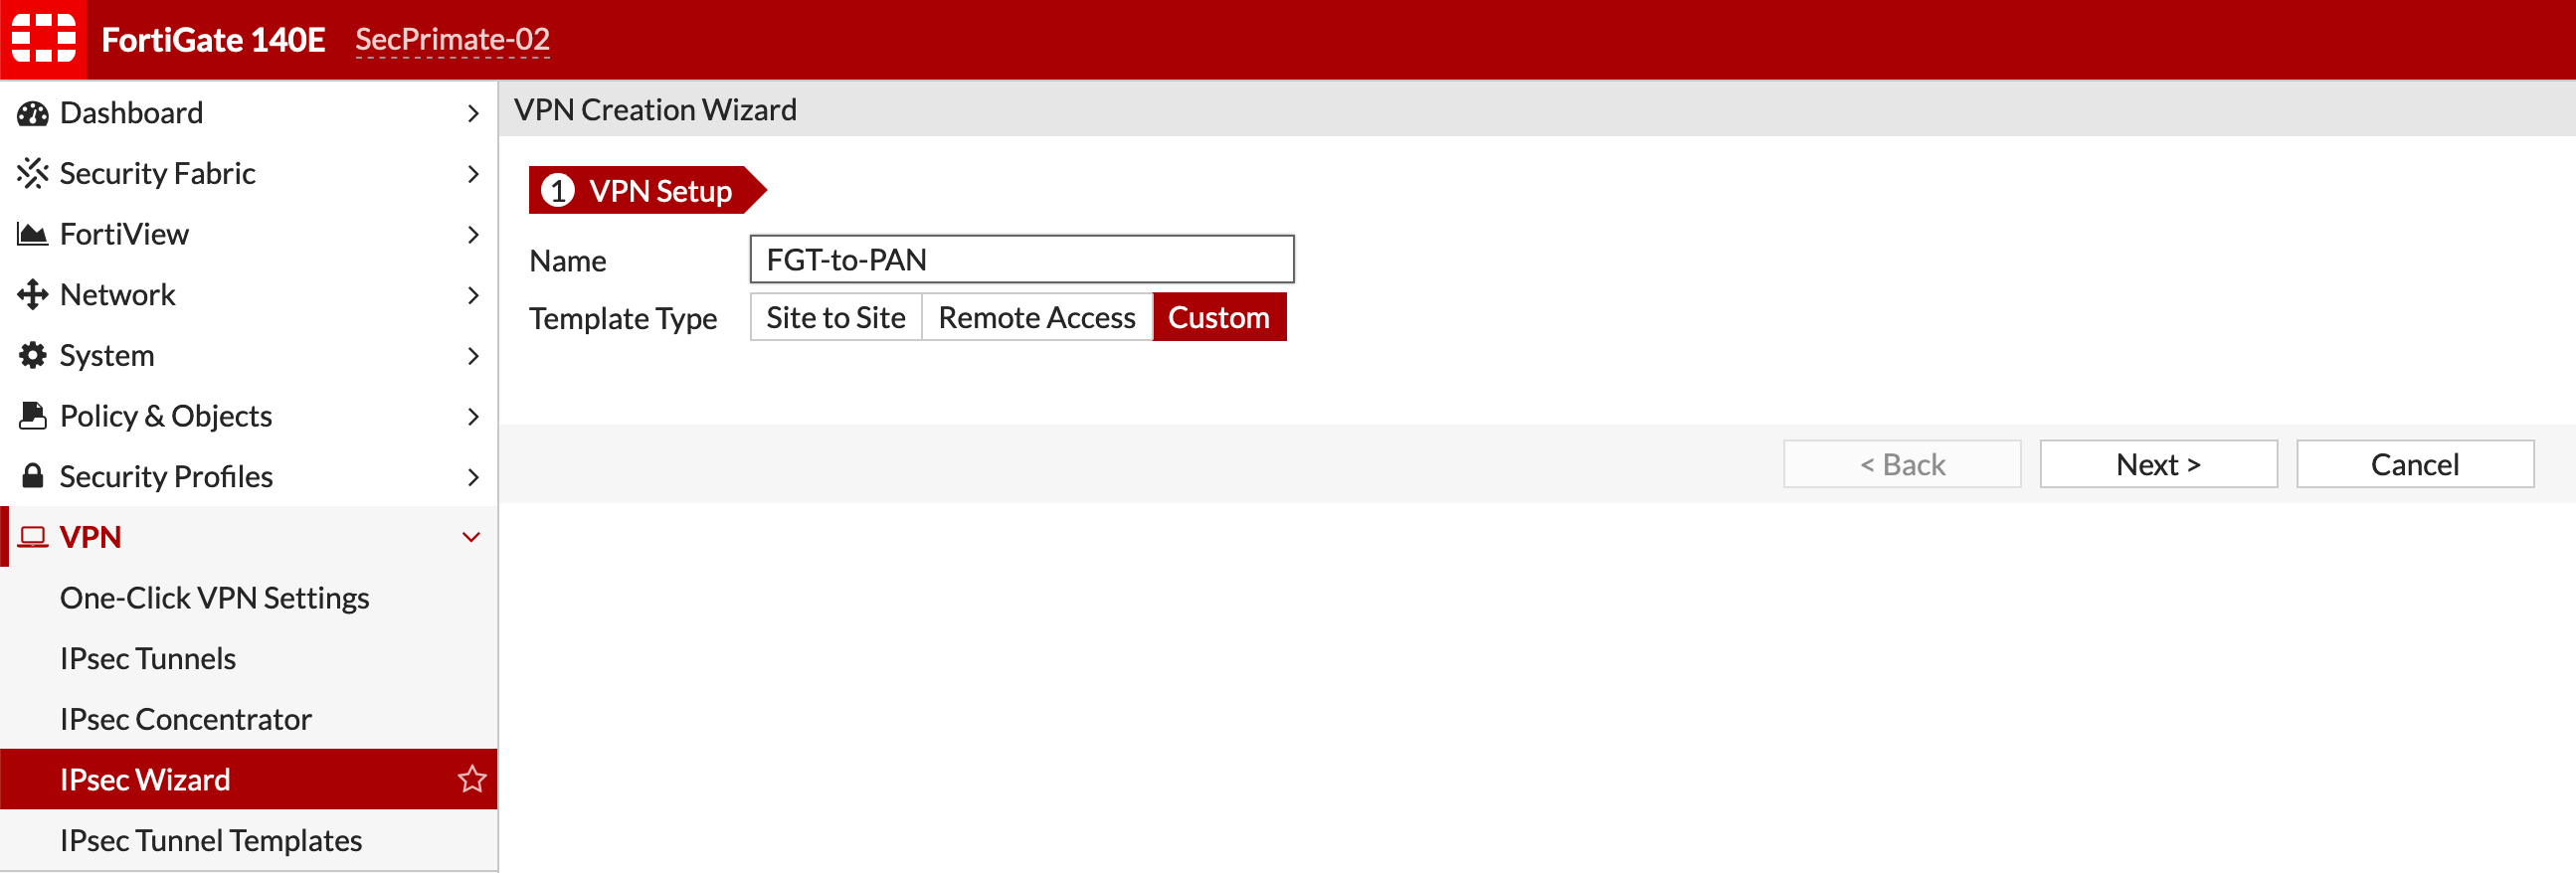
Give it a descriptive name as you will not be able to change after you create it, and choose Custom and Next
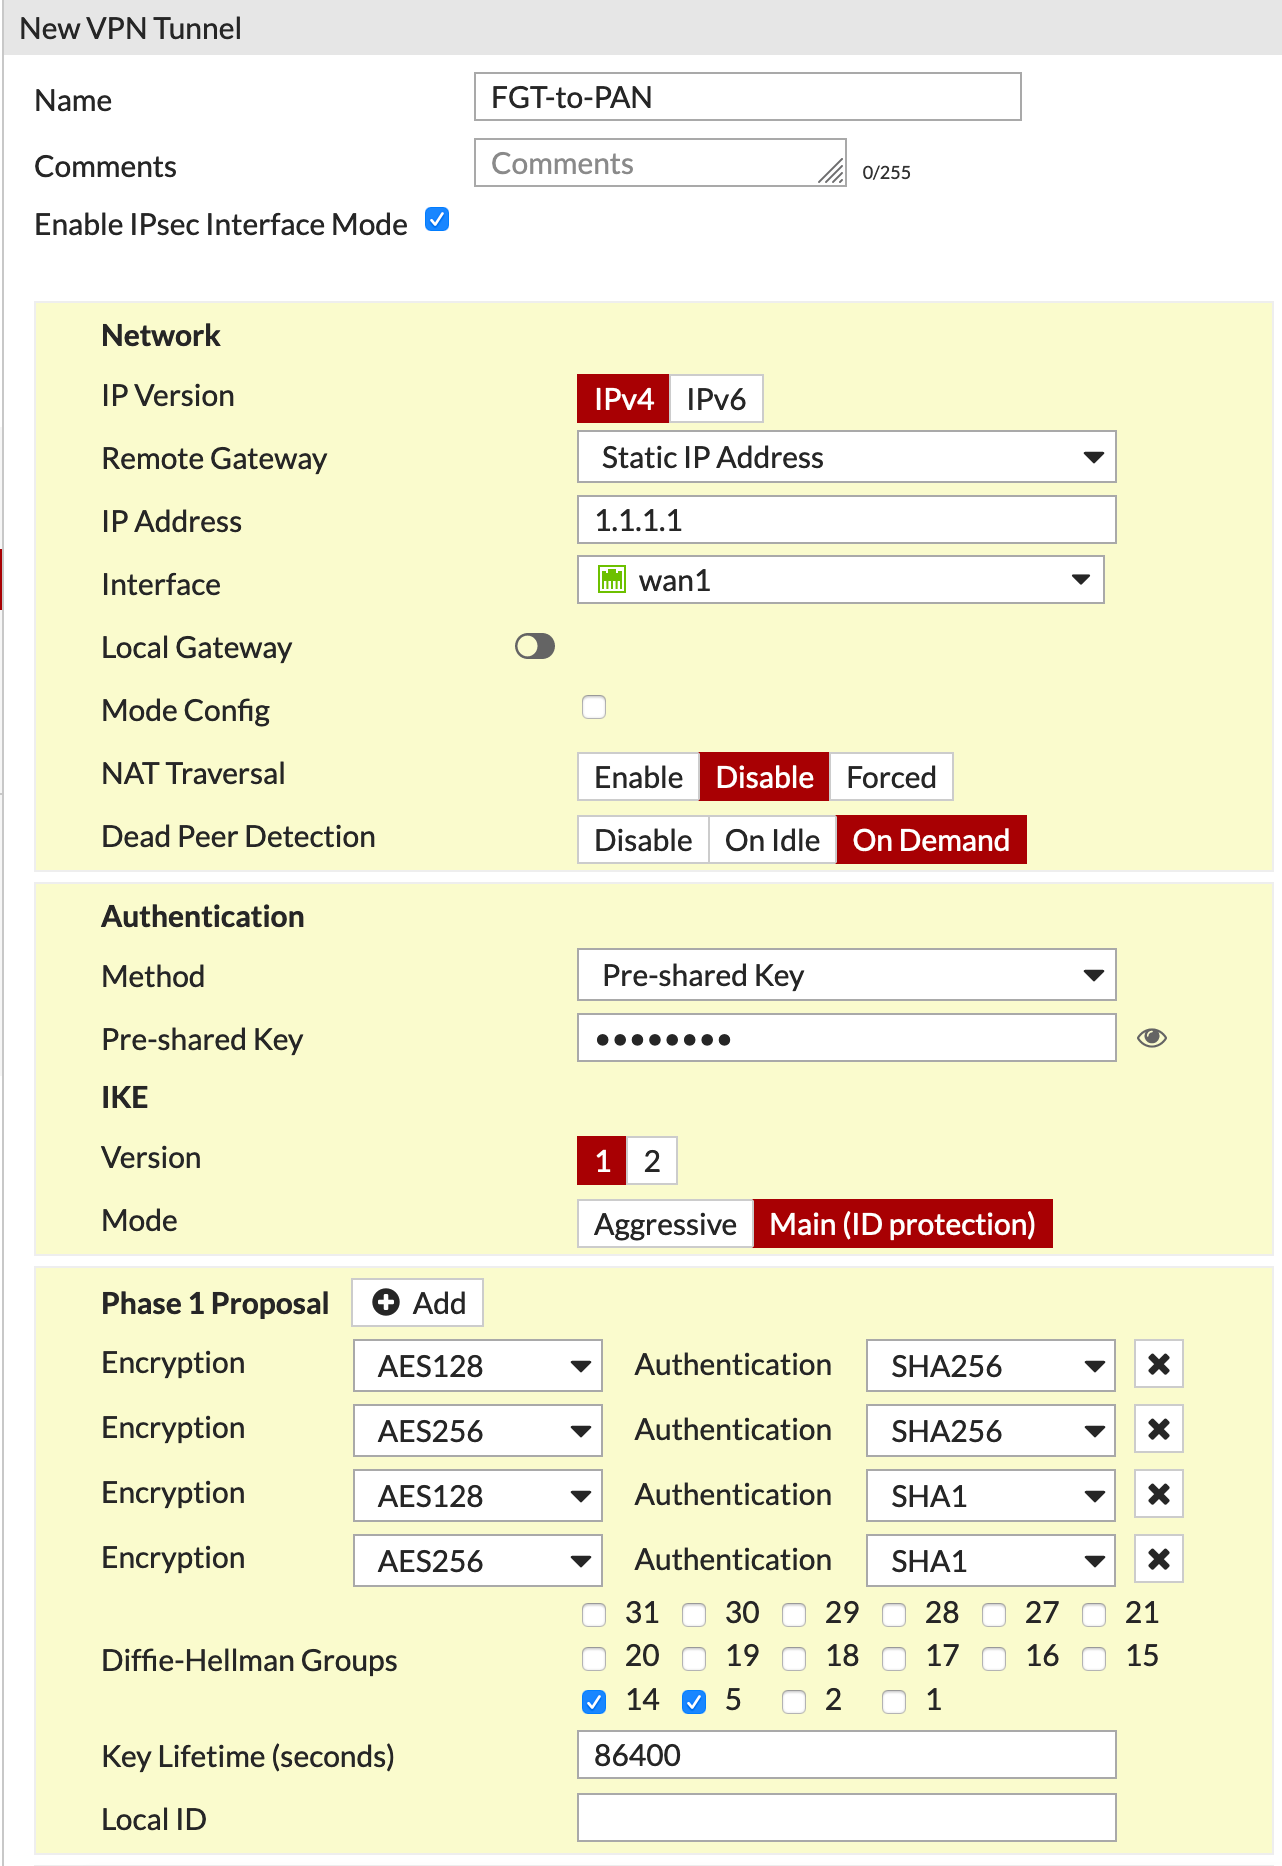
Unlike the PANOS where you need to create the Ingredients and then cook, the Fortigate is configured all from the same screen, save for Policies and Routes.
As you can see I have :
- Chosen a name
FGT-to-PAN - Told it the
Remote Gatewayis configured with a static IP. - Added the remote peer IP
- The outgoing interface.
- We entered the PSK
- We configured the Phase I Proposals.
- DH Group
- And Key Lifetime,
Phase II
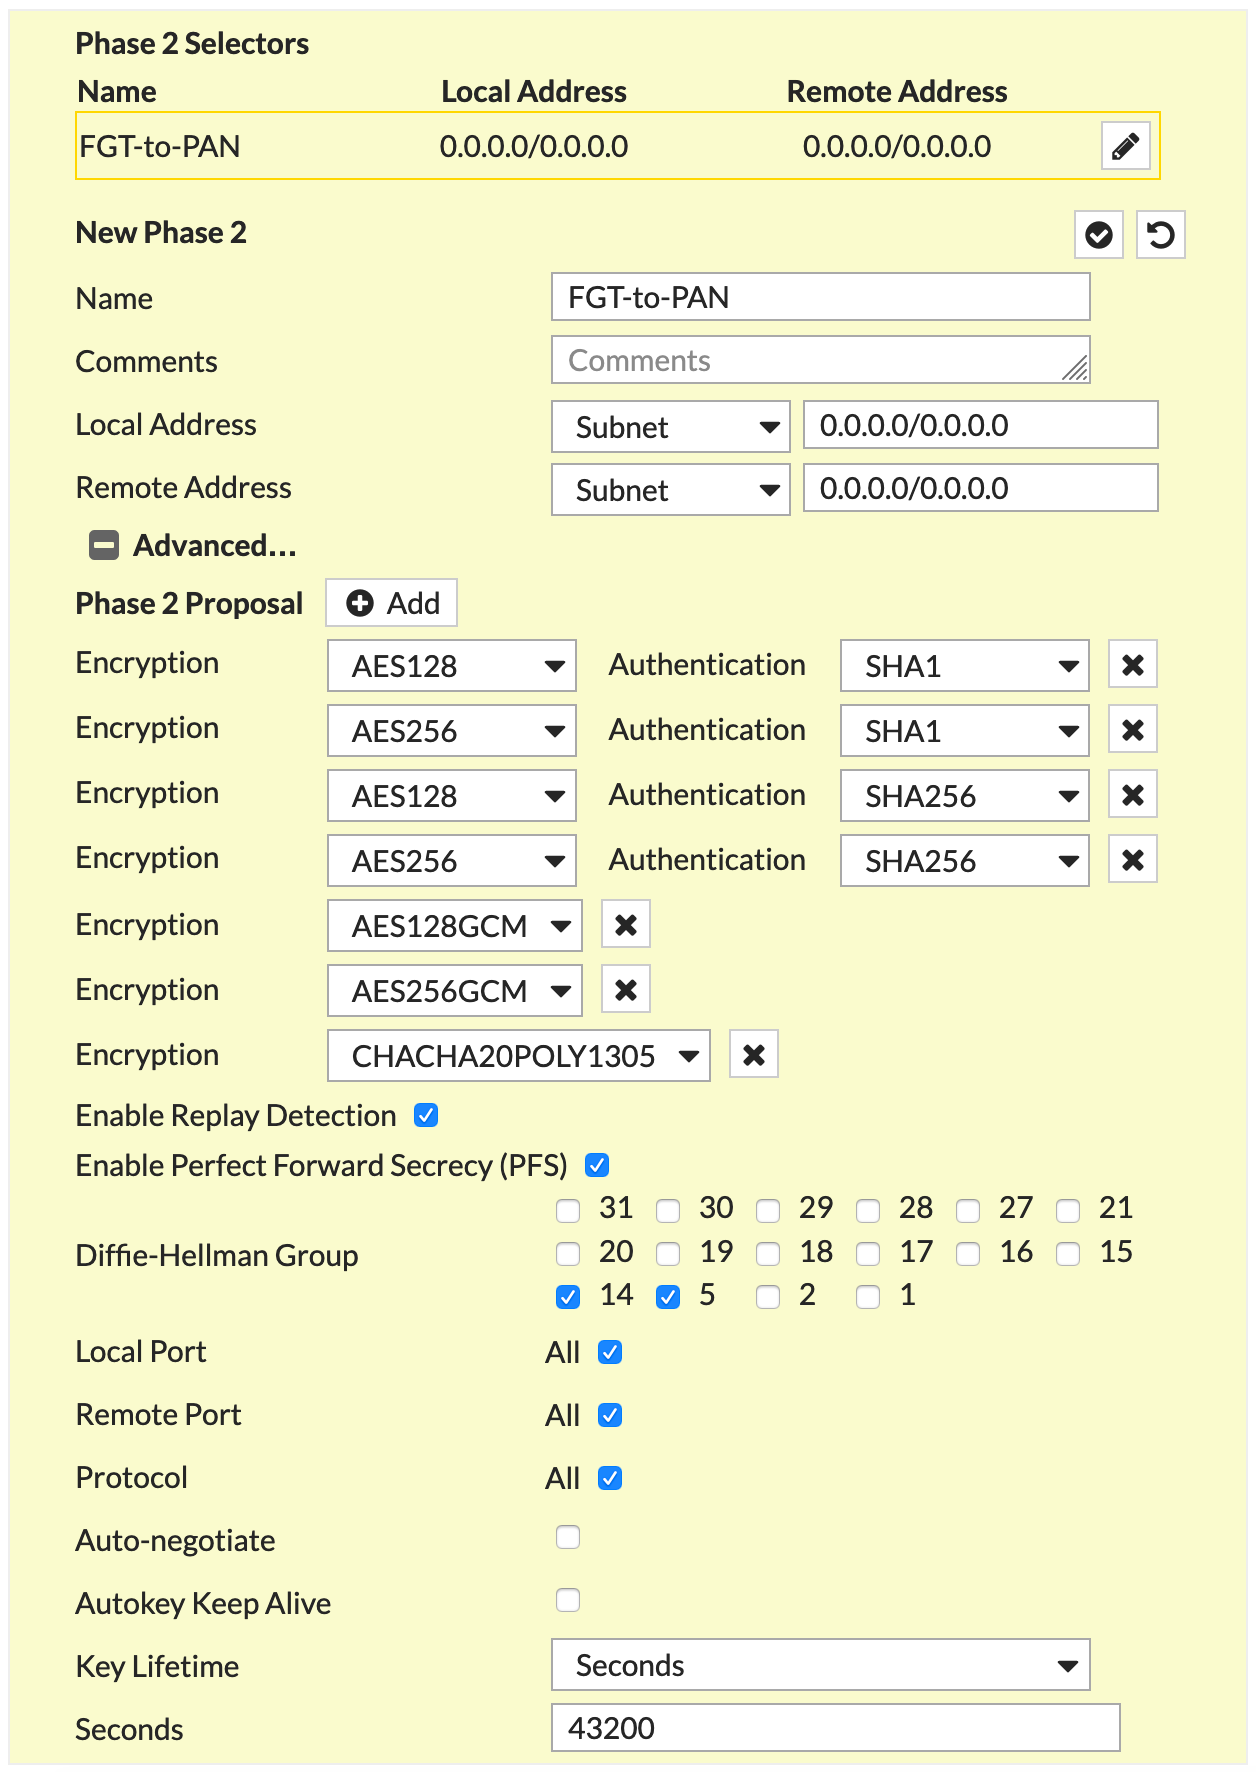
Again, Fortigate’s Phase II is configured on the same screen as the previous screenshot.
Tunnel Interface
In the ForiOS, the VPN process above will automatically create the tunnel interface for you

It will use the Interface you chose in the VPN first section to bind the tunnel interface to you.
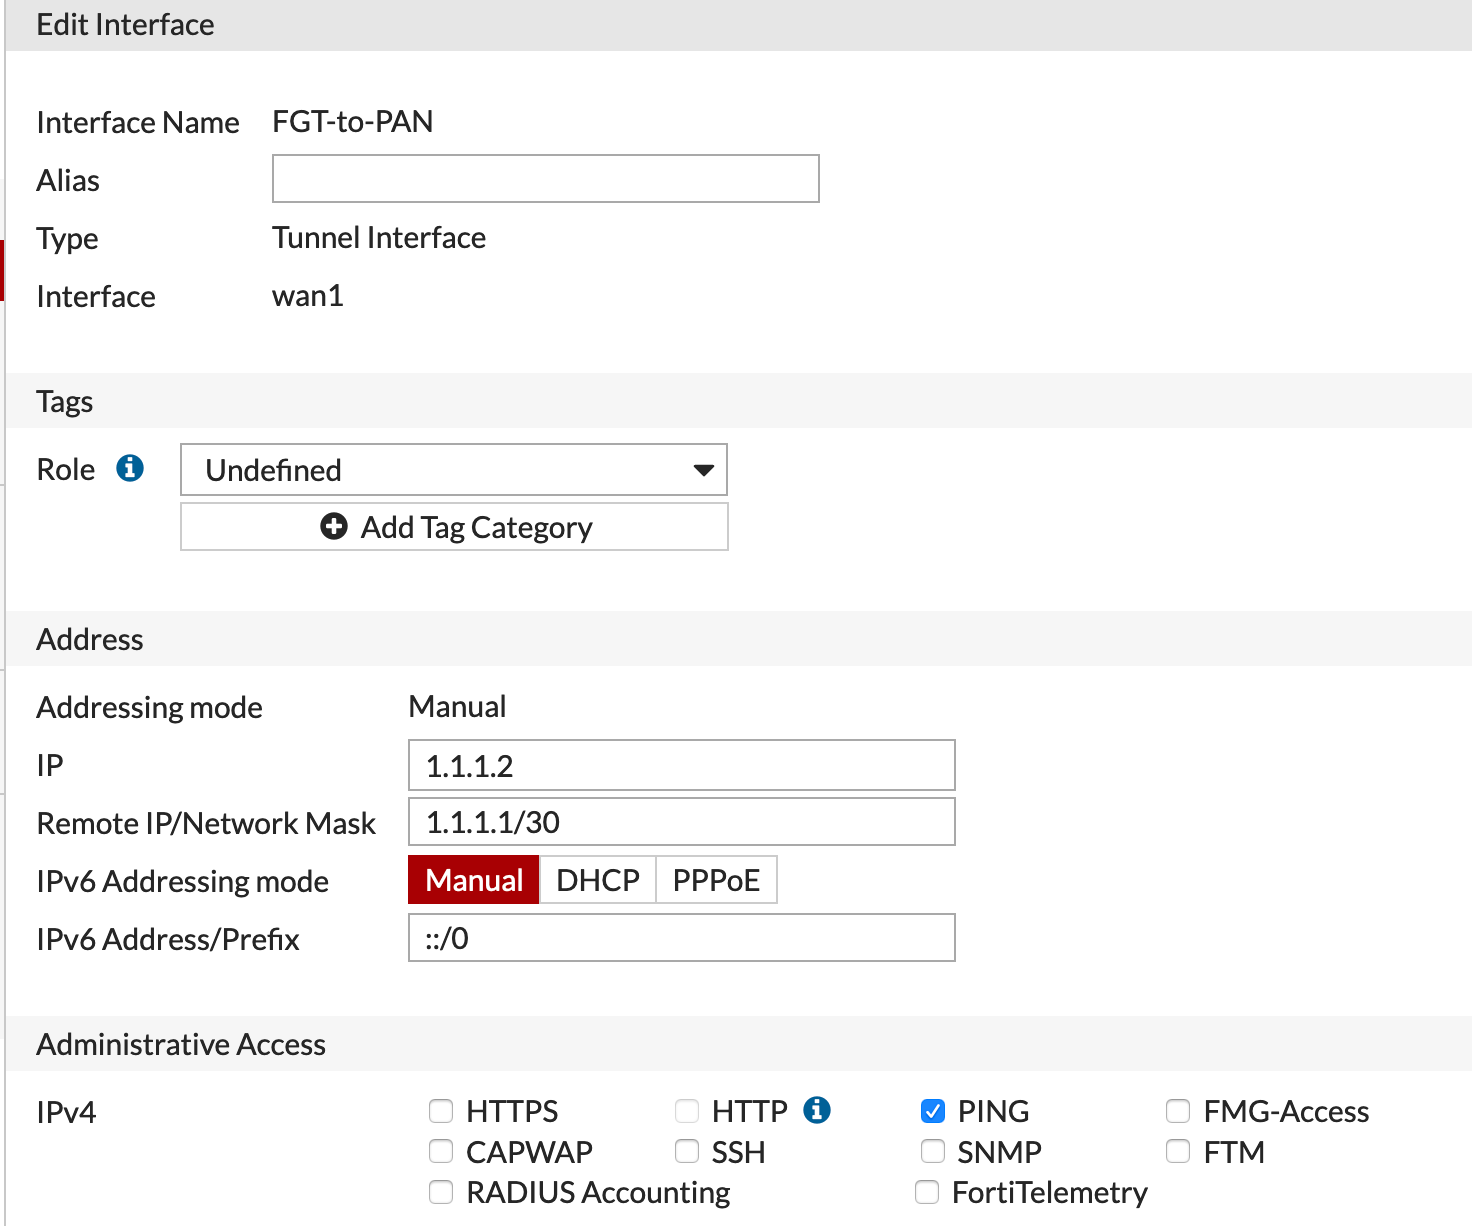
Here we can define the “PAN Equivalent” of Interface Mgmt profile as well as the Tunnel interface with the tunnel IP.
Policies
We will need to define the policies to permit traffic in and out of the VPN Tunnel we just created.
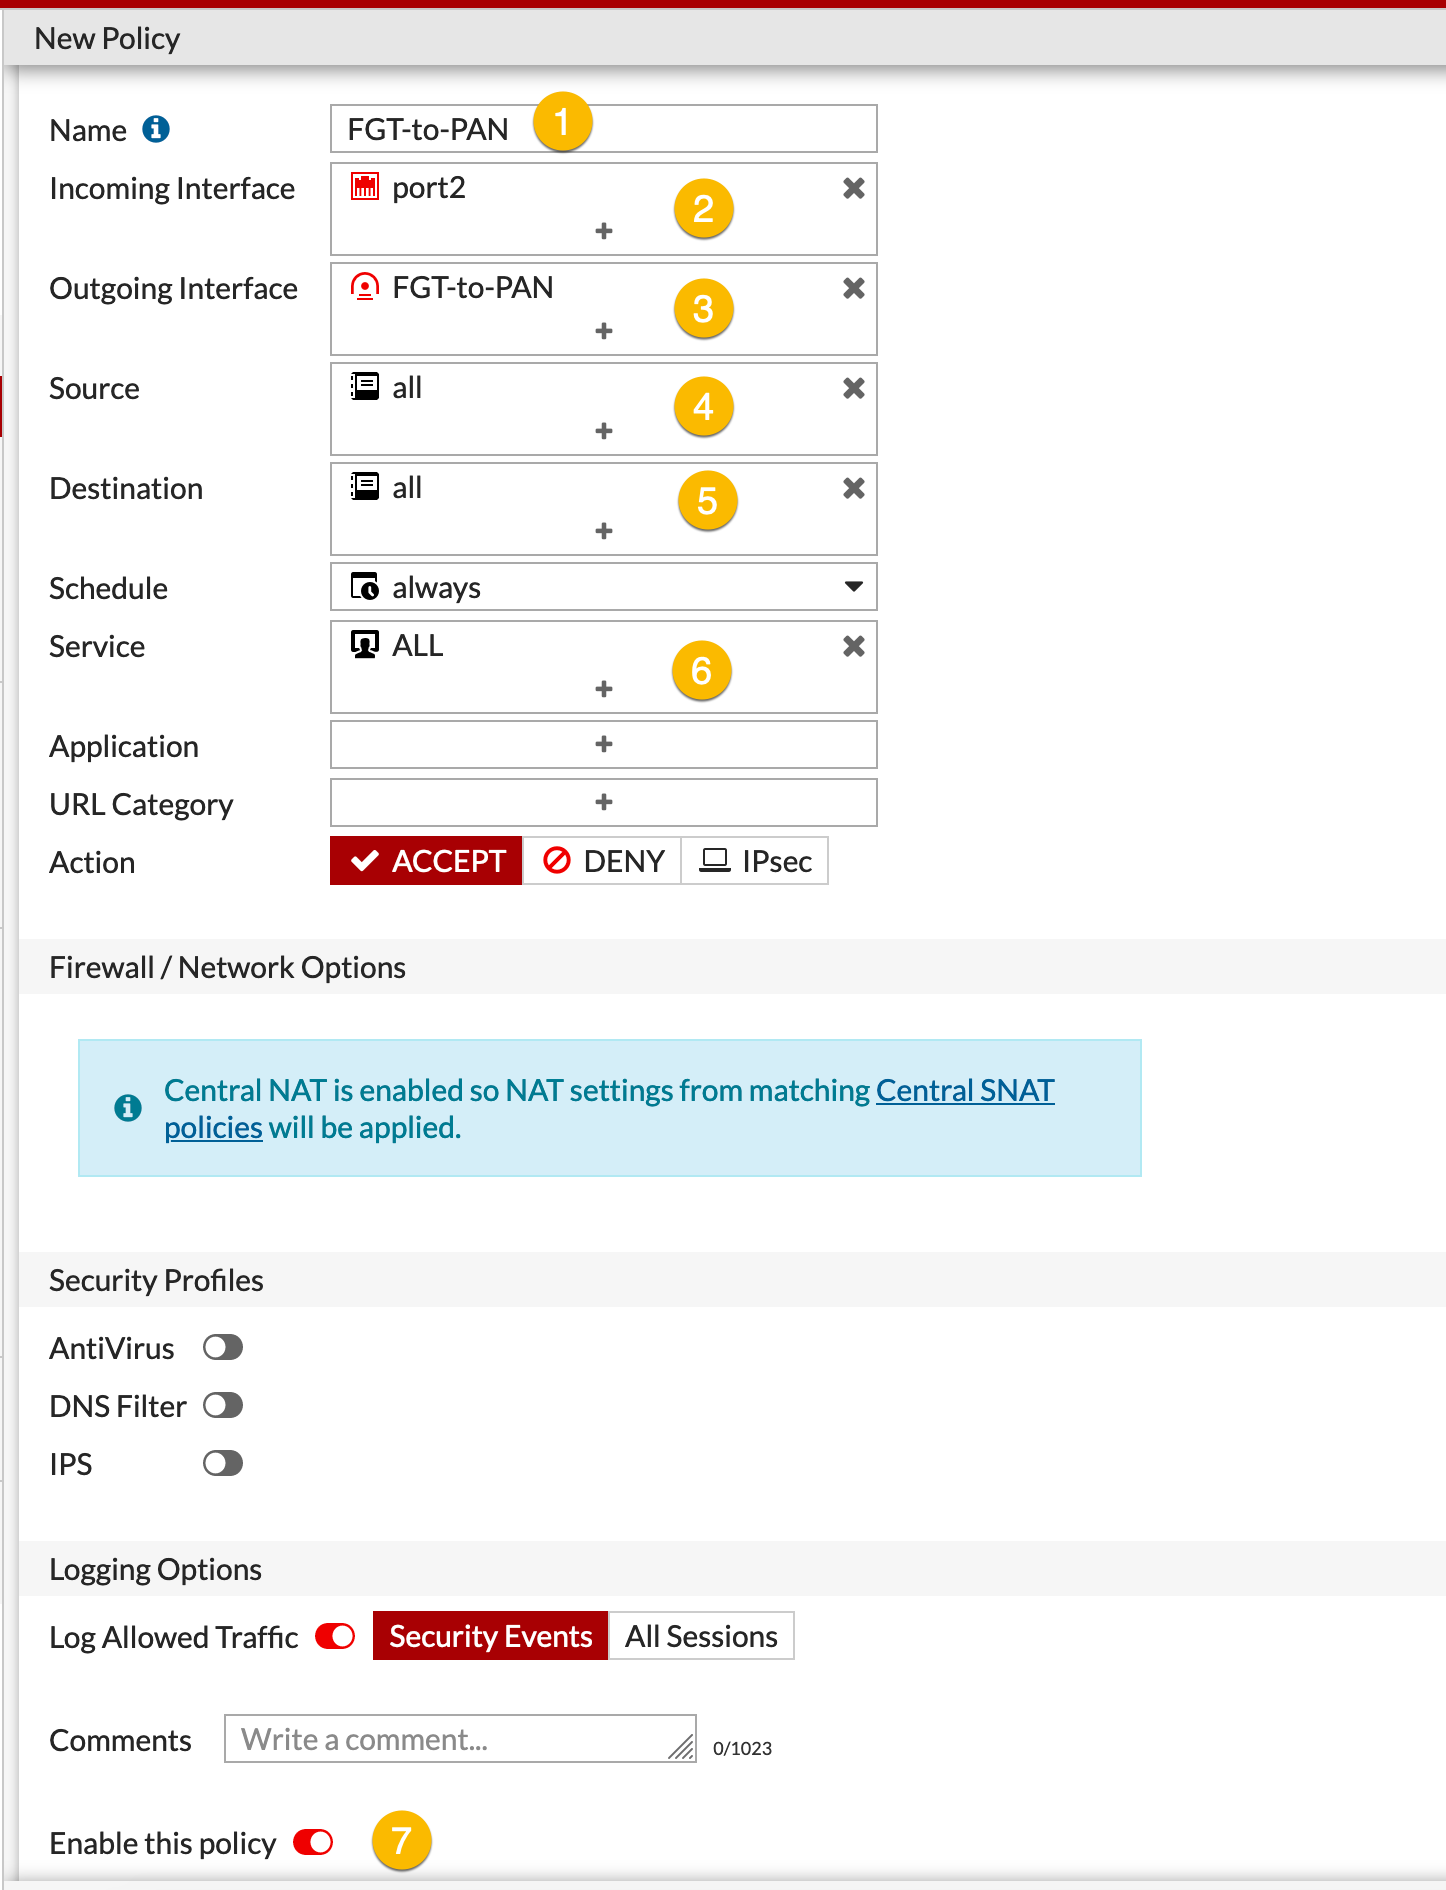
- Descriptive Name
- Incoming port(s), where the traffic is coming from.
- Destination Interface, in our case, the VPN tunnel we created (
FGT-to-PAN). - Source network(s) / IP’s
- Destination network(s) / IP’s
- Services you want to allow/deny
- Enable the policy
Choose OK.
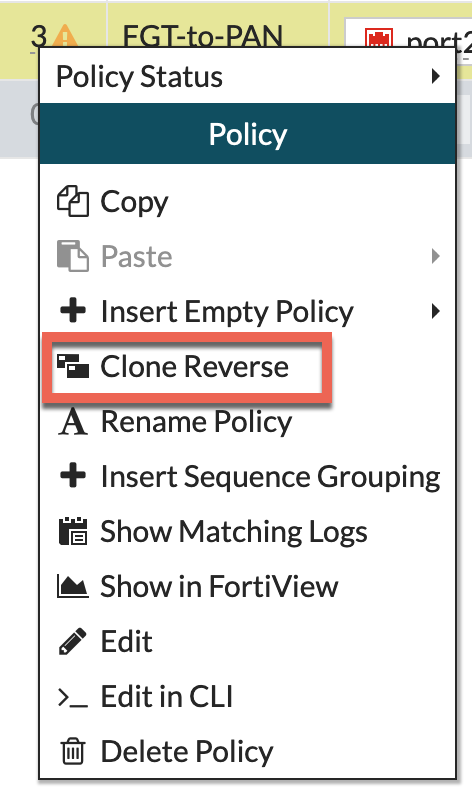
Now you can create in reverse order simply by right-clicking the policy you just created and choose Clone in Reverse

Conclusion
I have worked on PAN, Fortigate, Cisco, Checkpoint, Sidewinder, NetScreen, Watchguard and probably every single firewall that has ever been on the market….. yes including Border Manager from Novell (Don’t laugh). IMHO, I think the PAN implementation can be simplified substantially. I am sure it gives a level of granularity although that is a matter of opinion either way.
Hope this helps
Recent posts
-

-

Had a customer with over 200 static routes on... Full Story
-

This is a work in progress, I will be... Full Story
