If you've spent any time configuring user authentication on... Full Story
By Manny Fernandez
February 9, 2020

SPAN and RSPAN On Cisco Switches
Today I am going to cover a topic that I used to use regularly when I did primarily Cisco implementations. Being able to capture packets on a switch is important. For those “seasoned” network people that were around during the Ethernet Hub days, sniffing packets was much easier then than it is today. Back then, all packets were copied to all ports so one could turn on their Sniffer Pro (By Network Associates, Inc.) and start capturing packets. I used to have a Sniffer Pro and I even had the Y-Cable for the T1 and the V.35 Y-Cable. Wow those were fun times, but I digress.

For those who do not know, this is what the Sniffer Pro (Lunchbox) looked like 🙁
In this post, I will cover the Cisco switch spanning capabilities. I recently wrote an article about packet capture on the FortiSwitch, but for Cisco, you will need to span a port or a VLAN and capture it with some other device. On their Meraki line, packet-capture is possible.
Standard SPAN Configuration
Cisco has a couple of ways to mirror port. One of those ways is a standard SPAN port where the source and the destination is on the same switch. I use this method probably 99% of the time as this is usually for quickly troubleshooting purposes and not really long term.
Backup Backup Backup
I got into the habit of making sure I ALWAYS backup the running config before doing anything. In my SecureCRT, I use button bars where I can run scripts and/or execute SecureCRT commands by simply clicking a button.

If you look at the button bar above, when I click on the QuickLog , SecureCRT will prompt me for the location of where to save the configuration. Then when I choose the customer folder, project name folder and config folder, I then execute a TextExpander snippet that names the file. When I type ; and then ddd , TextExpander will name the file with the date and time, see below. I would then enter the host name (e.g. CUST-RTR-01)
20200207-2235-
Next, I would click the shRUN button. This script sets the terminal length to 0 and then executes sh run. It captures the entire config without the –more entries and having to hit the space bar, then sets the terminal length back to 24.
Physical Port
In this example, we are going to use GigabitEthernet1/0/10 as the source and GigabitEthernet1/0/11 as the destination.
You want to make sure there is no monitor currently being used. One time I overwrite a monitor session the customer was using to record voice calls. I did not have a backup of the config, hence the introduction portion of this article “Backup Backup Backup” and this section. 🙂
sh run | i monitor

As you can see in the screenshot, we have an existing monitor using session 1 with the source is g1/0/38 and the destination is g1/0/20
NOTE: When you have a device plugged into the destination it will not be using this port as a connectivity port, rather a monitoring port. Therefore you should have a secondary interface if you need to remotely connect to it.
Creating a new Session
First thing is to get into Global Configuration mode of config t as it is widely referred as. If you want to jump directly to the commands and skip the theory behind it scroll down to the “Reader’s Digest” section.
config t
Next you will enter the monitor command
monitor session X source {physical interface | VLAN interface } {received | transmitted | both}
Lets dissect the command:
Monitor
monitor has two options; the first is event-trace which honestly, I have NEVER used and the second is the session which we are using here.

Session
Cisco gives you 68 different sessions to use. However the number of ports and span sessions is determined by the switch model you are using.

Additionally, the session has three options:

You options are destination , filter or source
Destination is the port that you are going to be capturing on. Destination has multiple options you can use. The options are encapsulation and ingress .
Destination Interface Criteria
•A destination port must reside on the same switch as the source port (unless you are doing RSPAN)
•A destination port can be any Ethernet physical port (Note: Be careful when source port is VLAN or a 10GB port as you could overwhelme the port buffer and you will drop packets)
•A destination port can participate in only one SPAN session at a time, unlike the source that allows multiple source interfaces.
•A destination port cannot be a source port.
•A destination port cannot be an a LAG.
•A destination port can be a physical port that is assigned to LAG, however be careful as the single port in the LAG will be removed from the LAG while this is happening (stay away from it if possible)
•The port does not transmit any traffic except that traffic required for the monitor session unless learning is enabled (including DHCP, ping, RDP, etc). If learning is enabled, the port will also transmit traffic directed to hosts that have been learned on the destination port.
•If ingress traffic forwarding is enabled for a network security device, the destination port forwards traffic at Layer 2.
•A destination port does not participate in spanning tree while the SPAN session is active.
•When it is a destination port, it does not participate in any of the Layer 2 protocols (STP, VTP, CDP, DTP, PagP).
•A destination port that belongs to a source VLAN of any monitor session is excluded from the source list and is not monitored.
Filter when used in conjunction with VLAN, tells the switch port to ONLY capture certain VLAN IDs.
Source is the interface(s) and/or VLAN that will being mirrored.
Source Interface Criteria
•It can be any type of port ( e.g. EtherChannel/LACP, Fast Ethernet, Gigabit Ethernet, etc).
•It can be monitored in multiple “sessions”.
•It cannot be a destination port
•Each source port can be configured with either a recieved, transmitted, or both direction. Specifically for LACP ports (EtherChannel in Cisco speak), the direction you configure (rcv,tx or both) would apply to all physical ports in the LAG.
•Source ports can be in the same or different VLANs.
•For VLAN monitor sources, all active ports in the source VLAN are included as source ports.
Received
Receive or (Rx) SPAN— RX refers to the ingress traffic. The goal is to monitor all the packets received by the source interface or VLAN before the switch makes any modifications to the packet or any processing. A copy of each packet received by the source is sent to the destination port for that session. Modifications can be QoS, DSCP, etc.
Note: If you have an ACL on the port, the destination will still see the packet even if it is dropped by the switch as it egresses.
Transmitted
Transmitted or Tx — TX refers to the egress traffic. The goal is to monitor all the packets sent by the source interface. These include post-modification and processing. That is, the packet after the QoS and DSCP has been assigned. The modified packet are TTL, QoS, DSCP, etc.
Both
Both, obviously capture both Tx and Rx .
VLAN Tags are, by default not enabled. That is the packets are all untagged although you see the traffic from multiple VLANs if they existing on the source.
There are other specific options you can use like filtering certain packet types, and using ACLs, but they are outside of the scope of this article.
Reader’s Digest Command
Command
monitor session 2 source interface GigabitEthernet1/0/10 both
monitor session 2 destination interface GigabitEthernet1/0/11
The above command will take all packet received and transmitted from GigabitEthernet1/010 and copy the packets to GigabitEthernet1/0/11.
RSPAN Configuration
This configuration is a bit more complicated but does work. I have used this method in the past and have had success.
RSPAN uses VLANs and VLAN tagging to accomplish its magic. Therefore you are going to need to either have VLANs per-determined or create some new one. Care should be taken that the VLAN is not getting pruned along the way with the switchport trunk allowed VLAN command or similar.
The first thing we are going to do a create a RSPAN VLAN. This is different than a standard VLAN command with one exception.
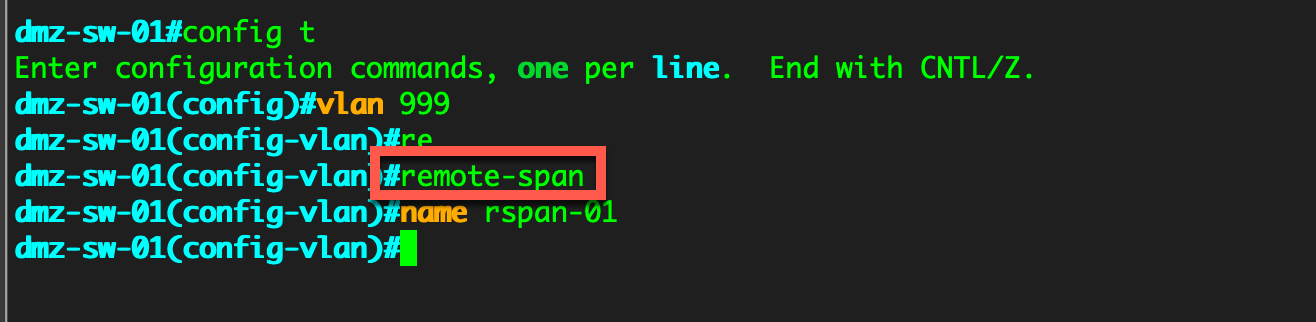
Here you can see that we issued the standard VLAN creation command and then issued the remote-span keyword. This tell the switch that is going to be used specifically for RSPAN traffic.
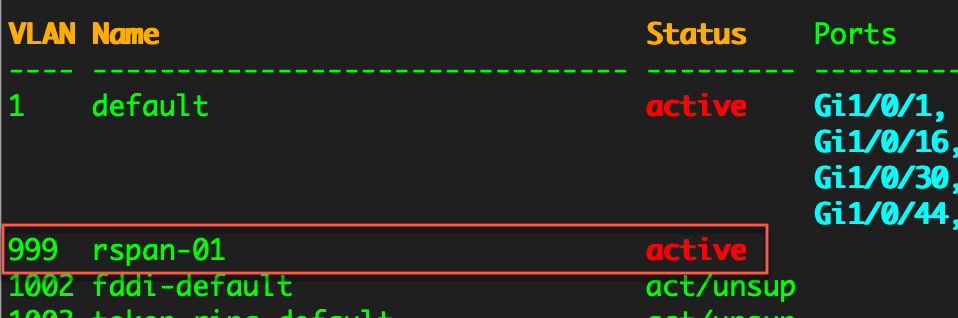
When we do issue the sh vlan command, we can see that VLAN 999 is active and we can see the name rspan-01.
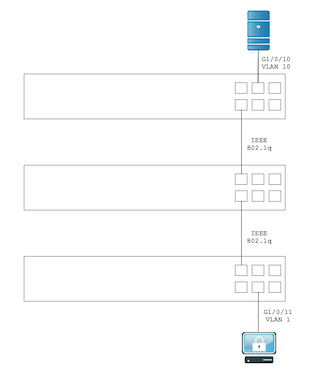
Below is a diagram of a conceptual environment where you would use RSPAN. We can see the top switch has a server plugged into g1/0/10 which is sitting on VLAN 10, then it passes through a switch and onto the bottom switch where a Wireshark or tcpdump machine is sitting capturing packets. The reason for the caution of the VLANs being passed along your switches is to make sure the middle switch is going to make VLAN 999 available on the bottom switch.
Note: The destination port is NOT on VLAN 999.
Now similar to the SPAN port configuration we are going to issue the source command
switch-top#
config t
monitor session 3 source interface GigabitEthernet1/0/10 both
monitor session 3 destination remote vlan 999
Note: On older Cisco switches that do not have the resources (few and far between) a reflector ports will be needed. This is essentially borrowing the resources and time on the ASICs to be used for the RSPAN.
Now on the bottom switch we will configure the opposite of the top switch.
switch-bottom#
config t
monitor session 3 source interface remote vlan 999
monitor session 3 destination interface GigabitEthernet1/0/11
Note: You do not need to match the session number on both switches. It only had local significance. You can use any session number you have available. Also not the remote keyword on the source command of the bottom switch. That needs to be there or it will think of a local VLAN.
Spanning/Mirroring ports is a very useful tool for troubleshooting. Anyone that knows me, knows my motto, “When in doubt, sniff it out”.
I hope this helps.
Recent posts
-

-

DNS is one of those technologies that quietly underpins... Full Story
-

BGP issues on FortiGate firewalls usually trace back to... Full Story
-

Every time your laptop talks to your router, a... Full Story
-

If you've spent any time configuring NAT on a... Full Story
-

If you have spent any time configuring firewall policies... Full Story
-

High availability on FortiGate is one of those features... Full Story
-

If you've configured SD-WAN on a FortiGate, you've almost... Full Story
-

FortiLink is the management protocol that turns a FortiSwitch... Full Story
-

FortiSwitches are pretty rock solid from Mean Time Between... Full Story
-

This is a quicky tip. Have you ever gone... Full Story
-

DNS is one of those quiet pieces of internet... Full Story
-

This article is an updated version of the previous... Full Story
-

You will add ns2 as a secondary (slave) BIND9... Full Story
-

In the process of deploying my lab, I needed... Full Story
-

RFC 8805, used to be known as Self-Correcting IP... Full Story
-

Years back, I wrote an article about certificate pinning. ... Full Story
-

FortiGates have the ability to send alerts to Microsoft... Full Story
-

In this post, I am going to walk through... Full Story
-

Troubleshooting VoIP on a FortiGate can feel like trying... Full Story
-

Prior to FortiOS 7.0, there were three commands to... Full Story
-

In this post, I am going to go over... Full Story
-

What we are going to do: We are going... Full Story
-

Choosing between FGCP (FortiGate Clustering Protocol) and FGSP (FortiGate... Full Story
-

Creating a VLAN on macOS (The "Pro" Move) A... Full Story
-

This blog post explores the logic behind how macOS... Full Story
-

Pretty Fly for a Wi-Fi Tell My Wi-Fi Love... Full Story
-

Part of my daily gig is creating BoMs (Bill-of-Materials)... Full Story
-

ICMP introduces several security risks, but careful filtering, rate... Full Story
-

The command diag debug application dhcps -1 enables full... Full Story
-

In the world of FortiOS, execute tac report is... Full Story
-

LLDP; What is it The Link Layer Discovery Protocol... Full Story
-

What it actually does When you run diagnose fdsm... Full Story
-

Monkey Bites are bite-sized, high-impact security insights designed for... Full Story
-

I have run macOS in macOS with Parallels but... Full Story
-

Don't be confused with my other FortiNAC posts where... Full Story
-

This is the third session in a multi-part article... Full Story
-

Today I was configuring key-based authentication on a FortiGate... Full Story
-

Netcat, often called the "Swiss Army knife" of networking,... Full Story
-

At its core, IEEE 802.1X is a network layer... Full Story
-

In case you did not see the previous FortiNAC... Full Story
-

This is our 5th session where we are going... Full Story
-

Now that we have Wireshark installed and somewhat configured,... Full Story
-

The Philosophy of Packet Analysis Troubleshooting isn't about looking... Full Story
-

Do you use Sequence Groups In your Firewall Policies? ... Full Story
-

The other day, I opened my Wireshark for macOS... Full Story
-

1. Executive Summary Objective This guide walks through the... Full Story