If you've spent any time configuring user authentication on... Full Story
By Manny Fernandez
February 27, 2018

ASA ‘HA’ configuration explained
When configuring the Cisco ASA for High Availability, the failover command is used to configure the devices.
A few terms before we begin: Active and Standby vs Primary and Secondary. In the ASA world, the Primary and Secondary do not change however any one of the Primary or Secondary can be the Active or the Standby. That is, if the Primary ASA is the Active ASA and it fails, the Secondary will take over the ‘Active’ role. However the Secondary will never become Primary unless you re-configure it manually to do so.
Configuring failover on an ASA pair
Choose which device will be the Primary and what interfaces you are going to be using for the SYNC connection. You need to make sure you ‘default interface g1/x’ to ensure there is no configuration on the interface. Obviously make sure it is not being used for something else.
On the primary:
failover lan unit primary
failover lan interface sync GigabitEthernet1/8
failover key %I Use a Random password generator%
failover link sync GigabitEthernet1/8
failover interface ip sync 7.7.7.1 255.255.255.252 standby 7.7.7.2
on the Secondary Unit:
failover lan unit secondary
failover lan interface sync GigabitEthernet1/8
failover key %I Use a Random password generator%
failover link sync GigabitEthernet1/8
failover interface ip sync 7.7.7.1 255.255.255.252 standby 7.7.7.2
These devices will agree on which one is going to be “Active” and whcih one is going to be “Standby” and once they do, each one will choose the first IP (7.7.7.1) and the secondary device will choose the ‘standby’ IP address (7.7.7.2). Note: These IP addresses are random one I used and are non-routable however, you should not choose an IP block that will be defined on the ASA itself or that the ASA will route to.
In the above configuration, we are using GigabitEthernet 1/8 as the Sync interface. The ASAs will exchange health information across this link as well state table entires.
in order to visually keep an eye on what device you are connected to, I recommend entering the following line to your config:
prompt hostname priority state
This command will show you the hostname, the priroty and the state. This is what it would look like:
![]()
As you can see in the example (names changed to protect the inncoent) we can see that this particular unit is the ‘Secondary’ unit but it is in fact the ‘Active’ unit.
To activate the failover configuration on both unit, you will enter the ‘failover’ command. Once this happens they will go through an election process and usually at the begining, the Primary unit will become the active device.
These are the determining factors for Active Unit determination:
1. If a unit boots and detects a peer already running as active, it will become the standby to that active.
2. If a Unit boots and does not detect a peer device, it will become ‘Active’
3.If both units boot simultaneously, the primary unit becomes the active unit and the secondary unit becomes the standby.
The unit can failover if one of the following events occurs:
• An administrator manually switches over from active to standby.
• The standby Cisco ASA stops receiving keepalive packets on the failover command interface.
• The command interface link goes down.
• The link state of an interface goes down.
• The unit has a hardware failure or a power failure.
• The unit has a software failure.
• Too many monitored interfaces fail.
• The no failover active command is entered on the active unit, or the failover active command is entered on the standby unit.
All commands entered on the Active unit are sent to the Stanby unit except for:
debug
failover lan unit
firewall
mode
and show
The state information passed to the standby unit includes the following:
• NAT translation table
• TCP connection states
• UDP connection states
• ARP table
• Layer 2 bridge table (when running in transparent firewall mode)
• HTTP connection states (if HTTP replication is enabled)
• ISAKMP and IPsec SA table
• GTP PDP connection database
The information that is not passed to the standby unit when stateful failover is enabled includes the following:
• HTTP connection table (unless HTTP replication is enabled)
• User authentication (uauth) table
• Routing tables
• State information for security service modules
• DHCP server address leases
• L2TP over IPsec state information
TROUBLESHOOTING
One of the basic commands you will be running to validate the status of the HA configuration is
sh failover
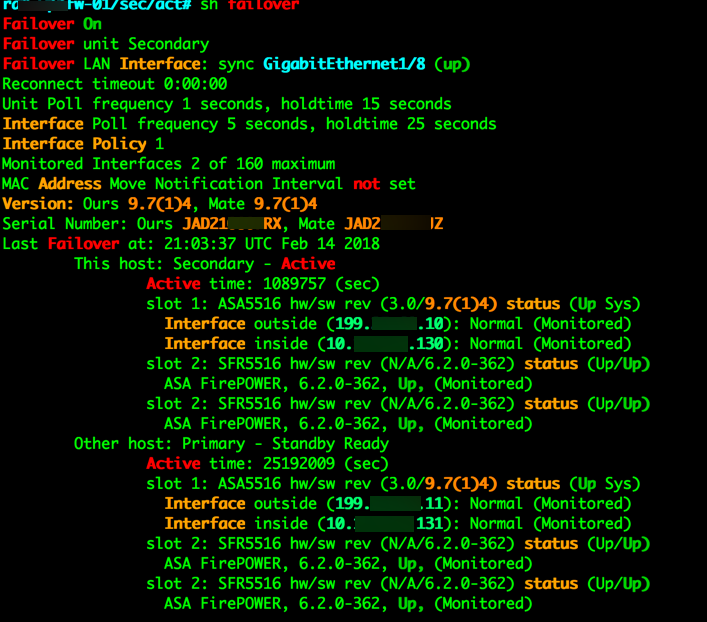
Here you can see the status of the unit you are connected to:
This host: Secondary - Active
and the status of the other unit
Other host: Primary - Standby Ready
You can also see the interfaces that are currently being monitored:

Another useful command is ‘sh failover history’
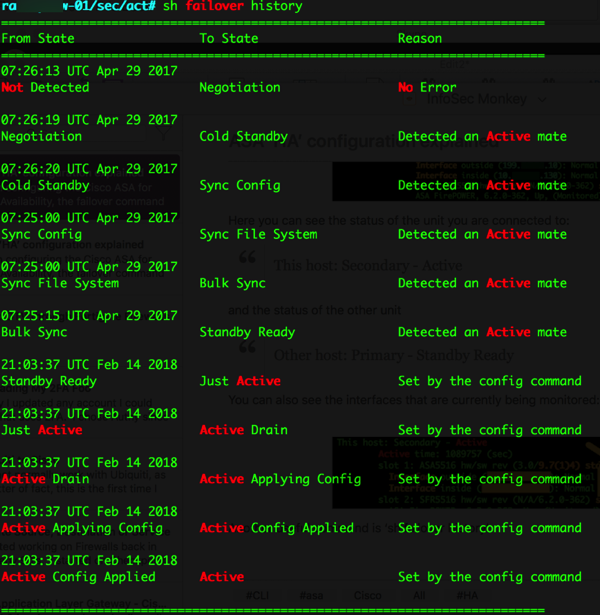
See key below:

When both ASAs think that they are the ‘Active’ device, this is called ‘Split-Brain’ and can cause some crazy stuff since you have multiple devices using the same IP address and sharing the MAC address.
SUGGESTION:
Before you begin, make sure that your VLANs are configured correctly on the various switches you are connected to the ASA. Make sure when you have multiple switches servicing the same interface (e.g. inside) which is the recommended configuration, that there is a trunk port and that the trunk is passing the necessary VLANs. Once you test all the connections, then configure the failover.
When you do a ‘wr mem’ on the primary ASA, it will push the config auto-magically to the standby.
Recent posts
-

-

DNS is one of those technologies that quietly underpins... Full Story
-

BGP issues on FortiGate firewalls usually trace back to... Full Story
-

Every time your laptop talks to your router, a... Full Story
-

If you've spent any time configuring NAT on a... Full Story
-

If you have spent any time configuring firewall policies... Full Story
-

High availability on FortiGate is one of those features... Full Story
-

If you've configured SD-WAN on a FortiGate, you've almost... Full Story
-

FortiLink is the management protocol that turns a FortiSwitch... Full Story
-

FortiSwitches are pretty rock solid from Mean Time Between... Full Story
-

This is a quicky tip. Have you ever gone... Full Story
-

DNS is one of those quiet pieces of internet... Full Story
-

This article is an updated version of the previous... Full Story
-

You will add ns2 as a secondary (slave) BIND9... Full Story
-

In the process of deploying my lab, I needed... Full Story
-

RFC 8805, used to be known as Self-Correcting IP... Full Story
-

Years back, I wrote an article about certificate pinning. ... Full Story
-

FortiGates have the ability to send alerts to Microsoft... Full Story
-

In this post, I am going to walk through... Full Story
-

Troubleshooting VoIP on a FortiGate can feel like trying... Full Story
-

Prior to FortiOS 7.0, there were three commands to... Full Story
-

In this post, I am going to go over... Full Story
-

What we are going to do: We are going... Full Story
-

Choosing between FGCP (FortiGate Clustering Protocol) and FGSP (FortiGate... Full Story
-

Creating a VLAN on macOS (The "Pro" Move) A... Full Story
-

This blog post explores the logic behind how macOS... Full Story
-

Pretty Fly for a Wi-Fi Tell My Wi-Fi Love... Full Story
-

Part of my daily gig is creating BoMs (Bill-of-Materials)... Full Story
-

ICMP introduces several security risks, but careful filtering, rate... Full Story
-

The command diag debug application dhcps -1 enables full... Full Story
-

In the world of FortiOS, execute tac report is... Full Story
-

LLDP; What is it The Link Layer Discovery Protocol... Full Story
-

What it actually does When you run diagnose fdsm... Full Story
-

Monkey Bites are bite-sized, high-impact security insights designed for... Full Story
-

I have run macOS in macOS with Parallels but... Full Story
-

Don't be confused with my other FortiNAC posts where... Full Story
-

This is the third session in a multi-part article... Full Story
-

Today I was configuring key-based authentication on a FortiGate... Full Story
-

Netcat, often called the "Swiss Army knife" of networking,... Full Story
-

At its core, IEEE 802.1X is a network layer... Full Story
-

In case you did not see the previous FortiNAC... Full Story
-

This is our 5th session where we are going... Full Story
-

Now that we have Wireshark installed and somewhat configured,... Full Story
-

The Philosophy of Packet Analysis Troubleshooting isn't about looking... Full Story
-

You have twenty years of muscle memory. You type... Full Story
-

Have you ever wanted to do some testing on... Full Story
-

Ask ten engineers to define "a network" and you... Full Story