If you've spent any time configuring user authentication on... Full Story
By Manny Fernandez
May 22, 2019

Fortigate DHCP and Microsoft Dynamic DNS
Remote branches that utilize Fortigate’s DHCP do not update Microsoft DNS servers automagically. Fortinet does not have a syncing feature to do this either. I do not think any of the Fortinet competitors have it either. This would be a nice feature though. Here is how we got this to work.
A few things you need to know:
Windows Server DNS Settings
On the Windows Server, if you launch the DNS server utility, you can change the ‘Dynamic Updates’ setting to three different options: Nonsecure and Secure, Secure Only and None. Below, I have described the differences of each option.
Nonsecure and Secure – When selected, any device can send registration request to the DNS server. The DNS server will automatically add the record of the requesting device to the DNS database, even if the computer does not belong to the same DNS domain (zone). Care should be used with this setting. However in an environment where you have non-Windows computers that do not “join the domain”, this may be needed.
Secure only – When selected, only the computers that are members of the DNS domain can register themselves with the DNS server. The DNS server automatically rejects the requests from the computers that do not belong to the domain.
None – When this option is selected, the DNS server does not accept any registration request from any computers whatsoever. In such cases, DNS administrators must manually add the IP addresses and the Fully Qualified Domain Names (FQDNs) of the client computers to the DNS database.
Windows Computer / Workstations
When you edit the interface and ‘Change Adapter Settings’ , you will need to go to ‘Internet Protocol Version 4 (TCP/IPv4)’ and then choose ‘Properties’
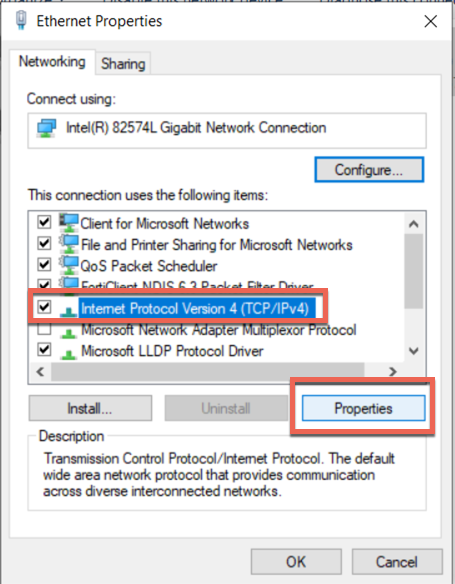
Under the ‘General’ tab, you will see the ‘Advanced’ button. Press it.
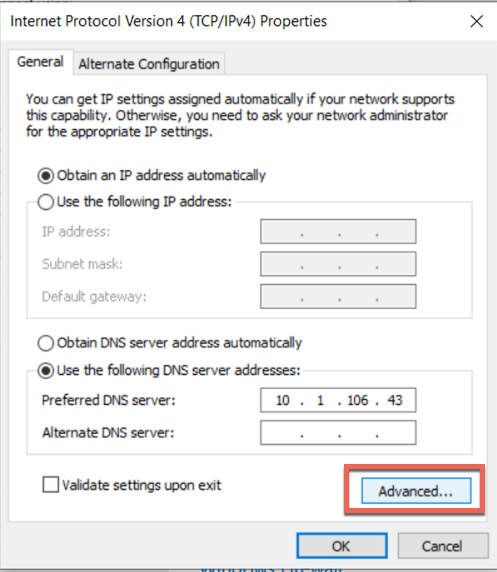
Ensure that you have the correct DNS server in the ‘DNS Server address’ section or ‘DHCP Enabled’ (If the latter, ensure that the Fortigate’s DHCP server is handing out the correct DNS server.
Ensure that at the bottom, you enable the ‘Register this connection’s address in DNS’ nad choose OK.
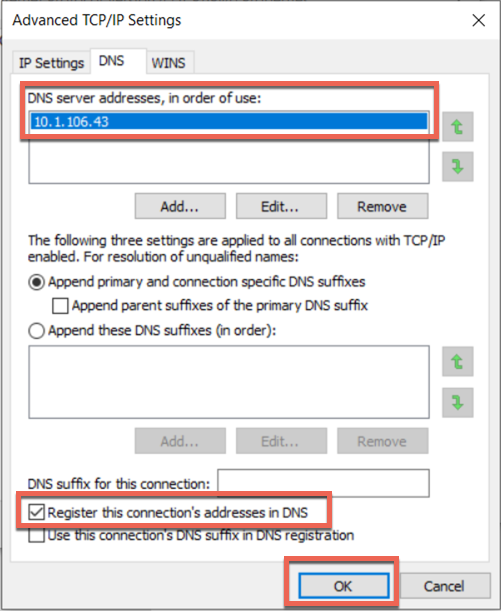
Here are what the ‘Advanced’ properties mean:
DNS server addresses, in order of use
This lists the name servers that your machine will contact for DNS resolution, in the order they will be contacted should one higher in the list be unreachable.
Append primary and connection specific DNS suffixes
When performing a name resolution request, this will append the dns suffix of the machine and DNS suffix for this connection (see below) to the host name in a dns query, if the query is not for a fully qualified host name. This helps to speed up queries so that they get sent to the proper authoritative server quicker (or at all).
Append parent suffixes of the primary DNS suffix
This does the same as the above, except it will take parent suffixes instead. For example, if your primary DNS suffix is somesub.mydomain.com then it will append .mydomain.com and .com to queries.
Append these DNS suffixes (in order)
This is a list that you can define of additional suffixes to add to queries.
DNS suffix for this connection
This is the DNS domain that you want that connection to be associated with. This is automatically set when the machine is part of an Active Directory domain.
Register this connection’s addresses in DNS
When this is checked your machine will attempt to dynamically create DNS records (ie- register itself) in the zone associated with the connection. This will either be the Active Directory domain your machine is a member of or the DNS suffix listed in the above setting if you have the next setting checked.
Use this connection’s DNS suffix in DNS registration
If this is checked then when attempting to dynamically register with DNS (if enabled) it will try to register itself in the zone of the DNS suffix for this connection.
(Note: This is in addition to the regular registration of the “full computer name”
Fortigate Configuration
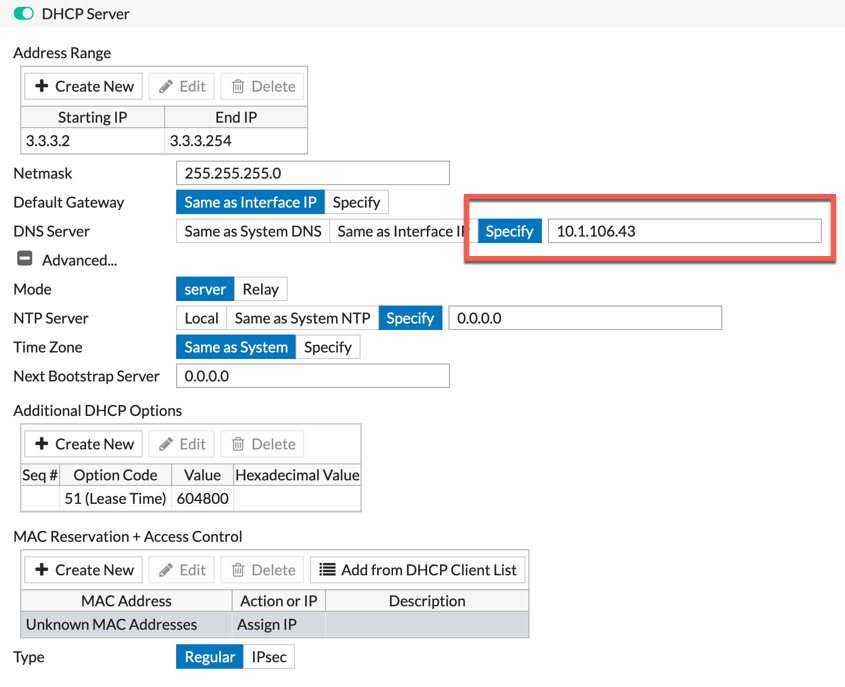
As you can see in the highlighted section, you need to specify the DNS server you want the PCs to register to.
Windows GPO Settings
If you would like to use GPO to modify the configuration:
Computer Configuration -> Administrative Templates -> Network -> DNS Client and right click on “DynamicUpdate” parameter in DNS Client Node and select “Properties”
Hope this helps.
Special thanks to Mat Sherif and Brian Modlin for helping me out on this post.
Recent posts
-

-

DNS is one of those technologies that quietly underpins... Full Story
-

BGP issues on FortiGate firewalls usually trace back to... Full Story
-

Every time your laptop talks to your router, a... Full Story
-

If you've spent any time configuring NAT on a... Full Story
-

If you have spent any time configuring firewall policies... Full Story
-

High availability on FortiGate is one of those features... Full Story
-

If you've configured SD-WAN on a FortiGate, you've almost... Full Story
-

FortiLink is the management protocol that turns a FortiSwitch... Full Story
-

FortiSwitches are pretty rock solid from Mean Time Between... Full Story
-

This is a quicky tip. Have you ever gone... Full Story
-

DNS is one of those quiet pieces of internet... Full Story
-

This article is an updated version of the previous... Full Story
-

You will add ns2 as a secondary (slave) BIND9... Full Story
-

In the process of deploying my lab, I needed... Full Story
-

RFC 8805, used to be known as Self-Correcting IP... Full Story
-

Years back, I wrote an article about certificate pinning. ... Full Story
-

FortiGates have the ability to send alerts to Microsoft... Full Story
-

In this post, I am going to walk through... Full Story
-

Troubleshooting VoIP on a FortiGate can feel like trying... Full Story
-

Prior to FortiOS 7.0, there were three commands to... Full Story
-

In this post, I am going to go over... Full Story
-

What we are going to do: We are going... Full Story
-

Choosing between FGCP (FortiGate Clustering Protocol) and FGSP (FortiGate... Full Story
-

Creating a VLAN on macOS (The "Pro" Move) A... Full Story
-

This blog post explores the logic behind how macOS... Full Story
-

Pretty Fly for a Wi-Fi Tell My Wi-Fi Love... Full Story
-

Part of my daily gig is creating BoMs (Bill-of-Materials)... Full Story
-

ICMP introduces several security risks, but careful filtering, rate... Full Story
-

The command diag debug application dhcps -1 enables full... Full Story
-

In the world of FortiOS, execute tac report is... Full Story
-

LLDP; What is it The Link Layer Discovery Protocol... Full Story
-

What it actually does When you run diagnose fdsm... Full Story
-

Monkey Bites are bite-sized, high-impact security insights designed for... Full Story
-

I have run macOS in macOS with Parallels but... Full Story
-

Don't be confused with my other FortiNAC posts where... Full Story
-

This is the third session in a multi-part article... Full Story
-

Today I was configuring key-based authentication on a FortiGate... Full Story
-

Netcat, often called the "Swiss Army knife" of networking,... Full Story
-

At its core, IEEE 802.1X is a network layer... Full Story
-

In case you did not see the previous FortiNAC... Full Story
-

This is our 5th session where we are going... Full Story
-

Now that we have Wireshark installed and somewhat configured,... Full Story
-

The Philosophy of Packet Analysis Troubleshooting isn't about looking... Full Story
-

You have twenty years of muscle memory. You type... Full Story
-

Have you ever wanted to do some testing on... Full Story
-

Ask ten engineers to define "a network" and you... Full Story