There are many options when troubleshooting in FortiGate firewalls. ... Full Story
By Manny Fernandez
May 22, 2018

Remote Access VPN with ASA as a client
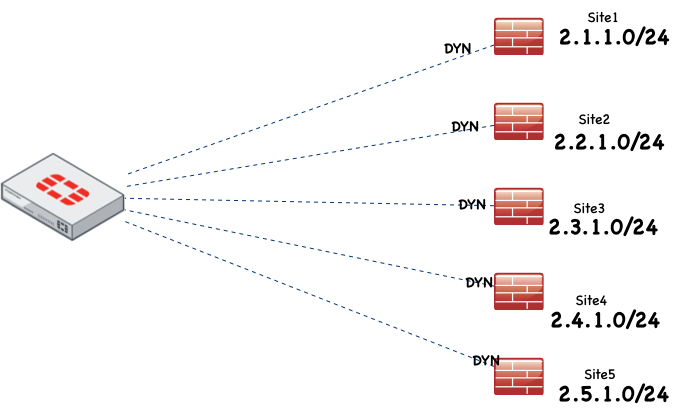
Today I had a customer that was buying two Fortigate 500Es for their datacenter but had some remote offices outside the country currently using Cisco’s EZ VPN. Although the Fortigate will not terminate an EZ VPN configuration, it can handle site-to-site VPNs with the ASA acting as a client while routing the LAN side of the ASA into the Fortigate. The Fortigate has a static public IP while the remote offices have dynamic IP addresses from their local carriers. The challenge we faced with configuring VPNs with dynamic IP addresses was that if I create a single VPN on the Fortigate, we would not be able to route to the local LANs of the ASA.

object network HQ
subnet 10.0.0.0 255.255.255.0
!
object network site1-lan
subnet 2.1.1.0 255.255.255.0
#These object will be used in the ASA configuration (ACL and NAT)
!crypto ipsec ikev1 transform-set 3desMD5 esp-3des esp-md5-hmac
#Cerated a transform set for the ASA which defines the Phase II encryption and Hashing.
!
crypto ikev1 policy 1
authentication pre-share
encryption 3des
hash md5
group 5
lifetime 86400
#Created an IKEv1 Policy to be used with the Phase I of the VPN Tunneltunnel-group X.X.X.X type ipsec-l2l
tunnel-group X.X.X.X ipsec-attributes
ikev1 pre-shared-key <enter-real-psk-here>
peer-id-validate nocheck#Created a tunnel group with the PSK. This is part of Phase I
nat (inside,outside) 1 source static site1-lan site1-lan destination static HQ HQ
#Created a ‘no-nat’ statement
crypto map outside-map 10 match address crypto-to-cisneros
crypto map outside-map 10 set pfs group5
crypto map outside-map 10 set peer X.X.X.X
crypto map outside-map 10 set ikev1 phase1-mode aggressive group5
crypto map outside-map 10 set ikev1 transform-set 3desMD5#Here we put all the pieces of Phase II together. Here we tell it to use aggressive mode, and PFS
crypto isakmp identity hostname
#Here I tell the ASA to provide its hostname when connecting to the Fortigate so that we know what VPN it belongs to.
hostname site1
#Changed the host name. It will append the domain name from the ‘domain-name’ command to the end of it.crypto map outside-map interface outside
crypto ikev1 enable outside
#We then enabled the IPSec and IKEv1 to the outside interface.
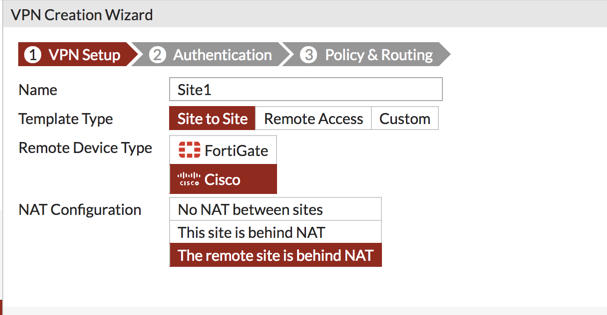
On the Fortigate side, you will need to create a new IPSec Tunnel with the Wizard.

You can choose a ‘Site to Site’ to a ‘Cisco’ then choose ‘The remote site is behind NAT’

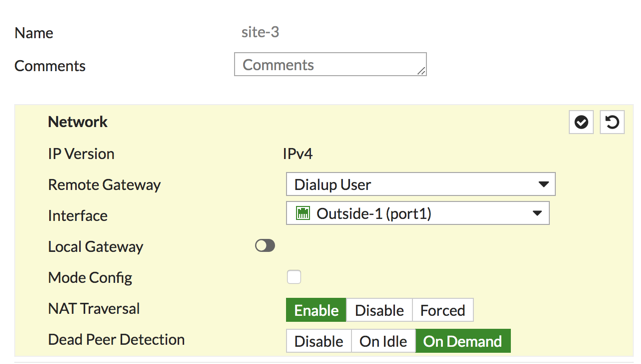
You will see the ‘Remote Gateway’ is a ‘Dialup User’ and ‘NAT T’ should be ‘enabled’.

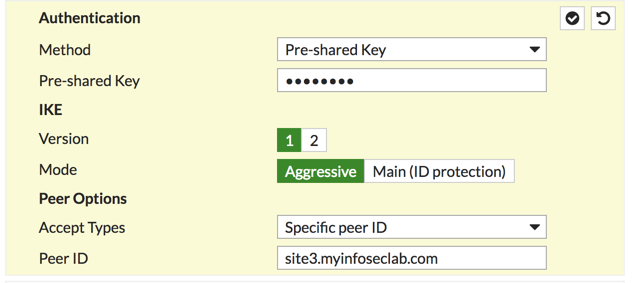
Add the pre-shared key and choose ‘Aggresive’ for the mode. Under ‘Accept Types’ choose ‘Specific Peer ID’ and then add the ‘hostname.domain-name’ from the ASA.
Ensure that your Phase I proopsal mathces with the ASA ‘crypto ikev1 policy’ from above.
Once this is done, you will need to choose the subnets on each side of the VPN. Ensure you have the correct policy in the IPv4 Policy section. You will also need to ensure that the Static Routes are correct as well.

Ensure you have the remote subnet defned and pointing to the particular VPN with a corresponding ‘blackhole’ route.
Recent posts
-

-

Have you ever had an IPS signature that continues... Full Story
-

Use case: Customer has a Split Tunnel Enabled but... Full Story
