If you've spent any time configuring user authentication on... Full Story
By Manny Fernandez
December 12, 2017

Fortigate CLI Tips and Tricks
I am a CLI guy. Make no mistake, I like the GUI but at the end of the day, I am a CLI Jockey and love the “ugly black screen”. To that end, I wanted to throw some short cuts together and post them on this blog.
GREP
Grep is a Unix command introduced years ago by Ken Thompson, in Unix 4. It is extremely useful from a BASH perspective to search for keyword(s) in multiple files or standard output. FortiOS is not different. When looking for a particular output, rather than showing the entire config, you can use ‘grep’ to limit the output. Below are some examples. The best way to test is to play with your config.
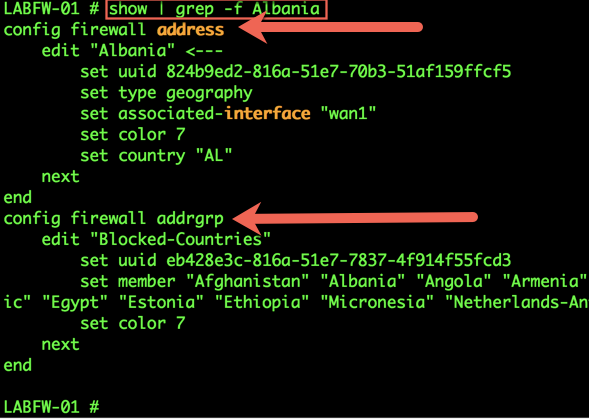
In the above example, I am searching the entire config for any entry of ‘Albania’. I use the ‘-f’ which will show the configuration location as well as the output I requested. You can see that it shows the ‘config firewall address’ as well as the ‘config firewall addrgrp’. As you can see it also shows me the output which is great for when you want to edit some setting and do not know if it is ‘config system’ or ‘config firewall’ as an example.

Sometimes, you may be looking for a particular MAC address in an ARP table. In the Cisco world (see below), the command is ‘sh ip arp | i 10.1.1.1’ as an example. This will search the ARP table for an entry that matches 10.1.1.1.

In the Fortigate example above, we can see that we searched the ‘arp list’ by issuing the ‘diag ip arp likst | grep 1.1.16.34’ and ‘1.1.16.36’ respectively. We can limit the output to only those IP addresses instead of showing the hundreds of MAC addresses in my system.
COLOR IN THE GUI
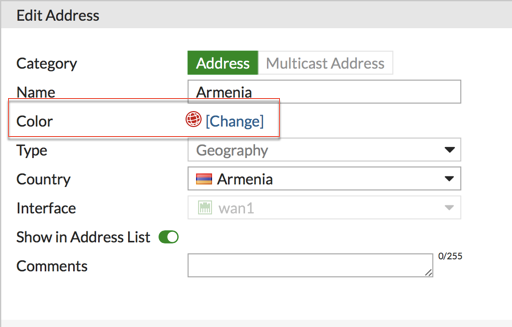
I am an O’G Checkpoint Guy. I used to deploy on AIX and Windows. The one thing I have always like about Checkpoint is the color on the objects. I think it keeps things looking clean. However the Fortigate does NOT come with this feature enabled. To enable it, head over to the cli and type:
config system settings
set gui-object-colors enable
end
This will give you and additional option when creating an object:
PING with Benefits 🙂
When you ping from a Fortigate device, hell any device that has multuiple interfaces, by default the ping will source from the nearest interface to the destination. As an example, you have a router with the ‘inside’ interface with a 10.1.1.1 and the ‘outside’ interface with a ’12.34.22.122’ and there is a default gateway of ’12.34.22.121’. In the absence of any other static route, if you tried to ping 4.2.2.2 from the device, it would source the ping from the ’12.34.22.122’.
On the Fortigate, if you want to source it from another interface instead of the ‘default’ interface chosen by the OS as part of the stack, following these commands:

Here, we are looking to see what settings have been selected for a ‘policy based ping’. We can see that:
5 packets will be sent
The size will be 56bytes
Timeout value is 2
You can follow up these commands with:
execute ping-options source 1.1.20.225
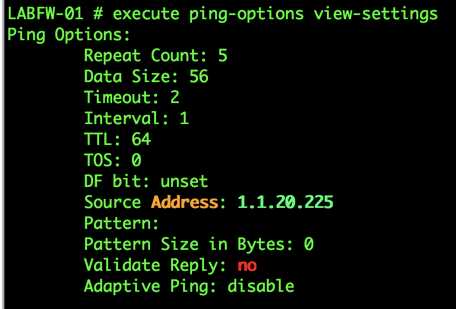
Here we can see that we will now source the pings from the ‘1.1.20.225’ interface.
Then follow it with your standard ‘execute ping 4.2.2.2′
What is my MAC address?
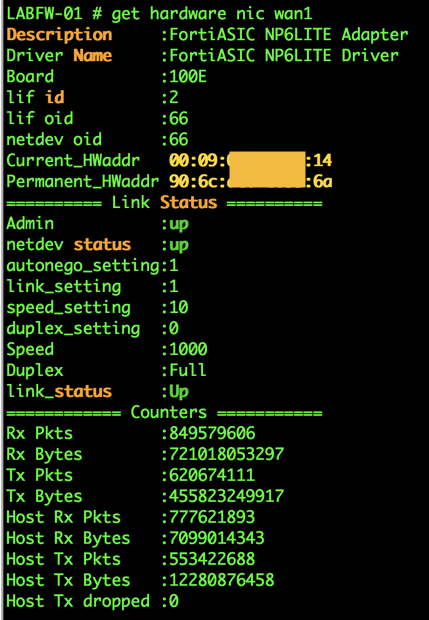
Sometimes, you need to identify your MAC address for your firewall. For instance, your perimeter router does not seem to pass any traffic to the Fortigate’s WAN1 interface. You can do a ‘sh ip arp | i 12.1.1.1’ and validate that your MAC address is being learned correctly.
To do this on the Fortigate, you can issue the following command:
get hardware nic wan1
Auto Revision Control (Credit to Eric Hastings from Fortinet)
config system global
set revision-backup-on-logout enable
end
If you are not connected to a FortiManager, you can run the above command and every time you log out, the Fortigate will back a backup of the configuration. You can then rollback to an older version and you can perform a ‘diff’ to see the changes. In my example, I renamed a policy from ‘FortiMail’ to ‘FortiMail Outbound’

Above, you can see that I have two backups and they were based on ‘Automatic Backup (logout)’. Now we will go a step further. By selecting both files, and right clicking:

You will have an option to either delete, Diff, or Save (By selecting a single one, the grayed out ‘details’ and ‘revert’ will become available to you.

Here we can see that the (1) Green entry WAS FortiMail and now it is “FortiMail Outbound’ (2).
NOTE: If you are using FortiManager, you will NOT see them in FortiGate.
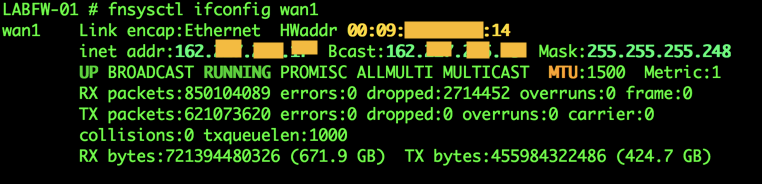
Discards and NIC Errors
By issuing the following command ‘ fnsysctl ifconfig’ command followed by an interface name, you will get information about the NIC on the Fortigate.
Recent posts
-

-

DNS is one of those technologies that quietly underpins... Full Story
-

BGP issues on FortiGate firewalls usually trace back to... Full Story
-

Every time your laptop talks to your router, a... Full Story
-

If you've spent any time configuring NAT on a... Full Story
-

If you have spent any time configuring firewall policies... Full Story
-

High availability on FortiGate is one of those features... Full Story
-

If you've configured SD-WAN on a FortiGate, you've almost... Full Story
-

FortiLink is the management protocol that turns a FortiSwitch... Full Story
-

FortiSwitches are pretty rock solid from Mean Time Between... Full Story
-

This is a quicky tip. Have you ever gone... Full Story
-

DNS is one of those quiet pieces of internet... Full Story
-

This article is an updated version of the previous... Full Story
-

You will add ns2 as a secondary (slave) BIND9... Full Story
-

In the process of deploying my lab, I needed... Full Story
-

RFC 8805, used to be known as Self-Correcting IP... Full Story
-

Years back, I wrote an article about certificate pinning. ... Full Story
-

FortiGates have the ability to send alerts to Microsoft... Full Story
-

In this post, I am going to walk through... Full Story
-

Troubleshooting VoIP on a FortiGate can feel like trying... Full Story
-

Prior to FortiOS 7.0, there were three commands to... Full Story
-

In this post, I am going to go over... Full Story
-

What we are going to do: We are going... Full Story
-

Choosing between FGCP (FortiGate Clustering Protocol) and FGSP (FortiGate... Full Story
-

Creating a VLAN on macOS (The "Pro" Move) A... Full Story
-

This blog post explores the logic behind how macOS... Full Story
-

Pretty Fly for a Wi-Fi Tell My Wi-Fi Love... Full Story
-

Part of my daily gig is creating BoMs (Bill-of-Materials)... Full Story
-

ICMP introduces several security risks, but careful filtering, rate... Full Story
-

The command diag debug application dhcps -1 enables full... Full Story
-

In the world of FortiOS, execute tac report is... Full Story
-

LLDP; What is it The Link Layer Discovery Protocol... Full Story
-

What it actually does When you run diagnose fdsm... Full Story
-

Monkey Bites are bite-sized, high-impact security insights designed for... Full Story
-

I have run macOS in macOS with Parallels but... Full Story
-

Don't be confused with my other FortiNAC posts where... Full Story
-

This is the third session in a multi-part article... Full Story
-

Today I was configuring key-based authentication on a FortiGate... Full Story
-

Netcat, often called the "Swiss Army knife" of networking,... Full Story
-

At its core, IEEE 802.1X is a network layer... Full Story
-

In case you did not see the previous FortiNAC... Full Story
-

This is our 5th session where we are going... Full Story
-

Now that we have Wireshark installed and somewhat configured,... Full Story
-

The Philosophy of Packet Analysis Troubleshooting isn't about looking... Full Story
-

You have twenty years of muscle memory. You type... Full Story
-

Have you ever wanted to do some testing on... Full Story
-

Ask ten engineers to define "a network" and you... Full Story