There are many options when troubleshooting in FortiGate firewalls. ... Full Story
By Manny Fernandez
December 7, 2017

Syslog Server running ‘rsyslog’
Although I run FortiSIEM on my home lab, I wanted to have a quick & dirty, low cost, simple solution to just collect logs. I am not a big Windows guy so wanted to keep the bloat off of my lab ESX environment. I deployed my standard CentOS 7 minimal installation (5 min install).
Once installed, I suggest backing up the original rsyslog configuration file located in /etc. The file name is rsyslog.conf
cp /etc/rsyslog.conf /etc/rsyslog.conf.orig
Next we will edit the .conf file leaving the .orig file as a backup in case we “screw the pooch” and have to revert.
vi /etc/rsyslog.conf
If you are not familiar with ‘vi’ you can use nano or your editor of choice. I recommend that you use ‘vi’ since it is available in almost every distro and if you get used to it, you will never feel that lonely feeling of not having your favorite editor. See my blog post “VI Cheat Sheet”
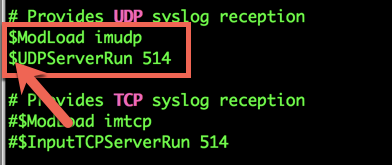
We need to un-comment the UDP support

Once you enable UDP, scroll down to the end of the file
In order to have rsyslog create separate folders for each reporting host, you will need to add the following template at the end of the ‘rsyslog.conf’
$template TmplAuth, "/var/log/rsyslog_custom/%HOSTNAME%/%PROGRAMNAME%.log"
$template TmplMsg, "/var/log/rsyslog_custom/%HOSTNAME%/%PROGRAMNAME%.log"
authpriv.* ?TmplAuth
*.info,mail.none,authpriv.none,cron.none ?TmplMsg
Now you can restart the rsyslogd service.
To test, I sent a test log from my Synology NAS

Here you can see the contents of the /var/log/rsyslog_custom/LAB-NFS/Sysytem.log
Hope this helps
Recent posts
-

-

Have you ever had an IPS signature that continues... Full Story
-

Use case: Customer has a Split Tunnel Enabled but... Full Story
