
If you've spent any time configuring user authentication on... Full Story
By Manny Fernandez
October 14, 2016
QuickHash Multi-Platform Hashing Tool
| Objective | Verify downloaded files, baseline folders, and prove copies are intact using QuickHash GUI, then cross-check every result with the hashing tools already built into your OS. |
| Target audience | Network and security engineers, sysadmins, and anyone who installs software from the internet and wants proof the bits were not tampered with. |
| Updated | Refreshed September 2026 from the original October 2016 InfoSecMonkey post. QuickHash has moved off SourceForge and gained newer algorithms since then. |
Contents
Executive Summary
Hashing files, and more importantly validating the hashes of files you download, is one of the cheapest integrity controls you can run. Legitimate software gets hijacked: in 2016 the Transmission BitTorrent client for Mac was trojanized twice (KeRanger ransomware, then the Keydnap backdoor), and the Linux Mint website was breached so visitors downloaded a backdoored ISO. Matching a checksum against a trusted reference is how you catch that before it runs.
There are plenty of hashing tools in the Mac App Store and elsewhere, but QuickHash GUI stands out: it is free, open source (GPLv2), runs on Windows, macOS, and Linux, and is packed with features beyond single-file hashing.
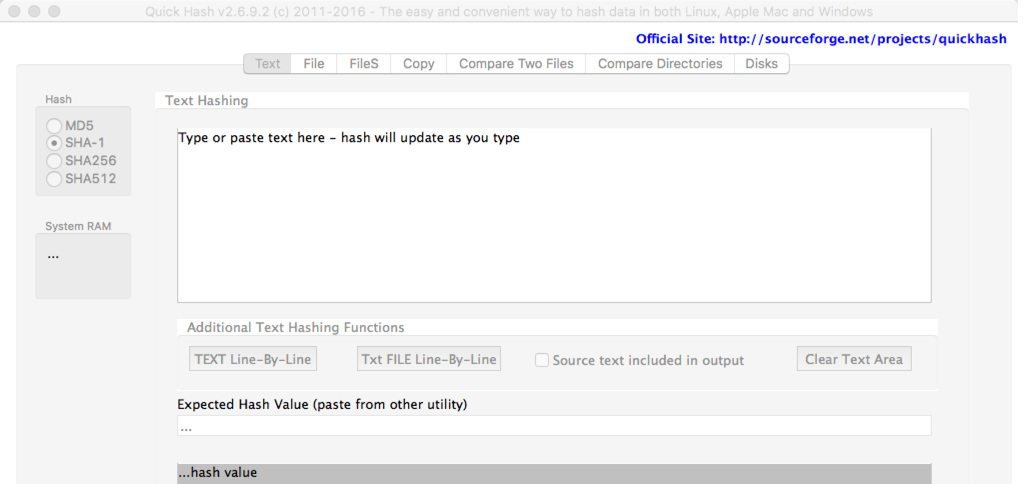
Note: The original SourceForge project page is frozen. QuickHash moved to quickhash-gui.org in December 2016, and the source lives at github.com/tedsmith/quickhash. Download only from those two locations.
Prerequisites and Architecture
Assumed Knowledge
You should be comfortable opening a terminal (Terminal on macOS/Linux, PowerShell on Windows) and know where your browser saves downloads. No prior hashing experience is required.
Components
| Component | Version / Detail | Role |
|---|---|---|
| QuickHash GUI | v3.3.4 (latest release at time of writing) | GUI hashing, comparison, and copy-with-hash |
| Host OS | Windows 10/11, macOS (Intel or Apple Silicon), Linux | Runs QuickHash and the native CLI tools |
| Native CLI hashers | shasum, sha256sum, Get-FileHash, certutil |
Independent cross-check of every QuickHash result |
| Trusted reference hash | Vendor release notes, signed SHA256SUMS file |
The value you compare against |
Supported Algorithms
The 2016 release offered MD5, SHA-1, SHA-256, and SHA-512. Current v3 builds add SHA-3, BLAKE2B, BLAKE3, xxHash, and CRC32. Pick the algorithm the publisher used; when you have a choice, pick SHA-256 or stronger.
| Algorithm | Output | Security Status | Use It For |
|---|---|---|---|
| MD5 | 128-bit | Broken (practical collisions) | Legacy matching only; never trust it against an attacker |
| SHA-1 | 160-bit | Broken (SHAttered collision, 2017) | Legacy compatibility only |
| SHA-256 | 256-bit | Strong | Default choice for download verification |
| SHA-512 | 512-bit | Strong | When the vendor publishes it; often faster on 64-bit CPUs |
| SHA-3 (256) | 256-bit | Strong | Alternative (Keccak) family |
| BLAKE2B (256) / BLAKE3 | 256-bit | Strong | Fast cryptographic hashing of large data sets |
| xxHash / CRC32 | 32 or 64-bit | Non-cryptographic | Speed only: backup and copy checks with no attacker in the threat model |
QuickHash Tab Map
| Tab | What It Does | Typical Use |
|---|---|---|
| Text | Hashes text as you type or paste; the value updates live | Checking a string, test vectors |
| File | Hashes one file and compares it to a pasted expected value | Download verification |
| FileS | Recursively hashes a folder; exports CSV or HTML | Baselining a directory |
| Copy | Copies files and hashes source and destination | Moving evidence or backups |
| Compare Two Files | Reports match or mismatch between two files | Is this the same build? |
| Compare Two Folders | Same check across every file in two folders | Backup and sync validation |
| Disks | Hashes a physical or logical disk (admin/root required) | Forensic image verification |
| Base64 | Hashes Base64-encoded data | Encoded payloads and attachments |
Step-by-Step Implementation Workflow
Step 1: Download and Verify QuickHash Itself
Goal: Start the chain of trust correctly by verifying the hashing tool before you rely on it.
Action: Download the build for your OS from quickhash-gui.org. Each download page lists SHA-256 values for the archive and every bundled library. Hash the archive with your native OS tool and compare.
macOS
shasum -a 256 ~/Downloads/<quickhash-download>.dmgLinux
sha256sum ~/Downloads/<quickhash-download>.tar.gzWindows (PowerShell or cmd)
Get-FileHash -Algorithm SHA256 "$env:USERPROFILE\Downloads\<quickhash-download>.zip"

certutil -hashfile "%USERPROFILE%\Downloads\<quickhash-download>.zip" SHA256
GUI Verification: The digest printed in your terminal matches the value published on the download page, character for character. On macOS, drag QuickHash-GUI.app from the DMG into /Applications. On Windows and Linux, extract the whole archive, including the libs folder, into one directory.
Step 2: Hash a Single File and Match the Expected Value
Goal: Confirm a download is bit-for-bit what the publisher released.
Action: Open the File tab. Drag and drop the file onto the window, or browse to it. Paste the expected hash obtained from a credible source into the expected-value field. QuickHash computes the digest and tells you whether they match.
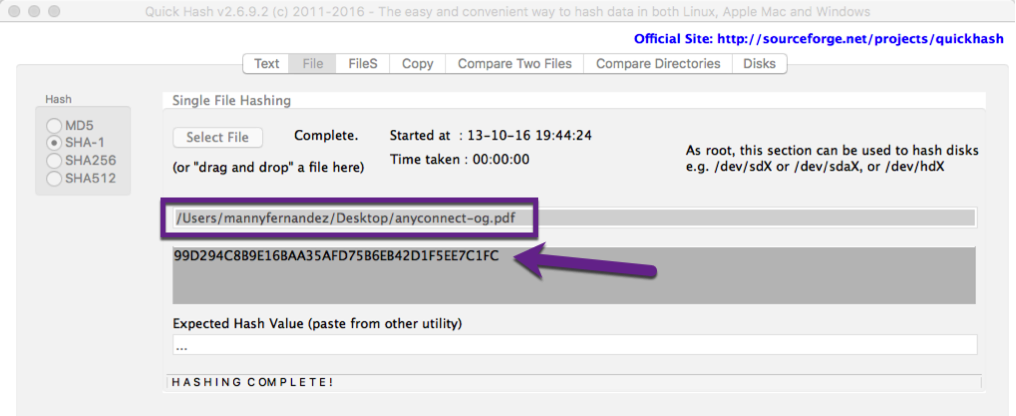
The same check from the CLI, useful when you want a scripted pass/fail:
Linux (two spaces between hash and filename)
echo "<expected-sha256> <file>" | sha256sum -c -macOS
shasum -a 256 -c <<< "<expected-sha256> <file>"Windows PowerShell (-eq is case-insensitive)
(Get-FileHash <file> -Algorithm SHA256).Hash -eq "<expected-sha256>"GUI Verification: QuickHash reports a match, sha256sum -c prints <file>: OK, and PowerShell returns True.
Step 3: Hash Text Dynamically
Goal: Hash strings without writing them to a file first.
Action: Open the Text tab and type or paste. The hash recalculates live as you add characters, which makes it handy for sanity-checking a known test vector or comparing two snippets of config.
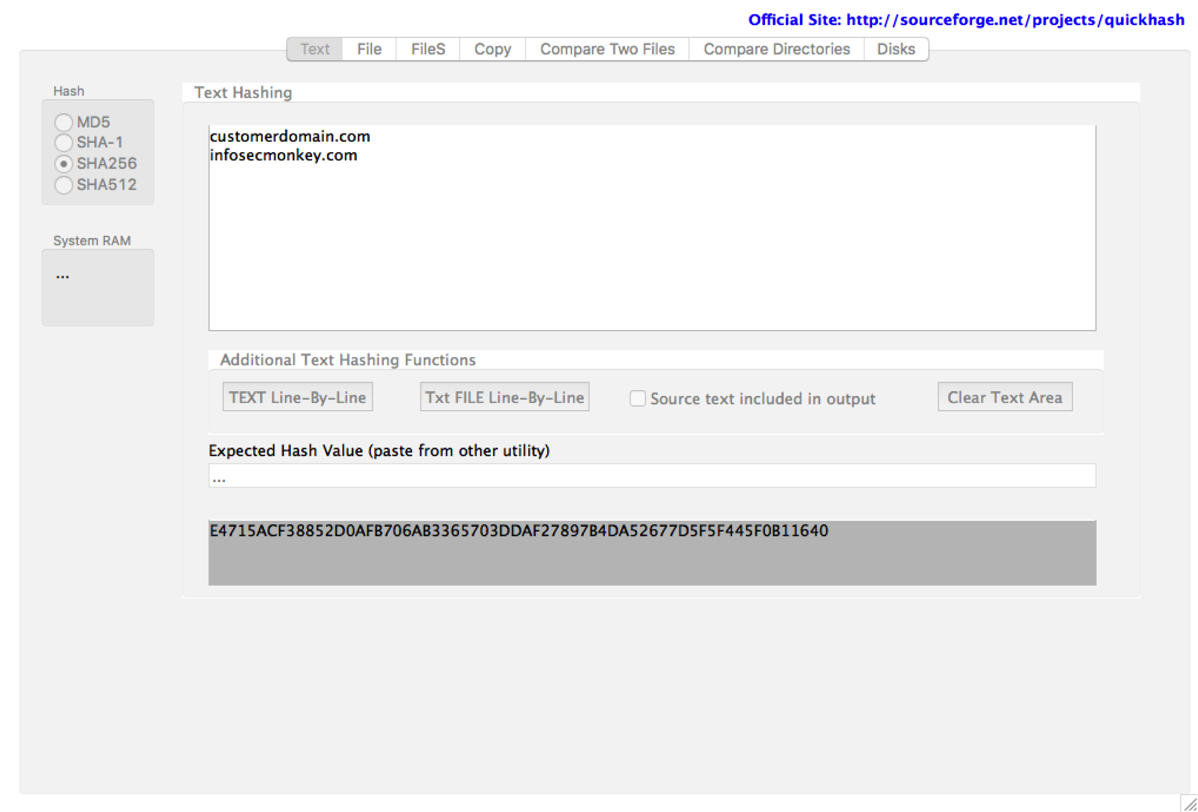
Warning: Retraction from the 2016 post. The original version of this article suggested hashing a customer domain plus a personal seed (for example customerdomain.com + infosecmonkey.com) to produce “reversible” site passwords you could regenerate onsite. Do not do this. A hash is not reversible, it is deterministic: anyone who learns the recipe can regenerate every password for every customer, the inputs are guessable, and a fast unsalted hash offers no brute-force resistance. Store unique random credentials in a password manager or vault instead.
GUI Verification: Typing abc (no trailing newline) in the Text tab with SHA-256 selected returns ba7816bf8f01cfea414140de5dae2223b00361a396177a9cb410ff61f20015ad, the published FIPS 180 test vector.
Step 4: Hash an Entire Folder and Export the Results
Goal: Create a baseline inventory of every file in a directory tree.
Action: Open the FileS tab, select the folder, and start hashing. QuickHash walks the tree recursively, shows file count, progress, and timing, and saves the output as CSV or HTML.
CSV Output

HTML Output
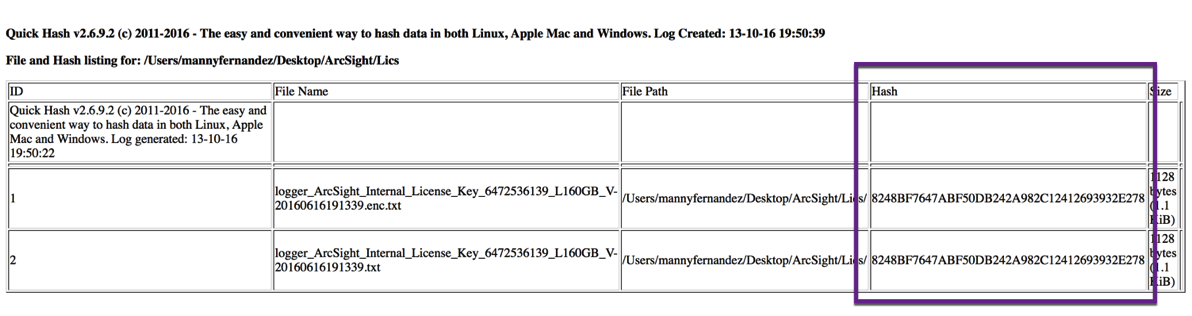
CLI equivalents that produce a re-checkable baseline:
Linux (create, then verify later)
find /path/to/folder -type f -exec sha256sum {} + | sort -k2 > baseline.sha256
sha256sum -c --quiet baseline.sha256
macOS
find /path/to/folder -type f -exec shasum -a 256 {} + | sort -k2 > baseline.sha256
shasum -a 256 -c baseline.sha256 | grep -v ": OK$"
Windows PowerShell
Get-ChildItem -Path <folder> -Recurse -File |
  Get-FileHash -Algorithm SHA256 |
  Export-Csv baseline.csv -NoTypeInformation
GUI Verification: The exported file lists every file in the tree. Spot-check two or three rows against a CLI hash of the same file.
Step 5: Copy Files with Hashing
Goal: Move data and prove the destination matches the source.
Action: Open the Copy tab and choose a source and destination. It is a rudimentary copy, but QuickHash hashes each file at both ends and writes the results to CSV or HTML, which gives you a transfer record.
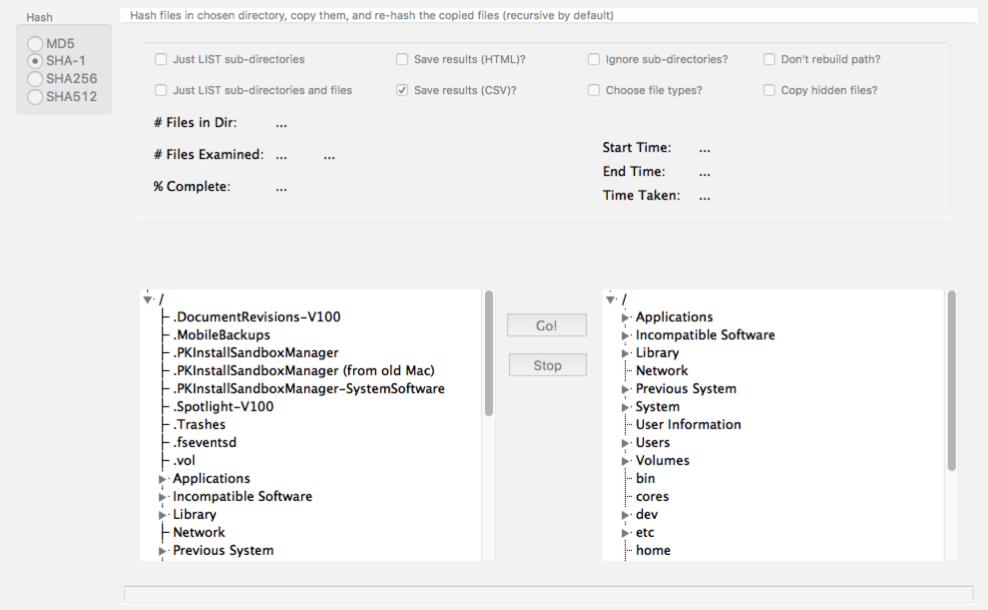
GUI Verification: Every row in the output shows identical source and destination hashes. Any mismatch is a failed copy that needs to be redone.
Step 6: Compare Two Files
Goal: Answer “are these two files identical?” in one click.
Action: Open Compare Two Files, select both files, and click Compare Now. This is not a diff tool like Beyond Compare or ExamDiff Pro; it will not show you what changed. You get a simple match or mismatch.
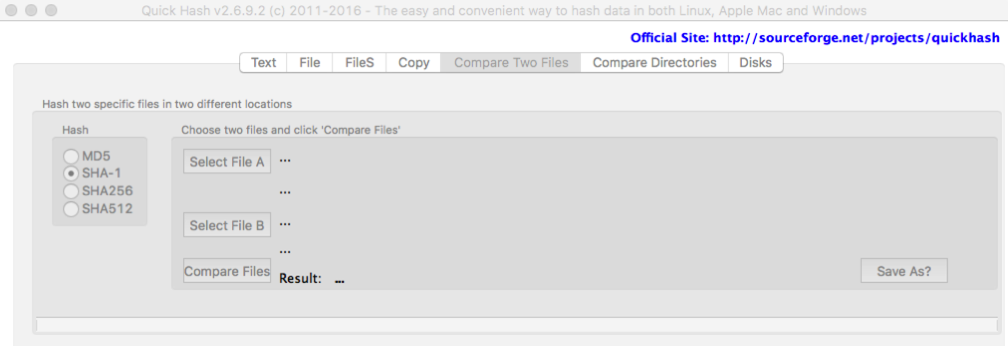
GUI Verification: Identical files report a match. Change a single byte in one of them and re-run; the verdict flips to mismatch.
Step 7: Compare Two Folders
Goal: Validate a backup, sync, or migration across many files at once.
Action: Open Compare Two Folders, select both directories, and run the comparison. It works like Compare Two Files but across every file, and the result can be written to a log.
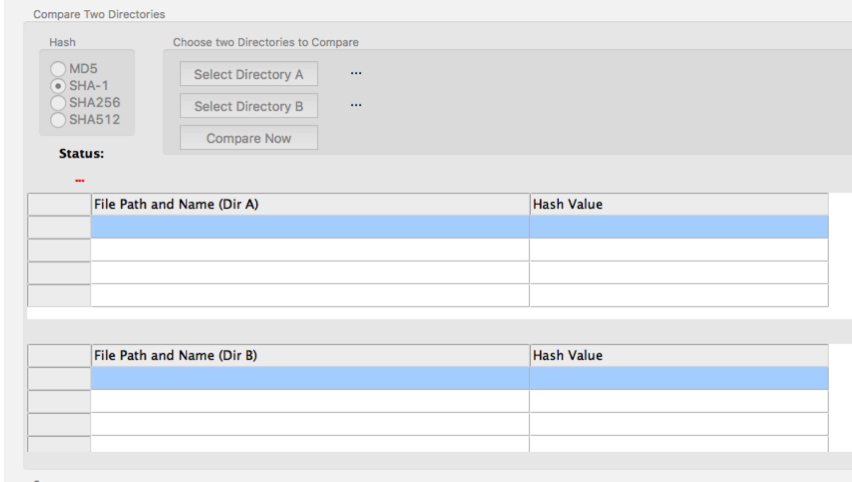
GUI Verification: A clean backup reports every file matched. Missing, extra, or altered files are called out individually.
Verification and Validation
Never trust a single tool for integrity work. Run these known-answer tests once to confirm QuickHash and your CLI agree, and to see the most common source of false mismatches (a trailing newline):
Known-answer tests (macOS: swap sha256sum for shasum -a 256)
printf 'abc' | sha256sum
# ba7816bf8f01cfea414140de5dae2223b00361a396177a9cb410ff61f20015ad  -

echo 'abc' | sha256sum
# edeaaff3f1774ad2888673770c6d64097e391bc362d7d6fb34982ddf0efd18cb  -

printf '' | sha256sum
# e3b0c44298fc1c149afbf4c8996fb92427ae41e4649b934ca495991b7852b855  -
Expected success state: the printf result matches the QuickHash Text tab for abc, the echo result differs (because echo appends a newline), and the empty-input value matches the well-known SHA-256 of zero bytes.
Where the publisher signs its releases, verify the signature as well as the hash. A signature proves who produced the file; a hash alone only proves it matches whatever reference you were given.
Signature checks
# Linux distros and many open source projects
gpg --verify SHA256SUMS.gpg SHA256SUMS

# macOS apps
codesign --verify --deep --strict --verbose=2 /Applications/<App>.app
spctl --assess --type execute --verbose /Applications/<App>.app
Windows installers
Get-AuthenticodeSignature .\<installer>.exe | Format-List Status, SignerCertificateTroubleshooting and Gotchas
Gotcha 1: The Hash Matches, but the File Is Still Malicious
Symptom: Verification passes, yet the download turns out to be compromised. Cause: The reference hash came from the same place as the file. In the 2016 Linux Mint breach, attackers controlled the website, so they could change the published checksum along with the ISO.
Resolution: Get the reference hash through a separate channel (release notes on a different host, a signed SHA256SUMS, the vendor support portal), and prefer signature verification with gpg, codesign, or Get-AuthenticodeSignature whenever it is offered.
Gotcha 2: False Mismatch from Formatting
Symptom: The digests look the same but QuickHash or a script reports a mismatch. Cause: Pasted leading or trailing whitespace, hash case (upper vs. lower), a trailing newline in text input, or CRLF vs. LF line endings in text files.
Resolution: Use the QuickHash case toggle next to the expected-value field, trim the pasted value, and hash text with printf rather than echo. For text files, check line endings:
Diagnose
file <file>                          # reports 'with CRLF line terminators'
printf '%s' '<pasted-hash>' | wc -c   # SHA-256 hex should be exactly 64
Gotcha 3: macOS Refuses to Open QuickHash
Symptom: Gatekeeper blocks the app because it was not downloaded from the App Store. Cause: The quarantine attribute set on internet downloads.
Resolution: Verify the DMG hash first (Step 1). Then allow it via System Settings, Privacy and Security, Open Anyway. If you must use the CLI, remove quarantine only from the app you just verified:
macOS
xattr -dr com.apple.quarantine /Applications/QuickHash-GUI.appGotcha 4: Folder Hashing Is Slow on Large Data Sets
Symptom: Hashing hundreds of gigabytes takes a very long time. Cause: Cryptographic algorithms are CPU-bound, and slow disks or network shares compound it.
Resolution: For copy or backup checks with no adversary in the threat model, switch to BLAKE3 or xxHash. Keep SHA-256 for anything security-relevant, and run large jobs against local disks rather than SMB or NFS shares where possible.
Recent posts
-

-

DNS is one of those technologies that quietly underpins... Full Story
-

BGP issues on FortiGate firewalls usually trace back to... Full Story
-

Every time your laptop talks to your router, a... Full Story
-

If you've spent any time configuring NAT on a... Full Story
-

If you have spent any time configuring firewall policies... Full Story
-

High availability on FortiGate is one of those features... Full Story
-

If you've configured SD-WAN on a FortiGate, you've almost... Full Story
-

FortiLink is the management protocol that turns a FortiSwitch... Full Story
-

FortiSwitches are pretty rock solid from Mean Time Between... Full Story
-

This is a quicky tip. Have you ever gone... Full Story
-

DNS is one of those quiet pieces of internet... Full Story
-

This article is an updated version of the previous... Full Story
-

You will add ns2 as a secondary (slave) BIND9... Full Story
-

In the process of deploying my lab, I needed... Full Story
-

RFC 8805, used to be known as Self-Correcting IP... Full Story
-

Years back, I wrote an article about certificate pinning. ... Full Story
-

FortiGates have the ability to send alerts to Microsoft... Full Story
-

In this post, I am going to walk through... Full Story
-

Troubleshooting VoIP on a FortiGate can feel like trying... Full Story
-

Prior to FortiOS 7.0, there were three commands to... Full Story
-

In this post, I am going to go over... Full Story
-

What we are going to do: We are going... Full Story
-

Choosing between FGCP (FortiGate Clustering Protocol) and FGSP (FortiGate... Full Story
-

Creating a VLAN on macOS (The "Pro" Move) A... Full Story
-

This blog post explores the logic behind how macOS... Full Story
-

Pretty Fly for a Wi-Fi Tell My Wi-Fi Love... Full Story
-

Part of my daily gig is creating BoMs (Bill-of-Materials)... Full Story
-

ICMP introduces several security risks, but careful filtering, rate... Full Story
-

The command diag debug application dhcps -1 enables full... Full Story
-

In the world of FortiOS, execute tac report is... Full Story
-

LLDP; What is it The Link Layer Discovery Protocol... Full Story
-

What it actually does When you run diagnose fdsm... Full Story
-

Monkey Bites are bite-sized, high-impact security insights designed for... Full Story
-

I have run macOS in macOS with Parallels but... Full Story
-

Don't be confused with my other FortiNAC posts where... Full Story
-

This is the third session in a multi-part article... Full Story
-

Today I was configuring key-based authentication on a FortiGate... Full Story
-

Netcat, often called the "Swiss Army knife" of networking,... Full Story
-

At its core, IEEE 802.1X is a network layer... Full Story
-

In case you did not see the previous FortiNAC... Full Story
-

This is our 5th session where we are going... Full Story
-

Now that we have Wireshark installed and somewhat configured,... Full Story
-

The Philosophy of Packet Analysis Troubleshooting isn't about looking... Full Story
-

InfoSecMonkey Threat Response October 24, 2026 | No fluff.... Full Story
-

InfoSecMonkey Threat Response October 24, 2026 | No fluff.... Full Story
-

Plus what you actually get with FortiCare Essential, Premium... Full Story