If you've spent any time configuring user authentication on... Full Story
By Manny Fernandez
February 22, 2026
Basics of Wireshark – Session 1 – Setting up your Wireshark Install
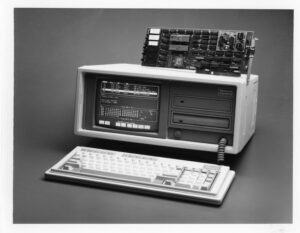
I have always been interested in packet capture and packet level analasys. I remember using Novell’s LANalyzer and who could forget the Network General Sniffer with the V.35 Y-Connectors and their T-1 Y-Connector. I also used another packet capture while at Lucent but can’t remember the name, if anyone remembers, hit me up. Even Microsoft had one breifly Network Monitor. Then came Ethereal which then became Wireshark. They have changed the game.
This will be a multi-part post where I will cover different aspects of Wireshark and how to analyze packet captures. Its not a Wireshark expert course or masterclass, but if you are new to Wireshark, you will hopefully walk away with a better grsp for the app, and more importnly how to do some troubleshooting. I have already started on the Capture and Display filter which will be Session 2.
It remids me of a trip to Grand Cayman with a customer of mine that was having issues with their Cable and Wireless circuit. It was supposed to be a point-to-point circuit. I called and worked with their network team, no one was able to fix it. I told the customer I needed to rent (yes you could do that then), and they agreed. I went on site with the Sniffer and brught a Cisco Serial cable which had a connection to a V.35 CSU/DSU and I brought a new V.35 cable and Cisco router. We tested the circuit and found that every single packet was marked Discard Eligible which was strange cause it was not Frame-Relay or so we though. DE is normally seen in Frame-Relay. Turns out the circuit was in fact Frame-Relay. We changed the cable, serial card, and router and captured more packets. Long story, longer, the engineers that had come to the customers office to ostensably wreck me, left with their tails tucked after they accused me of having a bad cable….. which I then pulled out the same report with the new router, card and cable. Turns out, they were doing some policing on the circuit. The CO was about 15 min away; 20 minutes after leaving the office, the circuit was testing clean. I am sure there is a picture of me at Cable and Wireless Cayman where they throw darts at. After that, any issue, I would threaten them we coming down with my Sniffer. 😂.
Focus Manny……
Wireshark
Honestly, there is very little I do with Wireshark on my PC as far as capturing, unless I am troubleshooting something on my device or to it. Most of the time, I am anazlying captures from other devices such as FortiGate firewalls, PAN firewalls, TCPDumo from a linux box somewhere, etc.
Lets download Wireshark. Click on Downloads. As you all know, I am on a macOS platform but Wireshark runs on macOS, Windows, and Linux.
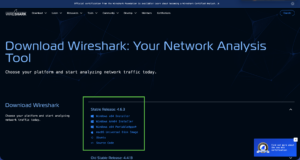
Choose your version of Wireshark and download it. I normally choose the defaults when installing them.
Additional Files on macOS
There are a few additional files when you mount the macOS .dmg file. These are:
Read me first.html
Donate to the Wireshark Foundation.htmlInstall ChmodBPF.pkg
Uninstall ChmodBPF.pkgAdd Wireshark to the system path.pkg
Remove Wireshark from the system path.pkg
ChmodBPF.pkg – This file will change the mode of the app. In short, it is a small configuration script that grants Wireshark the permissions it needs to capture live network traffic without requiring you to run the entire application as “root” (the superuser), which would be a major security risk. Conversely, the Uninstall will remove the modification to the applications.
Add Wireshark to the system path.pkg – While the ChmodBPF package handles permissions, the Add Wireshark to the system path.pkg is all about convenience and command-line access.
When you run this installer, it ensures that you can type wireshark, tshark, or other Wireshark utilities into your Terminal from any directory and have them launch instantly. And in this case, the Remove will remove it from the path.
I recommend you install both since we will use it in later sessions.
Configuration
Now that you have Wireshark installed lets get started. BTW, Wireshark has done a better job with the install where it does not require a restart which is helpful if you need to install it on a server during production.
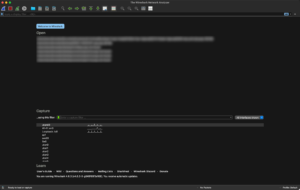
Interfaces
When you launch Wireshark, it is going to show you all the interfaces it sees as possibly capturing interfaces. Sometime, like in my case, I have a bunch of interfaces I will NOT use, although I may use like in VPN tunnel-interfaces.
To modify in macOS type ⌘ K and on Windows and Linux CTRL K
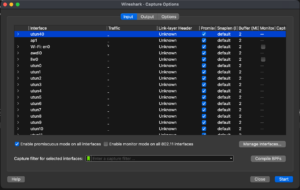
There you will see the list of Interfaces on your device.

If you click the Manage Interfaces you will be able to see and select/deselect the interfaces.
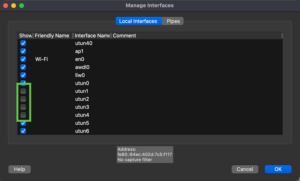
Now hit OK.
Layout
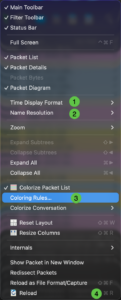
What you see is as important as what you capture. So lets see the different ways you can display your information. In macOS, you can go to the application icon on the top left, and choose Preferences. Once there you can go to the layout button

Depending on the realestate of your display, you may want to rearange what you are looking at.
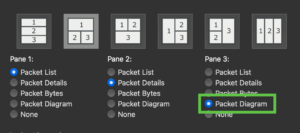
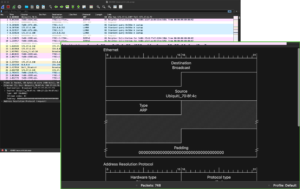
The Packet Diagram is an interesting option fairly new feature (~2020). If you choose that, It will show you the packet diagram in that paticulat packet
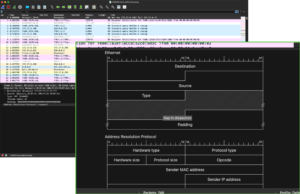
But, if you right click in the box and choose Show Field Values It will show the actual packet as it represents each section of diagram.
Settings
Get familiar with the settings. We will dive into them in other Sessions.
View Menu
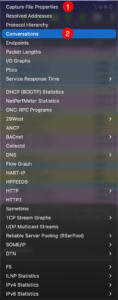
Statistics Menu
In Wireshark, there is a concept of Profiles you can use these to have specific setting for particular things you are troublehsooting. You may have buttons, color filters etc.
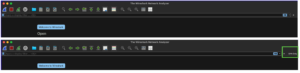
On the bottom right of the Wireshark screen, you will see the profile you are current on.
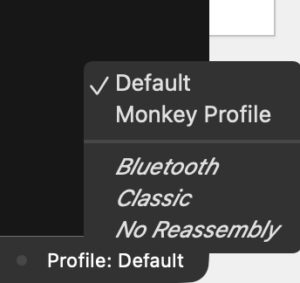
You can quickly swap between them.
You can also go to the Edit menus and choose Configuration Profiles
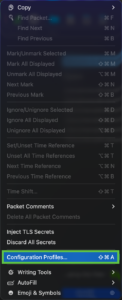
Once in there, you can create new profiles.
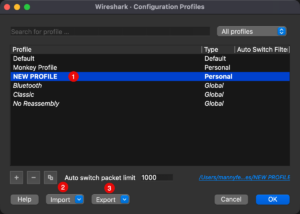
You can see that (1) is showing the NEW PROFILE i just created. Note (2) and (3) that will allow you to export your profiles and import some as well.
Buttons

- Start a new Capture
- Stop the current capture.
- Restart the current capture
- Capture settings (e.g. interface, capture filters, etc.)

- Open an existing capture (.pcap)
- Save the current capture
- Delete the current capture
- Reload the current capture (when you make color changes)

- Find a packet. This can be using a
display filter, aHex value, or aRegular Expression - Go to the
previouspacket. - Go to the
nextpacket - Go to a specific
packet number - Go to the first packet.
- Go to the last packet.
- Autoscroll to the last packet during a capture.

- Toggle the colors on and off
- Enlarge the main windows
- Reduce the main window
- Return the main windows to the default
- Fit colums to information shown.
- Go back to the window sizes originally set.
Check out my YouTube channel for the video version.
Recent posts
-

-

DNS is one of those technologies that quietly underpins... Full Story
-

BGP issues on FortiGate firewalls usually trace back to... Full Story
-

Every time your laptop talks to your router, a... Full Story
-

If you've spent any time configuring NAT on a... Full Story
-

If you have spent any time configuring firewall policies... Full Story
-

High availability on FortiGate is one of those features... Full Story
-

If you've configured SD-WAN on a FortiGate, you've almost... Full Story
-

FortiLink is the management protocol that turns a FortiSwitch... Full Story
-

FortiSwitches are pretty rock solid from Mean Time Between... Full Story
-

This is a quicky tip. Have you ever gone... Full Story
-

DNS is one of those quiet pieces of internet... Full Story
-

This article is an updated version of the previous... Full Story
-

You will add ns2 as a secondary (slave) BIND9... Full Story
-

In the process of deploying my lab, I needed... Full Story
-

RFC 8805, used to be known as Self-Correcting IP... Full Story
-

Years back, I wrote an article about certificate pinning. ... Full Story
-

FortiGates have the ability to send alerts to Microsoft... Full Story
-

In this post, I am going to walk through... Full Story
-

Troubleshooting VoIP on a FortiGate can feel like trying... Full Story
-

Prior to FortiOS 7.0, there were three commands to... Full Story
-

In this post, I am going to go over... Full Story
-

What we are going to do: We are going... Full Story
-

Choosing between FGCP (FortiGate Clustering Protocol) and FGSP (FortiGate... Full Story
-

Creating a VLAN on macOS (The "Pro" Move) A... Full Story
-

This blog post explores the logic behind how macOS... Full Story
-

Pretty Fly for a Wi-Fi Tell My Wi-Fi Love... Full Story
-

Part of my daily gig is creating BoMs (Bill-of-Materials)... Full Story
-

ICMP introduces several security risks, but careful filtering, rate... Full Story
-

The command diag debug application dhcps -1 enables full... Full Story
-

In the world of FortiOS, execute tac report is... Full Story
-

LLDP; What is it The Link Layer Discovery Protocol... Full Story
-

What it actually does When you run diagnose fdsm... Full Story
-

Monkey Bites are bite-sized, high-impact security insights designed for... Full Story
-

I have run macOS in macOS with Parallels but... Full Story
-

Don't be confused with my other FortiNAC posts where... Full Story
-

This is the third session in a multi-part article... Full Story
-

Today I was configuring key-based authentication on a FortiGate... Full Story
-

Netcat, often called the "Swiss Army knife" of networking,... Full Story
-

At its core, IEEE 802.1X is a network layer... Full Story
-

In case you did not see the previous FortiNAC... Full Story
-

This is our 5th session where we are going... Full Story
-

Now that we have Wireshark installed and somewhat configured,... Full Story
-

The Philosophy of Packet Analysis Troubleshooting isn't about looking... Full Story
-

You need to power on a box that is... Full Story
-

Executive Summary Objective This guide walks you end to... Full Story
-

1. Executive Summary Objective: This guide turns cryptic SMTP... Full Story