If you've spent any time configuring user authentication on... Full Story
By Manny Fernandez
February 25, 2026
Basics of Wireshark – Session 5 – Address Resolution, GEO IP, and Annotations
This is our 5th session where we are going to cover address resolution, GEO IP, and Annotating a .pcapng. In the previous articles Session 1, Session 2, Session 3, & Session 4.
Name Resolution
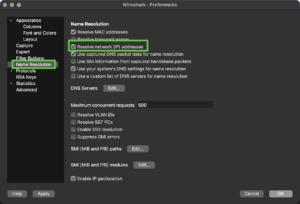
In order to use this next feature (edit resolved name), you will need to enable the Resolve network (IP) addresses.
Lets turn on the name resolution. Go to Wireshark Preferences, on macOS, its the Wireshark menu, then choose Preferences. Then hit OK.
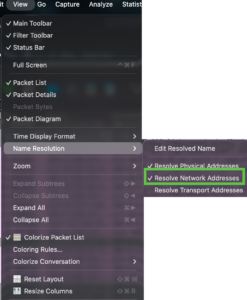
You can also access this feature from the View menu.

Once you enable the name resolution, you will see that any external public facing IPs or internal IPs if your machine is connected and you have an internal DNS assigned to your Wireshark machine.
Name the Packet
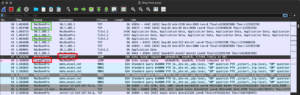
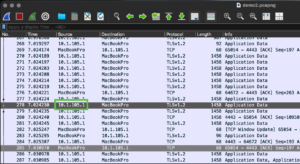
Let’s take a look at the Packet List before we make any changes.
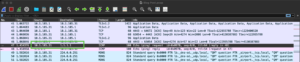
You can see that we have 1.1.1.1 on the destination and 10.1.105.31 as the source. If you are capturing many packets and looking at many different IPs, it may be necessary to name them.
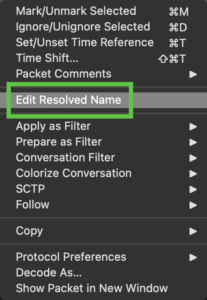
Now we can right click on the address we want to annotate and choose Edit Resolved Name
In my example, I am going to rename the 1.1.1.1 to Cloudflare and the 10.1.105.31 to MacBookPro.


Now when we look at the Packet List with the newly configured names, we can see those names appear on all packets being displayed.
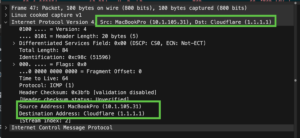
When you look at the Packet Details pane, you will be able to see both name and IP.
Pro Tip: If you save the file as a .pcap, it will NOT save any of the changes you made, however if you save the file as a .pcapng file, those changes will remain persistent. This is great when you are sending the annotated files to someone else.
Creating a Host File
If you do not have internal DNS to resolve local IPs and that is what you are trying to do, you can also create a host file. Do not confuse this with your /etc/hosts file. This is a different file but named the same.
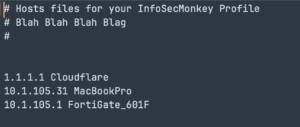
Here is the hosts file entries. We will need to save it with no extension. I like to save to the desktop and then move it as opposed to walking the folder down.
Note: Be mindful of your column width and don’t go crazy with the names. You will need to either scroll or adjust the column width.

On macOS, you can go to the Wireshark and then About Wireshark
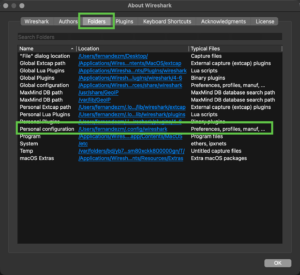
Choose Personal Configuration and double click. This will open the folder.
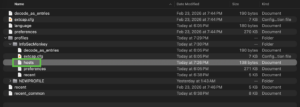
Her you can see the hosts file in the InfoSecMonkey profile folder.
Here you can see the original MacBookPro name for the previous example, but you can see 10.1.105.1 without a name.
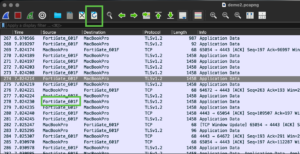
With the hosts file in place, you will need to hit the reload button on the button bar, and you will notice that the Packet List screen now shows the FortiGate_601F instead of the 10.1.105.1.
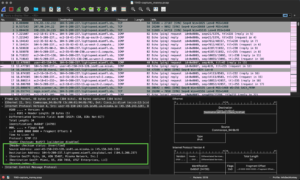
Adding Comments To A Packet
When you are collaborating or even when you are troubleshooting, it is sometimes important to comment on a particular packet. Wireshark allows you to do this.
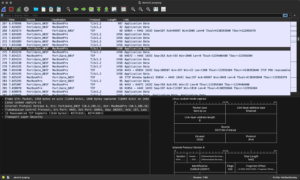
If you look at the Packet Detail pane, you can see that there are no comment sections. There is a couple of ways you can do this. The easiest way is to right click and choose Add New Comment
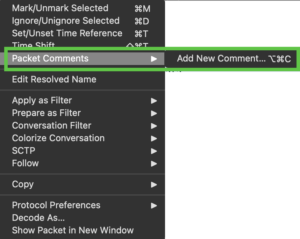
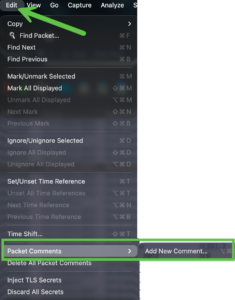
The other way is by going to the Edit menu, Packet Comments and then Add New Comment.
You will get a comment box where you can add you comment.
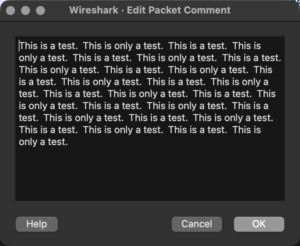
Click OK to accept the comments.
Geo-IP Resolution
Wireshark integrates MaxMind GeoIP2 (and the free GeoLite2) databases to provide geographical context to network traffic. This feature allows analysts to resolve IP addresses into physical locations and organizational data directly within the interface. You will need to download three databases.

Go to MaxMind Database Site
Sign up and download the free databases.
GeoLite2-ASN.mmdb
GeoLite2-City.mmdb
GeoLite2-Country.mmdb
The names of these files tell you everything you need to know. These DBs will give you Country, City and ASN for the IP addresses in you .pcap.
Now we are going to extract the databases to a folder and make note of it.
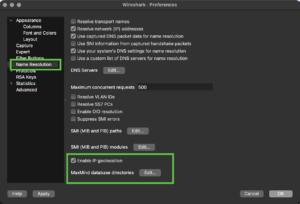
Go to Wireshark, then Preferences and click the Enable IP geolocation.
Note: You need to scroll down to see the path. It is not obvious that there is something you can scroll down to but there is.
You can see in the screenshot,

Next we will cover time and how to troubleshoot performance with certain protocols.
Hope this helps.
Recent posts
-

-

DNS is one of those technologies that quietly underpins... Full Story
-

BGP issues on FortiGate firewalls usually trace back to... Full Story
-

Every time your laptop talks to your router, a... Full Story
-

If you've spent any time configuring NAT on a... Full Story
-

If you have spent any time configuring firewall policies... Full Story
-

High availability on FortiGate is one of those features... Full Story
-

If you've configured SD-WAN on a FortiGate, you've almost... Full Story
-

FortiLink is the management protocol that turns a FortiSwitch... Full Story
-

FortiSwitches are pretty rock solid from Mean Time Between... Full Story
-

This is a quicky tip. Have you ever gone... Full Story
-

DNS is one of those quiet pieces of internet... Full Story
-

This article is an updated version of the previous... Full Story
-

You will add ns2 as a secondary (slave) BIND9... Full Story
-

In the process of deploying my lab, I needed... Full Story
-

RFC 8805, used to be known as Self-Correcting IP... Full Story
-

Years back, I wrote an article about certificate pinning. ... Full Story
-

FortiGates have the ability to send alerts to Microsoft... Full Story
-

In this post, I am going to walk through... Full Story
-

Troubleshooting VoIP on a FortiGate can feel like trying... Full Story
-

Prior to FortiOS 7.0, there were three commands to... Full Story
-

In this post, I am going to go over... Full Story
-

What we are going to do: We are going... Full Story
-

Choosing between FGCP (FortiGate Clustering Protocol) and FGSP (FortiGate... Full Story
-

Creating a VLAN on macOS (The "Pro" Move) A... Full Story
-

This blog post explores the logic behind how macOS... Full Story
-

Pretty Fly for a Wi-Fi Tell My Wi-Fi Love... Full Story
-

Part of my daily gig is creating BoMs (Bill-of-Materials)... Full Story
-

ICMP introduces several security risks, but careful filtering, rate... Full Story
-

The command diag debug application dhcps -1 enables full... Full Story
-

In the world of FortiOS, execute tac report is... Full Story
-

LLDP; What is it The Link Layer Discovery Protocol... Full Story
-

What it actually does When you run diagnose fdsm... Full Story
-

Monkey Bites are bite-sized, high-impact security insights designed for... Full Story
-

I have run macOS in macOS with Parallels but... Full Story
-

Don't be confused with my other FortiNAC posts where... Full Story
-

This is the third session in a multi-part article... Full Story
-

Today I was configuring key-based authentication on a FortiGate... Full Story
-

Netcat, often called the "Swiss Army knife" of networking,... Full Story
-

At its core, IEEE 802.1X is a network layer... Full Story
-

In case you did not see the previous FortiNAC... Full Story
-

This is our 5th session where we are going... Full Story
-

Now that we have Wireshark installed and somewhat configured,... Full Story
-

The Philosophy of Packet Analysis Troubleshooting isn't about looking... Full Story
-

1. High-Level Overview The FortiGate Wireless Intrusion Detection System... Full Story
-

What MIMO Actually Does Multiple Input, Multiple Output (MIMO)... Full Story
-

A practitioner's tour of the diagnose, test, and fnsysctl... Full Story