If you've spent any time configuring user authentication on... Full Story
By Manny Fernandez
May 15, 2026
Central NAT vs. Policy NAT in Fortinet FortiGate: A Practical Comparison
If you’ve spent any time configuring NAT on a FortiGate, you’ve probably noticed that Fortinet gives you two ways to do it: the traditional Policy NAT approach, where translation is built right into the firewall policy, and Central NAT, where SNAT and DNAT live in their own dedicated tables. Both get the job done, but they take very different philosophical approaches, and choosing the right one for your environment can save you a lot of pain down the road.
This post walks through how each mode works, what the order of operations looks like, and the pros and cons of each.
What is Policy NAT?
Policy NAT is FortiGate’s default and historically traditional approach to address translation. Every firewall policy has a NAT toggle, and when you enable it, the translation parameters (use outgoing interface IP, use a specific IP pool, etc.) are configured directly within that policy. Destination NAT is handled by attaching a Virtual IP (VIP) object as the destination address in the policy.
In other words, the policy is the NAT rule. Allow rule and translation rule are the same object.
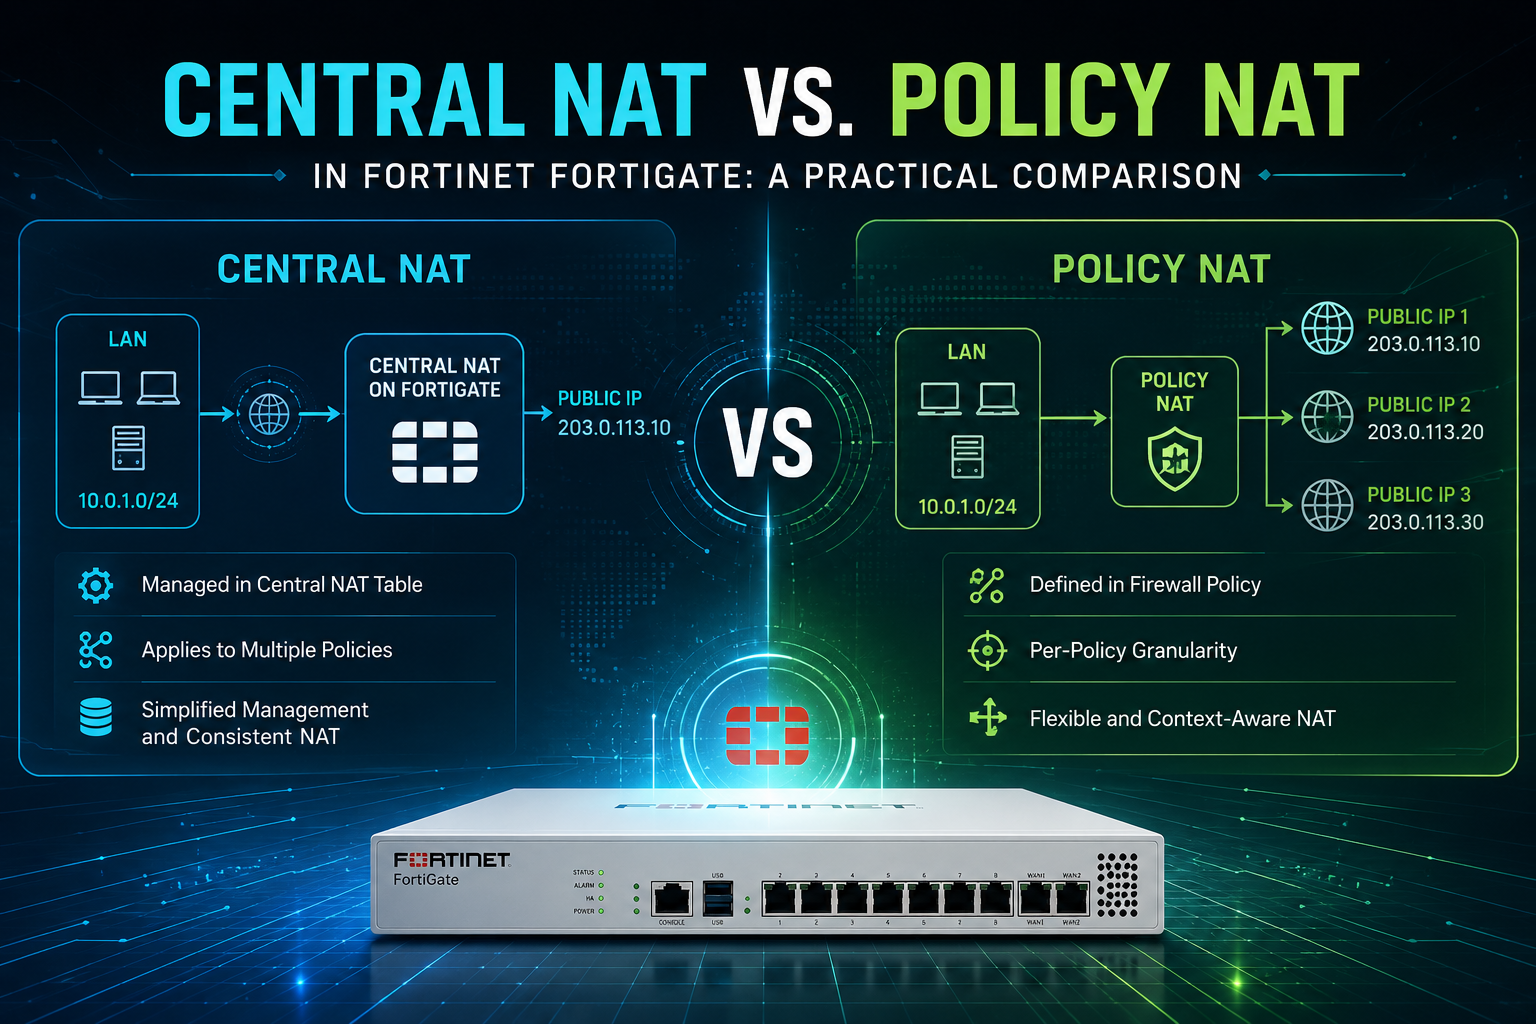
What is Central NAT?
Central NAT decouples translation from policy enforcement. Instead of embedding NAT settings in each firewall policy, FortiGate maintains two separate tables:
central-snat-map— handles all source NAT rulesDNAT & Virtual IPs table— handles all destination NAT rules
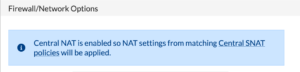
Firewall policies under Central NAT still permit or deny traffic, but they no longer carry NAT configuration. This model is closer to how Cisco ASA (8.3+), Palo Alto, and Check Point handle NAT — separate tables, separate logic. Central NAT is not enabled by default; it must be turned on via the CLI with config system settings and set central-nat enable. Once enabled, the NAT toggle inside IPv4 policies is hidden, and you must configure source NAT exclusively through the central-snat-map.
Default Behavior
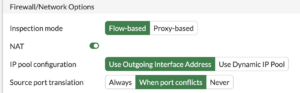
Out of the box, every FortiGate ships in Policy NAT mode. If you create a new policy and don’t enable the NAT checkbox, no source translation happens — traffic egresses with its original source IP. If you do enable NAT, the default behavior is to use the outgoing interface’s IP address (essentially port address translation / overload) unless you specify an IP pool.
For destination NAT in Policy mode, nothing happens until you create a VIP object and reference it as the destination in a policy.
When Central NAT is enabled, the default changes meaningfully. Firewall policies no longer perform any source translation regardless of any prior settings. If a packet matches a firewall policy but doesn’t match any rule in the central-snat-map, no SNAT occurs — the packet egresses with its original source. To get translation, you must explicitly add an entry to the central SNAT table. DNAT continues to work via Virtual IP objects, but in Central NAT mode the VIP is matched independently rather than being tied to a specific policy as the destination address.
Order of Operations
This is where the two modes really diverge, and understanding the packet flow is critical for writing policies that actually work.
Policy NAT Order of Operations
In Policy NAT mode, the flow looks like this:
Ingress– packet arrives on an interfaceDoS sensor and interface policy checksDNAT / VIP lookup– if the destination matches a VIP referenced in any policy, the destination IP is translatedRouting decision– based on the post-DNAT destination IPStateful inspection and policy lookup– the policy is matched using the post-DNAT (real internal) destination and the pre-NAT sourceUTM / security profile inspection(IPS, AV, web filter, etc.)SNAT– applied based on the matched policy’s NAT settingsEgress– packet leaves the outgoing interface
A key quirk here: VIPs are evaluated globally during the DNAT step, which is before the policy match. This is why a “Block Country” deny policy placed at the top of your rulebase will not block traffic destined to a VIP unless you enable set match-vip enable on the deny policy. The destination has already been translated to the internal IP before the deny rule gets a chance to evaluate.
Central NAT Order of Operations
Central NAT shifts some of this logic into dedicated stages:
Ingress– packet arrives on an interfaceDoS sensor and interface policy checksCentral DNAT / VIP lookup– destination IP is translated if a VIP matchesRouting decision– based on the post-DNAT destination IPFirewall policy lookup– policies are matched using the post-DNAT destination and pre-NAT source, but no NAT is configured hereUTM / security profile inspectionCentral SNAT map lookup– source IP is translated based on the matching central-snat-map entry (read top-down, first match wins)Egress– packet leaves the outgoing interface
The big behavioral difference: in Central NAT, the SNAT decision is made independently of the firewall policy match. You can have a single permit policy and use multiple central SNAT entries to translate different source ranges to different IP pools based on protocol, port, source interface, or destination, without ever creating duplicate firewall policies just to get different NAT behavior.
This also means the “match-vip” problem largely goes away. Because the central DNAT/VIP table is its own entity and the deny policies match against the translated destination, the order-of-evaluation gotchas from Policy NAT mode become much less of an issue.
Pros and Cons
Policy NAT
Pros
- Enabled by default, zero configuration overhead to get started
- Everything for a given flow lives in one place; reading a single policy tells you both “is this allowed” and “how is it translated”
- Supports dynamic NAT rules that translate a single internal address to different external addresses based on the service (e.g.,
10.10.10.1:HTTP →20.10.10.1,10.10.10.1:SMTP →20.10.10.2). This is actually not possible in Central NAT mode. - Familiar territory for long-time Fortinet admins
- Granular per-policy control without juggling separate tables
Cons
- Rule sprawl: if you need different NAT behavior for different traffic types, you often end up duplicating policies just to attach different IP pools
- Harder to audit at scale, to understand all your NAT, you have to read through every firewall policy
- VIPs interact strangely with deny policies due to the order of operations (the
match-vipissue) - Migrations from other vendors (Cisco, Palo Alto, Check Point) where NAT and security are separate often balloon in policy count when forced into this model
Central NAT
Pros
- Clean separation of concerns, security rules in one place, NAT rules in another
- Much easier to audit and document NAT behavior; one table to read instead of N policies
- More granular control over both IP and port translation (you can fix source ports, define port ranges, etc.)
- Familiar to engineers coming from Cisco ASA 8.3+, Palo Alto, or Check Point
- Eliminates most of the VIP-vs-deny-policy quirks of Policy NAT
- Significantly simpler for vendor migrations that originate from NAT-separated platforms
Cons
- Not enabled by default, you have to explicitly turn it on, and toggling it can cause disruption in a production environment
- Cannot translate the same source IP to different external addresses based purely on service/protocol distinction in the way Policy NAT can
- Adds a layer of indirection, troubleshooting requires checking both the policy table and the central SNAT map
- Some FortiGate features and older documentation still assume Policy NAT mode
- Enabling Central NAT after the fact requires reworking existing NAT configurations; it’s a one-way move in practice for most production deployments
- IP pool one-to-one mapping behavior across subnets can be non-deterministic, which has bitten engineers expecting strict 1:1 translation
Which Should You Choose?
The honest answer is: it depends on what you’re building and where you’re coming from.
If you’re running a small-to-medium FortiGate deployment with straightforward NAT needs, a couple of VIPs, basic outbound PAT to the internet, Policy NAT is perfectly fine and is what most Fortinet documentation, training, and community examples assume.
If you’re managing a larger environment with many NAT rules, multiple IP pools, complex outbound translation requirements, or migrating from a vendor where NAT and policy are separate constructs, Central NAT will almost certainly make your life easier. It scales better operationally and produces a cleaner, more auditable configuration. I normally use Central NAT because I was used to Cisco and PAN before and they have separate NAT Tables.
One important caveat: switching modes on a live FortiGate is disruptive. Make the decision early in your design process and stick with it.
Wrapping Up
Both Policy NAT and Central NAT can accomplish the same translation outcomes, the difference is how you organize the rules and where in the packet flow the translation decisions are made. Policy NAT keeps things consolidated and simple for smaller, traditional deployments. Central NAT trades that simplicity for scalability and a cleaner separation between “what’s allowed” and “how it’s translated.”
Knowing the order of operations for both, especially where DNAT happens relative to routing and policy matching, is the single most important thing for troubleshooting NAT issues on a FortiGate, regardless of which mode you’ve chosen.
Recent posts
-

-

DNS is one of those technologies that quietly underpins... Full Story
-

BGP issues on FortiGate firewalls usually trace back to... Full Story
-

Every time your laptop talks to your router, a... Full Story
-

If you've spent any time configuring NAT on a... Full Story
-

If you have spent any time configuring firewall policies... Full Story
-

High availability on FortiGate is one of those features... Full Story
-

If you've configured SD-WAN on a FortiGate, you've almost... Full Story
-

FortiLink is the management protocol that turns a FortiSwitch... Full Story
-

FortiSwitches are pretty rock solid from Mean Time Between... Full Story
-

This is a quicky tip. Have you ever gone... Full Story
-

DNS is one of those quiet pieces of internet... Full Story
-

This article is an updated version of the previous... Full Story
-

You will add ns2 as a secondary (slave) BIND9... Full Story
-

In the process of deploying my lab, I needed... Full Story
-

RFC 8805, used to be known as Self-Correcting IP... Full Story
-

Years back, I wrote an article about certificate pinning. ... Full Story
-

FortiGates have the ability to send alerts to Microsoft... Full Story
-

In this post, I am going to walk through... Full Story
-

Troubleshooting VoIP on a FortiGate can feel like trying... Full Story
-

Prior to FortiOS 7.0, there were three commands to... Full Story
-

In this post, I am going to go over... Full Story
-

What we are going to do: We are going... Full Story
-

Choosing between FGCP (FortiGate Clustering Protocol) and FGSP (FortiGate... Full Story
-

Creating a VLAN on macOS (The "Pro" Move) A... Full Story
-

This blog post explores the logic behind how macOS... Full Story
-

Pretty Fly for a Wi-Fi Tell My Wi-Fi Love... Full Story
-

Part of my daily gig is creating BoMs (Bill-of-Materials)... Full Story
-

ICMP introduces several security risks, but careful filtering, rate... Full Story
-

The command diag debug application dhcps -1 enables full... Full Story
-

In the world of FortiOS, execute tac report is... Full Story
-

LLDP; What is it The Link Layer Discovery Protocol... Full Story
-

What it actually does When you run diagnose fdsm... Full Story
-

Monkey Bites are bite-sized, high-impact security insights designed for... Full Story
-

I have run macOS in macOS with Parallels but... Full Story
-

Don't be confused with my other FortiNAC posts where... Full Story
-

This is the third session in a multi-part article... Full Story
-

Today I was configuring key-based authentication on a FortiGate... Full Story
-

Netcat, often called the "Swiss Army knife" of networking,... Full Story
-

At its core, IEEE 802.1X is a network layer... Full Story
-

In case you did not see the previous FortiNAC... Full Story
-

This is our 5th session where we are going... Full Story
-

Now that we have Wireshark installed and somewhat configured,... Full Story
-

The Philosophy of Packet Analysis Troubleshooting isn't about looking... Full Story
-

1. High-Level Overview The FortiGate Wireless Intrusion Detection System... Full Story
-

What MIMO Actually Does Multiple Input, Multiple Output (MIMO)... Full Story
-

A practitioner's tour of the diagnose, test, and fnsysctl... Full Story