If you've spent any time configuring user authentication on... Full Story
By Manny Fernandez
June 24, 2026
Deploying FortiGate Load Balance Health Check Monitors for High-Availability Virtual Servers
1. Executive Summary
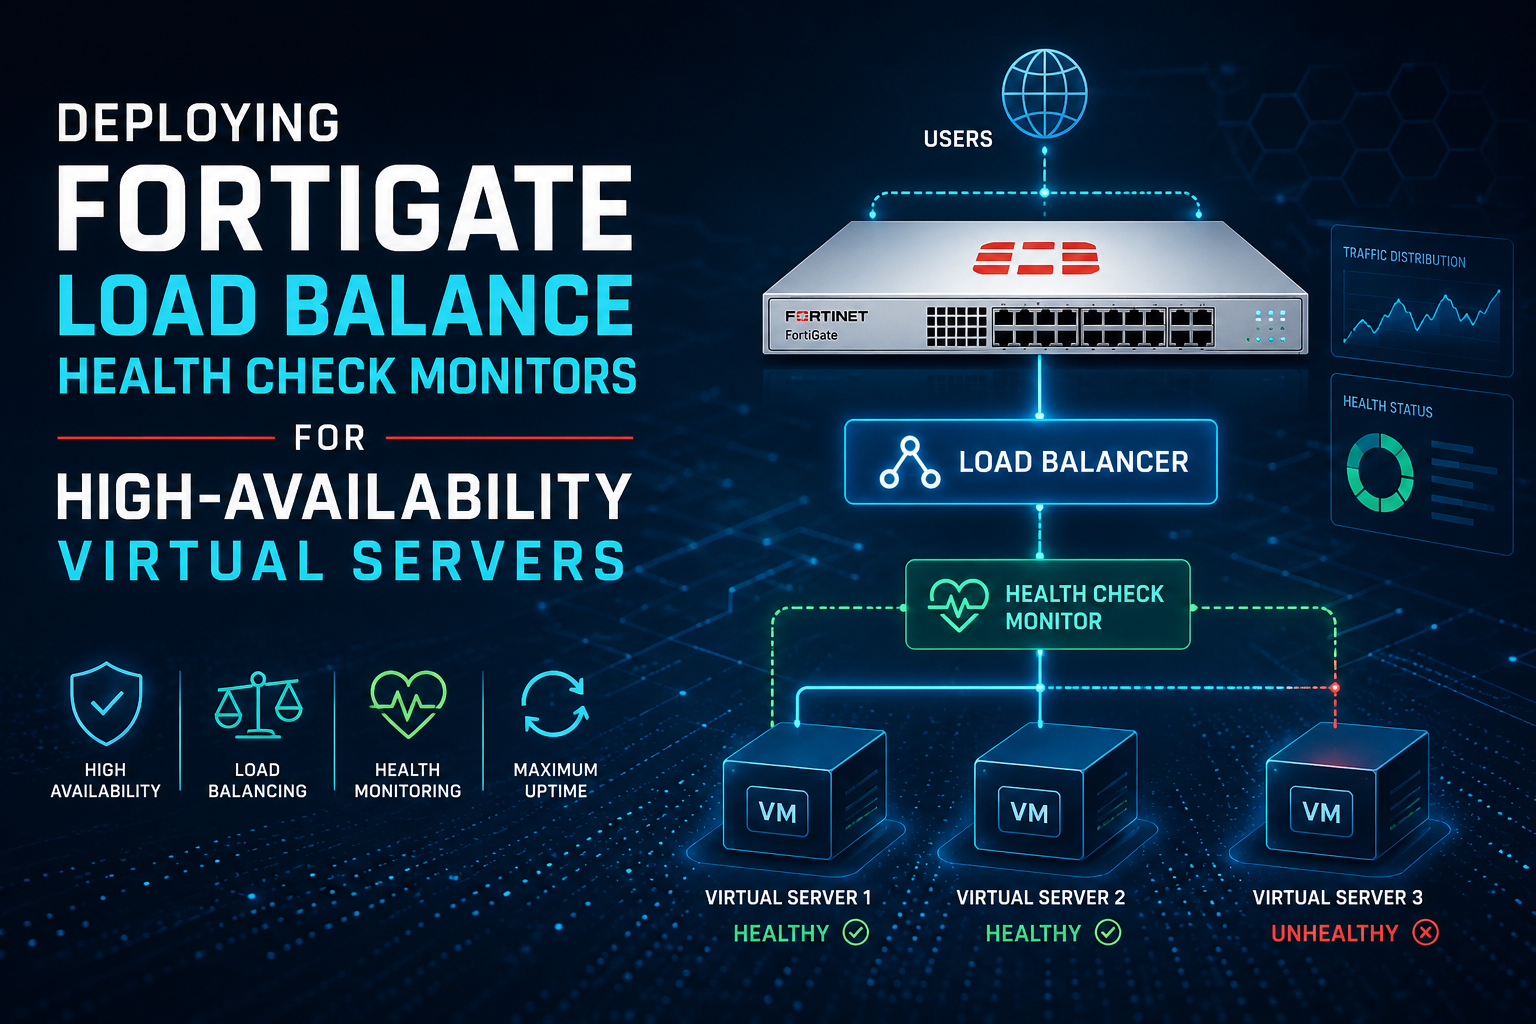
Objective: This guide documents how to build, apply, and validate Load Balance Monitors (config firewall ldb-monitor) on a FortiGate to provide active health checking for server load balancing virtual servers configured under Policy and Objects. When a real server fails its health check, FortiOS automatically removes it from the load balancing pool, preserving service availability without manual intervention.
Target Audience: Network Engineers, Security Engineers, and System Administrators responsible for FortiGate firewall policy and server publishing. Familiarity with FortiOS CLI and the GUI is assumed.
2. Prerequisites and Architecture
Assumed Knowledge:
– Working knowledge of FortiOS firewall policy and the Policy and Objects menu tree.
– Basic understanding of TCP/UDP, HTTP, ICMP, DNS, and SSL handshakes.
– Comfort editing configuration through both the GUI and the CLI.
– Conceptual understanding of server load balancing (Virtual Server / VIP type server-load-balance).
Environment and Lab Requirements:
– A FortiGate running FortiOS 7.2, 7.4, or 7.6. Health check monitor syntax is consistent across these releases, with HTTP/HTTPS and DNS options most fully featured in 7.4 and later.
– At least two backend real servers reachable from the FortiGate (a web pool is used in the examples).
– Load balancing is licensed and included in the base FortiOS feature set. No add-on license is required, but the feature is only visible in the GUI when Load Balance is enabled under System > Feature Visibility.
– Optional lab platform: a FortiGate VM in EVE-NG, GNS3, Proxmox, or a public cloud, with two backend Linux/Windows web hosts.
Component Table:
| Component | Role | Example Value |
| FortiGate (firewall) | Load balancer and health checker | mgmt FQDN: fgt-edge-01, mgmt IP 10.10.0.1 |
| Health Check Monitor | Active probe definition (ldb-monitor) | HC-HTTP-WEB |
| Virtual Server (VIP) | Front-end published service | VIP-WEB-PROD, ext IP 203.0.113.10:443 |
| Real Server 1 | Backend pool member | 10.20.0.11:443 |
| Real Server 2 | Backend pool member | 10.20.0.12:443 |
| Firewall Policy | Permits traffic to the virtual server | POL-PUBLISH-WEB |
Logical flow: Client to Virtual Server (203.0.113.10:443) to FortiGate load balancer to Real Server pool. The ldb-monitor probes each real server independently; failed members are marked down and excluded from new sessions.
3. Step-by-Step Implementation Workflow
Phase 1: Enable Load Balance Feature Visibility
The Goal: Expose the Virtual Server and health check objects in the GUI.
The Action: Turn on the Load Balance feature so the relevant menu items appear under Policy and Objects.
The Code/CLI/Config:
config system settings
set gui-load-balance enable
end
GUI Verification: Navigate to System > Feature Visibility, locate Load Balance, toggle it on, and click **Apply**. The Policy & Objects > Virtual Servers and Health Check sections become available.
Phase 2: Define the Health Check Monitor
The Goal: Create the active probe that determines whether a real server is up.
The Action: Build an ldb-monitor object. The example creates an HTTP monitor that requests a specific URL and matches an expected status code, which is far more reliable than a simple TCP or PING check because it validates the application layer, not just reachability.
The Code/CLI/Config:
config firewall ldb-monitor
edit "HC-HTTP-WEB"
set type http
set interval 10
set timeout 2
set retry 3
set port 80
set http-get "/health"
set http-match "200"
set http-max-redirects 0
next
end
Field meaning:
– type selects the probe protocol: ping, tcp, http, https, dns, or passive-sip.
– interval is the seconds between probes (default 10).
– timeout is the seconds to wait for a response before counting a failure (default 2).
– retry is the number of consecutive failures before the server is marked down (default 3).
– port overrides the probe port. Leave at 0 to inherit the real server port.
– http-get is the URL path requested. http-match is the string that must appear in the response (commonly a status code or body token).
For an HTTPS health check that validates the SSL handshake and an HTTP response:
config firewall ldb-monitor
edit "HC-HTTPS-WEB"
set type https
set interval 10
set timeout 2
set retry 3
set port 443
set http-get "/health"
set http-match "200"
next
end
For a lightweight reachability check (Layer 3 only) or a TCP port check (Layer 4):
config firewall ldb-monitor
edit "HC-PING"
set type ping
set interval 5
set timeout 2
set retry 3
next
edit "HC-TCP-443"
set type tcp
set port 443
set interval 10
set timeout 2
set retry 3
next
end
For a DNS service health check that validates a resolvable record:
config firewall ldb-monitor
edit "HC-DNS"
set type dns
set port 53
set dns-protocol udp
set dns-request-domain "health.example.com"
set dns-match-ip 10.20.0.11
set interval 10
set timeout 2
set retry 3
next
end
GUI Verification: Go to Policy & Objects > Health Check, click Create New, set Name, Type, Interval, Timeout, Retry, and (for HTTP/HTTPS) the URL and Matched Content. Save.
Phase 3: Create the Virtual Server and Attach the Monitor
The Goal: Publish the front-end service and bind the health check to the real server pool.
The Action: Create a server-load-balance type VIP, define real servers, and reference the monitor at the virtual server level (it applies to every real server in the pool).
The Code/CLI/Config:
config firewall vip
edit "VIP-WEB-PROD"
set type server-load-balance
set extip 203.0.113.10
set extintf "wan1"
set server-type https
set ldb-method round-robin
set extport 443
set monitor "HC-HTTPS-WEB"
config realservers
edit 1
set ip 10.20.0.11
set port 443
next
edit 2
set ip 10.20.0.12
set port 443
next
end
next
end
Notes:
– monitor accepts one or more ldb-monitor names. If multiple are listed, a real server must pass all of them to be considered up.
– ldb-method controls distribution: static, round-robin, weighted, least-session, least-rtt, first-alive, or http-host.
– A per-real-server set healthcheck enable and individual set monitor override is available in some FortiOS versions if you need a different probe per backend; otherwise the virtual-server-level monitor is inherited.
GUI Verification: Go to Policy & Objects > Virtual Servers, open VIP-WEB-PROD, confirm Health Check lists HC-HTTPS-WEB, and confirm both real servers appear under the server pool.
Phase 4: Create the Firewall Policy
The Goal: Permit inbound traffic to the published virtual server.
The Action: Reference the virtual server as the destination in a firewall policy. With a server-load-balance VIP, no separate static NAT is required; the VIP handles the translation to the pool.
The Code/CLI/Config:
config firewall policy
edit 0
set name "POL-PUBLISH-WEB"
set srcintf "wan1"
set dstintf "port2"
set srcaddr "all"
set dstaddr "VIP-WEB-PROD"
set action accept
set schedule "always"
set service "HTTPS"
set logtraffic all
next
end
GUI Verification: Go to Policy & Objects > Firewall Policy, confirm the policy exists, the destination is VIP-WEB-PROD, and the policy is enabled.
4. Verification and Validation
Check real server health state from the CLI. This is the primary command and shows each member as alive or dead:
diagnose firewall vip realserver list
Successful output shows each real server with a status of alive and increments the active session count under load. A failed member shows dead.
Inspect the load balance monitor counters:
diagnose firewall vip virtual-server real-server VIP-WEB-PROD
This displays per-real-server health, current sessions, and the configured monitor.
Confirm the monitor object is committed:
show firewall ldb-monitor HC-HTTPS-WEB
Generate test traffic and watch distribution:
diagnose sniffer packet any 'host 203.0.113.10 and port 443' 4
Validate the probe traffic itself. From the FortiGate you should see periodic probes leaving toward each real server on the monitor port:
diagnose sniffer packet any 'host 10.20.0.11 and port 443' 4
What success looks like: diagnose firewall vip realserver list shows every member alive, probe packets leave the FortiGate at the configured interval, and client connections to 203.0.113.10:443 are distributed across both real servers. When you stop the web service on one backend, that member transitions to dead after retry consecutive failures, and new sessions land only on the surviving server.
5. Troubleshooting and Gotchas
Gotcha 1: Real server flaps or never comes up because the HTTP match string is wrong. A type http monitor with http-match "200" expects the literal string 200 in the response. If your health endpoint returns a redirect (301/302) or a body without that token, the probe fails even though the server is healthy.
– Diagnose: diagnose firewall vip realserver list shows the member dead. Run a manual probe equivalent from a host: curl -i http://10.20.0.11/health and inspect the status line and body.
– Resolve: align http-get with a real endpoint and set http-match to a string that genuinely appears (status code or a known body token). Set http-max-redirects appropriately if the endpoint redirects.
Gotcha 2: HTTPS monitor fails due to SSL or SNI mismatch. A type https probe performs a TLS handshake. If the backend requires SNI or presents a certificate the probe rejects, the handshake fails and the server is marked down.
– Diagnose: sniff probe traffic with diagnose sniffer packet any host 10.20.0.11 and port 443' 6 and look for a reset or incomplete handshake. Confirm the backend serves the expected vhost without mandatory SNI.
– Resolve: where the backend tolerates it, use a `type tcp` probe on port 443 to validate listener availability without full TLS validation, or correct the backend TLS configuration so the probe handshake completes.
Gotcha 3: All members appear down because the FortiGate has no route or source reachability to the pool. Probes originate from the FortiGate egress interface toward the real server subnet. If routing, an intervening firewall, or a missing return path blocks the probe, every member fails simultaneously.
– Diagnose: execute ping 10.20.0.11 and diagnose sniffer packet any 'host 10.20.0.11' 4 to confirm probes leave and replies return. Check get router info routing-table all for a route to the pool subnet.
– Resolve: add the required route, fix the intervening ACL, or verify the real server firewall permits the FortiGate source IP. Confirm the `port` and type of the monitor match a service the backend actually listens on.
Additional tuning note: Aggressive timers (interval 5, timeout 2, retry 3) detect failures in roughly 15 seconds but increase probe load. For large pools, widen the interval or use a lightweight ping or tcp probe to reduce backend overhead, reserving http/https probes for services where application-layer validation is essential.
6. Central NAT Considerations
If the FortiGate runs in Central NAT mode (set central-nat enable), destination NAT is handled by the central DNAT and Virtual IPs table and injected directly into the kernel, rather than being activated by a VIP reference inside a firewall policy. The load balancing and health check behavior is unchanged, but where the VIP is referenced and how the policy matches both shift. The key rule: in Central NAT mode the VIP is a standalone object and is NOT placed in the policy destination.
What does not change
The ldb-monitor objects, the monitor binding on the virtual server, the load balance method, and every verification command behave identically. Health checking happens between the FortiGate and the real servers and is independent of NAT mode. diagnose firewall vip realserver list and the sniffer probes are unaffected.
Change 1: Enable VIP status explicitly
In Central NAT mode the VIP is no longer activated by a policy reference, so its status must be enabled on the object itself.
config firewall vip
edit "VIP-WEB-PROD"
set status enable
set type server-load-balance
set extip 203.0.113.10
set extintf "wan1"
set server-type https
set ldb-method round-robin
set extport 443
set monitor "HC-HTTPS-WEB"
config realservers
edit 1
set ip 10.20.0.11
set port 443
next
edit 2
set ip 10.20.0.12
set port 443
next
end
next
end
Change 2: Reference the mapped address in the policy, not the VIP
DNAT fires before policy evaluation, so the firewall policy matches post-translation traffic. Use the real server (mapped) address or an address group, not the VIP, as the destination. There is no SNAT section in the policy; Central SNAT rules are applied separately. Optionally set match-vip on the policy so it matches only traffic that was actually DNATed, rather than any traffic to the mapped IP.
config firewall address
edit "RS-WEB-POOL"
set subnet 10.20.0.0 255.255.255.0
next
end
# Firewall Policy
config firewall policy
edit 0
set name "POL-PUBLISH-WEB"
set srcintf "wan1"
set dstintf "port2"
set srcaddr "all"
set dstaddr "RS-WEB-POOL"
set action accept
set schedule "always"
set service "HTTPS"
set match-vip enable
set logtraffic all
next
end
Note: In Central NAT mode the VIP can also match local-out traffic. If you need to restrict that, apply srcintf-filter on the VIP object to scope which ingress interfaces the DNAT matches.
Change 3: Migration order matters
VIP objects carry over between modes, but a VIP that is assigned to a firewall policy in non-Central NAT mode must be unassigned before switching to Central NAT mode, or the toggle will fail. Follow this order:
– Remove the VIP from the dstaddr of the publishing policy (POL-PUBLISH-WEB).
– set central-nat enable under config system settings.
– Rebuild the policy against the mapped (real server) address as shown above, and confirm the VIP status is enabled.
Verification under Central NAT
Health check validation is identical. To additionally confirm the DNAT is installed in the kernel and forwarding to the pool, inspect the policy/DNAT rope table:
diagnose firewall iprope list 100000
You should see the VIP external IP as the destination with a nat base mapping to the real server address, alongside every pool member showing alive in diagnose firewall vip realserver list.
Recent posts
-

-

DNS is one of those technologies that quietly underpins... Full Story
-

BGP issues on FortiGate firewalls usually trace back to... Full Story
-

Every time your laptop talks to your router, a... Full Story
-

If you've spent any time configuring NAT on a... Full Story
-

If you have spent any time configuring firewall policies... Full Story
-

High availability on FortiGate is one of those features... Full Story
-

If you've configured SD-WAN on a FortiGate, you've almost... Full Story
-

FortiLink is the management protocol that turns a FortiSwitch... Full Story
-

FortiSwitches are pretty rock solid from Mean Time Between... Full Story
-

This is a quicky tip. Have you ever gone... Full Story
-

DNS is one of those quiet pieces of internet... Full Story
-

This article is an updated version of the previous... Full Story
-

You will add ns2 as a secondary (slave) BIND9... Full Story
-

In the process of deploying my lab, I needed... Full Story
-

RFC 8805, used to be known as Self-Correcting IP... Full Story
-

Years back, I wrote an article about certificate pinning. ... Full Story
-

FortiGates have the ability to send alerts to Microsoft... Full Story
-

In this post, I am going to walk through... Full Story
-

Troubleshooting VoIP on a FortiGate can feel like trying... Full Story
-

Prior to FortiOS 7.0, there were three commands to... Full Story
-

In this post, I am going to go over... Full Story
-

What we are going to do: We are going... Full Story
-

Choosing between FGCP (FortiGate Clustering Protocol) and FGSP (FortiGate... Full Story
-

Creating a VLAN on macOS (The "Pro" Move) A... Full Story
-

This blog post explores the logic behind how macOS... Full Story
-

Pretty Fly for a Wi-Fi Tell My Wi-Fi Love... Full Story
-

Part of my daily gig is creating BoMs (Bill-of-Materials)... Full Story
-

ICMP introduces several security risks, but careful filtering, rate... Full Story
-

The command diag debug application dhcps -1 enables full... Full Story
-

In the world of FortiOS, execute tac report is... Full Story
-

LLDP; What is it The Link Layer Discovery Protocol... Full Story
-

What it actually does When you run diagnose fdsm... Full Story
-

Monkey Bites are bite-sized, high-impact security insights designed for... Full Story
-

I have run macOS in macOS with Parallels but... Full Story
-

Don't be confused with my other FortiNAC posts where... Full Story
-

This is the third session in a multi-part article... Full Story
-

Today I was configuring key-based authentication on a FortiGate... Full Story
-

Netcat, often called the "Swiss Army knife" of networking,... Full Story
-

At its core, IEEE 802.1X is a network layer... Full Story
-

In case you did not see the previous FortiNAC... Full Story
-

This is our 5th session where we are going... Full Story
-

Now that we have Wireshark installed and somewhat configured,... Full Story
-

The Philosophy of Packet Analysis Troubleshooting isn't about looking... Full Story
-

Executive Summary A FortiGate is only as flexible as... Full Story
-

1. Title & Executive Summary Objective: This guide explains... Full Story
-

1. Title and Executive Summary Title: Power over Ethernet Standards... Full Story