
If you've spent any time configuring user authentication on... Full Story
By Manny Fernandez
October 5, 2026
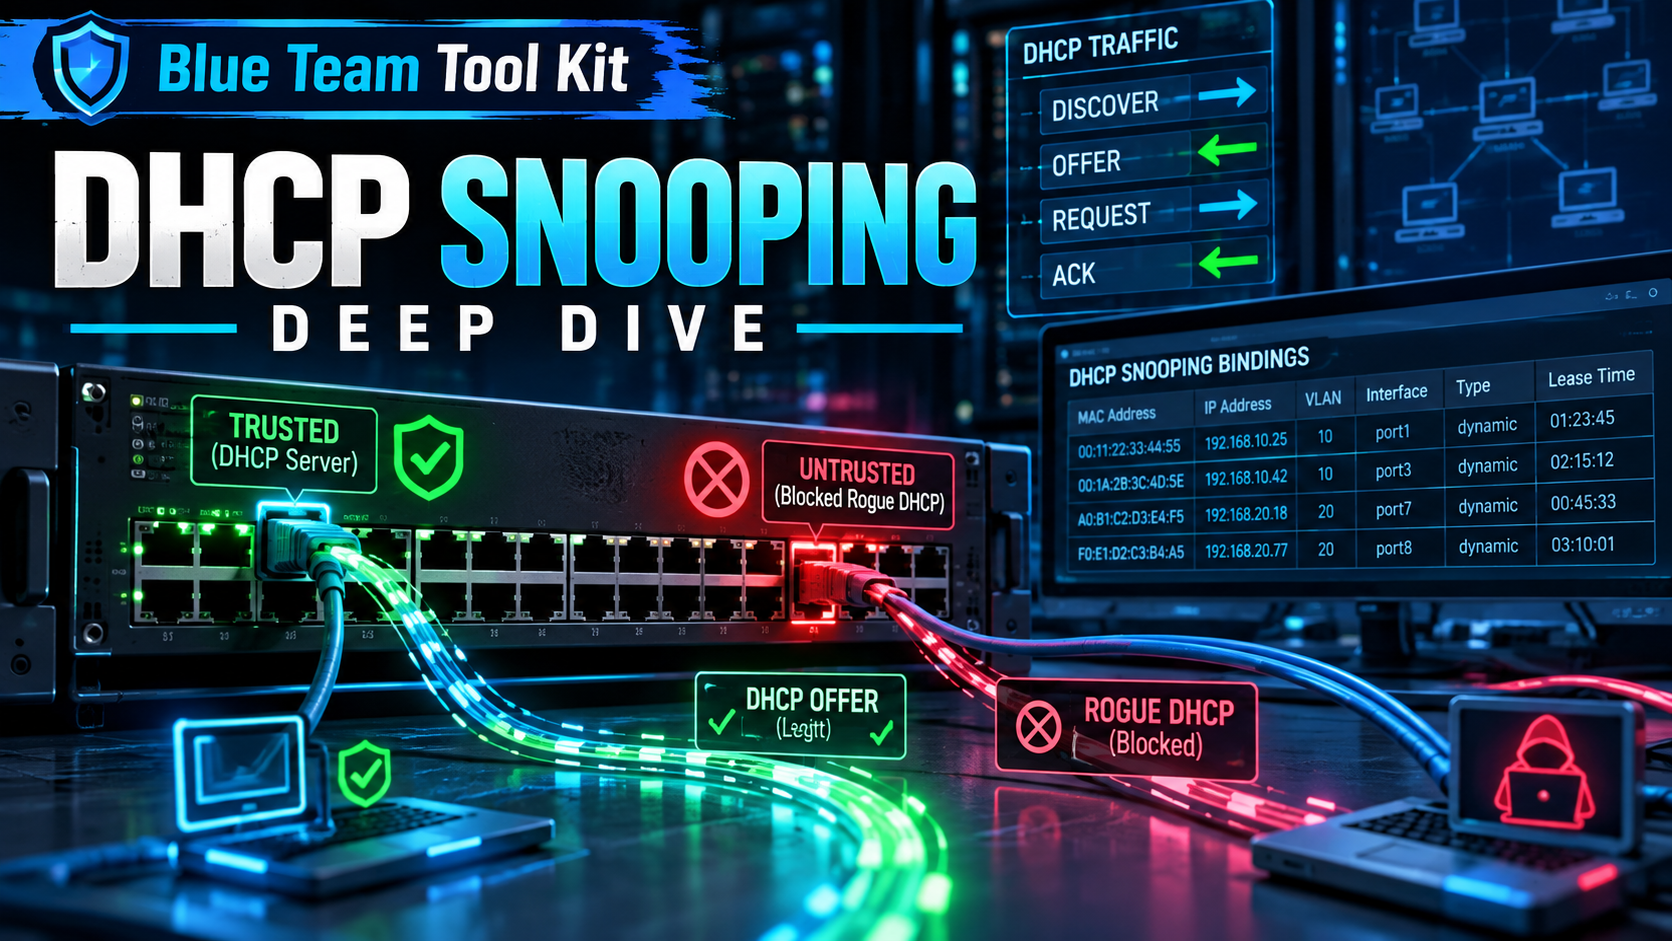
DHCP Snooping Deep Dive Building the Binding Table That Your Entire Layer 2 Security Stack Depends On
| Field | Detail |
|---|---|
| Objective | Explain exactly what DHCP snooping inspects, what it drops, and what it builds, then deploy it end to end on FortiSwitch (FortiLink-managed and standalone) with a multi-vendor reference for Cisco IOS-XE, Juniper EX, and Aruba AOS-CX. |
| Target audience | Network and security engineers who own access-layer switching, SEs designing campus or OT edge security, and anyone preparing to layer Dynamic ARP Inspection or IP Source Guard on top of snooping. |
| Platforms | FortiOS 7.4 / 7.6 with FortiLink-managed FortiSwitch, FortiSwitchOS 7.4+, Cisco IOS-XE, Junos ELS, AOS-CX |
Contents
- Executive Summary
- Why DHCP Is an Attack Surface
- How DHCP Snooping Works
- The Downstream Stack: What Consumes the Binding Table
- Prerequisites and Lab Architecture
- Step-by-Step Implementation (FortiLink-Managed FortiSwitch)
- Standalone FortiSwitchOS Equivalent
- Multi-Vendor Reference
- Verification and Validation
- Troubleshooting and Gotchas
- Best Practices Checklist
- Final Word
Executive Summary
DHCP is a protocol built on blind trust. A client broadcasts a request and accepts the first answer it hears, including the default gateway and DNS servers that will carry every byte it sends for the next lease period. Anything on the same broadcast domain can answer. That single design decision is why a laptop running a rogue DHCP service, a misconfigured home router plugged into a wall jack, or a five-line Scapy script can quietly become the default gateway for an entire VLAN.
DHCP snooping fixes that at the access switch. It splits every port into trusted and untrusted, drops server-side DHCP messages that arrive anywhere they should not, and records every successful lease into a binding table of MAC, IP, VLAN, port, and lease time. That table is the real prize: it is the authoritative source of truth that Dynamic ARP Inspection (DAI) and IP Source Guard (IPSG) consume to stop ARP poisoning and IP spoofing. Snooping alone stops rogue servers. Snooping plus its consumers closes most of the Layer 2 attack surface.
Note: What you will build
A FortiGate serving DHCP on vlan10 (10.0.10.0/24) through a FortiLink-managed FortiSwitch, with snooping enforced on access ports, an allowed-server list, Option 82 location tagging, static bindings for fixed-IP hosts, and DAI layered on top. Then you will prove it works by standing up a rogue DHCP server and watching its offers die at the port.
Why DHCP Is an Attack Surface
Before you can reason about what snooping filters, you need a precise model of who sends what. DHCPv4 (RFC 2131) uses UDP 67 for servers and relay agents and UDP 68 for clients. Every message type has a natural direction, and snooping enforces that direction at the port level.
| Message | Sent By | Purpose | Snooping Relevance |
|---|---|---|---|
| DHCPDISCOVER | Client | Locate available servers (broadcast) | Allowed on untrusted ports, rate limited |
| DHCPOFFER | Server | Propose an address and options | Dropped on untrusted ports |
| DHCPREQUEST | Client | Accept an offer, renew, or rebind | Allowed on untrusted ports |
| DHCPACK | Server | Commit the lease | Dropped on untrusted ports; creates the binding when seen on trusted |
| DHCPNAK | Server | Reject a request | Dropped on untrusted ports; removes binding |
| DHCPRELEASE | Client | Give the address back | Validated against binding port; spoofed releases dropped |
| DHCPDECLINE | Client | Report an address conflict | Validated against binding port |
| DHCPINFORM | Client | Request options only (static IP host) | Allowed; does not create a binding |
| DHCPLEASEQUERY / reply | Relay / Server | Lease state lookup (RFC 4388) | Replies dropped on untrusted ports |
The four attacks snooping is designed to stop
Rogue server / man-in-the-middle. The attacker answers DISCOVERs faster than the real server and hands out itself as the default gateway or DNS server. Every client that accepts the offer now routes through the attacker. This is the classic attack and the primary reason snooping exists. Accidental rogues (a consumer router plugged in backwards) cause the same outage without the malice.
Starvation. Tools such as Yersinia or dhcpig flood DISCOVERs with randomized client hardware addresses until the real pool is exhausted. Legitimate clients get nothing, which is often the setup step that makes the rogue server attack reliable: once the real server is out of addresses, the attacker is the only one answering.
Spoofed RELEASE and DECLINE. A client message forged with a victim’s MAC and IP tells the server to release the victim’s lease (or mark it conflicting), forcing reassignment or denial of service.
Option 82 injection. If an upstream server or relay uses relay-agent information for policy (address pool selection, rate plans in ISP networks), a client that inserts its own Option 82 can impersonate a different port or subscriber.
How DHCP Snooping Works
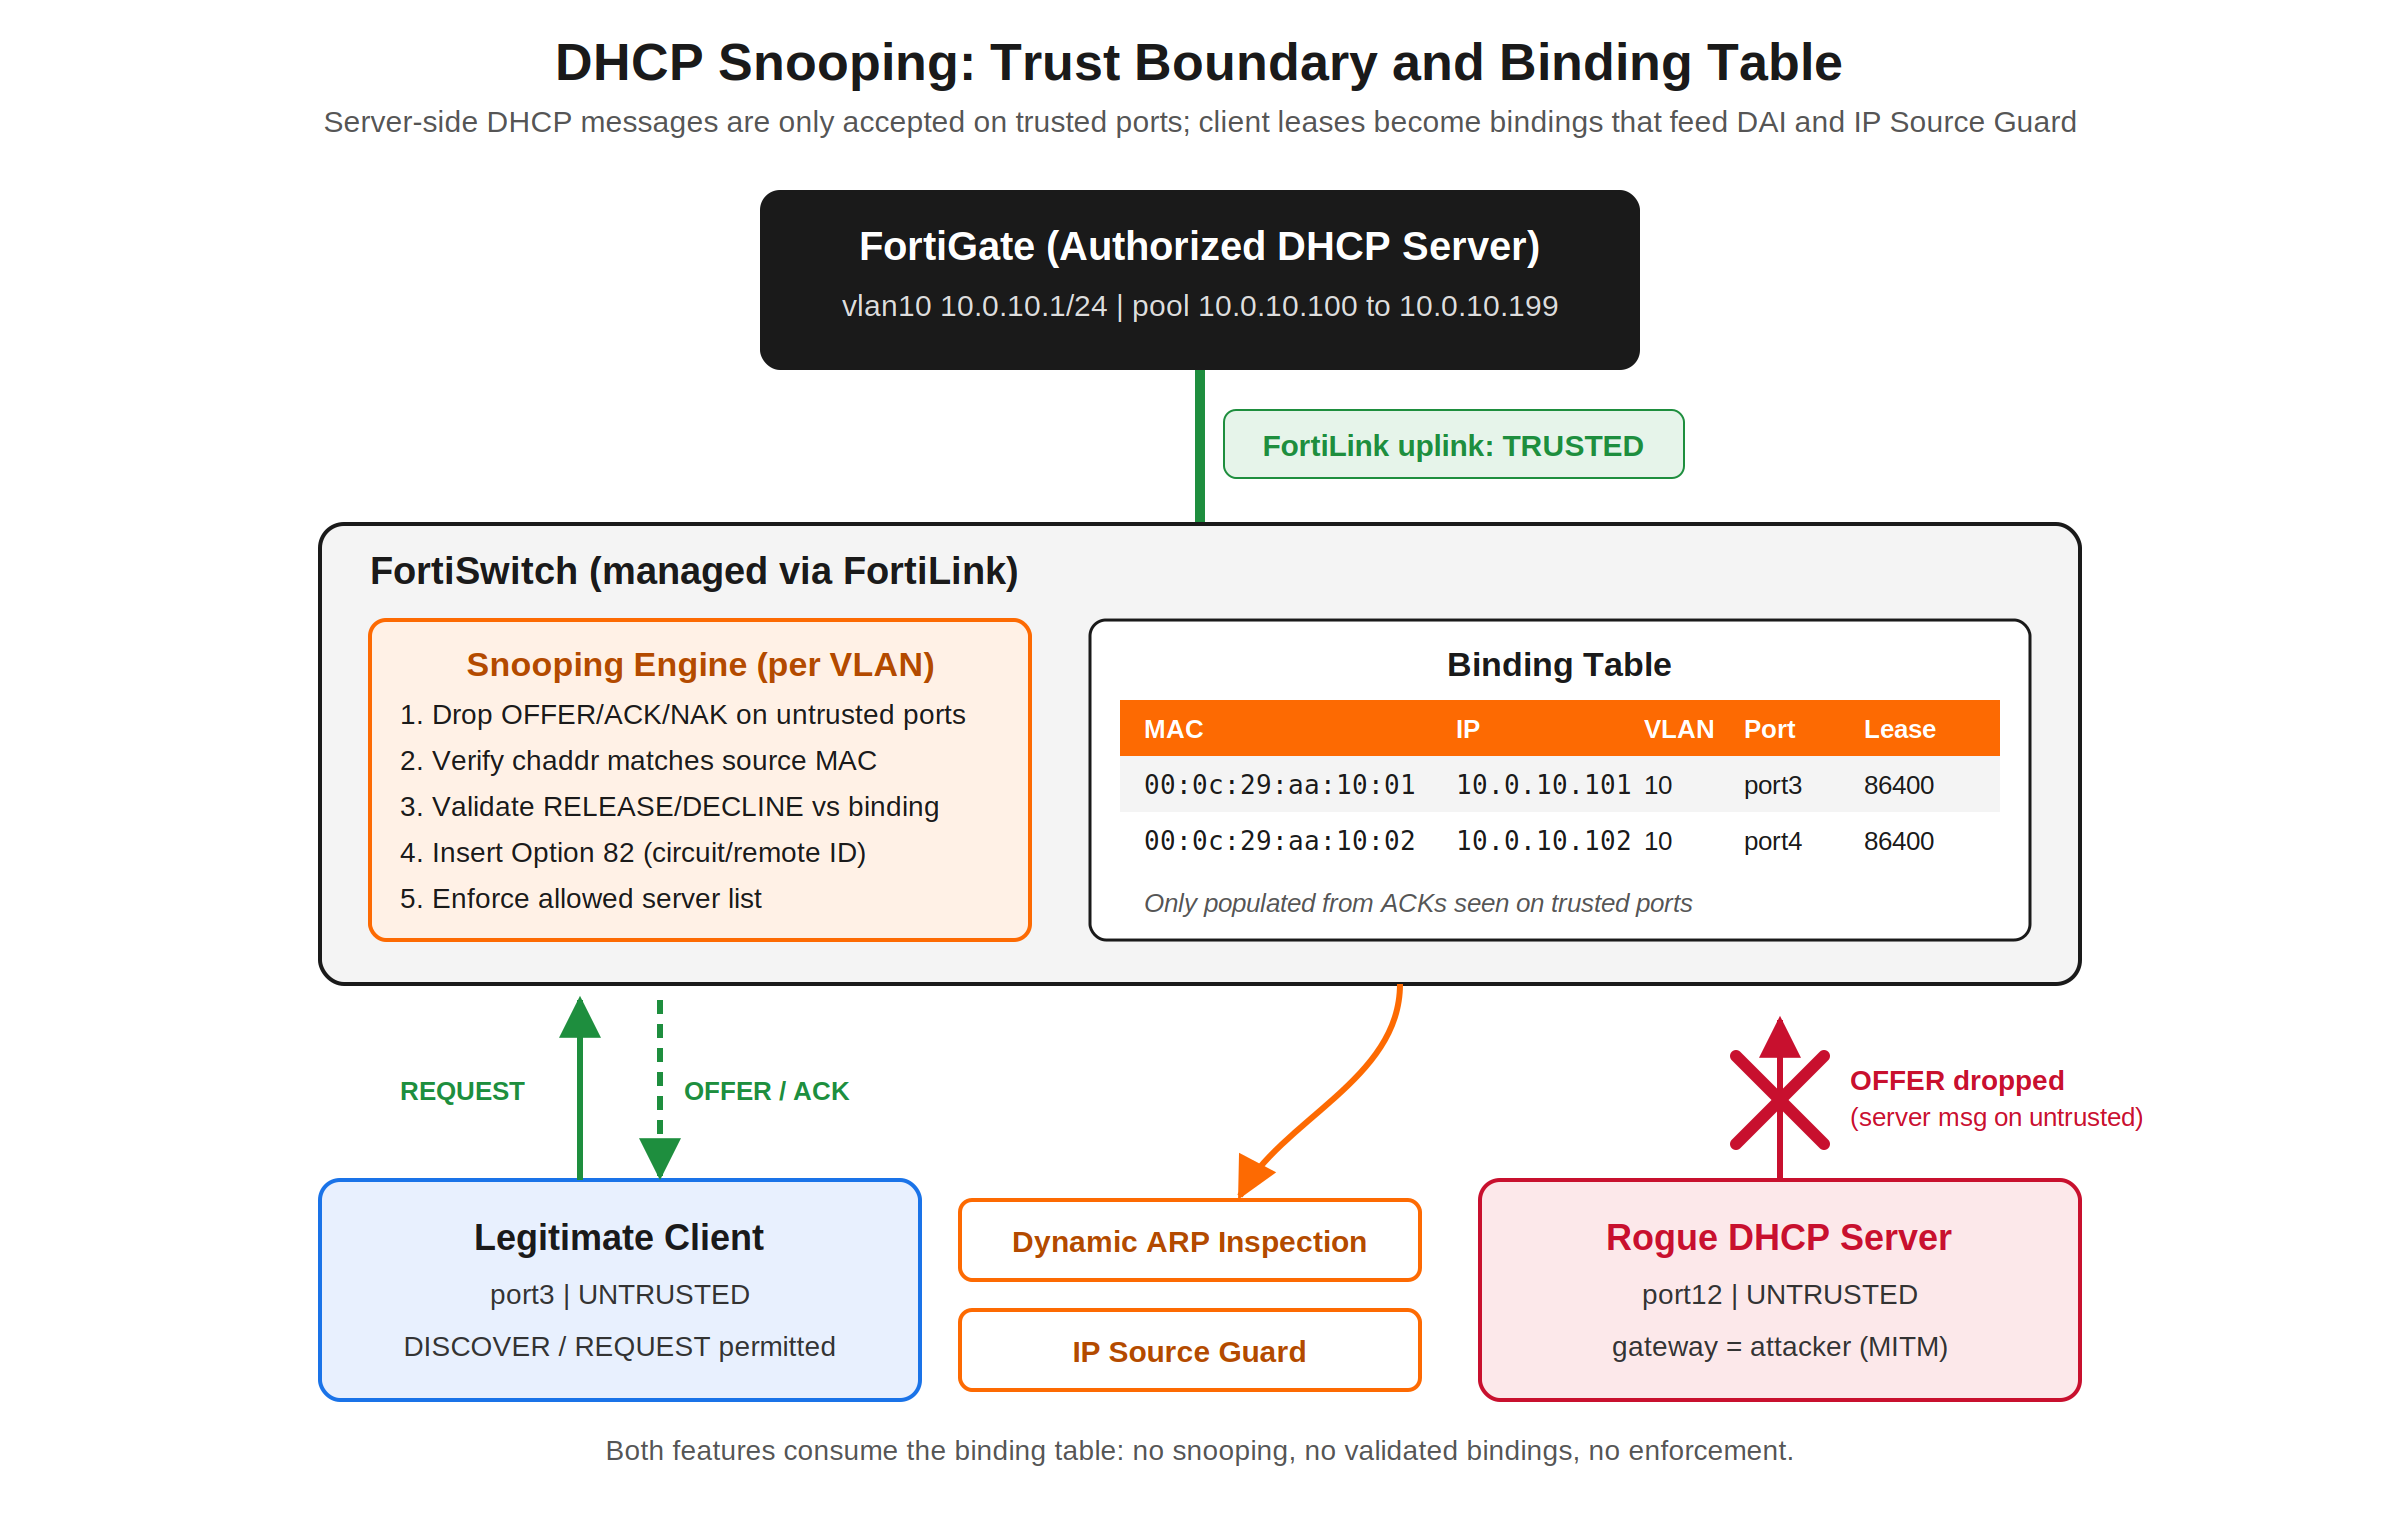
Trusted vs. untrusted ports
Trust is a per-port, and on most platforms per-VLAN, attribute. A trusted port is one that leads toward a legitimate DHCP server or relay: the uplink to the FortiGate, an inter-switch link, an MCLAG ICL, or the port where a Windows DHCP server lives. An untrusted port is everything else, which in a healthy design means every access port. The rule of thumb is simple: if you would not want a DHCPOFFER coming in on it, it is untrusted.
On FortiSwitch, ports are untrusted by default and you explicitly promote the ones that face servers. On Cisco, ports are also untrusted by default once snooping is enabled for a VLAN. That default is safe for clients and dangerous for uplinks: enable snooping without trusting the uplink and you have just blackholed DHCP for the whole VLAN.
What gets checked on an untrusted port
| Check | What the switch compares | Failure action |
|---|---|---|
| Server message filter | UDP source port 67 / message type OFFER, ACK, NAK, LEASEQUERY reply | Drop, increment counter |
| MAC verification | Ethernet source MAC vs. the chaddr field inside the DHCP payload |
Drop (blocks naive starvation tools) |
| Release / decline validation | Port the message arrived on vs. the port recorded in the binding | Drop (blocks spoofed releases) |
| Option 82 present | Inbound client packet already carrying relay-agent information | Drop unless that port is Option 82 trusted |
| Allowed server list | Server IP of OFFER/ACK vs. configured list (even on trusted ports) | Drop |
| Rate limit | DHCP packets per second on the port | Drop or err-disable, platform dependent |
The binding table
When the switch sees a DHCPACK coming back through a trusted port toward a client on an untrusted port, it records a binding: client MAC, assigned IP, VLAN, ingress port, and lease expiry. A NAK, RELEASE, DECLINE, or lease expiry removes it. Bindings are only learned for clients on untrusted ports, which is exactly what you want, since those are the ports where enforcement happens.
Treat the binding table as a security database, not a diagnostic curiosity. DAI uses it to decide whether an ARP reply claiming 10.0.10.101 is-at 00:0c:29:aa:10:01 is true. IP Source Guard uses it to program a per-port hardware filter that only permits the bound source IP (and optionally MAC). Hosts with static IPs never generate a DHCPACK, so they never appear in the table and will be dropped by DAI and IPSG unless you add static bindings. That one fact is responsible for most failed DAI rollouts.
MAC verification and its limits
MAC verification compares the frame’s source MAC with the chaddr inside the DHCP payload. Lazy starvation tools randomize only chaddr while sending from the attacker’s real NIC, so this check kills them outright. Better tools randomize both, and then MAC verification passes every frame. The real defense against full starvation is a combination of rate limiting, a per-port learn limit on the binding table, and port security or 802.1X MAC limits. Verification is necessary but not sufficient.
Option 82: relay agent information
Option 82 (RFC 3046) lets the snooping switch stamp each client request with where it came from. Sub-option 1, Circuit ID, typically identifies the port and VLAN. Sub-option 2, Remote ID, typically identifies the switch (MAC or hostname). The server can log it, use it to select a pool, or use it to pin an address to a physical jack. The switch strips Option 82 from the server’s reply before forwarding to the client.
The classic gotcha: when a Layer 2 snooping switch inserts Option 82 it is not a relay, so giaddr stays 0.0.0.0. RFC 3046 servers are expected to handle this, but many (including older Cisco IOS DHCP servers) drop any packet with Option 82 present and a zero giaddr because it looks like an untrusted relay. If clients stop getting addresses the moment you enable Option 82, this is the first thing to check.
Rate limiting and persistence
Snooping is a control-plane function: DHCP packets on snooped VLANs are punted to the switch CPU for inspection. That makes the switch itself a DoS target. Rate limit DHCP on untrusted ports (a normal client sends a handful of packets per lease cycle; 10 to 20 pps per access port is generous) and keep the limit far higher, or off, on trusted uplinks that aggregate an entire VLAN.
The binding table lives in RAM. Reboot an access switch without persistence and every client keeps a valid lease but has no binding, so DAI and IPSG drop them until they renew. Most platforms can export the table to flash or a remote server. Plan for it before you enable enforcement features that depend on it.
The Downstream Stack: What Consumes the Binding Table
| Feature | Attack Stopped | Depends On | Notes |
|---|---|---|---|
| DHCP snooping | Rogue server, starvation (partial), spoofed release | Port trust config | Foundation; enforcement of DHCP itself |
| Dynamic ARP Inspection | ARP poisoning / gratuitous ARP MITM | Snooping bindings or static entries / ARP ACLs | Validates IP-to-MAC claims in ARP on untrusted ports |
| IP Source Guard | Source IP spoofing, static IP squatting | Snooping bindings or static entries | Hardware per-port filter; consumes TCAM |
| DHCPv6 snooping / guard | Rogue DHCPv6 server | Port trust | Separate feature; IPv4 snooping does nothing for v6 |
| RA guard | Rogue IPv6 router advertisements | Port role | SLAAC hosts ignore DHCP entirely; this is the real v6 gateway control |
Gotcha: IPv6 is a separate problem
IPv4 DHCP snooping provides zero protection against a rogue IPv6 router. Any host that sends a Router Advertisement can become the IPv6 default gateway for dual-stack clients, and modern operating systems prefer IPv6. If the VLAN carries IPv6 (or the clients merely have it enabled, which they do by default), deploy RA guard and DHCPv6 snooping alongside the v4 controls.
Prerequisites and Lab Architecture
Assumed knowledge
- DHCP DORA exchange and relay behavior (
giaddr, UDP 67/68). - FortiLink switch management from FortiGate, including the FortiSwitch VLAN interface model under
config system interface. - Basic 802.1Q trunking and the difference between access, uplink, and ISL ports.
Lab components
| Component | Role | Addressing / Port |
|---|---|---|
| FortiGate (FortiOS 7.4.x or 7.6.x) | FortiLink controller, DHCP server for vlan10 | vlan10 10.0.10.1/24 on interface fortilink |
| FortiSwitch 248E (access) | Snooping enforcement point | port47-48 FortiLink uplink, port1-46 access |
| FortiSwitch 124F (downstream) | Second-tier access switch over ISL | ISL on 248E port46 |
| Linux client | Legitimate DHCP client | 248E port3, vlan10 |
| Linux “rogue” host | dnsmasq rogue DHCP server for testing | 248E port12, vlan10, static 10.0.10.250 |
| Printer (static IP) | Fixed-address host to prove static binding need | 248E port19, 10.0.10.20 |
Note: Placeholder convention
Replace <SWITCH_SN> with your FortiSwitch serial (for example S248EXXXXXXXXXXX). Internal LAN addressing uses 10.0.0.0/16 throughout. Run FortiLink commands from the FortiGate CLI in the VDOM that owns the FortiLink interface.
Step-by-Step Implementation (FortiLink-Managed FortiSwitch)
Step 1: Set global snooping behavior
Goal: Define how snooping behaves across every managed switch before enabling it on any VLAN.
Action: Set the Option 82 format, decide whether client broadcasts are flooded to untrusted ports, set binding expiry, and cap per-port learning to blunt starvation.
drop-untrusted means client DISCOVER and REQUEST broadcasts are forwarded only toward trusted ports instead of flooding to every port in the VLAN. A rogue server on an access port never even hears the request, which is stronger than simply dropping its reply. dhcp-snoop-db-per-port-learn-limit caps how many bindings one port can create; set it to what a real access port needs (a phone plus a PC plus headroom), not the maximum.
GUI verification: No direct GUI equivalent for the global knobs; confirm with show switch-controller global.
Step 2: Enable snooping on the FortiSwitch VLAN
Goal: Turn on snooping, MAC verification, and Option 82 insertion for vlan10.
Action: Snooping is enabled per FortiSwitch VLAN interface on the FortiGate. It is off by default.
GUI verification: WiFi and Switch Controller > FortiSwitch VLANs > edit vlan10. Where your build exposes the DHCP snooping toggle in the VLAN dialog, confirm it shows enabled; otherwise verify from the CLI with show system interface vlan10.
Step 3: Define the allowed server list
Goal: Ensure only known server IPs are honored, even on trusted ports.
Action: Port trust says where server traffic may enter. The server list says who may send it. Use both: a compromised device behind a trusted ISL should still not be able to serve leases.
If a relay sits between the switch and the server, list the address the OFFER/ACK is sourced from as seen by the switch, which is the relay’s VLAN interface address, not the back-end server.
GUI verification: The server list is CLI-only on most builds; verify with show system interface vlan10.
Step 4: Trust the right ports (and only those)
Goal: Mark every server-facing and inter-switch path as trusted; leave all access ports untrusted.
Action: FortiLink uplinks to the FortiGate are generally trusted automatically. ISL trunks to downstream FortiSwitches, MCLAG ICLs, and any port facing a third-party switch or local DHCP server need explicit attention.
Gotcha: Trust the downstream switch on both ends
On a two-tier FortiSwitch topology, OFFERs and ACKs traverse the ISL in both switches. If the downstream 124F still treats its upstream ISL port as untrusted, clients behind it get nothing. Verify trust on both sides of every ISL with get switch dhcp-snooping database-summary on each switch.
GUI verification: WiFi and Switch Controller > FortiSwitch Ports > right-click a port > DHCP Snooping > Trusted / Untrusted. Add the DHCP Snooping column to see the state of every port at once.
Step 5: Add static bindings for fixed-IP hosts
Goal: Give printers, cameras, PLCs, and other static-IP devices a binding so DAI and IPSG do not drop them.
Action: Static entries must reference a snooping-enabled VLAN and an untrusted, non-802.1X port. A FortiSwitch supports a maximum of 64 static entries.
A port with a static entry cannot be added to a trunk until the entry is removed. If you have more than a handful of fixed-IP hosts, a better long-term answer is DHCP reservations on the server: the device gets the same IP every time and a real binding is learned dynamically.
Step 6: Layer Dynamic ARP Inspection on top
Goal: Use the binding table to drop forged ARP on untrusted ports.
Action: Enable ARP inspection on the VLAN interface. Trust ARP on the same uplinks you trusted for DHCP (done in Step 4 via arp-inspection-trust).
Roll DAI out only after the binding table has been populated for at least one full lease cycle, or after forcing renewals. Enabling it on a VLAN full of clients with valid leases but no bindings (for example, right after a switch reboot) drops their ARP until they renew. Where your FortiOS build offers a monitor mode for ARP inspection, use it first and review the violations before enforcing.
Step 7: Optional Option 82 per-port override
Goal: Stamp a human-readable jack identifier into Option 82 for server-side logging or pool selection.
Action: Per-port override replaces both the global Circuit ID and Remote ID for that port and VLAN.
Standalone FortiSwitchOS Equivalent
For a FortiSwitch in standalone mode, the same feature lives under config switch vlan and config switch interface on the switch itself.
Multi-Vendor Reference
The concepts are identical across vendors; the syntax and defaults are not. These are the equivalent minimal configs for the same lab (vlan 10, uplink trusted, access ports rate limited).
Cisco IOS-XE (Catalyst 9000)
Juniper EX (ELS)
On Juniper ELS, access ports are untrusted and trunk ports are trusted by default once dhcp-security is applied to the VLAN. That default is the opposite of what bites Cisco and FortiSwitch admins, and it means a trunk to an untrusted device (a hypervisor, an unmanaged AP) is trusted unless you override it.
Aruba AOS-CX
Command translation
| Task | FortiGate (FortiLink) | Cisco IOS-XE | Junos ELS | AOS-CX |
|---|---|---|---|---|
| Bindings | diag switch-controller switch-info dhcp-snooping client-db <SN> |
show ip dhcp snooping binding |
show dhcp-security binding |
show dhcpv4-snooping binding |
| Status / trust | diag switch-controller switch-info dhcp-snooping database <SN> |
show ip dhcp snooping |
show dhcp-security |
show dhcpv4-snooping |
| Drop counters | get switch dhcp-snooping status (switch CLI) |
show ip dhcp snooping statistics |
show dhcp-security statistics |
show dhcpv4-snooping statistics |
| Default trust | All untrusted (FortiLink uplink trusted) | All untrusted | Access untrusted, trunks trusted | All untrusted |
Verification and Validation
Check 1: Snooping state and trusted ports
Expected: vlan10 appears under the snoop-enabled VLANs, and only your uplink and ISL ports appear under trusted ports.
Check 2: Bindings are being learned
Expected: the client MAC, 10.0.10.1xx, VLAN 10, and port3 appear in the client database; 10.0.10.1 appears in the server database as trusted.
Check 3: The rogue server dies at the port
On the rogue host on port12, run a throwaway dnsmasq instance handing out itself as gateway:
From any client, probe for every server that answers. Only the FortiGate should respond:
If you see a second response with Server Identifier 10.0.10.250, snooping is not enforcing on port12. Check that port12 is untrusted and that vlan10 is listed in snoop-enabled VLANs. With drop-untrusted set, the dnsmasq log on the rogue host should show no DISCOVERs arriving at all.
Check 4: Drop counters on the switch
Troubleshooting and Gotchas
Gotcha 1: DHCP dies the moment snooping is enabled
Symptom: every client on the VLAN, or every client behind a particular switch, stops getting addresses. Cause: the path to the server crosses a port that is still untrusted, usually an ISL to a downstream FortiSwitch or a trunk to a third-party switch. Fix: walk the path from client to server and trust every hop toward the server on every switch.
Gotcha 2: Clients fail only after enabling Option 82
Symptom: snooping works, then enabling Option 82 breaks leases. Cause: the server rejects requests that carry Option 82 with giaddr 0.0.0.0, or a relay further upstream discards them as untrusted relay information. Fix: confirm with a packet capture on the server side, then either configure the server or relay to accept them (on Cisco relays, ip dhcp relay information trust-all or per-interface ip dhcp relay information trusted) or disable Option 82 insertion if you are not consuming it.
Gotcha 3: Static-IP devices go dark after DAI or IPSG
Symptom: printers, cameras, and PLCs lose connectivity right after enforcement is enabled; DHCP clients are fine. Cause: no DHCPACK, no binding, so DAI drops their ARP and IPSG drops their IP traffic. Fix: add static snooping entries (Step 5), convert them to DHCP reservations, or move them to a VLAN where enforcement is not applied. Inventory fixed-IP hosts before the change window, not during it.
Gotcha 4: Everything breaks after a switch reboot
Symptom: after a reload, DAI-protected clients cannot ARP until they renew. Cause: the binding table was RAM-only. Fix: enable binding persistence where the platform supports it (ip dhcp snooping database on Cisco), shorten lease times on enforced VLANs so renewals happen quickly, and schedule enforcement rollouts so a full renewal cycle has passed.
Gotcha 5: Starvation still succeeds
Symptom: the pool empties even with MAC verification on. Cause: the attack tool randomizes both the Ethernet source MAC and chaddr, so verification passes. Fix: cap per-port bindings (dhcp-snoop-db-per-port-learn-limit), rate limit DHCP on access ports, and enforce MAC limits through 802.1X or port security. Watch the per-port binding count for outliers.
Gotcha 6: Wireless and virtualization edge cases
A bridged-mode SSID or a hypervisor uplink puts many clients behind one switch port. That is fine for snooping (bindings record the same port for many MACs) but it collides with low per-port learn limits and tight rate limits. Size those limits per port role, and remember that if the AP or hypervisor itself runs a DHCP service, its port must be trusted, which widens the trust boundary to everything behind it.
Best Practices Checklist
- Enable snooping on every user and IoT VLAN, not just the ones that have had incidents.
- Trust only server-facing uplinks, ISLs, and ICLs; audit trust on both ends of every inter-switch link.
- Turn on the allowed server list so trust is not the only gate.
- Use
drop-untrustedso client broadcasts never reach access ports. - Set per-port learn limits and DHCP rate limits sized to the port’s real role.
- Inventory static-IP hosts and give them static bindings or reservations before enabling DAI or IPSG.
- Persist the binding table where supported, and stage enforcement after a full lease cycle.
- Deploy RA guard and DHCPv6 protection on any VLAN where clients have IPv6 enabled.
- Re-run the rogue server test after every switch replacement, firmware upgrade, or topology change.
Final Word
DHCP snooping is unglamorous, cheap, and already licensed on the switch you own. It removes the most common accidental outage on a campus network (the rogue home router) and the most common Layer 2 MITM primitive (the rogue server), and it builds the binding table that DAI and IP Source Guard need to do their jobs. Deploy it in the right order: trust the uplinks, enable snooping, verify bindings, then turn on the enforcement features that depend on it.
Recent posts
-

-

DNS is one of those technologies that quietly underpins... Full Story
-

BGP issues on FortiGate firewalls usually trace back to... Full Story
-

Every time your laptop talks to your router, a... Full Story
-

If you've spent any time configuring NAT on a... Full Story
-

If you have spent any time configuring firewall policies... Full Story
-

High availability on FortiGate is one of those features... Full Story
-

If you've configured SD-WAN on a FortiGate, you've almost... Full Story
-

FortiLink is the management protocol that turns a FortiSwitch... Full Story
-

FortiSwitches are pretty rock solid from Mean Time Between... Full Story
-

This is a quicky tip. Have you ever gone... Full Story
-

DNS is one of those quiet pieces of internet... Full Story
-

This article is an updated version of the previous... Full Story
-

You will add ns2 as a secondary (slave) BIND9... Full Story
-

In the process of deploying my lab, I needed... Full Story
-

RFC 8805, used to be known as Self-Correcting IP... Full Story
-

Years back, I wrote an article about certificate pinning. ... Full Story
-

FortiGates have the ability to send alerts to Microsoft... Full Story
-

In this post, I am going to walk through... Full Story
-

Troubleshooting VoIP on a FortiGate can feel like trying... Full Story
-

Prior to FortiOS 7.0, there were three commands to... Full Story
-

In this post, I am going to go over... Full Story
-

What we are going to do: We are going... Full Story
-

Choosing between FGCP (FortiGate Clustering Protocol) and FGSP (FortiGate... Full Story
-

Creating a VLAN on macOS (The "Pro" Move) A... Full Story
-

This blog post explores the logic behind how macOS... Full Story
-

Pretty Fly for a Wi-Fi Tell My Wi-Fi Love... Full Story
-

Part of my daily gig is creating BoMs (Bill-of-Materials)... Full Story
-

ICMP introduces several security risks, but careful filtering, rate... Full Story
-

The command diag debug application dhcps -1 enables full... Full Story
-

In the world of FortiOS, execute tac report is... Full Story
-

LLDP; What is it The Link Layer Discovery Protocol... Full Story
-

What it actually does When you run diagnose fdsm... Full Story
-

Monkey Bites are bite-sized, high-impact security insights designed for... Full Story
-

I have run macOS in macOS with Parallels but... Full Story
-

Don't be confused with my other FortiNAC posts where... Full Story
-

This is the third session in a multi-part article... Full Story
-

Today I was configuring key-based authentication on a FortiGate... Full Story
-

Netcat, often called the "Swiss Army knife" of networking,... Full Story
-

At its core, IEEE 802.1X is a network layer... Full Story
-

In case you did not see the previous FortiNAC... Full Story
-

This is our 5th session where we are going... Full Story
-

Now that we have Wireshark installed and somewhat configured,... Full Story
-

The Philosophy of Packet Analysis Troubleshooting isn't about looking... Full Story
-

InfoSecMonkey Threat Response October 24, 2026 | No fluff.... Full Story
-

InfoSecMonkey Threat Response October 24, 2026 | No fluff.... Full Story
-

Plus what you actually get with FortiCare Essential, Premium... Full Story