
If you've spent any time configuring user authentication on... Full Story
By Manny Fernandez
July 19, 2026
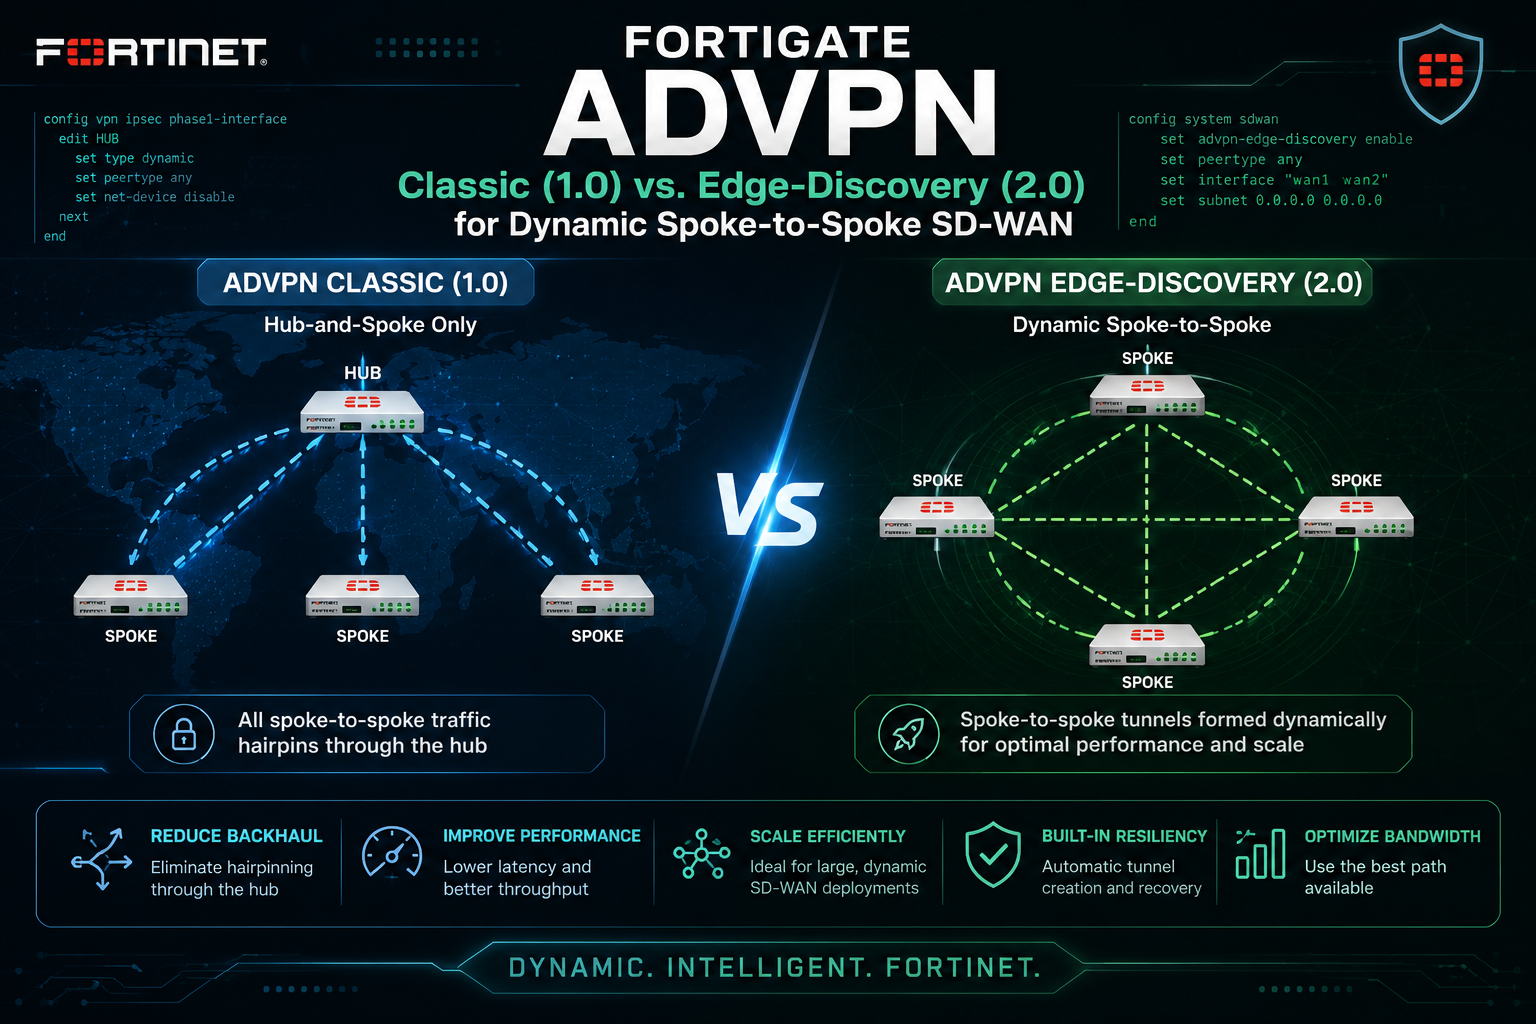
FortiGate ADVPN: Classic (1.0) vs. Edge-Discovery (2.0) for Dynamic Spoke-to-Spoke SD-WAN
1. Executive Summary
Objective. This guide explains what changed between ADVPN 1.0 and ADVPN 2.0 on FortiGate, then walks two complete deployment tracks so you can stand up on-demand spoke-to-spoke shortcuts on the version that fits your fleet. ADVPN (Auto-Discovery VPN) lets a hub-and-spoke IPsec topology build direct, dynamic tunnels between spokes so branch-to-branch traffic stops hair-pinning through the hub. Getting the version right matters because 1.0 and 2.0 make opposite assumptions about where path intelligence lives, and mixing those assumptions is where deployments break.
Target audience. Network and security engineers, SD-WAN architects, and SEs who already run FortiGate hub-and-spoke overlays and need spoke-to-spoke automation with predictable path selection.
Version reality check. ADVPN 1.0 is supported through the FortiOS 7.2 branch and works with both IKEv1 and IKEv2. ADVPN 2.0 (edge discovery and path management) arrived in the 7.4 branch, is IKEv2 only, and at time of writing supports IPv4 only. If any device in the mesh cannot run 7.4.x, you are deploying 1.0. Always confirm exact knob syntax against the Fortinet Administration Guide for your running build before change control.
2. How ADVPN 1.0 and 2.0 Differ
Both versions do the same job at a high level: user traffic between two spoke LANs triggers an on-demand IPsec shortcut, and the shortcut is torn down after the traffic goes idle. What differs is who decides which underlay the shortcut is built on, and how much BGP scaffolding you need to make that decision correct.
ADVPN 1.0 in one paragraph
The hub is the brain. Spokes exchange IKE shortcut-offer and shortcut-reply messages through the hub, and the hub uses policy routes to keep a shortcut on the same overlay it was requested on. Because a spoke only learns another spoke LAN as a BGP prefix whose next hop is the remote spoke tunnel IP, correct path selection depends on a specific BGP design: the hub acts as a route reflector, next-hop is preserved (not rewritten to the hub), BGP additional-path (add-path) advertises one path per overlay, and the spoke recursively resolves the tunnel-IP next hop over the freshly built shortcut. It works, but the routing design is load-bearing and unforgiving.
ADVPN 2.0 in one paragraph
The spokes are the brain. Each spoke runs edge discovery and path management, so it learns the remote spoke WAN link inventory (IP, transport group, link quality, cost, and member order) directly from an expanded IKE Shortcut-Reply and picks the best matching underlay itself. Path selection no longer depends on route reflection, add-path, BGP-per-overlay, or BGP-on-loopback. BGP (or any IGP) is now only responsible for distributing LAN reachability, not for steering shortcuts. Spokes tag overlays into transport groups and only build shortcuts between links that share a group, and overlay placeholders let two spokes build a shortcut across a transport the hub is not even connected to.
| Dimension | ADVPN 1.0 (Classic) | ADVPN 2.0 (Edge Discovery) |
|---|---|---|
| FortiOS support | Through the 7.2 branch | 7.4 branch and later (path management from 7.4.2) |
| IKE version | IKEv1 or IKEv2 | IKEv2 only |
| Address family | IPv4 and IPv6 | IPv4 only (current) |
| Path-selection intelligence | Centralized on the hub | Distributed to the spokes |
| Shortcut trigger | User traffic only | Health-driven plus user traffic; spokes can pre-select a better path |
| Routing dependency | Route reflection, add-path, per-overlay BGP or BGP-on-loopback all load-bearing | BGP or IGP for LAN reachability only; not used for path selection |
| Underlay awareness | Spoke A cannot see Spoke B link health before building | Spokes exchange health and pick the best matching underlay |
| Transport control | Kept on same overlay via hub policy routes | Transport groups plus overlay placeholders |
| Best fit | Existing fleets pinned below 7.4, or mixed-version meshes | Greenfield or fully 7.4+ fleets wanting resilient, self-optimizing shortcuts |
The single most common migration mistake: keeping the 1.0 route-reflector and add-path scaffolding after moving to 2.0, then wondering why behavior is inconsistent. In 2.0 the spokes steer. Let them.
3. Prerequisites & Architecture
Assumed knowledge
- FortiGate route-based IPsec (phase1-interface and phase2-interface), dial-up hubs, and tunnel-interface IP addressing.
- iBGP fundamentals: neighbor groups, neighbor ranges, route reflection, and recursive next-hop resolution.
- FortiGate SD-WAN members, zones, performance SLA health checks, and service (steering) rules.
Lab and licensing requirements
- Three FortiGate instances (physical, VM, or EVE-NG/GNS3). One hub, two spokes minimum to prove a shortcut.
- FortiOS 7.2.x for the 1.0 track; FortiOS 7.4.x (7.4.4+ recommended) for the 2.0 track. ADVPN itself needs no add-on license; it is part of FortiOS. IPS/AV licensing only matters if you inspect the tunneled traffic.
- Two WAN underlays per site (for example ISP1 and ISP2, or Internet and MPLS) to make dual-overlay path selection meaningful.
Reference topology
| Device | Role | Underlays | Overlay tunnel IP | LAN / Loopback |
|---|---|---|---|---|
| FGT-HUB | Dial-up hub, BGP route reflector (1.0) | 203.0.113.1 (ISP1), 198.51.100.1 (ISP2) | 10.255.1.254, 10.255.2.254 | 172.16.255.254/32 (Lo) |
| FGT-SPOKE1 | Spoke | DHCP/Static ISP1 + ISP2 | 10.255.1.1, 10.255.2.1 | 10.1.0.0/24 |
| FGT-SPOKE2 | Spoke | DHCP/Static ISP1 + ISP2 | 10.255.1.2, 10.255.2.2 | 10.2.0.0/24 |
ASN 65000 is used throughout (iBGP). Overlay 1 rides ISP1, overlay 2 rides ISP2. Replace every <placeholder> with your real values.
4. Track A: Deploying ADVPN 1.0 (FortiOS 7.2)
Step A1: Hub IPsec (dial-up, one phase1 per overlay)
Goal: Terminate all spokes on the hub and enable it to relay shortcut offers, while keeping the hub as a single dial-up interface per overlay.
Action: Configure a dynamic phase1 per underlay. The three settings that make ADVPN 1.0 work on the hub are auto-discovery-sender enable, tunnel-search nexthop, and exchange-interface-ip enable.
config vpn ipsec phase1-interface
    edit "HUB-OV1"
        set type dynamic
        set interface "port1"
        set ike-version 2
        set peertype any
        set net-device disable
        set tunnel-search nexthop
        set add-route disable
        set auto-discovery-sender enable
        set exchange-interface-ip enable
        set network-overlay enable
        set network-id 1
        set psksecret <strong_psk_ov1>
    next
    edit "HUB-OV2"
        set type dynamic
        set interface "port2"
        set ike-version 2
        set peertype any
        set net-device disable
        set tunnel-search nexthop
        set add-route disable
        set auto-discovery-sender enable
        set exchange-interface-ip enable
        set network-overlay enable
        set network-id 2
        set psksecret <strong_psk_ov2>
    next
end
config vpn ipsec phase2-interface
    edit "HUB-OV1-P2"
        set phase1name "HUB-OV1"
        set keepalive enable
        set auto-negotiate enable
    next
    edit "HUB-OV2-P2"
        set phase1name "HUB-OV2"
        set keepalive enable
        set auto-negotiate enable
    next
end
config system interface
    edit "HUB-OV1"
        set ip 10.255.1.254 255.255.255.255
        set remote-ip 10.255.1.253 255.255.255.0
    next
    edit "HUB-OV2"
        set ip 10.255.2.254 255.255.255.255
        set remote-ip 10.255.2.253 255.255.255.0
    next
end
GUI verification: VPN > IPsec Tunnels shows both hub tunnels as dial-up parents. The shortcut children appear here only after spokes connect and traffic flows.
Step A2: Spoke IPsec (one phase1 per overlay, pointed at the hub)
Goal: Let each spoke receive shortcut offers and dynamically instantiate shortcut interfaces to peer spokes.
Action: Mirror the hub, but set auto-discovery-receiver enable, net-device enable (so the spoke spins up dynamic shortcut interfaces), and point remote-gw at the hub underlay IP. Repeat with matching network-id on the second overlay.
config vpn ipsec phase1-interface
    edit "S1-OV1"
        set interface "port1"
        set ike-version 2
        set peertype any
        set net-device enable
        set auto-discovery-receiver enable
        set exchange-interface-ip enable
        set add-route disable
        set remote-gw 203.0.113.1
        set network-overlay enable
        set network-id 1
        set psksecret <strong_psk_ov1>
    next
    edit "S1-OV2"
        set interface "port2"
        set ike-version 2
        set peertype any
        set net-device enable
        set auto-discovery-receiver enable
        set exchange-interface-ip enable
        set add-route disable
        set remote-gw 198.51.100.1
        set network-overlay enable
        set network-id 2
        set psksecret <strong_psk_ov2>
    next
end
config system interface
    edit "S1-OV1"
        set ip 10.255.1.1 255.255.255.255
        set remote-ip 10.255.1.254 255.255.255.0
    next
    edit "S1-OV2"
        set ip 10.255.2.1 255.255.255.255
        set remote-ip 10.255.2.254 255.255.255.0
    next
end
Step A3: BGP with route reflection and add-path
Goal: Distribute LAN prefixes so a spoke learns a remote spoke LAN with the remote spoke tunnel IP as next hop, on every overlay, so a shortcut can be recursively resolved.
Action (hub): Reflect routes, do not rewrite next-hop-self, and advertise additional paths so spokes learn one path per overlay.
config router bgp
    set as 65000
    set router-id 172.16.255.254
    set ibgp-multipath enable
    set additional-path enable
    set graceful-restart enable
    config neighbor-group
        edit "SPOKES"
            set remote-as 65000
            set route-reflector-client enable
            set additional-path send
            set adv-additional-path 4
            set soft-reconfiguration enable
        next
    end
    config neighbor-range
        edit 1
            set prefix 10.255.0.0 255.255.0.0
            set neighbor-group "SPOKES"
        next
    end
    config network
        edit 1
            set prefix 172.16.255.254 255.255.255.255
        next
    end
end
Action (spoke): Peer to both hub tunnel IPs, request additional paths, and enable recursive next-hop so the tunnel-IP next hop resolves over the shortcut once it exists.
config router bgp
    set as 65000
    set router-id 10.1.0.1
    set additional-path enable
    set recursive-next-hop enable
    config neighbor
        edit "10.255.1.254"
            set remote-as 65000
            set additional-path receive
            set soft-reconfiguration enable
        next
        edit "10.255.2.254"
            set remote-as 65000
            set additional-path receive
            set soft-reconfiguration enable
        next
    end
    config network
        edit 1
            set prefix 10.1.0.0 255.255.255.0
        next
    end
end
Step A4: SD-WAN steering and firewall policy
Goal: Steer spoke-to-spoke traffic across the overlay zone so it triggers a shortcut, and permit it in policy.
config system sdwan
    set status enable
    config zone
        edit "OVERLAY"
        next
    end
    config members
        edit 1
            set interface "S1-OV1"
            set zone "OVERLAY"
        next
        edit 2
            set interface "S1-OV2"
            set zone "OVERLAY"
        next
    end
    config health-check
        edit "HUB-HC"
            set server 10.255.1.254 10.255.2.254
            set members 1 2
            config sla
                edit 1
                    set latency-threshold 200
                    set jitter-threshold 50
                    set packetloss-threshold 5
                next
            end
        next
    end
    config service
        edit 1
            set name "SPOKE-TO-SPOKE"
            set dst "RFC1918-BRANCHES"
            set mode sla
            config sla
                edit "HUB-HC"
                    set id 1
                next
            end
            set priority-members 1 2
        next
    end
end
config firewall policy
    edit 100
        set name "OVERLAY-to-OVERLAY"
        set srcintf "OVERLAY"
        set dstintf "OVERLAY"
        set srcaddr "LOCAL-LAN" "RFC1918-BRANCHES"
        set dstaddr "LOCAL-LAN" "RFC1918-BRANCHES"
        set action accept
        set schedule "always"
        set service "ALL"
    next
end
GUI verification: Network > SD-WAN > SD-WAN Rules shows SPOKE-TO-SPOKE bound to the OVERLAY members. Once traffic flows between LANs, VPN > IPsec Tunnels lists a new shortcut child tunnel.
5. Track B: Deploying ADVPN 2.0 (FortiOS 7.4)
Track B reuses the same tunnel-interface addressing and firewall policy. The deltas are: IKEv2 is mandatory, path selection moves to the spokes via advpn-select, overlays are tagged into transport groups, health is embedded so spokes learn each other, and BGP drops back to LAN reachability only. No route reflector or add-path scaffolding is required for steering.
Step B1: Phase1 deltas for 2.0
Goal: Enable IKEv2 auto-discovery with a shared idle timeout so shortcuts to the same peer tear down cleanly, and prepare overlays for transport grouping.
config vpn ipsec phase1-interface
    edit "S1-OV1"
        set ike-version 2
        set auto-discovery-receiver enable
        set auto-discovery-shortcuts independent
        set exchange-interface-ip enable
        set net-device enable
        set idle-timeout enable
        set idle-timeoutinterval 5
        set network-overlay enable
        set network-id 1
        set remote-gw 203.0.113.1
        set psksecret <strong_psk_ov1>
    next
end
On the hub, keep
auto-discovery-sender enable and IKEv2, as in Track A. The 2.0 intelligence is on the spokes, so most 2.0-specific configuration lands in SD-WAN, not phase1.Step B2: SD-WAN edge discovery and transport groups
Goal: Turn on ADVPN 2.0 path selection, tag each overlay to a transport group, and embed measured health so spokes can compare each other before building.
Action: Enable advpn-select at the SD-WAN root, assign a transport-group to each member (Internet overlays in group 1, MPLS in group 2, for example), and set embed-measured-health enable on the health check.
config system sdwan
    set status enable
    set advpn-select enable
    set advpn-health-check "HUB-HC"
    config zone
        edit "OVERLAY"
        next
    end
    config members
        edit 1
            set interface "S1-OV1"
            set zone "OVERLAY"
            set transport-group 1
        next
        edit 2
            set interface "S1-OV2"
            set zone "OVERLAY"
            set transport-group 1
        next
    end
    config health-check
        edit "HUB-HC"
            set server 10.255.1.254 10.255.2.254
            set members 1 2
            set embed-measured-health enable
            config sla
                edit 1
                    set latency-threshold 200
                    set jitter-threshold 50
                    set packetloss-threshold 5
                next
            end
        next
    end
    config service
        edit 1
            set name "SPOKE-TO-SPOKE"
            set dst "RFC1918-BRANCHES"
            set mode sla
            config sla
                edit "HUB-HC"
                    set id 1
                next
            end
            set priority-members 1 2
        next
    end
end
Step B3: Simplified BGP (reachability only)
Goal: Distribute LAN prefixes. That is all BGP does in 2.0. Route reflection and add-path are no longer required for path selection.
config router bgp
    set as 65000
    set router-id 10.1.0.1
    config neighbor
        edit "10.255.1.254"
            set remote-as 65000
            set soft-reconfiguration enable
        next
        edit "10.255.2.254"
            set remote-as 65000
            set soft-reconfiguration enable
        next
    end
    config network
        edit 1
            set prefix 10.1.0.0 255.255.255.0
        next
    end
end
Optional (advanced 2.0): overlay placeholders let two spokes build a shortcut over a transport the hub does not ride (for example a private circuit between two branches). Configure the placeholder overlay and match transport groups on both spokes. Validate exact placeholder syntax against the Fortinet 8.0 Administration Guide topic “Example SD-WAN overlay placeholders using ADVPN 2.0” before deploying.
6. Verification & Validation
Run these from a spoke after generating LAN-to-LAN traffic (for example a continuous ping from 10.1.0.10 to 10.2.0.10). Success means a shortcut tunnel appears, BGP resolves the remote LAN over that shortcut, and the session no longer transits the hub.
Confirm the parent tunnels and shortcuts
# Parent tunnels plus any dynamically built shortcut children
get vpn ipsec tunnel summary
diagnose vpn tunnel list

# IKE gateway state (look for the shortcut gateway to the peer spoke)
diagnose vpn ike gateway list
What success looks like: a new tunnel named after the parent with a shortcut suffix, phase1 and phase2 both up, and the remote gateway set to the peer spoke public IP (not the hub).
Confirm routing resolves over the shortcut
get router info bgp summary
get router info routing-table bgp
diagnose vpn ike routes list
What success looks like: the remote spoke LAN (10.2.0.0/24) is a BGP route whose next hop is the remote spoke tunnel IP (for example 10.255.1.2), and the routing table resolves that next hop through the shortcut interface, not the hub.
Confirm SD-WAN steering and health
diagnose sys sdwan health-check
diagnose sys sdwan service
# ADVPN 2.0 edge discovery and path state
diagnose sys sdwan advpn
What success looks like: the health check reports the overlays in SLA, and the SPOKE-TO-SPOKE service shows the shortcut member as selected. On 2.0, the advpn output lists the discovered remote edge and the chosen transport.
7. Troubleshooting & Gotchas
Gotcha 1: The shortcut never forms. Traffic keeps hair-pinning through the hub and no child tunnel appears.
Diagnose:
diagnose debug reset
diagnose debug application ike -1
diagnose debug enable
# generate spoke-to-spoke traffic, watch for shortcut-offer / shortcut-reply
diagnose sys sdwan service
Resolve: The usual causes are a missing tunnel-search nexthop on the hub phase1, net-device set wrong (must be disable on the hub, enable on spokes), or the SD-WAN service not actually matching the destination so no traffic is steered onto the overlay. Confirm the service dst covers the remote branch subnets and that the OVERLAY zone holds both members.
Gotcha 2: The shortcut forms, but traffic still goes through the hub. You can see the child tunnel, yet the data path does not use it.
Diagnose:
get router info routing-table 10.2.0.0
get router info bgp network 10.2.0.0/24
diagnose vpn ike routes list
Resolve (1.0): Almost always a BGP design problem. If the hub applied next-hop-self, the remote LAN next hop becomes the hub, recursive resolution never points at the shortcut, and the hub path wins. Remove next-hop-self on the reflected neighbor group, confirm additional-path is enabled on both sides so per-overlay paths exist, and confirm recursive-next-hop enable on the spoke. Resolve (2.0): confirm advpn-select enable and that both overlays share a transport-group; a mismatched transport group blocks the shortcut from being selected.
Gotcha 3: 2.0 shortcuts are flaky or refuse to negotiate. Tunnels come up to the hub but spoke-to-spoke fails intermittently.
Diagnose:
diagnose vpn ike gateway list
diagnose sys sdwan advpn
get vpn ipsec tunnel details
Resolve: Verify every device in the mesh is IKEv2. ADVPN 2.0 will not negotiate shortcuts over IKEv1, and a single IKEv1 spoke poisons its own path. Confirm the traffic is IPv4 (2.0 does not yet handle IPv6 shortcuts). Check that exchange-interface-ip is enabled everywhere so spokes can learn peer tunnel IPs, and that network-id matches per overlay end to end. A shortcut wedged in a bad state clears with a targeted flush:
diagnose vpn ike gateway flush name <shortcut_gateway_name>
Migration tip. When moving a live fleet from 1.0 to 2.0, upgrade and convert spokes in pairs so you can validate a real shortcut between two 2.0 nodes, and only strip the old route-reflector and add-path config once every spoke that needs to mesh is on 7.4 and running
advpn-select. Because 2.0 steering lives on the spokes, a hub-first sequence buys you nothing on its own.Published by InfoSecMonkey · No fluff. Just the config that works. ·
Recent posts
-

-

DNS is one of those technologies that quietly underpins... Full Story
-

BGP issues on FortiGate firewalls usually trace back to... Full Story
-

Every time your laptop talks to your router, a... Full Story
-

If you've spent any time configuring NAT on a... Full Story
-

If you have spent any time configuring firewall policies... Full Story
-

High availability on FortiGate is one of those features... Full Story
-

If you've configured SD-WAN on a FortiGate, you've almost... Full Story
-

FortiLink is the management protocol that turns a FortiSwitch... Full Story
-

FortiSwitches are pretty rock solid from Mean Time Between... Full Story
-

This is a quicky tip. Have you ever gone... Full Story
-

DNS is one of those quiet pieces of internet... Full Story
-

This article is an updated version of the previous... Full Story
-

You will add ns2 as a secondary (slave) BIND9... Full Story
-

In the process of deploying my lab, I needed... Full Story
-

RFC 8805, used to be known as Self-Correcting IP... Full Story
-

Years back, I wrote an article about certificate pinning. ... Full Story
-

FortiGates have the ability to send alerts to Microsoft... Full Story
-

In this post, I am going to walk through... Full Story
-

Troubleshooting VoIP on a FortiGate can feel like trying... Full Story
-

Prior to FortiOS 7.0, there were three commands to... Full Story
-

In this post, I am going to go over... Full Story
-

What we are going to do: We are going... Full Story
-

Choosing between FGCP (FortiGate Clustering Protocol) and FGSP (FortiGate... Full Story
-

Creating a VLAN on macOS (The "Pro" Move) A... Full Story
-

This blog post explores the logic behind how macOS... Full Story
-

Pretty Fly for a Wi-Fi Tell My Wi-Fi Love... Full Story
-

Part of my daily gig is creating BoMs (Bill-of-Materials)... Full Story
-

ICMP introduces several security risks, but careful filtering, rate... Full Story
-

The command diag debug application dhcps -1 enables full... Full Story
-

In the world of FortiOS, execute tac report is... Full Story
-

LLDP; What is it The Link Layer Discovery Protocol... Full Story
-

What it actually does When you run diagnose fdsm... Full Story
-

Monkey Bites are bite-sized, high-impact security insights designed for... Full Story
-

I have run macOS in macOS with Parallels but... Full Story
-

Don't be confused with my other FortiNAC posts where... Full Story
-

This is the third session in a multi-part article... Full Story
-

Today I was configuring key-based authentication on a FortiGate... Full Story
-

Netcat, often called the "Swiss Army knife" of networking,... Full Story
-

At its core, IEEE 802.1X is a network layer... Full Story
-

In case you did not see the previous FortiNAC... Full Story
-

This is our 5th session where we are going... Full Story
-

Now that we have Wireshark installed and somewhat configured,... Full Story
-

The Philosophy of Packet Analysis Troubleshooting isn't about looking... Full Story
-

Executive Summary Objective: Get you from zero to writing... Full Story
-

NAND cells, the flash translation layer, SLC caching, TRIM,... Full Story
-

Nmap Scripting Engine (NSE): From One-Liners to Your First... Full Story