If you've spent any time configuring user authentication on... Full Story
By Manny Fernandez
June 27, 2026
FortiGate-to-FortiGate GRE Tunnel Deployment Guide
Overview
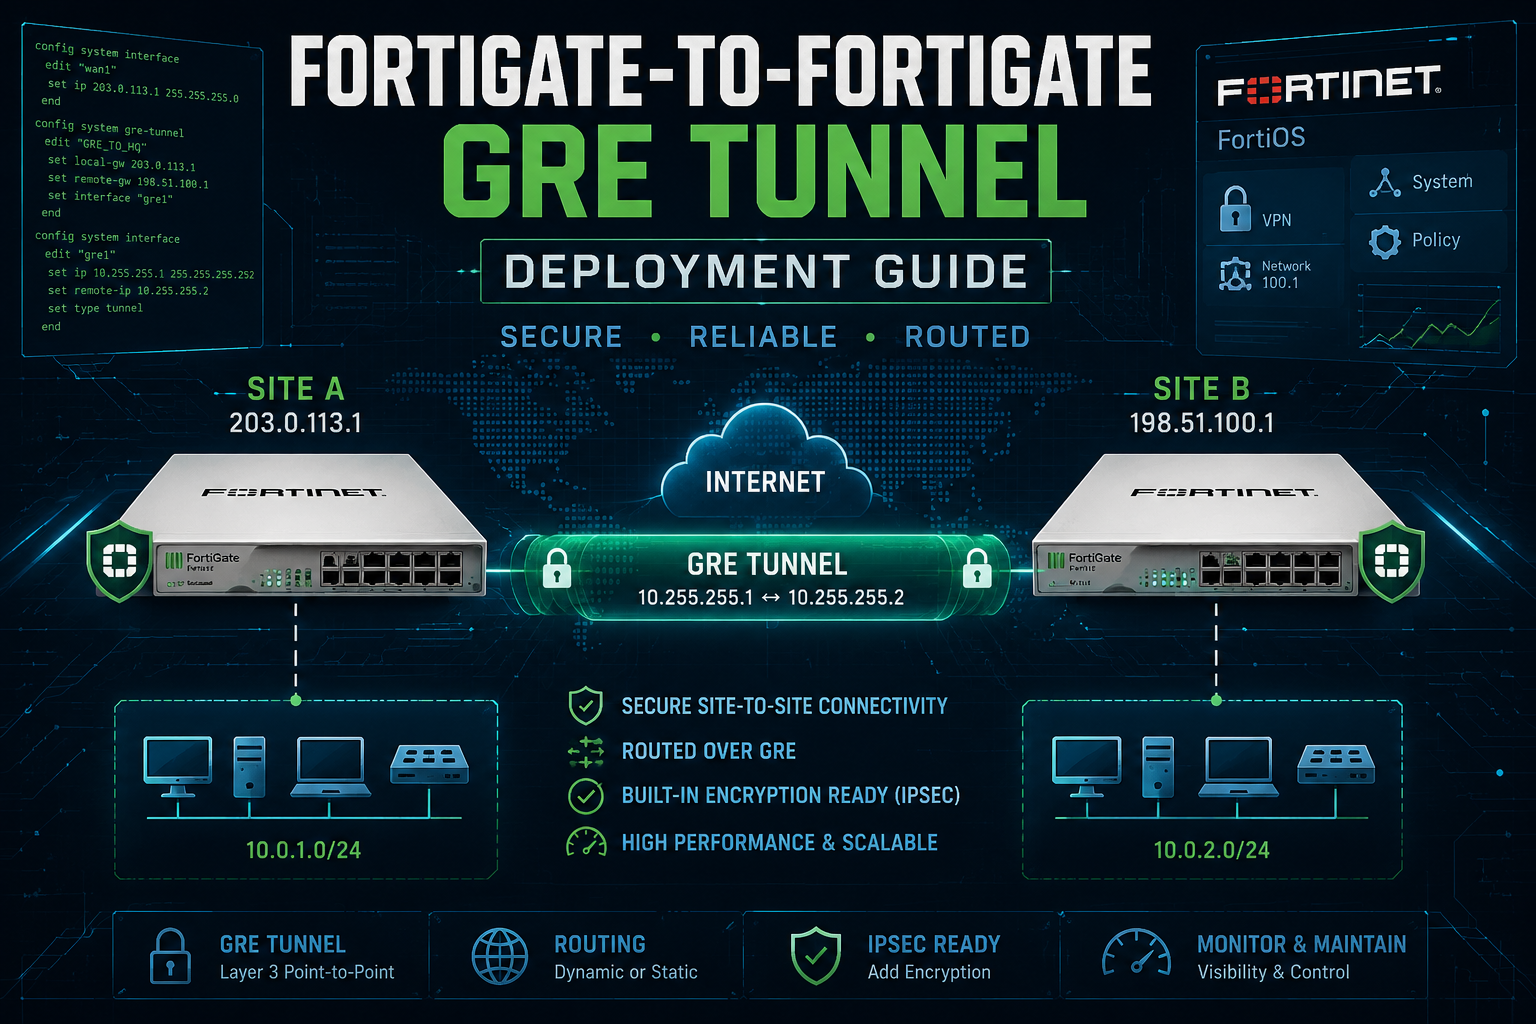
A FortiGate can build a strictly GRE tunnel to another FortiGate with no IPsec involved. FortiOS implements Generic Routing Encapsulation per RFC 2784 (with RFC 1701 heritage) as a native, routable tunnel interface configured under config system gre-tunnel. The result is a Layer 3 point-to-point virtual interface that encapsulates passenger traffic in IP protocol 47.
This guide walks through a clean two-FortiGate GRE build: the tunnel definition, the transport (underlay) reachability, tunnel interface addressing, routing across the overlay, and the firewall policies that make it actually pass traffic. It closes with keepalives, MTU/MSS handling, verification, and troubleshooting.
Important security note. GRE provides no confidentiality, no integrity, and no authentication. Anything you send across a bare GRE tunnel traverses the underlay in cleartext. Use bare GRE only across trusted transport (private WAN, MPLS, lab, or a path you already trust). If the underlay is the public internet, wrap GRE in IPsec (GRE-over-IPsec) instead. This guide intentionally covers the strictly-GRE case as requested.
When to use bare GRE
GRE on its own earns its place in a few specific scenarios:
– Multicast or non-IP passenger protocols across an IP core – Plain IPsec tunnel-mode does not natively carry multicast; GRE does, which is why GRE-over-IPsec exists. Bare GRE alone carries multicast where the path is already trusted.
– Routing protocol adjacencies over a simple point-to-point overlay – OSPF, BGP, or RIP can ride the GRE interface as if it were a normal point-to-point link.
– Connecting two sites across a private/MPLS underlay where the provider already isolates traffic and encryption is not required.
– Lab and interoperability testing, including GRE peering with non-Fortinet routers (Cisco IOS, Linux, etc.).
If the data crosses an untrusted network, do not use bare GRE. Move to GRE-over-IPsec.
Reference topology
This guide uses two FortiGates connected across a routed transport network. The transport could be the internet (lab only), an MPLS handoff, or a private WAN.
| Element | FortiGate A (HQ) | FortiGate B (Branch) |
| Underlay (WAN) interface | Server (VLAN) | port1 |
| Underlay IP (transport) | 10.1.106.1 | 10.1.106.180 |
| GRE tunnel interface name | gre-to-branch | gre-to-DC |
| GRE local gateway | 10.1.106.1 | 10.1.106.2 |
| GRE remote gateway | 10.1.106.180 | 10.1.106.1 |
| Tunnel interface IP (overlay) | 198.19.249.1/32 | 198.19.240.2/32 |
| Tunnel remote IP (overlay peer) | 198.19.240.2 | 198.19.240.1 |
| LAN behind device | 198.19.250.1/32 (LB) | 198.19.250.2/32 (LB) |
The overlay /32 plus remote-IP model is the FortiOS idiom for GRE: you assign the tunnel interface a host address and explicitly point it at the peer’s tunnel address. A /30 also works; the /32 + remote approach is cleaner and avoids wasted addressing.
Prerequisites
Before configuring the tunnel, confirm:
1. Underlay reachability – FortiGate A must be able to reach FortiGate B’s transport IP and vice versa. Test with `execute ping`. GRE rides on top of this; if the underlay is down, the tunnel never comes up.
2. IP protocol 47 is permitted end to end – GRE is its own IP protocol (47), not TCP or UDP. Any intermediate firewall, ISP filter, or upstream policy must allow protocol 47 in both directions. This is the single most common reason a GRE tunnel silently fails.
3. No overlapping LAN subnets – between the two sites (or you will need NAT, which is out of scope here).
4. Administrative access – to both FortiGates (CLI strongly recommended for GRE; the GUI exposes only part of the configuration).
Step 1 — Confirm underlay reachability
On FortiGate A:
execute ping 10.1.106.180
On FortiGate B:
execute ping 10.1.106.1
Both must succeed before continuing. If they do not, fix routing and policy on the underlay first. Nothing below will work until the transport path is healthy.
Step 2 — Create the GRE tunnel interface
GRE tunnels are defined under config system gre-tunnel. This creates the logical tunnel and binds it to a local underlay interface and the remote peer’s transport address.
FortiGate A (HQ):
config system gre-tunnel
edit "gre-to-branch"
set interface "Server"
set local-gw 10.1.106.1
set remote-gw 10.1.106.180
next
end
FortiGate B (Branch):
config system gre-tunnel
edit "gre-to-DC"
set interface "port1"
set local-gw 10.1.106.180
set remote-gw 10.1.106.1
next
end
Field meanings:
– interface is the underlay interface that sources the GRE packets (the egress WAN port).
– local-gw is this FortiGate’s own transport IP used as the GRE source.
– remote-gw is the peer FortiGate’s transport IP, the GRE destination.
At this point the tunnel object exists and a system interface with the same name (gre-to-Branch / gre-to-DC) is automatically created, but it has no IP addressing yet.
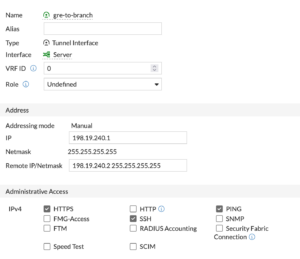
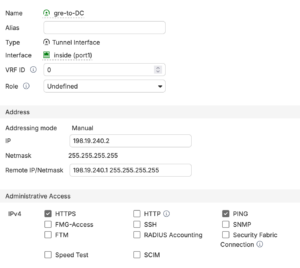
Step 3 — Address the tunnel interface
The GRE interface needs an overlay IP and an explicit pointer to the peer’s overlay IP. This is done under config system interface on the auto-created tunnel interface.
FortiGate A (HQ):
config system interface
edit "gre-to-Branch"
set ip 198.19.240.1 255.255.255.255
set remote-ip 198.19.240.2 255.255.255.255
set allowaccess ping
next
end
FortiGate B (Branch):
config system interface
edit "gre-to-DC"
set ip 198.19.240.2 255.255.255.255
set remote-ip 198.19.240.1 255.255.255.255
set allowaccess ping
next
end
Notes:
– ip is this side’s tunnel (overlay) address as a /32.
– remote-ip tells FortiOS the peer’s tunnel address so it can resolve the point-to-point next hop. On older FortiOS, the mask field on remote-ip is required; supply 255.255.255.255.
– allowaccess ping lets you ping the tunnel interface IP for verification. Keep it minimal; do not enable management protocols on the tunnel unless you need them.
Step 4 — Route traffic across the tunnel
The tunnel is now addressable, but the FortiGate has no reason to send LAN traffic through it. Add static routes for the remote LAN pointing at the GRE interface. Because it is a point-to-point interface, you route to the interface itself (a gateway is not strictly required, though specifying the peer overlay IP is fine).
FortiGate A (HQ) — reach Branch LAN 198.19.250.2/32:
config router static
edit 0
set dst 198.19.250.2 255.255.255.255
set device "gre-to-Branch"
next
end
FortiGate B (Branch) — reach HQ LAN 10.10.0.0/24:
config router static
edit 0
set dst 198.19.250.1 255.255.255.255
set device "gre-to-DC"
next
end
If you prefer a dynamic routing protocol over the tunnel, you can instead form an OSPF or BGP adjacency on the 198.19.240/30-style overlay. Static routing is shown here for clarity.
Step 5 — Firewall policies for tunneled traffic
GRE tunnel traffic must be permitted by policy, in both directions, treating the GRE interface as the tunnel zone. You need policies allowing LAN-to-tunnel and tunnel-to-LAN.
FortiGate A (HQ):
config firewall policy
edit 0
set name "LAN-to-GRE-Branch"
set srcintf "port2"
set dstintf "gre-to-Branch"
set srcaddr "HQ-LAN"
set dstaddr "Branch-LAN"
set action accept
set schedule "always"
set service "ALL"
next
edit 0
set name "GRE-B-to-LAN"
set srcintf "gre-to-Branch"
set dstintf "port2"
set srcaddr "Branch-LAN"
set dstaddr "HQ-LAN"
set action accept
set schedule "always"
set service "ALL"
next
end
FortiGate B (Branch):
config firewall policy
edit 0
set name "LAN-to-GRE-DC"
set srcintf "port2"
set dstintf "gre-to-DC"
set srcaddr "Branch-LAN"
set dstaddr "HQ-LAN"
set action accept
set schedule "always"
set service "ALL"
next
edit 0
set name "GRE-A-to-LAN"
set srcintf "gre-to-DC"
set dstintf "port2"
set srcaddr "HQ-LAN"
set dstaddr "Branch-LAN"
set action accept
set schedule "always"
set service "ALL"
next
end
Define HQ-LAN (198.19.250.1/32) and Branch-LAN (198.19.250.2/32) as firewall address objects on the respective devices first. Do not enable NAT on these policies for site-to-site routed traffic; you want the original source addresses preserved across the tunnel.
Disclaimer: Service ALL is shown for brevity. In production, scope policies to the services and source/destination objects actually required, and apply security profiles per your standards rather than permitting all traffic between sites.
Step 6 — (Optional) GRE keepalives
By default a GRE tunnel interface can appear “up” even when the peer is unreachable, because GRE is stateless. Keepalives let the FortiGate detect a dead peer and bring the interface down so routing can react. Keepalives are configured on the tunnel object.
Both FortiGates (adjust names):
config system gre-tunnel
edit "gre-to-Branch"
set keepalive-interval 5
set keepalive-failtimes 4
next
end
– keepalive-interval is seconds between keepalive probes.
– keepalive-failtimes is the number of consecutive missed probes before the tunnel is declared down.
With the values above, the tunnel is marked down after roughly 20 seconds of lost keepalives. Both ends should run keepalives for symmetric detection.
Step 7 — MTU and MSS handling
GRE adds 24 bytes of overhead (20-byte outer IP header + 4-byte GRE header). On a standard 1500-byte underlay, the effective tunnel payload MTU is about 1476 bytes. Without adjustment, large TCP flows can blackhole when DF is set and PMTUD is filtered.
Two common mitigations:
1. TCP MSS clamping on the tunnel policies (recommended, robust):
config firewall policy
edit <policy-id-for-tunnel>
set tcp-mss-sender 1436
set tcp-mss-receiver 1436
next
end
1436 = 1476 tunnel MTU minus 40 bytes of TCP/IP header. Apply to the policies that send traffic into the tunnel on both FortiGates.
2. Set the tunnel interface MTU explicitly (if you need to override):
config system interface
edit "gre-to-Branch"
set mtu-override enable
set mtu 1476
next
end
MSS clamping is generally the more reliable fix because it works regardless of PMTUD behavior on intermediate hops.
Verification
Check the tunnel interface state:
get system interface physical | grep -A2 gre-to-branch
diagnose netlink interface list gre-to-branch
Ping the peer’s tunnel (overlay) IP from FortiGate A:
execute ping 198.19.250.255.2
If this succeeds, GRE encapsulation and the overlay are working.
Ping across to the remote LAN, sourced from the local LAN interface:
execute ping-options source 198.19.250.2
execute ping 198.19.250.1
Confirm the route resolves to the tunnel:
get router info routing-table static
You should see 198.19.250.2/32 via the gre-to-Branch interface.
Watch GRE packets on the underlay (sniffer):
diagnose sniffer packet port1 'proto 47' 4
Protocol 47 packets flowing in both directions confirm GRE is on the wire.
Troubleshooting
| Symptom | Likely cause | Action |
| Tunnel interface never comes up | Underlay unreachable, or local-gw/remote-gw reversed | Verify execute ping to peer transport IP; recheck local-gw and remote-gw |
| Underlay pings work, overlay ping fails | IP protocol 47 blocked by an upstream/ISP filter | Sniff proto 47 on both ends; confirm protocol 47 permitted end to end |
| Overlay ping works, LAN-to-LAN fails | Missing route or missing firewall policy | Check static route device and the tunnel policies in both directions |
| Large transfers stall, small pings fine | MTU/MSS, DF plus filtered PMTUD | Apply MSS clamping (1436) on tunnel policies |
| Tunnel shows up but peer is dead | No keepalives; GRE is stateless | Enable keepalive-interval / keepalive-failtimes on both ends |
| Asymmetric or no return traffic | remote-ip not set or wrong on tunnel interface | Confirm set remote-ip points at the peer’s /32 tunnel address |
| Traffic leaves unencrypted (expected) | Bare GRE has no encryption by design | If confidentiality is required, migrate to GRE-over-IPsec |
Appendix A — Bare GRE versus GRE-over-IPsec
| Attribute | Bare GRE (this guide) | GRE-over-IPsec |
| Encryption | None | IPsec ESP encryption |
| Integrity / authentication | None | IPsec authentication |
| Carries multicast / routing protocols | Yes | Yes |
| Suitable over public internet | No | Yes |
| Suitable over trusted/private WAN | Yes | Yes (defense in depth) |
| Overhead | ~24 bytes | ~24 bytes GRE + IPsec overhead |
| Config complexity | Lower | Higher |
If you ever need to add encryption later, the migration path is to build a phase1/phase2 IPsec tunnel between the same transport endpoints and bind the GRE tunnel inside it, rather than rebuilding the overlay from scratch.
Recent posts
-

-

DNS is one of those technologies that quietly underpins... Full Story
-

BGP issues on FortiGate firewalls usually trace back to... Full Story
-

Every time your laptop talks to your router, a... Full Story
-

If you've spent any time configuring NAT on a... Full Story
-

If you have spent any time configuring firewall policies... Full Story
-

High availability on FortiGate is one of those features... Full Story
-

If you've configured SD-WAN on a FortiGate, you've almost... Full Story
-

FortiLink is the management protocol that turns a FortiSwitch... Full Story
-

FortiSwitches are pretty rock solid from Mean Time Between... Full Story
-

This is a quicky tip. Have you ever gone... Full Story
-

DNS is one of those quiet pieces of internet... Full Story
-

This article is an updated version of the previous... Full Story
-

You will add ns2 as a secondary (slave) BIND9... Full Story
-

In the process of deploying my lab, I needed... Full Story
-

RFC 8805, used to be known as Self-Correcting IP... Full Story
-

Years back, I wrote an article about certificate pinning. ... Full Story
-

FortiGates have the ability to send alerts to Microsoft... Full Story
-

In this post, I am going to walk through... Full Story
-

Troubleshooting VoIP on a FortiGate can feel like trying... Full Story
-

Prior to FortiOS 7.0, there were three commands to... Full Story
-

In this post, I am going to go over... Full Story
-

What we are going to do: We are going... Full Story
-

Choosing between FGCP (FortiGate Clustering Protocol) and FGSP (FortiGate... Full Story
-

Creating a VLAN on macOS (The "Pro" Move) A... Full Story
-

This blog post explores the logic behind how macOS... Full Story
-

Pretty Fly for a Wi-Fi Tell My Wi-Fi Love... Full Story
-

Part of my daily gig is creating BoMs (Bill-of-Materials)... Full Story
-

ICMP introduces several security risks, but careful filtering, rate... Full Story
-

The command diag debug application dhcps -1 enables full... Full Story
-

In the world of FortiOS, execute tac report is... Full Story
-

LLDP; What is it The Link Layer Discovery Protocol... Full Story
-

What it actually does When you run diagnose fdsm... Full Story
-

Monkey Bites are bite-sized, high-impact security insights designed for... Full Story
-

I have run macOS in macOS with Parallels but... Full Story
-

Don't be confused with my other FortiNAC posts where... Full Story
-

This is the third session in a multi-part article... Full Story
-

Today I was configuring key-based authentication on a FortiGate... Full Story
-

Netcat, often called the "Swiss Army knife" of networking,... Full Story
-

At its core, IEEE 802.1X is a network layer... Full Story
-

In case you did not see the previous FortiNAC... Full Story
-

This is our 5th session where we are going... Full Story
-

Now that we have Wireshark installed and somewhat configured,... Full Story
-

The Philosophy of Packet Analysis Troubleshooting isn't about looking... Full Story
-

1. Executive Summary Objective: This guide replaces the legacy... Full Story
-

Every FortiGate is two devices wearing one chassis. One... Full Story
-

Every FortiGate admin knows execute ping. Most know execute... Full Story