If you've spent any time configuring user authentication on... Full Story
By Manny Fernandez
January 30, 2026

Host Header Based NAT’ng
Use Case
Well, its not 100% Network Address Translation, although it does do just that.
The Use Case is as Follows: Customer has a limited address space and the carrier is not playing nice with them by giving them a hard time to get a new IPv4 block. Customer came to me and asked if there was something they could use similar to host-headers in the webserver world. Turns out, the FortiGate CAN in fact do that. He wanted to use one public IP to host many web-based apps without the need of adding different ports for each one.
Utilizing the Load Balancing feature of the FortiGate and the Virtual Server object in the GUI, we can do just that. In our scenario, we are using three https (TCP 443) servers as the REAL servers, while the 192.168.1.101 will represent the public facing IP.
What we need
- FortiGate – running FortiOS (This lab is on a 7.6.5 version) and more than
2GBof RAM - Multiple Servers – These would be on your private network or somewhere we can route to.
- Trusted Certificate – Wildcard will be the easiest.
- Load Balancing Feature Turned On
- Certificate Feature turned on
NOTE: There are a few difference if you are using Central NAT or Not. I will list them here.
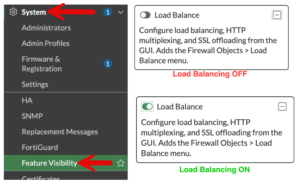
Enabling Load Balancing
If not already enabled, you will need to go to System then Feature Visibility and enabled the
Now lets create our Virtual Server by going to Policy & Objects then Virtual Servers
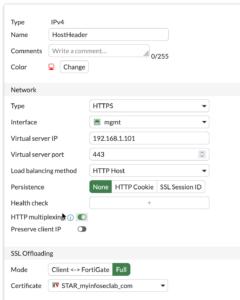
You can give it a name and a comment if necessary.
Type in my case is HTTPS.
Interface will be where the VIP will live. In my case it is the 192.168.1.101 which lives on the mgmt interface (mine is a lab environment).
Virtual IP will be the VIP the DNAT that the outside or connecting devices will see.
In Central NAT, that menu item shows DNAT and if you are not running Central NAT, it will say Virtual IP.
Load Balancing Method will be HTTP Host
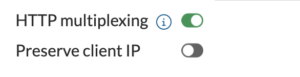
Enable the HTTP multiplexing – Normally, every time a client (browser) makes a request to a website, a TCP connection is established. Without multiplexing, the FortiGate would open a corresponding new TCP connection to the back-end server for every single client request.
With HTTP Multiplexing enabled, the FortiGate maintains a “pool” of established TCP connections to the back-end servers. Instead of opening and closing connections for every user, the FortiGate “recycles” these persistent connections to send multiple requests from different clients
SSL Offloading should be set to FULL.
Certificate should be your wildcard certificate.
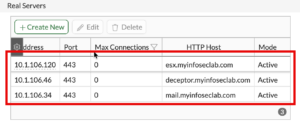
Now we will define the REAL servers. These are the servers that you are trying to connect to behind the load balancer.
You will add the real IP address and the port and then the name of the server as it appears in DNS.
FortiGate-120G # dia sniffer packet any 'host 10.1.106.120 and port 443' 4 l 0
interfaces=[any]
filters=[host 10.1.106.120 and port 443]
55.346822 port1 out 10.1.106.180.24454 -> 10.1.106.120.443: syn 3021552702
55.346963 port1 in 10.1.106.120.443 -> 10.1.106.180.24454: syn 1768556423 ack 3021552703
55.346994 port1 out 10.1.106.180.24454 -> 10.1.106.120.443: ack 1768556424
We can see above and below, how we have three-way handshake. My connections were being NAT’d.
FortiGate-120G # dia sniffer packet any 'host 10.1.106.46 and port 443' 4 l 0
interfaces=[any]
filters=[host 10.1.106.46 and port 443]
63.575683 port1 out 10.1.106.180.6912 -> 10.1.106.46.443: syn 22431656
63.575776 port1 in 10.1.106.46.443 -> 10.1.106.180.6912: syn 2349007186 ack 22431657
63.575792 port1 out 10.1.106.180.6912 -> 10.1.106.46.443: ack 2349007187
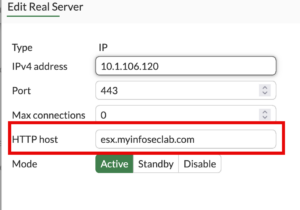
In my case, because of networking piculoarities because of the lab, I needed to NAT because my 10.1.106.0/24 networks knows how to get to the 192.168.1.0/24 network and it breaks routing. But for normal activity, you probably want to keep the real IP of the client. You can do this by enabling the Preserve client IP.
Firewall Policy
Finally, you will need the firewall policy.
![]()
The above is using central nat where you put the real IP addresses in the destination. I prefer this method but you can do what you feel more confortable or what the customer is running.
![]()
If you are not running central nat and are using policy nat, you will add the Virtual Server object in the destination.
NOTE: You policy must be in Proxy Mode not Flow Mode.
Hope this helps
Recent posts
-

-

DNS is one of those technologies that quietly underpins... Full Story
-

BGP issues on FortiGate firewalls usually trace back to... Full Story
-

Every time your laptop talks to your router, a... Full Story
-

If you've spent any time configuring NAT on a... Full Story
-

If you have spent any time configuring firewall policies... Full Story
-

High availability on FortiGate is one of those features... Full Story
-

If you've configured SD-WAN on a FortiGate, you've almost... Full Story
-

FortiLink is the management protocol that turns a FortiSwitch... Full Story
-

FortiSwitches are pretty rock solid from Mean Time Between... Full Story
-

This is a quicky tip. Have you ever gone... Full Story
-

DNS is one of those quiet pieces of internet... Full Story
-

This article is an updated version of the previous... Full Story
-

You will add ns2 as a secondary (slave) BIND9... Full Story
-

In the process of deploying my lab, I needed... Full Story
-

RFC 8805, used to be known as Self-Correcting IP... Full Story
-

Years back, I wrote an article about certificate pinning. ... Full Story
-

FortiGates have the ability to send alerts to Microsoft... Full Story
-

In this post, I am going to walk through... Full Story
-

Troubleshooting VoIP on a FortiGate can feel like trying... Full Story
-

Prior to FortiOS 7.0, there were three commands to... Full Story
-

In this post, I am going to go over... Full Story
-

What we are going to do: We are going... Full Story
-

Choosing between FGCP (FortiGate Clustering Protocol) and FGSP (FortiGate... Full Story
-

Creating a VLAN on macOS (The "Pro" Move) A... Full Story
-

This blog post explores the logic behind how macOS... Full Story
-

Pretty Fly for a Wi-Fi Tell My Wi-Fi Love... Full Story
-

Part of my daily gig is creating BoMs (Bill-of-Materials)... Full Story
-

ICMP introduces several security risks, but careful filtering, rate... Full Story
-

The command diag debug application dhcps -1 enables full... Full Story
-

In the world of FortiOS, execute tac report is... Full Story
-

LLDP; What is it The Link Layer Discovery Protocol... Full Story
-

What it actually does When you run diagnose fdsm... Full Story
-

Monkey Bites are bite-sized, high-impact security insights designed for... Full Story
-

I have run macOS in macOS with Parallels but... Full Story
-

Don't be confused with my other FortiNAC posts where... Full Story
-

This is the third session in a multi-part article... Full Story
-

Today I was configuring key-based authentication on a FortiGate... Full Story
-

Netcat, often called the "Swiss Army knife" of networking,... Full Story
-

At its core, IEEE 802.1X is a network layer... Full Story
-

In case you did not see the previous FortiNAC... Full Story
-

This is our 5th session where we are going... Full Story
-

Now that we have Wireshark installed and somewhat configured,... Full Story
-

The Philosophy of Packet Analysis Troubleshooting isn't about looking... Full Story
-

Overview FortiOS 8.0 introduces custom tags as a first-class... Full Story
-

These are two distinct mechanisms on FortiOS, and conflating... Full Story
-

Replacement messages are the pages and text blocks that... Full Story