If you've spent any time configuring user authentication on... Full Story
By Manny Fernandez
March 9, 2026

FortiNAC Device Profiling and Config Wizard – Session 3
This is the third session in a multi-part article on FortiNAC. In the previous ones we have (1) Installing it, (2) Initial Discovery and now in this one, we will go over the Config Wizard as well as Device Profiling.
Port 2 on the FortiNAC
Let’s talk about port 2 on the NAC server. In FortiNAC (Network Access Control), Port 2 (eth1) typically serves as the Isolation Interface (also known as the logical eth1 or the Service Interface). Its primary function is to handle traffic for devices that have not yet been “accepted” or fully authenticated onto the production network.
Core Functions of Port 2
Captive Portal Delivery
When a new or non-compliant device connects to the network, FortiNAC uses Port 2 to host the Captive Portal. This is where users see login screens, Acceptable Use Policies (AUP), or registration forms.
Traffic Redirection (Quarantine)
Devices in an “Isolation” or “Quarantine” state are logically shunted to this interface. Port 2 acts as the gateway for these restricted devices, ensuring they cannot reach the internal production environment but can reach the FortiNAC services needed to get healthy or authenticated.
DHCP and DNS Services
In many configurations, Port 2 runs local services to manage isolated endpoints:
* DHCP – Assigns temporary IP addresses to devices in the isolation VLAN.
* DNS – Provides “DNS Steering,” which intercepts any web request (like infosecmonkey.com) and redirects the user’s browser to the FortiNAC registration page.
Communication within the Isolation VLAN
Port 2 is physically or logically connected to the Isolation/Registration VLAN on your switching infrastructure. It is the “landing zone” for any device that has not yet passed the security posture check.
FortiGate/FortiSwitch Configuration Port2
To have port2 be able to route to l3 subnets via Layer 3 Isolation you need to be able to get packets to and from the isolation VLAN of each site.
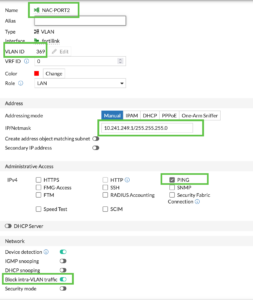
Here we have a VLAN where my FortiNAC’s port2 will communicate with my FortiGate. I created a new VLAN 369 and assigned an IP address to it of 10.241.249.1/24. I enabled ping and enabled the Block Intra-VLAN traffic.
FortiGate/FortiSwitch Isolation VLAN
At the remote sites, we need to create VLANs to be used as Isolation VLANs. I have one I created on my FortiSwitch via the FortiGate
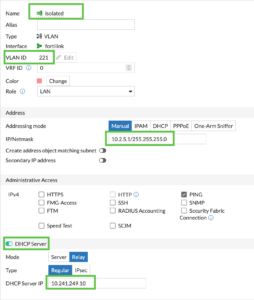
In this VLAN, we configure it as a DHCP Relay Server to the IP address of Port2 on the FortiNAC (10.241.249.10 which we will be configured later).
Running Config Wizard
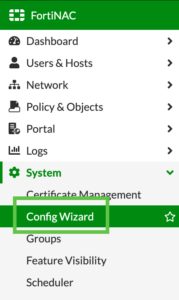
Once you have an IP address on your FortiNAC and you have licensed it through support.fortinet.com, and you have the basic dashboard, you can go to System then Config Wizard
Under the basic network section, you will need validate your information for the management interface.
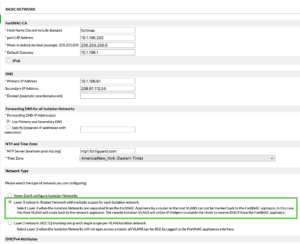
Now we will choose the Layer 3 Isolation step.
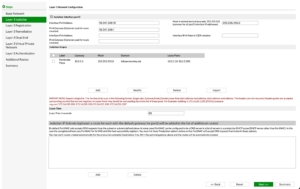
Here we will configure an IP address on the same subnet we created earlier. As you can see, I used 10.241.249.10/24 and gave it a gateway of 10.241.249.1.
Here you will define the DHCP scopes for the remote isolation network(s).
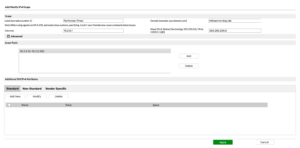
In my case, I have 10.2.5.10–10.2.5.200 and the gateway (simile to Option3 on DHCP).
In my case, (if you have read my other articles, its a thing with me), I needed to add the VLAN to my trunk ports.
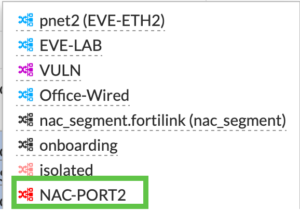
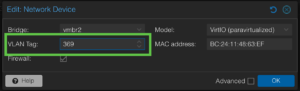
Here you can see NAC-PORT2 has been added. Additionally, on my ProxMox, I need to add the VLAN tag to my interface.
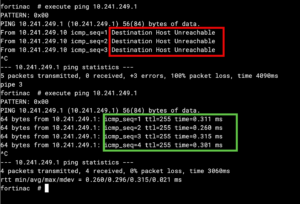
To test it, I went to the CLI on the FortiNAC and ping’d the gateway.
Device Profiling
In my case, I saw that I had some APs (Access Points) on my network, and I wanted to register them. There are two ways to do this. One of the ways is with a rule and the other is manually.
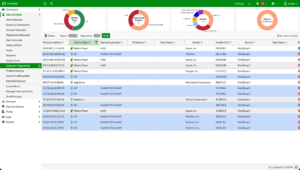
So I did a ⌘ select, and selected all the APs.
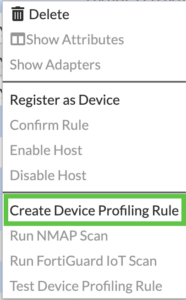
You are now going to right-click on any of them and choose Create Device Profiling Rule
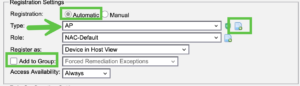
You can set these devices to automatic register or manual register. Since it is my lab, I will set to automatic
You can click the little page icon, and change the icon.
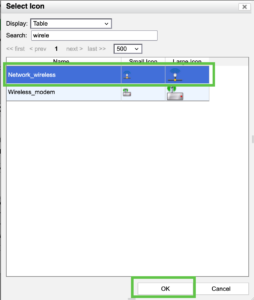
In my case, I am doing Access Points so Network_wireless and hit OK.
Go to System then Device Profiling Rules

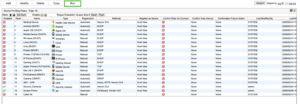
On the top row, you will see Run click that

You should see a messages telling you it is evaluating the rogues.
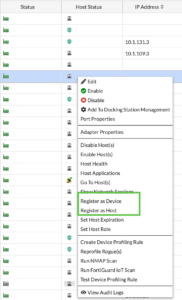
To manually register a device, and under the Users & Hosts and then Adapters section. Right click a device.
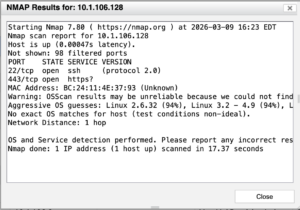
Scanning Devices for Profiling
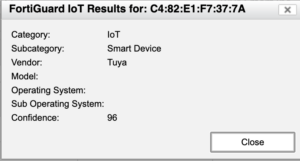
When you have unidentified rogue devices, you can use nmap and FortiGuard IOT Scan scanners to help Identify. By right clicking on the device you can choose the nmap and FortiGuard IOT scan.
Hope this helps.
Recent posts
-

-

DNS is one of those technologies that quietly underpins... Full Story
-

BGP issues on FortiGate firewalls usually trace back to... Full Story
-

Every time your laptop talks to your router, a... Full Story
-

If you've spent any time configuring NAT on a... Full Story
-

If you have spent any time configuring firewall policies... Full Story
-

High availability on FortiGate is one of those features... Full Story
-

If you've configured SD-WAN on a FortiGate, you've almost... Full Story
-

FortiLink is the management protocol that turns a FortiSwitch... Full Story
-

FortiSwitches are pretty rock solid from Mean Time Between... Full Story
-

This is a quicky tip. Have you ever gone... Full Story
-

DNS is one of those quiet pieces of internet... Full Story
-

This article is an updated version of the previous... Full Story
-

You will add ns2 as a secondary (slave) BIND9... Full Story
-

In the process of deploying my lab, I needed... Full Story
-

RFC 8805, used to be known as Self-Correcting IP... Full Story
-

Years back, I wrote an article about certificate pinning. ... Full Story
-

FortiGates have the ability to send alerts to Microsoft... Full Story
-

In this post, I am going to walk through... Full Story
-

Troubleshooting VoIP on a FortiGate can feel like trying... Full Story
-

Prior to FortiOS 7.0, there were three commands to... Full Story
-

In this post, I am going to go over... Full Story
-

What we are going to do: We are going... Full Story
-

Choosing between FGCP (FortiGate Clustering Protocol) and FGSP (FortiGate... Full Story
-

Creating a VLAN on macOS (The "Pro" Move) A... Full Story
-

This blog post explores the logic behind how macOS... Full Story
-

Pretty Fly for a Wi-Fi Tell My Wi-Fi Love... Full Story
-

Part of my daily gig is creating BoMs (Bill-of-Materials)... Full Story
-

ICMP introduces several security risks, but careful filtering, rate... Full Story
-

The command diag debug application dhcps -1 enables full... Full Story
-

In the world of FortiOS, execute tac report is... Full Story
-

LLDP; What is it The Link Layer Discovery Protocol... Full Story
-

What it actually does When you run diagnose fdsm... Full Story
-

Monkey Bites are bite-sized, high-impact security insights designed for... Full Story
-

I have run macOS in macOS with Parallels but... Full Story
-

Don't be confused with my other FortiNAC posts where... Full Story
-

This is the third session in a multi-part article... Full Story
-

Today I was configuring key-based authentication on a FortiGate... Full Story
-

Netcat, often called the "Swiss Army knife" of networking,... Full Story
-

At its core, IEEE 802.1X is a network layer... Full Story
-

In case you did not see the previous FortiNAC... Full Story
-

This is our 5th session where we are going... Full Story
-

Now that we have Wireshark installed and somewhat configured,... Full Story
-

The Philosophy of Packet Analysis Troubleshooting isn't about looking... Full Story
-

1. High-Level Overview The FortiGate Wireless Intrusion Detection System... Full Story
-

What MIMO Actually Does Multiple Input, Multiple Output (MIMO)... Full Story
-

A practitioner's tour of the diagnose, test, and fnsysctl... Full Story