If you've spent any time configuring user authentication on... Full Story
By Manny Fernandez
February 13, 2026

Installing FortiNAC on ProxMox
As in the previous article about deploying in EVE-NG, ProxMox uses the KVM version of the FortiNAC. This is a bit more involved that the OVA so there will be some SSH‘ng and some Linux commands. If you are running ProxMox, this should be normal hapnistance for you. Deploying FortiNAC on Proxmox (KVM) is a solid choice, though it’s worth noting that Fortinet doesn’t provide a native .qcow2 file out of the box. You’ll generally use the KVM/OpenStack deployment package (which comes as a .out.kvm.zip containing .qcow2 files) and adapt it for the ProxMox environment.
CPU: 4 vCPUs (minimum)
RAM: 8 GB to 16 GB (depending on the number of endpoints)
Storage: 40 GB+ (Thin provisioning is fine)
Network: At least one Bridge (vmbr0 or whatever your VLAN is) for management;
I will be using the default FortiGate Isolation/Registration VLANs and pass those through my 40GB trunk port.
Lets get started.
Downloading the File
The answer is YES, I am using some of the images from my previous article.
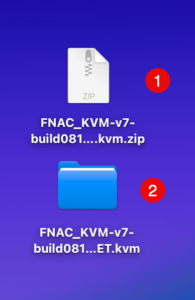
As we can see, I unzipped the .zip file and I now have a folder with the same name as the .zip file with some files in it.

You will want to upload these files to /tmp of the PVE node.
Once you upload the files, you will need to rename the FNCKVM.qcow2 to fortinac.qcow2 by running the following command.
mv FNCKVM.qcow2 fortinac.qcow2
Now you need to attach the qcow2 files to the VM.
qm importdisk 104 fortinac.qcow2 thin-mint
qm importdisk 104 datadrive.qcow2 thin-mint
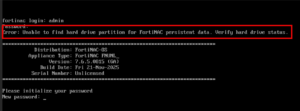
If you forget to do the datadrive, you will get the following error when you boot up.
Error: Unable to find hard drive partition for FortiNAC persistent data. Verify hard drive status.
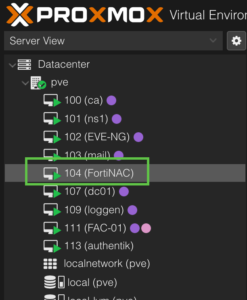
In the previous command, the 104 Is the VM ID (see below) and the thin-mint Is the storage name.
Now when you go to your Hardware, you will see an unused disk and if done right, you will have a second one. If you double-click on the unused disk and click OK.
Also, I added three additional NICs.
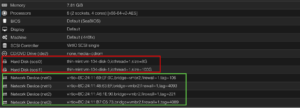
As you can see, I have my 4 Nics and my two drives.
![]()
The default username and password is root and YAMS

Once you log in, you will see the following.
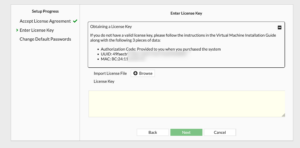
You should see a screen similar to this when you login. You will need to have the MAC address of your VM as well as the Hardware UUID. This will be needed when you enter your registration code on support.fortinet.com
More to come.
Recent posts
-

-

DNS is one of those technologies that quietly underpins... Full Story
-

BGP issues on FortiGate firewalls usually trace back to... Full Story
-

Every time your laptop talks to your router, a... Full Story
-

If you've spent any time configuring NAT on a... Full Story
-

If you have spent any time configuring firewall policies... Full Story
-

High availability on FortiGate is one of those features... Full Story
-

If you've configured SD-WAN on a FortiGate, you've almost... Full Story
-

FortiLink is the management protocol that turns a FortiSwitch... Full Story
-

FortiSwitches are pretty rock solid from Mean Time Between... Full Story
-

This is a quicky tip. Have you ever gone... Full Story
-

DNS is one of those quiet pieces of internet... Full Story
-

This article is an updated version of the previous... Full Story
-

You will add ns2 as a secondary (slave) BIND9... Full Story
-

In the process of deploying my lab, I needed... Full Story
-

RFC 8805, used to be known as Self-Correcting IP... Full Story
-

Years back, I wrote an article about certificate pinning. ... Full Story
-

FortiGates have the ability to send alerts to Microsoft... Full Story
-

In this post, I am going to walk through... Full Story
-

Troubleshooting VoIP on a FortiGate can feel like trying... Full Story
-

Prior to FortiOS 7.0, there were three commands to... Full Story
-

In this post, I am going to go over... Full Story
-

What we are going to do: We are going... Full Story
-

Choosing between FGCP (FortiGate Clustering Protocol) and FGSP (FortiGate... Full Story
-

Creating a VLAN on macOS (The "Pro" Move) A... Full Story
-

This blog post explores the logic behind how macOS... Full Story
-

Pretty Fly for a Wi-Fi Tell My Wi-Fi Love... Full Story
-

Part of my daily gig is creating BoMs (Bill-of-Materials)... Full Story
-

ICMP introduces several security risks, but careful filtering, rate... Full Story
-

The command diag debug application dhcps -1 enables full... Full Story
-

In the world of FortiOS, execute tac report is... Full Story
-

LLDP; What is it The Link Layer Discovery Protocol... Full Story
-

What it actually does When you run diagnose fdsm... Full Story
-

Monkey Bites are bite-sized, high-impact security insights designed for... Full Story
-

I have run macOS in macOS with Parallels but... Full Story
-

Don't be confused with my other FortiNAC posts where... Full Story
-

This is the third session in a multi-part article... Full Story
-

Today I was configuring key-based authentication on a FortiGate... Full Story
-

Netcat, often called the "Swiss Army knife" of networking,... Full Story
-

At its core, IEEE 802.1X is a network layer... Full Story
-

In case you did not see the previous FortiNAC... Full Story
-

This is our 5th session where we are going... Full Story
-

Now that we have Wireshark installed and somewhat configured,... Full Story
-

The Philosophy of Packet Analysis Troubleshooting isn't about looking... Full Story
-

You have twenty years of muscle memory. You type... Full Story
-

Have you ever wanted to do some testing on... Full Story
-

Ask ten engineers to define "a network" and you... Full Story