If you've spent any time configuring user authentication on... Full Story
By Manny Fernandez
May 2, 2026
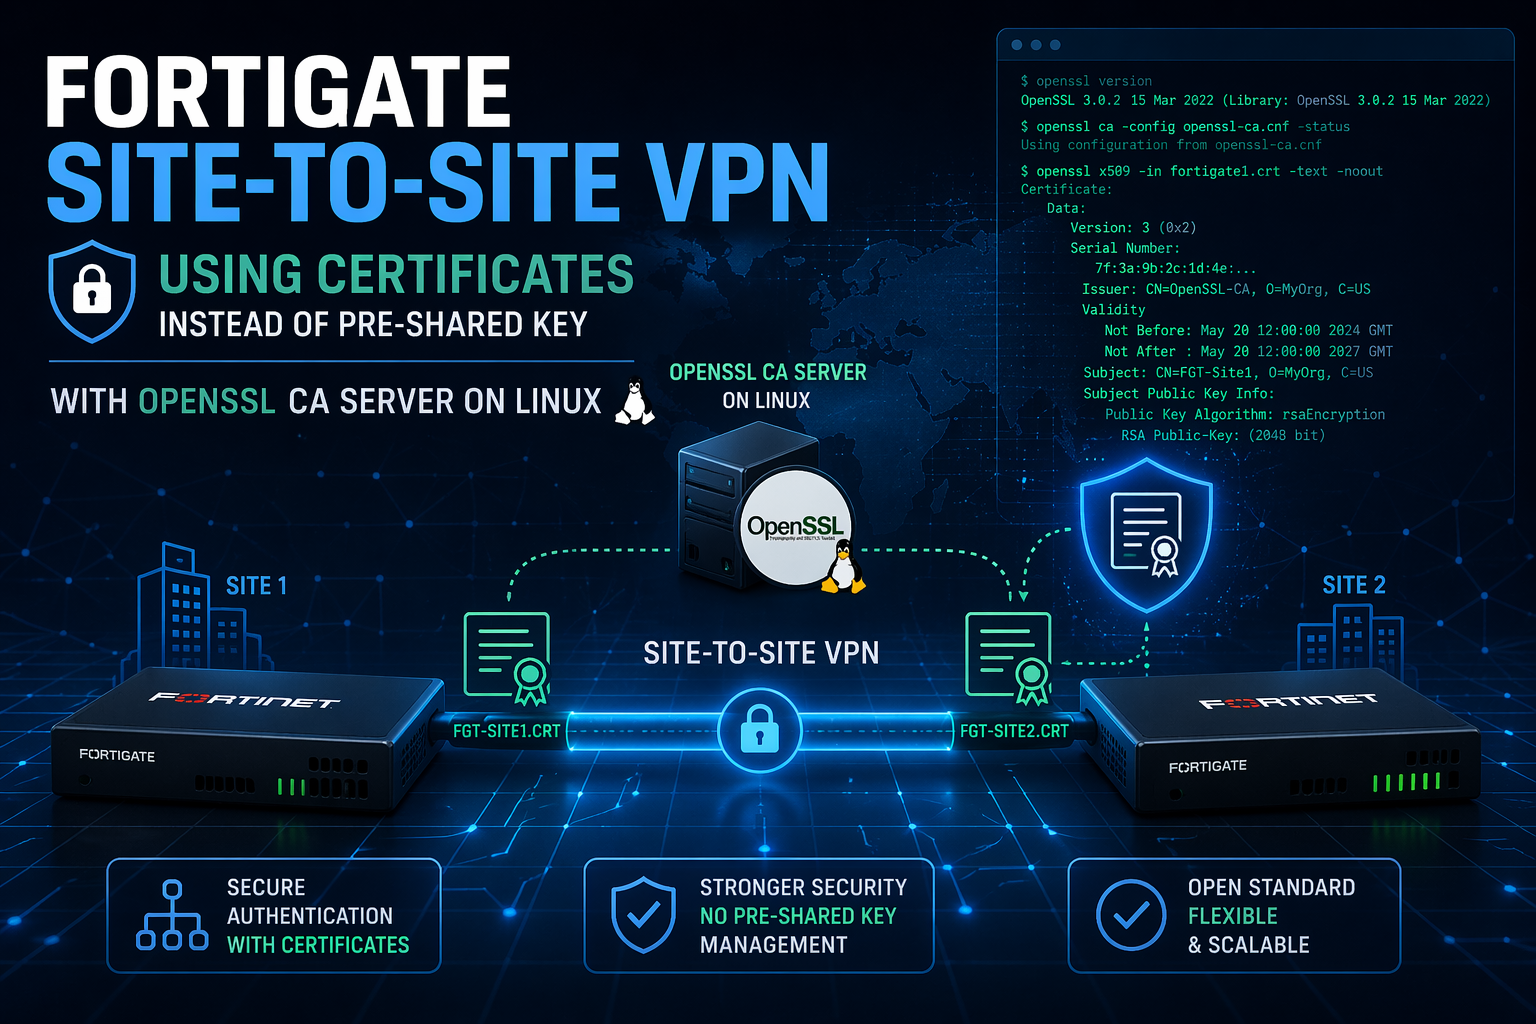
Cert-Based Site-to-Site VPN on FortiGates using Open SSL as the CA – 2026 Version
This article is an updated version of the previous one I did in 2019. In this
1. Plan your PKI and VPN parameters
Before touching any device, decide on:
– Root CA details
– Common Name (CN): e.g.,
Corp-Root-CA – Key size:
4096 bits – Validity: e.g.,
3650 days– FortiGate certificate subjects (per device)
– HQ CN:
FGT-HQ-VPN – Branch CN:
FGT-BR-VPN – Same Organization (O) across certificates; keep OU unique if you care about later segregation.
– IPsec parameters: (use
– IKE version: 2
– Authentication method:
signature (certificates) – Phase 1 proposals:
aes256-sha256 – DH group:
20 or higher (e.g., 20, 21) – Key lifetime:
28800s (P1), 3600s (P2) – Phase 2 selectors:
0.0.0.0/0 (both sides) – Mode: interface‑based IPsec
– FortiGate Site 1 –
– Public IP
12.1.1.1– Local Subnet
10.240.30.0/23– FortiGate Site 2 –
– Public IP
12.1.1.2– Local Subnet
10.240.32.0/232. Build the OpenSSL CA on Ubuntu (fresh install)
All commands assume Ubuntu 22.04+ with sudo.
2.1 Install OpenSSL and prepare CA directories
sudo apt update
sudo apt install -y openssl
Create a simple CA hierarchy:
sudo mkdir -p /opt/ca/{certs,crl,newcerts,private,csr}
sudo chmod 700 /opt/ca/private
sudo touch /opt/ca/index.txt
echo 1000 | sudo tee /opt/ca/serial
2.2 Create a dedicated openssl.cnf
Create /opt/ca/openssl.cnf with a minimal CA profile:
sudo vi /opt/ca/openssl.cnf
Example content (trimmed to essentials; adjust DN defaults as needed):
[ ca ]
default_ca = CA_default
[ CA_default ]
dir = /opt/ca
certs = $dir/certs
crl_dir = $dir/crl
new_certs_dir = $dir/newcerts
database = $dir/index.txt
serial = $dir/serial
private_key = $dir/private/ca.key.pem
certificate = $dir/certs/ca.cert.pem
default_md = sha256
name_opt = ca_default
cert_opt = ca_default
default_days = 3650
preserve = no
policy = policy_loose
[ policy_loose ]
countryName = optional
stateOrProvinceName = optional
localityName = optional
organizationName = supplied
organizationalUnitName = optional
commonName = supplied
emailAddress = optional
[ req ]
default_bits = 4096
distinguished_name = req_distinguished_name
string_mask = utf8only
default_md = sha256
x509_extensions = v3_ca
[ req_distinguished_name ]
countryName = Country Name (2 letter code)
stateOrProvinceName = State or Province Name
localityName = Locality Name
0.organizationName = Organization Name
organizationalUnitName = Organizational Unit Name
commonName = Common Name
countryName_default = US
stateOrProvinceName_default = Florida
localityName_default = Miami
0.organizationName_default = Example Corp
organizationalUnitName_default = Network
commonName_default = Corp-Root-CA
[ v3_ca ]
subjectKeyIdentifier = hash
authorityKeyIdentifier = keyid:always,issuer
basicConstraints = critical, CA:true
keyUsage = critical, digitalSignature, cRLSign, keyCertSign
[ v3_server ]
basicConstraints = CA:false
keyUsage = critical, digitalSignature, keyEncipherment
extendedKeyUsage = serverAuth, clientAuth
subjectKeyIdentifier = hash
authorityKeyIdentifier = keyid,issuer
The v3_server section will be used to sign FortiGate CSRs as end‑entity certificates suitable for IPsec
2.3 Generate the Root CA key and certificate
cd /opt/ca
sudo openssl genrsa -out private/ca.key.pem 4096
sudo chmod 600 private/ca.key.pem
sudo openssl req -config openssl.cnf \
-key private/ca.key.pem \
-new -x509 -days 3650 -sha256 \
-extensions v3_ca \
-out certs/ca.cert.pem
Fill the DN as desired (CN will be your CA name). The result `certs/ca.cert.pem` is the CA certificate you will import into both FortiGates as a CA certificate.
3. Generate certificates for the FortiGates
There are two patterns for FortiGate certs:
– Generate private key and CSR off‑box on Ubuntu, sign, then import key+cert to FortiGate.
– Or generate CSR on FortiGate and sign it externally.
Since we are using a Linux CA, we’ll do everything on Ubuntu and import PKCS\#12 into the FortiGates, which aligns with Fortinet’s recommendations for IPsec/SSL VPN certs.
Assume:
– HQ FortiGate cert name: fgt-hq-vpn
– Branch FortiGate cert name: fgt-br-vpn
3.1 Create HQ key and CSR
Creating the HQ key a CSR (Certificate Signing Request)
cd /opt/ca
sudo openssl genrsa -out private/fgt-hq-vpn.key.pem 4096
sudo openssl req -new -sha256 \
-key private/fgt-hq-vpn.key.pem \
-out csr/fgt-hq-vpn.csr.pem \
-subj "/C=US/ST=Florida/L=Miami/O=Example Corp/OU=Network/CN=FGT-HQ-VPN"
3.2 Sign HQ CSR with CA
Signing the CSR
sudo openssl ca -config openssl.cnf \
-extensions v3_server \
-days 1825 -notext -md sha256 \
-in csr/fgt-hq-vpn.csr.pem \
-out certs/fgt-hq-vpn.cert.pem
Verify:
sudo openssl x509 -in certs/fgt-hq-vpn.cert.pem -noout -text | grep "X509v3 Extended Key Usage" -A1
You should see `TLS Web Server Authentication, TLS Web Client Authentication` (or similar), confirming server/client usage is allowed.
3.3 Create Branch key and CSR, then sign
sudo openssl genrsa -out private/fgt-br-vpn.key.pem 4096
sudo openssl req -new -sha256 \
-key private/fgt-br-vpn.key.pem \
-out csr/fgt-br-vpn.csr.pem \
-subj "/C=US/ST=Florida/L=Miami/O=Example Corp/OU=Network/CN=FGT-BR-VPN"
sudo openssl ca -config openssl.cnf \
-extensions v3_server \
-days 1825 -notext -md sha256 \
-in csr/fgt-br-vpn.csr.pem \
-out certs/fgt-br-vpn.cert.pem
4. Package FortiGate certificates as PKCS\#12
FortiGate can import a certificate with its private key as either PEM pair or PKCS\#12; PKCS\#12 is usually smoother.
4.1 Create HQ PKCS\#12
cd /opt/ca
sudo openssl pkcs12 -export \
-inkey private/fgt-hq-vpn.key.pem \
-in certs/fgt-hq-vpn.cert.pem \
-certfile certs/ca.cert.pem \
-name "fgt-hq-vpn" \
-out certs/fgt-hq-vpn.p12
Set an export password and record it securely; you will need it at import time on the FortiGate.
4.2 Create Branch PKCS\#12
sudo openssl pkcs12 -export \
-inkey private/fgt-br-vpn.key.pem \
-in certs/fgt-br-vpn.cert.pem \
-certfile certs/ca.cert.pem \
-name "fgt-br-vpn" \
-out certs/fgt-br-vpn.p12
Now you have:
– Root CA: /opt/ca/certs/ca.cert.pem
– HQ client cert (with key): /opt/ca/certs/fgt-hq-vpn.p12
– Branch client cert (with key): /opt/ca/certs/fgt-br-vpn.p12
Copy these files securely to your admin workstation or directly upload via HTTPS to each FortiGate.
5. Import CA and local certificates into each FortiGate
The overall Fortinet flow is: import the CA as a CA certificate, import the end‑entity cert as a local certificate, create a PKI peer object referencing the CA, then reference both in the IPsec Phase1.
5.1 Enable certificate visibility (GUI)
On each FortiGate (HQ and Branch), ensure certificates feature is enabled in GUI:
– Go to System → Feature Visibility.
– Enable Certificates.
– Apply.
5.2 Import CA certificate on both FortiGates
GUI path (HQ and Branch):
– Go to System → Certificates.
– Click Import → CA Certificate.
– Upload ca.cert.pem.
– Name it (e.g., Corp-Root-CA).
CLI equivalent:
config vpn certificate ca
edit "Corp-Root-CA"
set ca "<paste-base64-of-ca.cert.pem>"
next
end
(I recommend using the GUI)
5.3 Import local certificate+key on HQ
– Go to System → Certificates.
– Click Import → Local Certificate.
– Type: PKCS12 Certificate (or Certificate with key depending on GUI wording).
– File: fgt-hq-vpn.p12.
– Enter the PKCS\#12 password.
– After import, you should see a local certificate named fgt-hq-vpn in the Local Certificates table.
Repeat on Branch using fgt-br-vpn.p12.
Note: On the HQ side, you should have a fgt-hq-vpn certificate in the Local Certificates section and your root CA in the Remote CA Certificates

Troubleshooting :
diagnose vpn ike log filter rem-addr4 %Peer-IP%
dia debug application ike -255
dia deb en
Recent posts
-

-

DNS is one of those technologies that quietly underpins... Full Story
-

BGP issues on FortiGate firewalls usually trace back to... Full Story
-

Every time your laptop talks to your router, a... Full Story
-

If you've spent any time configuring NAT on a... Full Story
-

If you have spent any time configuring firewall policies... Full Story
-

High availability on FortiGate is one of those features... Full Story
-

If you've configured SD-WAN on a FortiGate, you've almost... Full Story
-

FortiLink is the management protocol that turns a FortiSwitch... Full Story
-

FortiSwitches are pretty rock solid from Mean Time Between... Full Story
-

This is a quicky tip. Have you ever gone... Full Story
-

DNS is one of those quiet pieces of internet... Full Story
-

This article is an updated version of the previous... Full Story
-

You will add ns2 as a secondary (slave) BIND9... Full Story
-

In the process of deploying my lab, I needed... Full Story
-

RFC 8805, used to be known as Self-Correcting IP... Full Story
-

Years back, I wrote an article about certificate pinning. ... Full Story
-

FortiGates have the ability to send alerts to Microsoft... Full Story
-

In this post, I am going to walk through... Full Story
-

Troubleshooting VoIP on a FortiGate can feel like trying... Full Story
-

Prior to FortiOS 7.0, there were three commands to... Full Story
-

In this post, I am going to go over... Full Story
-

What we are going to do: We are going... Full Story
-

Choosing between FGCP (FortiGate Clustering Protocol) and FGSP (FortiGate... Full Story
-

Creating a VLAN on macOS (The "Pro" Move) A... Full Story
-

This blog post explores the logic behind how macOS... Full Story
-

Pretty Fly for a Wi-Fi Tell My Wi-Fi Love... Full Story
-

Part of my daily gig is creating BoMs (Bill-of-Materials)... Full Story
-

ICMP introduces several security risks, but careful filtering, rate... Full Story
-

The command diag debug application dhcps -1 enables full... Full Story
-

In the world of FortiOS, execute tac report is... Full Story
-

LLDP; What is it The Link Layer Discovery Protocol... Full Story
-

What it actually does When you run diagnose fdsm... Full Story
-

Monkey Bites are bite-sized, high-impact security insights designed for... Full Story
-

I have run macOS in macOS with Parallels but... Full Story
-

Don't be confused with my other FortiNAC posts where... Full Story
-

This is the third session in a multi-part article... Full Story
-

Today I was configuring key-based authentication on a FortiGate... Full Story
-

Netcat, often called the "Swiss Army knife" of networking,... Full Story
-

At its core, IEEE 802.1X is a network layer... Full Story
-

In case you did not see the previous FortiNAC... Full Story
-

This is our 5th session where we are going... Full Story
-

Now that we have Wireshark installed and somewhat configured,... Full Story
-

The Philosophy of Packet Analysis Troubleshooting isn't about looking... Full Story
-

1. High-Level Overview The FortiGate Wireless Intrusion Detection System... Full Story
-

What MIMO Actually Does Multiple Input, Multiple Output (MIMO)... Full Story
-

A practitioner's tour of the diagnose, test, and fnsysctl... Full Story