If you've spent any time configuring user authentication on... Full Story
By Manny Fernandez
June 22, 2026
Deploying Cacti with NetFlow Support on Ubuntu Linux: Configuring Cisco, Fortinet and Juniper for Netflow
A step-by-step deployment and configuration guide for building a Cacti monitoring server with the FlowView plugin for NetFlow, sFlow, and IPFIX flow analysis.
1. Background: What Cacti and FlowView Do
Cacti is an open source network monitoring and graphing platform built on RRDtool. It polls devices over SNMP, stores time-series data in round-robin databases, and renders graphs for interface throughput, CPU, memory, and thousands of other data sources. Cacti gives you the “how much” of network traffic.
NetFlow answers a different question: “who is talking to whom, over what protocol, and how much.” A NetFlow-capable device (router, switch, firewall) samples traffic, builds flow records describing each conversation (source and destination IP, ports, protocol, byte and packet counts), and exports those records as UDP datagrams to a collector. Fortinet FortiGate, Cisco IOS, Juniper, MikroTik, and most enterprise gear support some flavor of flow export.
The FlowView plugin turns Cacti into that collector and analyzer. It receives exported flow datagrams, parses them, stores them in a database, and presents searchable, filterable, chartable reports inside the Cacti web console. You can answer questions like “which host consumed the most bandwidth last night” or “what destination ports are seeing the most traffic.”
How FlowView 4.x Works
The modern FlowView plugin (version 4.x) is a significant architectural change from older guides you may find online. Key points:
– FlowView 4.x no longer requires flow-tools or flow-capture. The entire receive, parse, and store pipeline is handled in PHP, bundled with the plugin.
– Flow data is stored in the MySQL or MariaDB database rather than flat files on disk. MariaDB is strongly preferred because FlowView uses Aria storage tables, which are crash safe and roughly five times faster than InnoDB for scanning historical flow data.
– A background service (systemd) runs one or more Listeners. Each Listener binds to a UDP port and receives flow exports from your devices.
– The collector auto-detects NetFlow v5, NetFlow v9, and IPFIX (v10) on the same port. You do not need a separate listener per version.
– Charting is handled by JavaScript already built into Cacti, so the old OpenFlashCharts dependency is gone.
This guide targets FlowView 4.x on Ubuntu Server 22.04 LTS or 24.04 LTS.
2. Architecture and Flow of Data
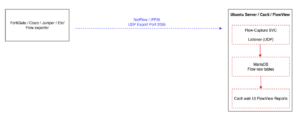
The exporter is the device that watches traffic and sends flow records. The collector is your Cacti server, which receives, stores, and visualizes them.
3. Prerequisites and Sizing
Before you start, confirm the following:
– Ubuntu Server 22.04 LTS or 24.04 LTS with root or sudo access.
– A static IP address on the Cacti server. Exporters need a fixed destination.
– At minimum 2 vCPU and 4 GB RAM for a small deployment. Flow collection is CPU and disk intensive. For busy networks budget 4 to 8 vCPU, 8 to 16 GB RAM, and fast storage (SSD or NVMe).
– Disk space scaled to flow volume and retention. Flow tables grow quickly. Start with at least 50 GB free and monitor growth.
– Network reachability: exporters must be able to send UDP to your chosen flow port (commonly 2055, 9995, or 9996), and you must poll devices via SNMP (UDP 161) for standard Cacti graphing.
Version targets used in this guide:
– Cacti 1.2.27 or newer (FlowView 4.x requires 1.2.27 minimum).
– MariaDB 10.5 or newer (10.11 LTS recommended). MySQL 8.0 works but lacks Aria tables and will be slower.
– PHP 8.1 or 8.3 depending on your Ubuntu release.
4. Step 1: Prepare the Operating System
Update the system and set the hostname and timezone. Accurate time is critical because flow timestamps and RRD polling both depend on it.
sudo apt update && sudo apt upgrade -y
sudo hostnamectl set-hostname cacti-flow-01
sudo timedatectl set-timezone America/New_York
sudo apt install -y chrony
sudo systemctl enable --now chrony
timedatectl status
Install baseline tooling that later steps and FlowView depend on. The `iproute2` package provides `ss`, which FlowView uses to verify the listener service is running.
sudo apt install -y wget curl unzip git rrdtool snmp snmpd \
iproute2 net-tools moreutils
5. Step 2: Install MariaDB and Tune It for Cacti
Install MariaDB and run the security hardening script.
sudo apt install -y mariadb-server mariadb-client
sudo systemctl enable --now mariadb
sudo mysql_secure_installation
During mysql_secure_installation, set a strong root password, remove anonymous users, disallow remote root login, and drop the test database.
Cacti is strict about database tuning and will warn you in its install checklist if values are wrong. Create a dedicated tuning file.
sudo tee /etc/mysql/mariadb.conf.d/90-cacti.cnf >/dev/null <<'EOF'
[mysqld]
character-set-server = utf8mb4
collation-server = utf8mb4_unicode_ci
max_heap_table_size = 128M
tmp_table_size = 128M
join_buffer_size = 128M
innodb_buffer_pool_size = 2G
innodb_doublewrite = ON
innodb_flush_log_at_timeout = 3
innodb_read_io_threads = 32
innodb_write_io_threads = 16
innodb_buffer_pool_instances = 9
innodb_io_capacity = 5000
innodb_io_capacity_max = 10000
innodb_file_format = Barracuda
innodb_large_prefix = 1
innodb_flush_log_at_trx_commit = 2
EOF
sudo systemctl restart mariadb
Adjust innodb_buffer_pool_size to roughly half of system RAM for a dedicated server. The values above suit an 8 GB host. On Ubuntu 24.04 with MariaDB 10.11 the innodb_file_format and innodb_large_prefix settings are deprecated and can be omitted if MariaDB logs warnings.
Create the Cacti database and a dedicated user.
sudo mysql -u root -p
CREATE DATABASE cacti DEFAULT CHARACTER SET utf8mb4 COLLATE utf8mb4_unicode_ci;
CREATE USER 'cactiuser'@'localhost' IDENTIFIED BY‘ChangeMe_StrongPassword‘;
GRANT ALL PRIVILEGES ON cacti.* TO 'cactiuser'@'localhost';
GRANT SELECT ON mysql.time_zone_name TO 'cactiuser'@'localhost';
FLUSH PRIVILEGES;
EXIT;
Cacti requires the MySQL time zone tables to be populated, or graphs and flow timestamps will be wrong.
sudo mariadb-tzinfo-to-sql /usr/share/zoneinfo | sudo mysql -u root -p mysql
6. Step 3: Install the Web Stack (Apache and PHP)
Install Apache, PHP, and every PHP extension Cacti checks for. The exact PHP version depends on your Ubuntu release; the metapackage `php` pulls the default.
sudo apt install -y apache2 libapache2-mod-php \
php php-mysql php-snmp php-xml php-mbstring php-json php-gd \
php-gmp php-zip php-ldap php-curl php-intl php-bcmath \
php-cli php-common php-pear php-dev
Set PHP runtime values that Cacti requires. Find your active php.ini for Apache and CLI and edit both.
# Apache PHP ini (path varies by version, e.g. 8.1 or 8.3)
PHPVER=$(php -r 'echo PHP_MAJOR_VERSION.".".PHP_MINOR_VERSION;')
echo "Detected PHP $PHPVER"
for INI in /etc/php/$PHPVER/apache2/php.ini /etc/php/$PHPVER/cli/php.ini; do
sudo sed -i 's/^memory_limit = .*/memory_limit = 512M/' "$INI"
sudo sed -i 's/^max_execution_time = .*/max_execution_time = 90/' "$INI"
sudo sed -i 's|^;date.timezone =.*|date.timezone = America/New_York|' "$INI"
done
sudo systemctl restart apache2
The date.timezone value must match the system timezone. A mismatch is the most common cause of FlowView showing flows at the wrong time.
7. Step 4: Install SNMP and spine (Optional but Recommended)
Spine is Cacti’s high-performance C-based poller. It is optional for FlowView itself but recommended for any real deployment because the default PHP poller does not scale. You can install spine from the Cacti packages or build it. The distro package is simplest:
sudo apt install -y cacti-spine
If cacti-spine is unavailable on your release, you can continue with the built-in PHP poller (cmd.php) and add spine later. FlowView does not depend on the poller choice.
8. Step 5: Install Cacti Core
You have two options. Option A (distro package) is fastest but may lag the version FlowView needs. Option B (manual install) gives you full control and the latest release. For FlowView 4.x, Option B is recommended so you are on Cacti 1.2.27 or newer.
Option A: Quick Path via apt
sudo apt install -y cacti
The package configures Apache and the database for you via debconf. After it completes, verify the version is 1.2.27 or higher (grep CACTI_VERSION /usr/share/cacti/site/include/cacti_version). If it is older, use Option B instead.
Option B: Manual Install of Latest Cacti (Recommended)
Download the latest stable release and place it in the web root.
cd /tmp
LATEST=$(curl -s https://api.github.com/repos/Cacti/cacti/releases/latest \
| grep tag_name | cut -d '"' -f4)
echo "Latest Cacti release: $LATEST"
wget "https://github.com/Cacti/cacti/archive/refs/tags/${LATEST}.tar.gz" -O cacti.tar.gz
tar -xzf cacti.tar.gz# Read the real extracted directory name from the tarball rather than guessing.
# The release tag looks like “release/1.2.30”, and GitHub names the archive
# folder “cacti-release-1.2.30” (the slash becomes a dash, it is not stripped).
SRCDIR=$(tar -tzf cacti.tar.gz | head -1 | cut -d/ -f1)
echo "Extracted directory: $SRCDIR"
sudo rm -rf /var/www/html/cacti
sudo mv "$SRCDIR" /var/www/html/cacti
Do not hand-build the directory name from the tag (for example cacti-${LATEST#release/}), because that produces cacti-1.2.30 while the actual folder is cacti-release-1.2.30, and the move fails with “cannot start”. Reading the name from the tarball as shown above is reliable across all releases. If you run the move twice, re-extract first: once mv has relocated the directory it is gone from /tmp, so a second mv of the same name will fail.
Load the Cacti schema into the database.
sudo mysql -u root -p cacti < /var/www/html/cacti/cacti.sql
Create the Cacti config file pointing at your database.
sudo cp /var/www/html/cacti/include/config.php.dist \
/var/www/html/cacti/include/config.php
sudo nano /var/www/html/cacti/include/config.php
Set these values in config.php:
$database_type = 'mysql';
$database_default = 'cacti';
$database_hostname = 'localhost';
$database_username = 'cactiuser';
$database_password =‘ChangeMe_StrongPassword’; #Change to the strong password you set
$database_port = '3306';
$database_ssl = false;
Set ownership and permissions so the web server and poller can write where they need to.
sudo chown -R www-data:www-data /var/www/html/cacti
sudo find /var/www/html/cacti -type d -exec chmod 755 {} \;
sudo find /var/www/html/cacti -type f -exec chmod 644 {} \;
sudo chmod -R 775 /var/www/html/cacti/{log,rra,resource,scripts,cache}
Create the poller cron job. Cacti polls every five minutes by default.
echo "*/5 * * * * www-data php /var/www/html/cacti/poller.php > /dev/null 2>&1" \
| sudo tee /etc/cron.d/cacti
Create an Apache virtual host (or alias) for Cacti.
sudo tee /etc/apache2/conf-available/cacti.conf >/dev/null <<'EOF'
Alias /cacti /var/www/html/cacti
<Directory /var/www/html/cacti>
Options +FollowSymLinks
AllowOverride None
Require all granted
AddType application/x-httpd-php .php
php_value max_execution_time 90
php_value memory_limit 512M
php_value date.timezone America/New_York
</Directory>
EOF
sudo a2enconf cacti
sudo systemctl reload apache2
9. Step 6: Run the Cacti Web Installer
Open a browser to the Cacti URL:
http://YOUR_SERVER_IP/cacti
Log in with the default credentials admin / admin. You will be forced to change the password on first login.
Work through the installer:
1. Accept the license.
2. Pre-installation checks. Cacti validates PHP modules, database settings, directory permissions, and binary paths. Resolve every red item before continuing. Common fixes were handled in earlier steps (timezone, memory_limit, time zone tables, ownership).
3. Choose the installation type (New Primary Server).
4. Confirm database connection details.
5. Select binary paths (RRDtool, snmp utilities). The installer usually auto-detects them.
6. Choose the poller (spine if installed, otherwise cmd.php).
7. Confirm directory permissions (the `chmod 775` step above covers these).
8. Select the default device and graph templates to import. Accept the defaults.
9. Confirm and install.
After installation, log in and confirm the poller runs cleanly under Console > System Utilities > View Cacti Log. You should see poller completion messages every five minutes.
10. Step 7: Install the FlowView Plugin
FlowView ships from the Cacti GitHub organization. Clone it directly into the Cacti plugins directory and name the folder exactly flowview.
cd /var/www/html/cacti/plugins
sudo git clone https://github.com/Cacti/plugin_flowview.git flowview
If you prefer a stable tag over the development branch, check the releases page and check out a tagged version:
cd /var/www/html/cacti/plugins/flowview
sudo git fetch --tags
sudo git checkout v4.9# substitute the latest stable tag
Create the plugin database config. By default FlowView uses the Cacti database, which is fine for most deployments. For very large flow volumes you can point it at a separate database, but start simple.
cd /var/www/html/cacti/plugins/flowview
sudo cp config.php.dist config.php
sudo vi config.php
For the standard single-database setup, leave the FlowView config pointed at the Cacti connection (the defaults reference the main Cacti settings). Only change it if you are using a dedicated flow database.
Fix ownership so the web UI can manage the plugin.
sudo chown -R www-data:www-data /var/www/html/cacti/plugins/flowview
Now enable the plugin in the UI:
1. Go to Console > Configuration > Plugins.
2. Find FlowView in the list.
3. Click the install icon, then the enable icon.
Configure plugin settings under Console > Configuration > Settings > FlowView. Important values:
– Partitioning method: choose Daily for small or medium deployments, Hourly for high-volume commercial deployments.
– Retention: set how long raw flow tables are kept before they age out. Start conservatively (for example 7 to 14 days) and increase once you understand your disk growth.
– DNS resolution: enable if you want IP addresses resolved to hostnames in reports. This adds load and depends on outbound DNS.
11. Step 8: Create a Listener
A Listener is the UDP socket that receives flow exports. Each Listener binds to one port.
1. Go to FlowView > Listeners in the Cacti console.
2. Click Add (the plus icon).
3. Configure the Listener:
– Name: a clear label, for example Core-Edge-NetFlow.
– Port: the UDP port your devices will export to. 2055 is a common NetFlow v9 and IPFIX default. 9995 and 9996 are also widely used. Pick one and be consistent.
– Allowed Devices (allowed hosts): set the specific exporter IP addresses for security, or leave at 0 (all) only on a trusted management segment. Specifying allowed devices is the safer choice.
4. Save the Listener.
Remember the port number. You will configure it on both the firewall and the exporters, and you must restart the collector service after adding or changing any Listener.
12. Step 9: Install and Start the FlowView Collector Service
FlowView includes its collector service in the plugin’s service folder. This background process binds the Listener ports and writes flows to the database. The unit is named flow-capture (not flowview), and the exact filenames vary by plugin version, so always inspect your own service directory and read its README first. It is the authoritative source.
ls -la /var/www/html/cacti/plugins/flowview/service
cat /var/www/html/cacti/plugins/flowview/service/README.md
On a current 4.x checkout you will see, among others: flow-capture (the collector script the unit runs), flow-capture.service (the systemd unit), cacti-flow-capture and flow-capture-freebsd (FreeBSD variants), and the README.
Two prerequisites must be true before the service will start at all, both called out in the plugin README: the FlowView plugin must be installed and enabled in the Cacti UI, and at least one Listener must exist (Section 11). If no Listener is defined, the service will not start, because there is nothing for it to bind. Any time you add or remove a Listener, you must restart the service.
Install the unit. The shipped unit ships with `User=apache`, which is the web user on Red Hat style systems. On Ubuntu the web user is `www-data`, so you must change that line or the service runs as a nonexistent user and fails. This is the single most important edit.
sudo cp /var/www/html/cacti/plugins/flowview/service/flow-capture.service \
/etc/systemd/system/flow-capture.service
sudo vi /etc/systemd/system/flow-capture.service
In that file, confirm or set the following. The ExecStart path is usually already correct for /var/www/html/cacti:
[Service]
User=www-data
ExecStart=/usr/bin/php -q /var/www/html/cacti/plugins/flowview/service/flow-capture --systemd
ExecStop=/usr/bin/php -q /var/www/html/cacti/plugins/flowview/service/flow-capture stop
ExecReload=/usr/bin/php -q /var/www/html/cacti/plugins/flowview/service/flow-capture reload
Verify the php path matches your system (which php should return /usr/bin/php). Then reload systemd and enable the service.
sudo systemctl daemon-reload
sudo systemctl enable flow-capture
Do not start it until the plugin is enabled in the UI and a Listener exists. Once both are true:
sudo systemctl start flow-capture
sudo systemctl status flow-capture
Confirm the service is listening on your chosen UDP port.
sudo ss -lunp | grep -E '2055|9995|9996'
You should see the php process (running flow-capture) bound to the Listener port. If ss shows nothing, the usual cause is a missing Listener or the service not having been restarted after the Listener was added. Restart it after every Listener change:
sudo systemctl restart flow-capture
13. Step 10: Open the Firewall on the Collector
If the host runs UFW, allow your flow port and the web and SNMP ports.
sudo ufw allow 80/tcp comment 'Cacti web'
sudo ufw allow 2055/udp comment 'NetFlow collector'# match your Listener port
sudo ufw allow 161/udp comment 'SNMP polling'
sudo ufw reload
sudo ufw status verbose
If your exporters use 9995 or 9996, open those instead of 2055. Only open the ports you actually use.
14. Step 11: Configure Exporters to Send Flows
Configure each network device to export flow records to the Cacti server IP on the Listener port. Examples follow for common platforms. Replace COLLECTOR_IP with your Cacti server address and the port with your Listener port.
Fortinet FortiGate (NetFlow)
FortiGate exports NetFlow per interface. Configure the collector, then bind NetFlow sampling to the interfaces you care about.
config system netflow
set collector-ip COLLECTOR_IP
set collector-port 2055
set source-ip 0.0.0.0
set active-flow-timeout 60
set inactive-flow-timeout 15
set template-tx-timeout 60
end
config system interface
edit "port1"
set netflow-sampler both
next
edit "internal"
set netflow-sampler both
next
end
The netflow-sampler option accepts tx, rx, or both. Use both to capture traffic in each direction. FortiGate exports NetFlow v9 by default on current FortiOS, which FlowView auto-detects.
Cisco IOS / IOS-XE (Flexible NetFlow)
flow record FV-RECORD
match ipv4 source address
match ipv4 destination address
match transport source-port
match transport destination-port
match ipv4 protocol
collect counter bytes
collect counter packets
flow exporter FV-EXPORTER
destination COLLECTOR_IP
source GigabitEthernet0/0
transport udp 2055
export-protocol netflow-v9
flow monitor FV-MONITOR
record FV-RECORD
exporter FV-EXPORTER
cache timeout active 60
interface GigabitEthernet0/1
ip flow monitor FV-MONITOR input
ip flow monitor FV-MONITOR output
MikroTik RouterOS (Traffic Flow)
/ip traffic-flow set enabled=yes
/ip traffic-flow target add dst-address=COLLECTOR_IP port=2055 version=9
Generating Flows from a Linux Host (softflowd)
If you have no flow-capable hardware, you can generate flows from a Linux box (for example by mirroring a switch port to it) using softflowd:
sudo apt install -y softflowd
sudo softflowd -i eth0 -n COLLECTOR_IP:2055 -v 9
15. Step 12: Verify End-to-End Flow Collection
Confirm packets are arriving on the collector. With tcpdump you should see UDP datagrams from your exporters hitting the Listener port.
sudo tcpdump -ni any udp port 2055 -c 20
If you see no packets, the problem is upstream: check the exporter config, routing, and any firewall between the device and the collector. If you see packets but no data in Cacti, the problem is the collector service or the Listener configuration.
Confirm the collector service is healthy and check the Cacti log for FlowView activity.
sudo systemctl status flow-capture
sudo tail -f /var/www/html/cacti/log/cacti.log | grep -i flowview
Finally, view flows in the UI:
1. Go to FlowView > View Flows.
2. Set a recent time range.
3. Apply filters (by device, IP, port, or protocol) and run the query.
Flows typically appear within a minute or two of the first export, allowing for the exporter’s active flow timeout. If a device only exports completed flows, long-lived sessions may not appear until they end or the active timeout elapses, which is why setting active-flow-timeout 60 on exporters helps timeliness.
16. Step 13: System Tuning for Higher Flow Volume
Busy networks can overwhelm default UDP buffers, causing dropped flow datagrams. Increase kernel buffer sizes and connection limits, and persist them.
sudo tee /etc/sysctl.d/99-cacti-flow.conf >/dev/null <<'EOF'
net.core.rmem_max = 67108864
net.core.rmem_default = 33554432
net.core.netdev_max_backlog = 5000
net.core.somaxconn = 1024
EOF
sudo sysctl --system
If a single collector process approaches 100 percent CPU, add more Listeners on additional ports and spread your exporters across them. Each Listener runs its own receiver, so spreading load across several ports is the supported scaling path before you reach for database sharding.
For very large commercial deployments, FlowView supports horizontal scaling through MariaDB replication and MaxScale shard queries. That is beyond the scope of a single-server build, but the plugin README documents the replication and MaxScale setup if you grow into it.
17. Troubleshooting Reference
The table below maps common symptoms to likely causes and fixes.
| Symptom | Likely Cause | Fix |
| No packets in tcpdump on the collector | Exporter misconfigured, routing, or firewall blocking | Verify exporter destination IP and port, check routing, open the UDP port on every firewall in the path |
| Packets arrive but no flows in UI | Collector service not running or wrong Listener port | systemctl status flowview, confirm Listener port matches export port, restart the service |
| Flows show wrong timestamps | PHP or system timezone mismatch, time tables missing | Align date.timezone with system timezone, load MySQL time zone tables, verify chrony |
| unpack() PHP warnings in cacti.log | Malformed or unsupported template from exporter | Confirm exporter uses v5, v9, or IPFIX, update FlowView, restart service to refresh templates |
| Service will not bind to port | Port already in use or insufficient privilege | ss -lunp to find the conflict, choose a free port, confirm the unit may bind |
| Database growing too fast | Retention too long or partitioning too coarse | Lower retention, switch to Hourly partitioning, confirm aged tables convert to Aria |
| Listener changes not taking effect | Service not restarted after edit | systemctl restart flowview after every Listener add or change |
| Poller not updating graphs | Cron job missing or wrong owner | Confirm /etc/cron.d/cacti exists and runs as www-data, check the Cacti log |
18. Quick Command Reference
# Service control
sudo systemctl restart flow-capture# after any Listener change
sudo systemctl status flow-capture
sudo journalctl -u flow-capture -f# Verify listener socket
sudo ss -lunp | grep 2055# Watch incoming flow packets
sudo tcpdump -ni any udp port 2055 -c 20# Watch FlowView activity in the Cacti log
sudo tail -f /var/www/html/cacti/log/cacti.log | grep -i flowview# Confirm Cacti poller is running
sudo tail -f /var/www/html/cacti/log/cacti.log | grep -i 'poller'
19. Summary Checklist
1. OS prepared, hostname, timezone, and chrony set.
2. MariaDB installed, tuned, time zone tables loaded, cacti database and user created.
3. Apache and PHP installed with required modules and runtime values.
4. Cacti 1.2.27+ installed, web installer completed, poller running.
5. FlowView plugin cloned as flowview, installed, and enabled.
6. FlowView settings configured (partitioning, retention, DNS).
7. Listener created on a chosen UDP port.
8. FlowView systemd collector service installed, enabled, and bound to the port.
9. Firewall opened for the flow port, web, and SNMP.
10. Exporters configured to send flows to the collector.
11. End-to-end verification with tcpdump, service status, and the FlowView UI.
12. System tuned for flow volume, retention monitored.
20. Appendix A: Field Fixes for Common Install Errors
These are real errors seen during installation, with the cause and the fix. They cluster around the manual Cacti core install (Section 8, Option B) and the schema load.
A.1 “mv: cannot stat 'cacti-1.2.30': No such file or directory“
Cause: the GitHub release tag is release/1.2.30. When you build the directory name by stripping the prefix (${LATEST#release/} gives 1.2.30), you get cacti-1.2.30, but GitHub names the extracted folder cacti-release-1.2.30. The slash in the tag becomes a dash; it is not removed. So the move targets a directory that does not exist.
Fix: read the real directory name from the tarball instead of constructing it.
cd /tmp
tar -xzf cacti.tar.gz
SRCDIR=$(tar -tzf cacti.tar.gz | head -1 | cut -d/ -f1)
echo "Extracted directory: $SRCDIR"
sudo rm -rf /var/www/html/cacti
sudo mv "$SRCDIR" /var/www/html/cacti
A.2 “mv: cannot stat ...” on the second move attempt
Cause: a sequencing mistake. If you already ran a successful mv that relocated the directory into /var/www/html/cacti, then ran a second block that did rm -rf /var/www/html/cacti followed by another mv of the same source, the source no longer exists in /tmp because the first move consumed it. You end up deleting the good copy and having nothing left to move.
Fix: never rm the destination and then re-mv a source that was already moved. Re-extract, then move exactly once.
cd /tmp
tar -xzf cacti.tar.gz
SRCDIR=$(tar -tzf cacti.tar.gz | head -1 | cut -d/ -f1)
sudo rm -rf /var/www/html/cacti
sudo mv "$SRCDIR" /var/www/html/cacti# Verify the move landed before continuing
ls /var/www/html/cacti/cacti.sql && echo "OK, cacti is in place"
A.3 “ERROR 1050 (42S01): Table aggregate_graph_templates already exists”
Cause: the schema in cacti.sql was already loaded into the cacti database by an earlier attempt. Loading it again hits tables that already exist and stops.
Fix: drop and recreate the database for a clean slate, re-apply the grants, then load the schema exactly once. The cactiuser account itself still exists, so it does not need recreating.
sudo mysql -u root -p <<'SQL'
DROP DATABASE IF EXISTS cacti;
CREATE DATABASE cacti DEFAULT CHARACTER SET utf8mb4 COLLATE utf8mb4_unicode_ci;
GRANT ALL PRIVILEGES ON cacti.* TO 'cactiuser'@'localhost';
GRANT SELECT ON mysql.time_zone_name TO 'cactiuser'@'localhost';
FLUSH PRIVILEGES;
SQL
sudo mysql -u root -p cacti < /var/www/html/cacti/cacti.sqlVerify: should print a few hundred lines, one per table
sudo mysql -u root -p -e "USE cacti; SHOW TABLES;" | wc -l
Safety note: dropping the database is only safe before you complete the web installer, because at that point there is no real monitoring data to lose. Never drop the cacti database once the collector is in production and gathering data.
A.4 Clean-room sequence for the manual Cacti install
If you hit any of the above and want to restart the core install cleanly from scratch, this is the full safe sequence:
cd /tmp
# (re)download if needed
LATEST=$(curl -s https://api.github.com/repos/Cacti/cacti/releases/latest \
| grep tag_name | cut -d '"' -f4)
wget "https://github.com/Cacti/cacti/archive/refs/tags/${LATEST}.tar.gz" -O cacti.tar.gz# extract and move once, reading the real dir name
tar -xzf cacti.tar.gz
SRCDIR=$(tar -tzf cacti.tar.gz | head -1 | cut -d/ -f1)
sudo rm -rf /var/www/html/cacti
sudo mv "$SRCDIR" /var/www/html/cacti# recreate a clean database and load schema once
sudo mysql -u root -p <<'SQL'
DROP DATABASE IF EXISTS cacti;
CREATE DATABASE cacti DEFAULT CHARACTER SET utf8mb4 COLLATE utf8mb4_unicode_ci;
GRANT ALL PRIVILEGES ON cacti.* TO 'cactiuser'@'localhost';
GRANT SELECT ON mysql.time_zone_name TO 'cactiuser'@'localhost';
FLUSH PRIVILEGES;
SQL
sudo mysql -u root -p cacti < /var/www/html/cacti/cacti.sql# config file, then permissions (as in Section 8)
sudo cp /var/www/html/cacti/include/config.php.dist \
/var/www/html/cacti/include/config.php
# edit config.php with your cactiuser password, then:
sudo chown -R www-data:www-data /var/www/html/cacti
From here, resume at the Apache alias and the web installer in Sections 8 and 9.
A.5 “FATAL: Connection to Cacti database failed” with no config.php
Symptom: the Cacti web page shows a FATAL error asking you to check the PHP MySQL module, the database, and the credentials in config.php. A check shows the file is missing entirely.
sudo grep -E '^\$database_' /var/www/html/cacti/include/config.php
# grep: …/config.php: No such file or directory
Cause: Cacti ships config.php.dist as a template and never creates config.php for you. During a manual install or a clean-room rebuild it is easy to move the directory into place but forget to create the real config from the template, so Cacti has no database credentials at all.
Fix: confirm the template exists, copy it, set the database block, and fix ownership.
ls -la /var/www/html/cacti/include/config.php.dist
sudo cp /var/www/html/cacti/include/config.php.dist \
/var/www/html/cacti/include/config.php
sudo nano /var/www/html/cacti/include/config.php
Set these values, with the password matching the cactiuser account:
$database_type = 'mysql';
$database_default = 'cacti';
$database_hostname = 'localhost';
$database_username = 'cactiuser';
$database_password =‘YOUR_CACTIUSER_PASSWORD’;
$database_port = '3306';
$database_ssl = false;
sudo chown www-data:www-data /var/www/html/cacti/include/config.php
sudo chmod 644 /var/www/html/cacti/include/config.php
If config.php.dist itself is missing, the directory move did not complete. Confirm the tree is intact (you should see cacti.sql, include/, plugins/, poller.php and many others) and if not, re-run the clean-room sequence in A.4.
ls /var/www/html/cacti/ | head
A.6 “ERROR 1045 (28000): Access denied for user 'cactiuser'@'localhost'“
Symptom: config.php exists, but a direct credential test is denied:
mysql -u cactiuser -p'YOUR_CACTIUSER_PASSWORD' cacti -e "SELECT COUNT(*) FROM version;"
# ERROR 1045 (28000): Access denied for user 'cactiuser'@'localhost' (using password: YES)
Cause: the password on the cactiuser account does not match the password in config.php. They drift apart easily when the database has been dropped and recreated several times during troubleshooting.
Fix: reset the account password to the exact string config.php uses, so both sides agree.
sudo mysql -u root -p <<'SQL'
ALTER USER 'cactiuser'@'localhost' IDENTIFIED BY 'YOUR_CACTIUSER_PASSWORD';
GRANT ALL PRIVILEGES ON cacti.* TO 'cactiuser'@'localhost';
FLUSH PRIVILEGES;
SQL
Re-test (should now return a count, not access denied)
mysql -u cactiuser -p'YOUR_CACTIUSER_PASSWORD' cacti -e "SELECT COUNT(*) FROM version;"# Confirm config.php uses the same password
sudo grep '$database_password' /var/www/html/cacti/include/config.php
Host-mismatch variant: if the reset still fails, the account may be defined for a different host than localhost. Check which host the account is bound to.
sudo mysql -u root -p -e "SELECT user, host FROM mysql.user WHERE user='cactiuser';"
If the host is not localhost (for example % or 127.0.0.1), that is the problem. When PHP connects to localhost it uses the MySQL Unix socket, which matches the localhost host entry specifically, so an account defined only for % or 127.0.0.1 will not authenticate the same way. Create the account for localhost explicitly.
sudo mysql -u root -p <<'SQL'
CREATE USER IF NOT EXISTS 'cactiuser'@'localhost' IDENTIFIED BY 'YOUR_CACTIUSER_PASSWORD';
ALTER USER 'cactiuser'@'localhost' IDENTIFIED BY 'YOUR_CACTIUSER_PASSWORD';
GRANT ALL PRIVILEGES ON cacti.* TO 'cactiuser'@'localhost';
FLUSH PRIVILEGES;
SQL
Security note: passwords typed on the command line land in your shell history. On a box that will sit on customer networks, clear it once everything works (`history -c && history -w`), or keep this credential to the lab only and set a separate production password.
A.7 Web UI fails but the CLI test succeeds
If the direct mysql test in A.6 succeeds but the web page still shows the FATAL error, the problem is on the PHP side, usually the MySQL module not being loaded for the Apache process. Confirm the module is present and enabled, then restart Apache.
php -m | grep -i mysqli
PHPVER=$(php -r 'echo PHP_MAJOR_VERSION.".".PHP_MINOR_VERSION;')
sudo apt install -y php${PHPVER}-mysql
sudo phpenmod mysqli
sudo systemctl restart apache2
Also confirm MariaDB is actually running and listening.
systemctl is-active mariadb
sudo ss -lntp | grep 3306
A.8 “Unit flowview.service not found” and the flow-capture naming
Symptom: you try to manage the collector as flowview.service and systemd reports it does not exist.
sudo systemctl restart flowview
# Failed to restart flowview.service: Unit flowview.service not found.
Cause: the FlowView plugin’s collector service is named flow-capture, not flowview. Older guides and some documentation refer to a flowview.service, which does not match what current 4.x checkouts ship. The plugin’s service directory contains flow-capture, flow-capture.service, cacti-flow-capture, and flow-capture-freebsd. If you previously saw a flow-capture.service on the box and assumed it was an obsolete flow-tools leftover, it was not. It is the correct modern collector unit. Do not delete it.
Fix: use the correct name and install the unit per Section 12, with the User=www-data edit. Confirm the unit name from the plugin directory rather than assuming.
ls -la /var/www/html/cacti/plugins/flowview/service
systemctl list-unit-files | grep -i flow
The collector service for this plugin version is flow-capture. Manage it accordingly:
sudo systemctl status flow-capture
sudo systemctl restart flow-capture
sudo journalctl -u flow-capture -n 30 --no-pager
The most common reason the service is installed but the port shows nothing in ss is that no Listener has been created yet, or the service was not restarted after the Listener was added. The plugin README states this directly: the service will not start without at least one Listener, and you must restart it after any Listener change.
A.9 flow-capture crash loop with status=217/USER
Symptom: the flow-capture service is enabled but will not stay running. systemctl status shows it restarting repeatedly with a high restart counter, and the journal contains:
flow-capture.service: Failed to determine user credentials: No such process
flow-capture.service: Main process exited, code=exited, status=217/USER
flow-capture.service: Failed with result 'exit-code'.
Cause: the unit’s User= directive names an account that does not exist on this system. The plugin ships the unit with User=apache`, which is the web user on Red Hat style systems. Ubuntu and Debian have no apache account; their web user is www-data. systemd’s exit code 217/USER means exactly this: the configured user could not be resolved. The service crash-loops because of the `Restart=always` directive in the unit.
Fix: change the user to www-data, reload systemd, and restart.
sudo sed -i 's/^User=apache/User=www-data/' /etc/systemd/system/flow-capture.service
grep '^User=' /etc/systemd/system/flow-capture.service # should read: User=www-data
sudo systemctl daemon-reload
sudo systemctl restart flow-capture
sudo systemctl status flow-capture
A healthy result shows active (running), a single clean “Started” line, no 217/USER, and a stable PID. Confirm the port is bound:
sudo ss -lunp | grep 2055
A correct bind looks like the following, with the collector’s own IP and the php process listening on the Listener port (UNCONN is normal for a UDP socket):
UNCONN 0 0 10.1.106.67:2055 0.0.0.0:* users:(("php",pid=2413,fd=7))
Recent posts
-

-

DNS is one of those technologies that quietly underpins... Full Story
-

BGP issues on FortiGate firewalls usually trace back to... Full Story
-

Every time your laptop talks to your router, a... Full Story
-

If you've spent any time configuring NAT on a... Full Story
-

If you have spent any time configuring firewall policies... Full Story
-

High availability on FortiGate is one of those features... Full Story
-

If you've configured SD-WAN on a FortiGate, you've almost... Full Story
-

FortiLink is the management protocol that turns a FortiSwitch... Full Story
-

FortiSwitches are pretty rock solid from Mean Time Between... Full Story
-

This is a quicky tip. Have you ever gone... Full Story
-

DNS is one of those quiet pieces of internet... Full Story
-

This article is an updated version of the previous... Full Story
-

You will add ns2 as a secondary (slave) BIND9... Full Story
-

In the process of deploying my lab, I needed... Full Story
-

RFC 8805, used to be known as Self-Correcting IP... Full Story
-

Years back, I wrote an article about certificate pinning. ... Full Story
-

FortiGates have the ability to send alerts to Microsoft... Full Story
-

In this post, I am going to walk through... Full Story
-

Troubleshooting VoIP on a FortiGate can feel like trying... Full Story
-

Prior to FortiOS 7.0, there were three commands to... Full Story
-

In this post, I am going to go over... Full Story
-

What we are going to do: We are going... Full Story
-

Choosing between FGCP (FortiGate Clustering Protocol) and FGSP (FortiGate... Full Story
-

Creating a VLAN on macOS (The "Pro" Move) A... Full Story
-

This blog post explores the logic behind how macOS... Full Story
-

Pretty Fly for a Wi-Fi Tell My Wi-Fi Love... Full Story
-

Part of my daily gig is creating BoMs (Bill-of-Materials)... Full Story
-

ICMP introduces several security risks, but careful filtering, rate... Full Story
-

The command diag debug application dhcps -1 enables full... Full Story
-

In the world of FortiOS, execute tac report is... Full Story
-

LLDP; What is it The Link Layer Discovery Protocol... Full Story
-

What it actually does When you run diagnose fdsm... Full Story
-

Monkey Bites are bite-sized, high-impact security insights designed for... Full Story
-

I have run macOS in macOS with Parallels but... Full Story
-

Don't be confused with my other FortiNAC posts where... Full Story
-

This is the third session in a multi-part article... Full Story
-

Today I was configuring key-based authentication on a FortiGate... Full Story
-

Netcat, often called the "Swiss Army knife" of networking,... Full Story
-

At its core, IEEE 802.1X is a network layer... Full Story
-

In case you did not see the previous FortiNAC... Full Story
-

This is our 5th session where we are going... Full Story
-

Now that we have Wireshark installed and somewhat configured,... Full Story
-

The Philosophy of Packet Analysis Troubleshooting isn't about looking... Full Story
-

1. Executive Summary Objective: This guide turns a FortiAuthenticator... Full Story
-

DISCLAIMER: Please see link above for the official Fortinet... Full Story
-

The underlying assumption that Let’s Encrypt requires you to... Full Story